Last year I was invited to submit images for an exhibition at the Hutt Art Society that combined paintings, drawing and photographs of the naked body. It is intended to be run every two years and so I have started making images for the next one.
I really like producing bodyscapes so I approached Jaimee via Model Mayhem to see if she was interested to assist. We met some months ago and I went through what I was looking forward. She was willing to take part but with other commitments it was not until last Sunday that we finally managed to get together to do the shoot.
Tight underwear leaves marks.
When she arrived Jaimee admitted that she had been wearing her bra all day and that it was likely to have caused marks in her skin.
Normally I would request a model remove any tight clothing at least an hour before a shoot starts so that such marks have time to fade. I had forgotten to do this with Jaimee which was a big oversight on my part. While you can easily remove the marks in Photoshop, it does slow down the overall processing as so I generally try to ensure to limit the effect.
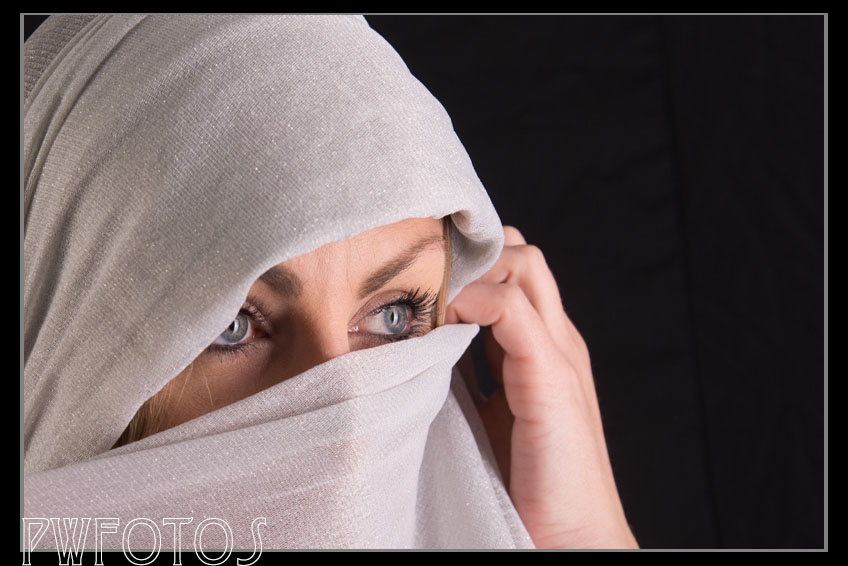
While the intention was to shoot bodyscapes I also wanted to try some other images so actually started the evening with a mask and petticoat. We then moved onto using lengths of fabric.
Doing the shoot in this way where we moved from essentially clothed to fully nude has the advantage that it gives time for the model to get comfortable with the session. It is very important in the bodyscape shots because quite often you are shooting close to your model. It also had the advantage in this case because it allowed time for the marks to fade.
When it came time to do the bodyscapes I was using a large stripbox as the main light positioned to the side of the model. A second light with a small honeycombed grid acted as a fill light.
Towards the end of the session I had Jaimee apply oil to her body and we then sprayed her with water. It creates a really neat effect.
Jaimee was a real champion because the evening was not that warm but she did not complain.
I have never been a fan of hanging a camera around my neck, and have always simply wrapped the strap around my wrist. As I moved up in gear the desire to use the neckstrap diminished further.
If you look at the following table you can see how the weight of the gear I am using has increased dramatically. The first column is the weight in grams of my original digital camera and second is my current camera.
D90
D600
Body with kit lens
520g
Replace lens with 24-70 f2.8
660g
940g
Add Battery Grip
1,020g
1,220g
Replace lens with 70-200 f2.8
1,940g
2,140g
As you will appreciate lugging a 2kg weight around your neck tends to get fairly uncomfortable.
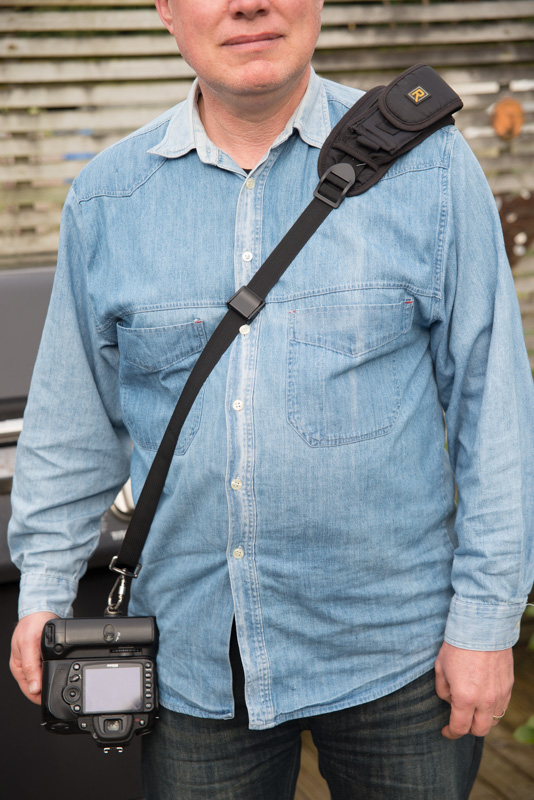
Black Rapid sling
Some years ago I attended a workshop in Auckland and one of the tutors was using a Blackrapid strap. This goes over one shoulder with the camera hanging at the waist on the opposite side of the body. The camera is attached to the strap via a clip that screws into the tripod screw on the bottom of the camera.
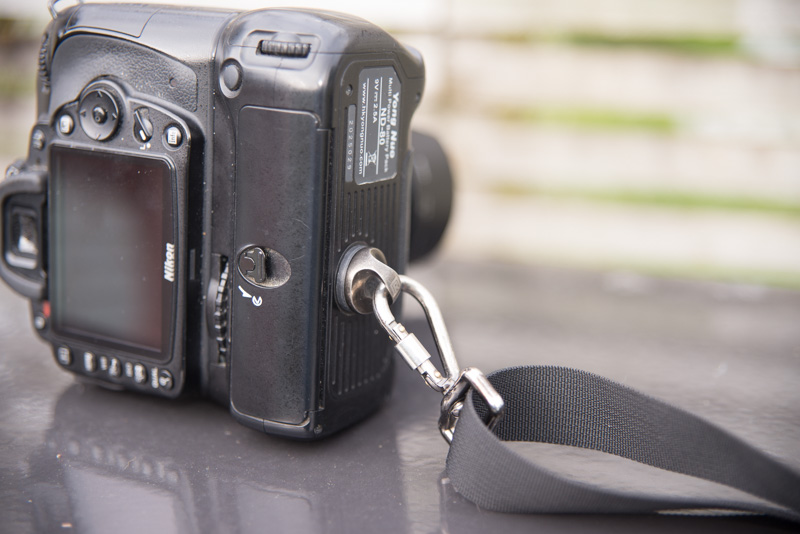
I thought that this was a great idea, however I considered that the price of the strap in NZ was too high. After showing it to my wife she said that she could make something similar which she did. We used the quick release plate from my monopod to attach the camera to the strap.
The strap attaches via the camera’s tripod screw
This arrangement seemed to work for a while until I noticed that the hoop that I was using was starting to bend. Fortunately this coincided with receiving birthday vouchers and so I bought the Blackrapid strap.
The strap worked very well while I was using the D90 but when I got the D600 I started to have a number of issues with it. The first was that the extra weight appeared to result in the length adjusters not working properly which was more of the an annoyance than an issue. A more serious issue was that while the camera was in a good place while you were standing upright, if you leaned over the camera swung round, and you had to have good reactions to catch it before it hit something.
The second real drawback of the design is that if you were using the camera on a tripod then you could not have the strap and a quick release attached at the same time, as the camera only has one place to attach them.
As a result of the two issues I was carrying the camera more than I wanted to.
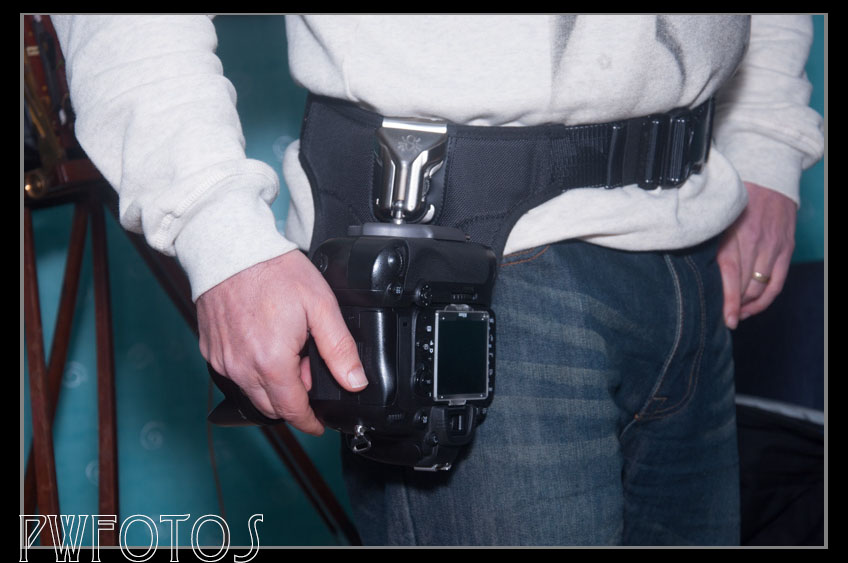
Then a couple of month ago I was watching a Lindsay Adler workshop on CreativeLive.com and she had her camera mounted at her hip using a device called a spider holster. I discovered that there were agents for it in New Zealand and that I could buy it from them at the same price as B&H would in New York without the additional freight charges.
So while I was in Auckland visiting family we drove over to Photogear on the North Shore and they let me try one for about 20 minutes. That was enough to convince me that it was the solution to the issues I was having so I bought one.
I got to really put it through its paces over the three days shooting the Body Arts Rocks Conference and it really worked out great. You do have to position to belt carefully with your jeans so that once you add the 2kg camera to it, you do not feel like your pants are going to fall down. My wife expressed the concern that having a 2kg weight on one side of the body would cause issues with my back, but I actually did not encounter any such issues over the 3 days.
Now I will admit that at $199 it is not a cheap items but it enabled me to feel fully in control knowing that the camera was not going to move regardless of how I altered my upper body.
They have also fixed the tripod issue as the plate that attaches to the camera has two screw mounts in the bottom so you can attach a quick release plate and still use the holster.
If you are looking at a way to manage a camera while out on location then I would strongly recommend that your look at this option.
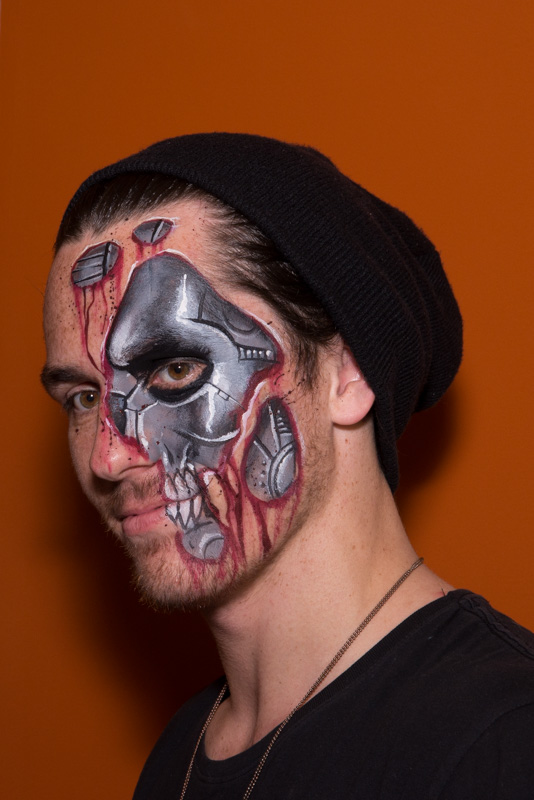
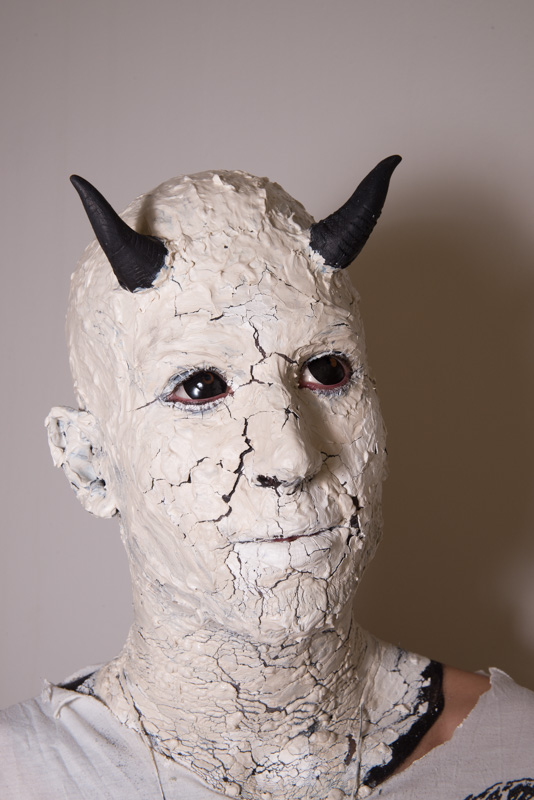
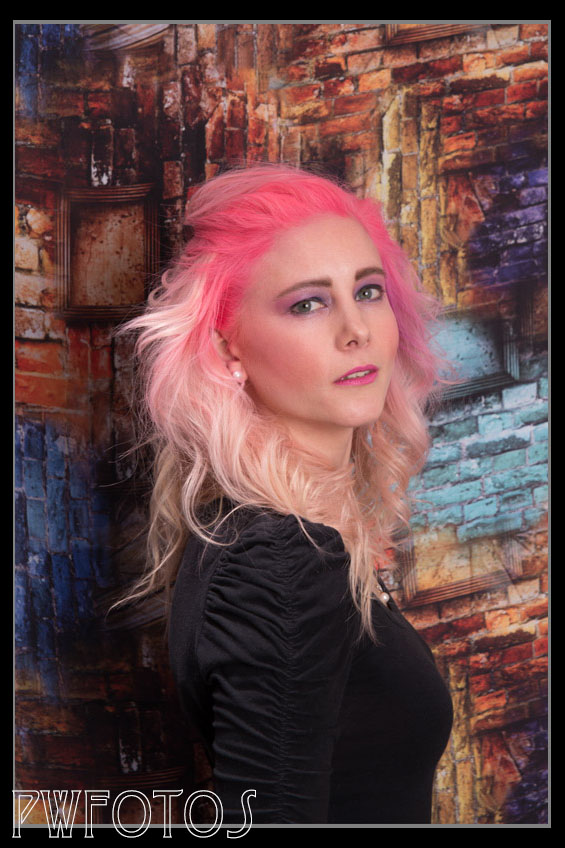
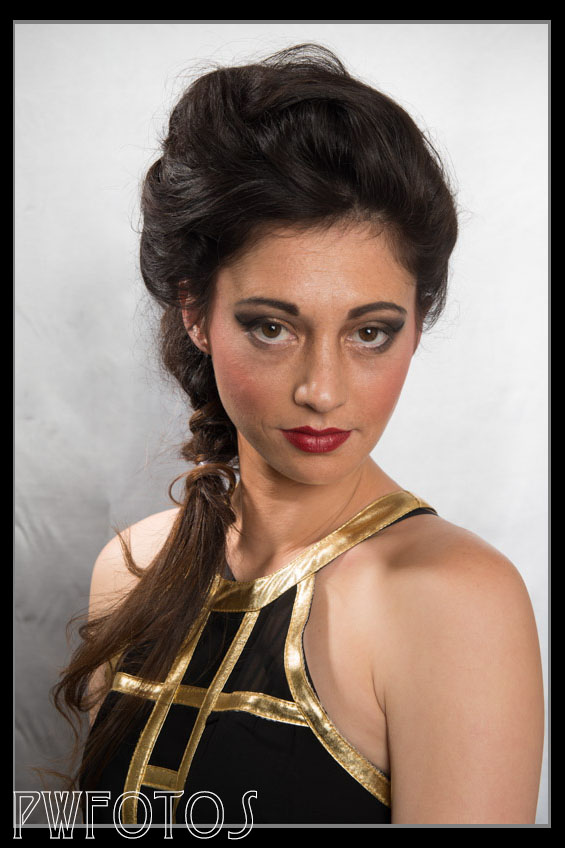
The Creative Focus Competition is a nationwide competition organised by the Pukekohe Camera club that has an aim of promoting photography that pushes the boundaries of traditional images both in terms of in camera techniques as well as post processing. The competition is in its second year.
Last year I entered four images and all four received acceptances, so i had high hopes of being able to repeat that process again. I entered four image again in a category they referred to as “fusion” however the more common term that should have used was composites.
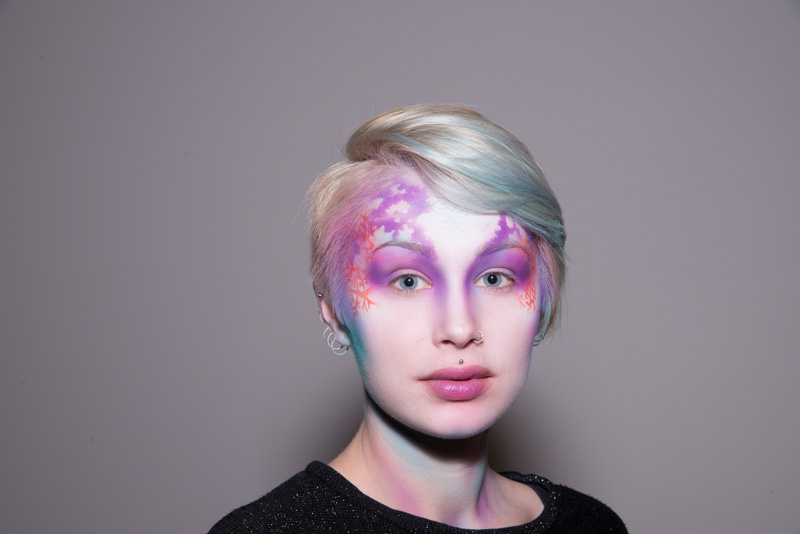
This year I was not as successful having only two images (shown below) being successful. At first I was disappointed by this but then I learned that they had received twice as many images as the previous year. This meant that their rejection rate had to considerably higher as all the successful images are printed in a book after the competition.
There are literally hundreds of articles and tutorials on the internet about how to use light to achieve various looks. If you have been studying lighting then you should be familiar with such terms as “hard vs soft light’, butterfly lighting, Rembrandt lighting and a host of other styles and approaches.
Now most of the articles focus on helping the photographer achieve high quality images in an environment where you have time to achieve the look you want. What these articles don’t tell you is how do you set the lighting to meet the requirements of the client. While you may think that they will both be the same, in reality there can be quite a difference.
In this article I am going to look at the lighting choices that I made for the Body Art Rocks Conference and explain why I made them.
With the conference I was shooting two quite different types of images namely:
Ones documenting the event as it unfolded, and
A series of images of the final creations suitable for the artists and models to display in their portfolios.
Once I knew what I was shooting I then could look at what key factors I would need to consider, which turned out to be quite different.
Documentary Shots
The essential element in documenting the event was ensuring that I had sufficient images to clearly showed what had happened over the three days. The reality in capturing images that are intended to document something is that even a poor image is better than none, however you do want to try to get as good an image as possible.
Knowing that I would be moving from room to room and encountering different ambient lighting conditions, and I would be shooting subjects from a range of distances and focal lengths. This meant that the only lighting that would be of any practical use was on-camera flash.
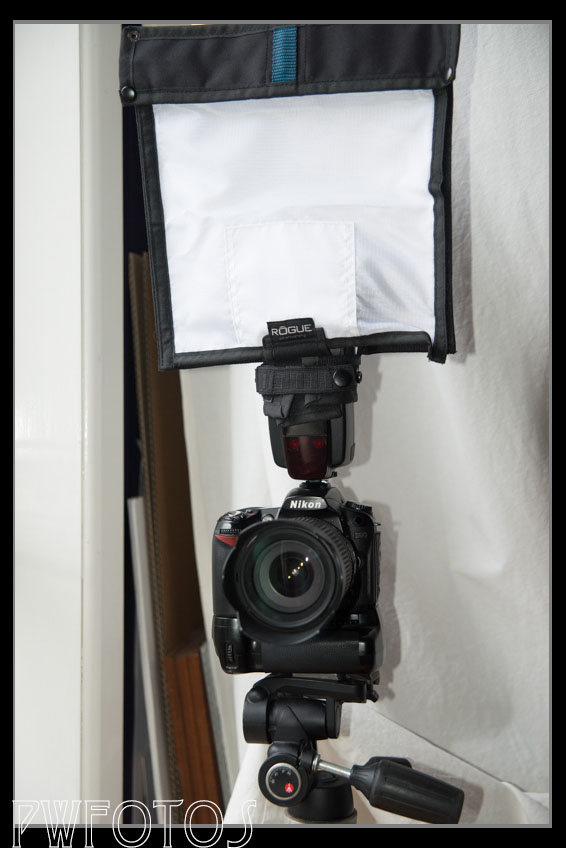
The rogue flash bender and diffusion panel fits over the camera mounted speedlight
Now on-camera flash is generally one to avoid if possible as it is a very harsh light and not the most flattering. You need to soften the light in some way. Generally to soften the light you need to increase the size of it relative to the subject. To do this I used a Rogue flash bender and diffusion panel. This fits over the speed light and spreads the light out resulting in a softer light.
It does reduce the amount of light that the flash generates slightly and this can muck up trying to get the camera to handle the setting. I generally do not like shooting TTL when I have flash and so shot the whole weekend in manual mode.
Initially this did require some trial and error to determine what was the best setting for each of the rooms as well as for shots taken close up as opposed from afar.
For the close up’s the most important thing was ensuring that the image did not over expose the subject and at the same time the flash did not wash out the colours that the artist was painting.
The lighting in this image is quite even and the colours have been maintained. As this was shot in a dark room the ISO was high (f5.6 1/100 ISO 800)Despite the fact that the zombie is quite close to the wall the diffusion panel had softened the light so that strong shadows are not generated. To ensure that the image was not blown out the iso was quite low (f5.6 1/100 ISO 100)
Final Images
The final images were intended to be used by the artists and models in their portfolios. The key to producing images for the artists lay in ensuring that their work was presented in the best possible way. As the model had essentially become their canvas it was more important to bring out the colours.
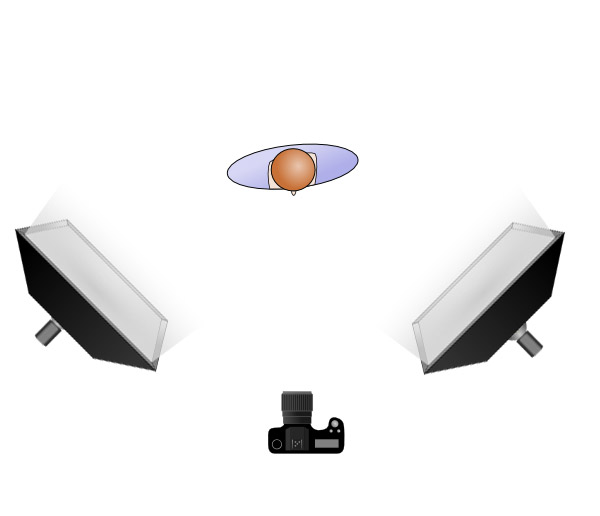
These images were going to be shot in one location and that meant that we could set up studio lights with big soft boxes on them. However we had to fit the shots into the conference programme which meant that we could not muck with the lighting on each subject. Essentially you have to set up a “production line” environment where the subject comes in, you take the image, and then move onto the next subject with the minimum amount of effort.
To do this you create a lighting zone and shoot everyone on the same setting. This was achieved with two strobes set to the same power and positioned on both sides of the camera as shown below.
This essentially creates the light zone which was metered at f7.1 1/100 and ISO 100. It means that the model would be correctly exposed no matter where they stood in the zone.
With this lighting arrangement in place it was a very quick routine to move the model on stage and then take the photos without any mucking around between models. When you have 17 models to shoot in 15 minutes this is essential.
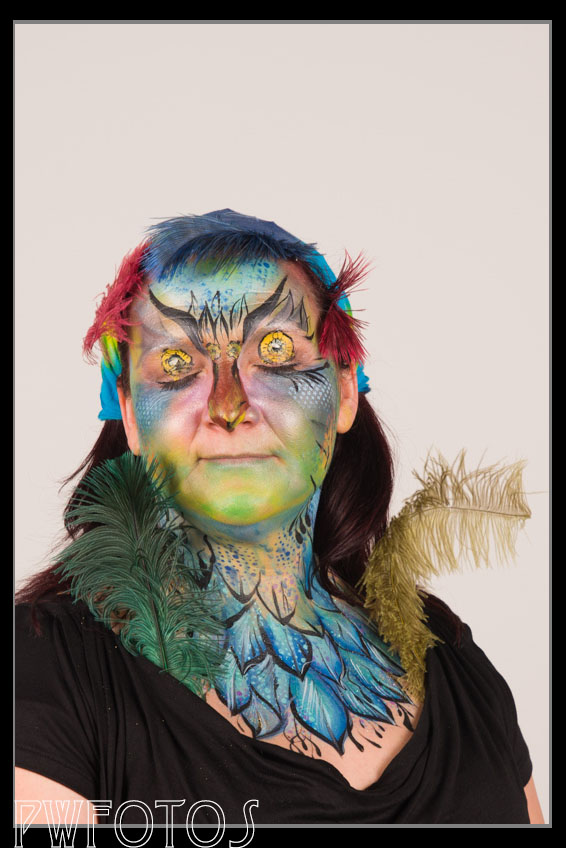
The big disadvantage of this approach is that you don’t get the shading in the light that eliminates it being called “flat” lighting. In this case I was not actually worried about that though because as I have already said, the purpose of the photos is to more to record the art than the canvas.
Ideally the areas chosen to take these images would not be used for other things but that was not the case and at other times it was used as one of the workshop areas. This meant that we were relying on the white wall to be the backdrop rather than putting up a backdrop.
For the most part this work however we did run into an issue of getting separation when the model had light coloured hair.
While the image is fine with regard to the painting the overall effect also employed the hair and we are losing detail as it is blending with the background.
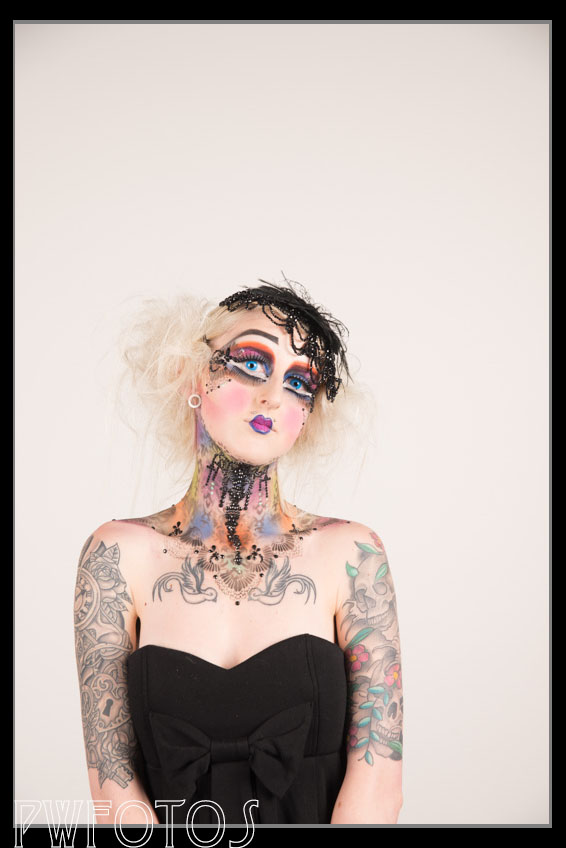
Now while shooting on the Saturday I had not realised the extent of this issue, and therefore had to correct it in post. But on the Sunday I anticipated it and handle it in a simple way. Firstly I told the two models that had blond hair that we were going to shoot them last, and then once we had shot them both on the white, I turned one of the lights around and shot them against the black panels that made up the side wall.
This shot against the black panel provide good separation of model to background. The lighting is more dramatic because it uses a single light camera right and a silver reflector on the left.
Had I been using a backdrop then I would have mounted a darker colour and had it sitting at the back so that it would have been a very quick job to change it over.
I have just spent three full on days photographing the Body Arts Rocks Conference 2014 which was organised by BodyFX .
The event was held over three days at the Dowse Museum in Lower Hutt and it consisted of a range of workshops and competitions. I met with Nicole a couple of weeks before to go over the draft agenda and to try to plan what was needed and also where I could set up studio lights. The intention was that I would cover the workshops to document to event, as well as providing professional images of the finished looks in the competitions.
Shooting in the Dowse proved to be quite a tricky exercise as each of the four rooms that were being used had completely different light levels ranging from lots of natural light to non. They also ranged in size.
I had taken my D600 and D90 cameras with me and initially had speedlights fitted to both. The D90 was originally intended to be there as backup. The initial shots with the bare lights were too harsh so I fitted the Rogue Diffusion Panel to the light mounted on the D600. After the first shots in each of the rooms it became apparent that I didn’t need the flash in Room 4 and rather than keep swapping setting I set up the D90 for that room only.
As I have found that TTL metering with flash is not that accurate I set the flash to full power and then altered the camera setting. On the first day I played with the ISO between the rooms with mixed results but by day two I had a solid set of combinations of aperture and ISO that I knew would work in each room and also depending upon how close the subjects were too me. My aim with the shots was to get fairly close to a correct looking exposure as I knew that I could adjust it in post. I wanted a very quick turnaround of the image though so I made sure that the adjustments would be minor.
With the documentary type shots I moved from workshop to workshop and tried to record not only what the presenter was doing but also the participants.
By the Sunday I had built up a good rapport with a number of the attendees as well as a few of the models so when the time came to record the progress of the body painting competition everyone was comfortable with me being around.
I was told that BodyFX had experienced some issues with photographers in the past supplying images in a timely manner. So I made sure that this would not happen and the images from each day were processed that night and delivered the next day.
I have received quite a lot of praise for the shots that were delivered which was very pleasing. It was an enjoyable but very tiring three days.
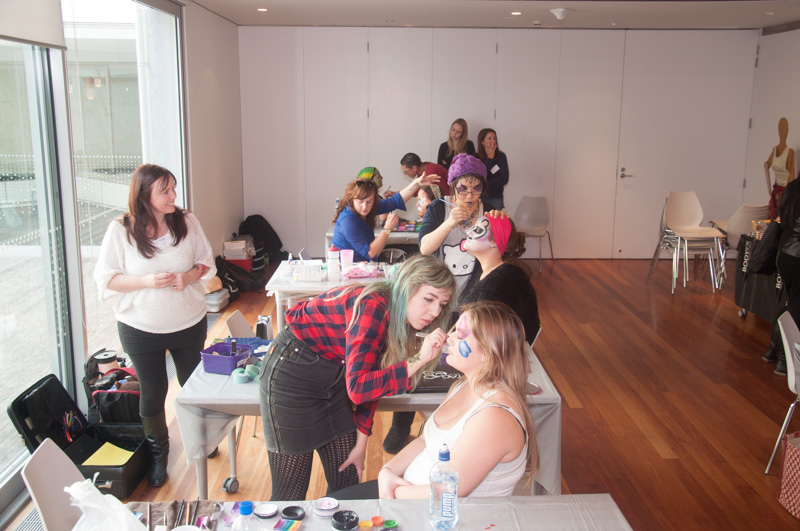
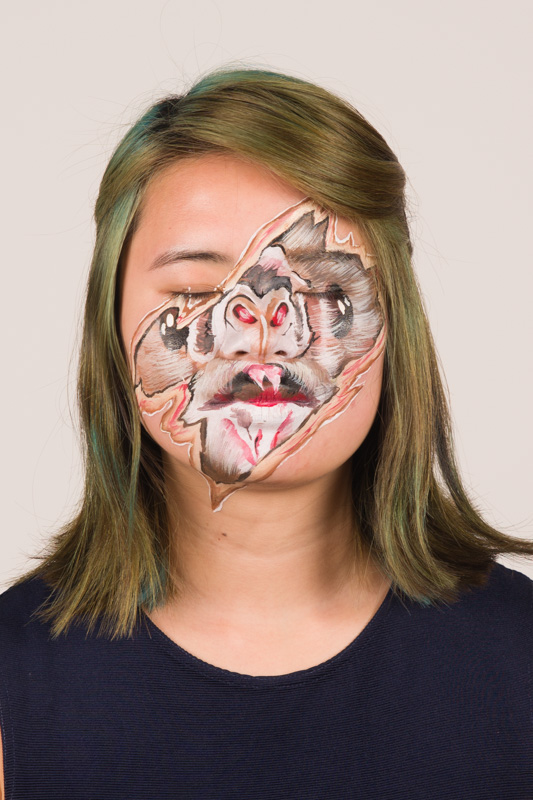
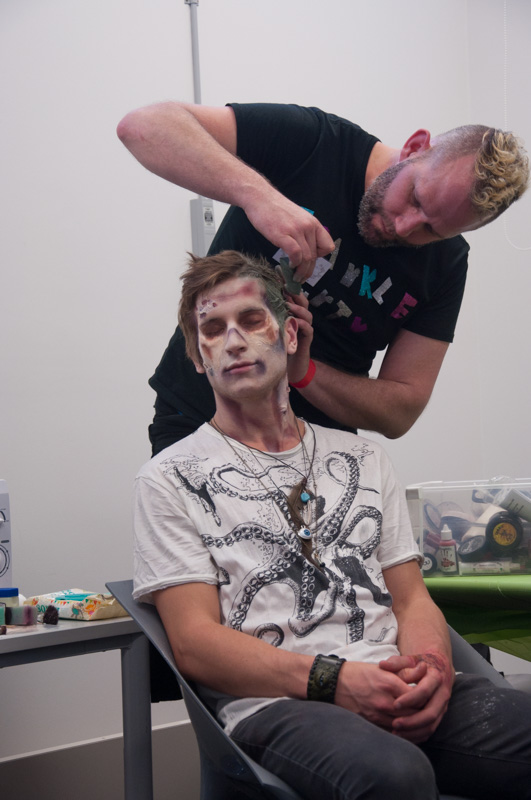
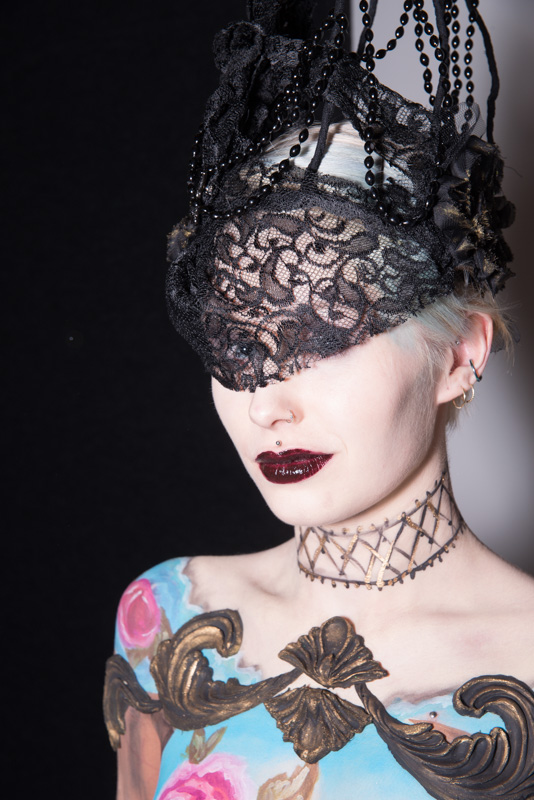
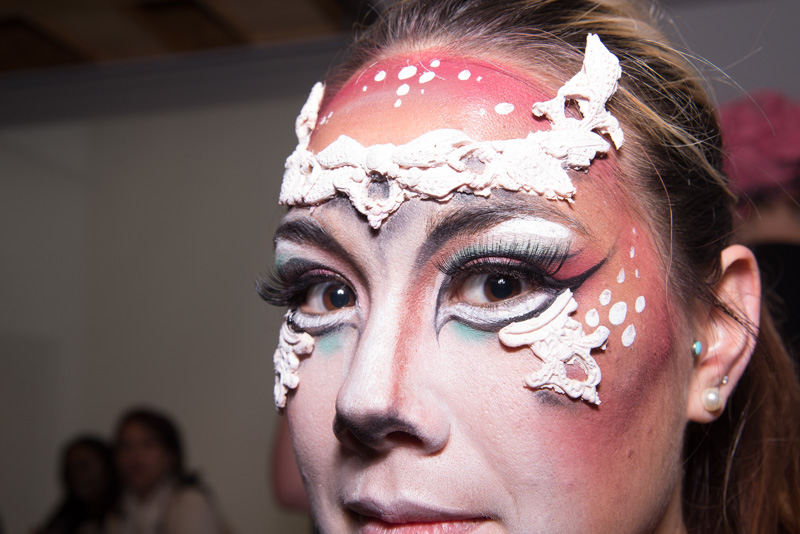
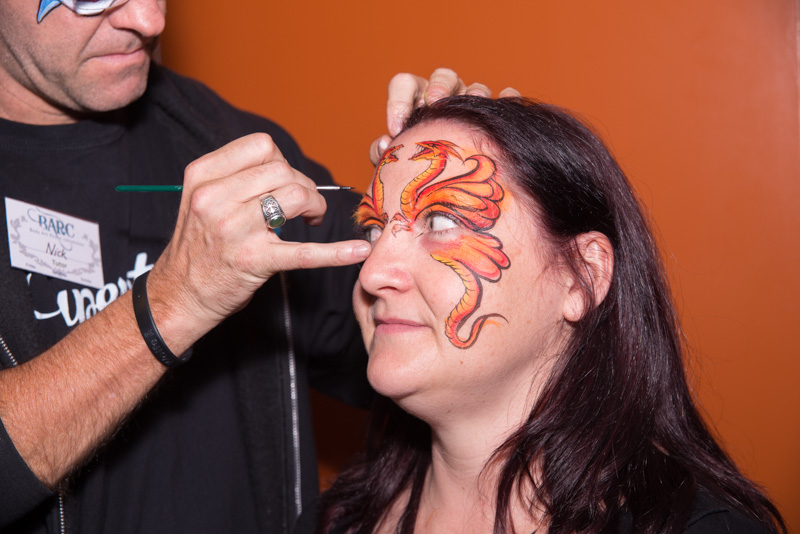
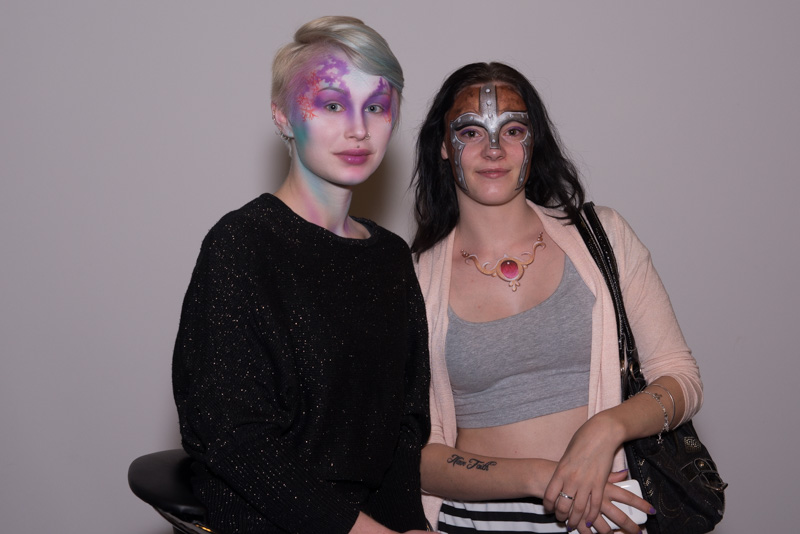
Hell Pizza sponsored the Friday night dinner so I was asked to ensure we got some shots they could use.The finished Zombie makeupHannah looks stunning after Yolanda has finished airbrushing her makeup onContestants in the Beginners Face painting competitions work. They had 45 minutes to create something.The winning look in the Advanced Facepainting competitionJulian applies mud to the models hair in order to create the zombie skullNick Wolfe demonstrates how to create a monster skullEmily Walker with her stunning creation on Hannah that won the body painting competitionThe flat earth was the inspiration of this painting by Karen HavicanA close up of Hannah’s headdressNick Wolfe paints up the prosthetic that he added to his model in the showcaseA close up of Stacie’s face.The four contestants in the Extreme Makeup competition. The artist had 2.5 hours to produce this look. Third from the left was the winner.Julian from BodyFX ran a fund session on communicationAmazing looking wounds created from Nicole Heydenrijk’s class on GellsNick Wolfe and the two models he painted in his first sessionAnnie Reynold from Australia demonstrates how to create advanced butterfliesLace inspired masksNick produced some very intricate designsOne of the workshops centred around half face animal designs and was run by Christy Lewis.The detail in the body painting was very impressiveThe makeup room was full on for the whole 5 hours that the artists had to work.Contestants in the Beginners Face Painting competitionAnnie applies finishing touches to a makeup that also included gemsModels compare looksNick turned Tom into the terminator in around 5 minutes.Families visiting the Dowse on Saturday also ended up being painted.Working through the Extreme Makeup competitionDan applied most of this makeup to himself.
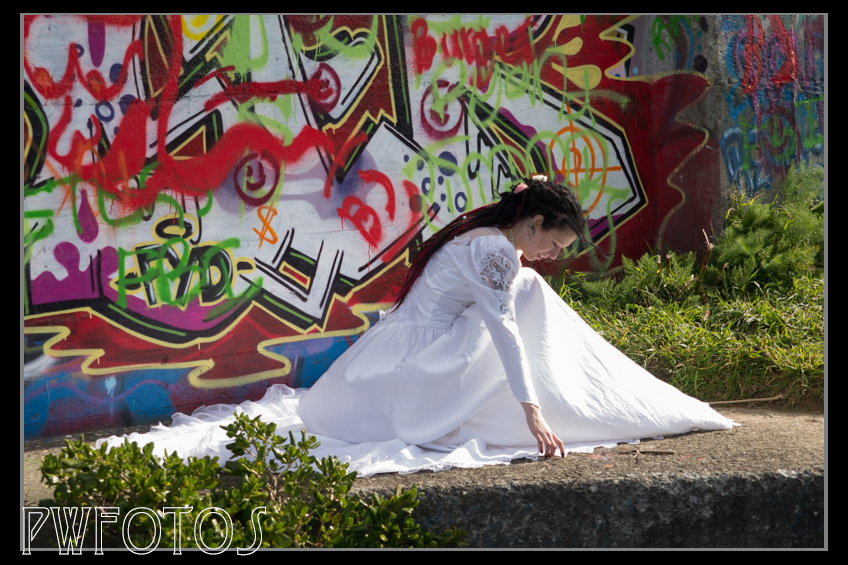
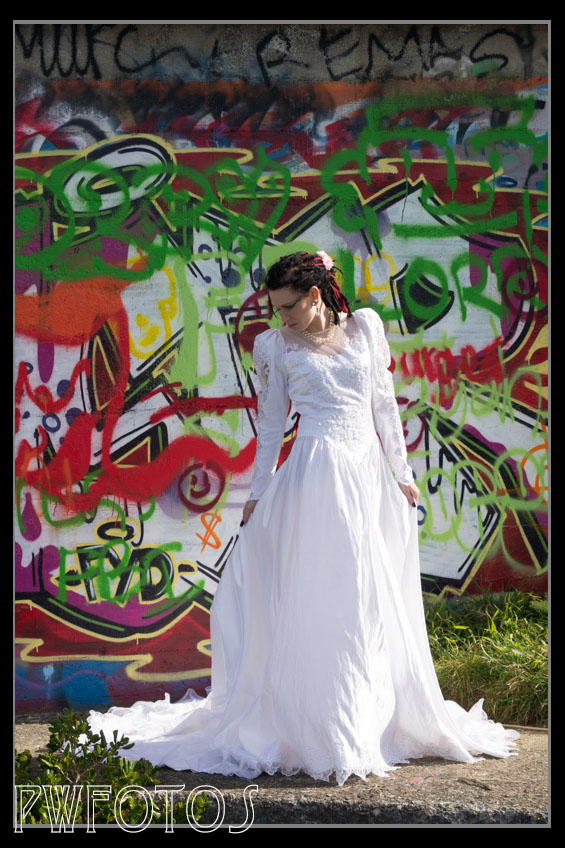
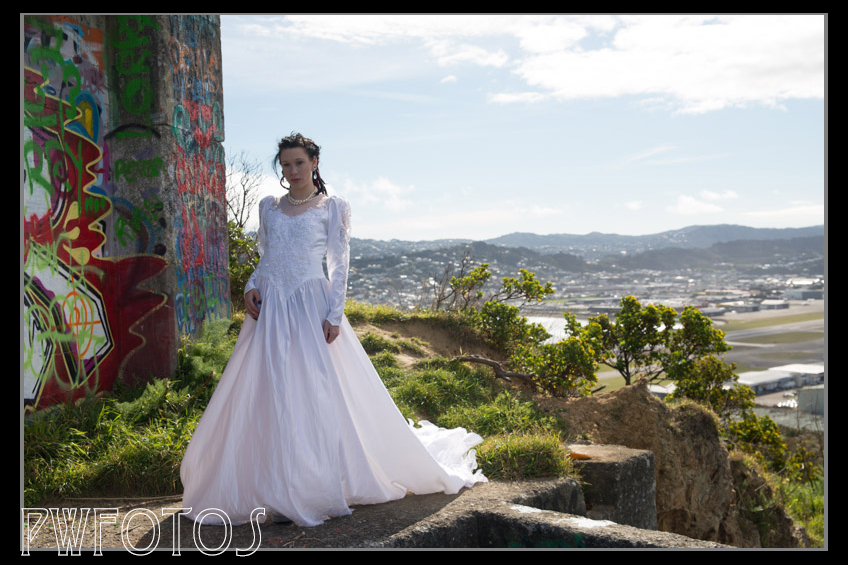
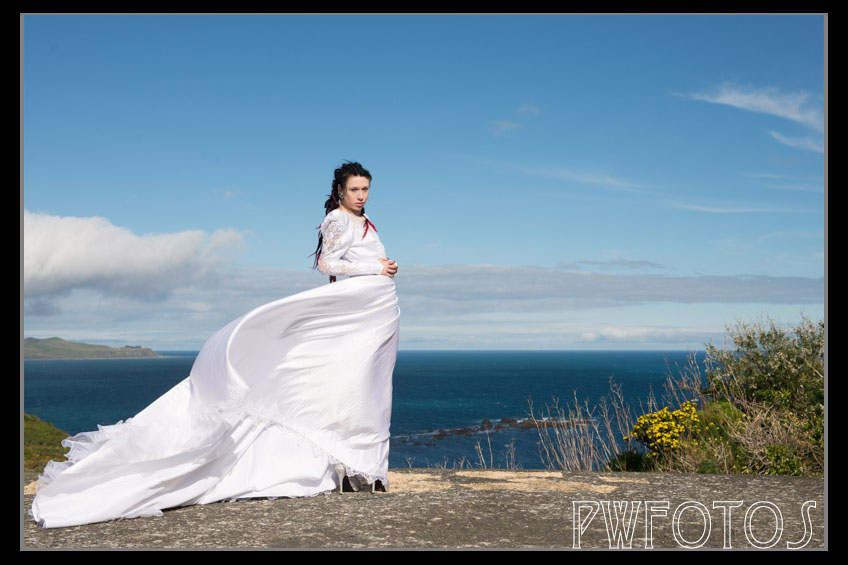
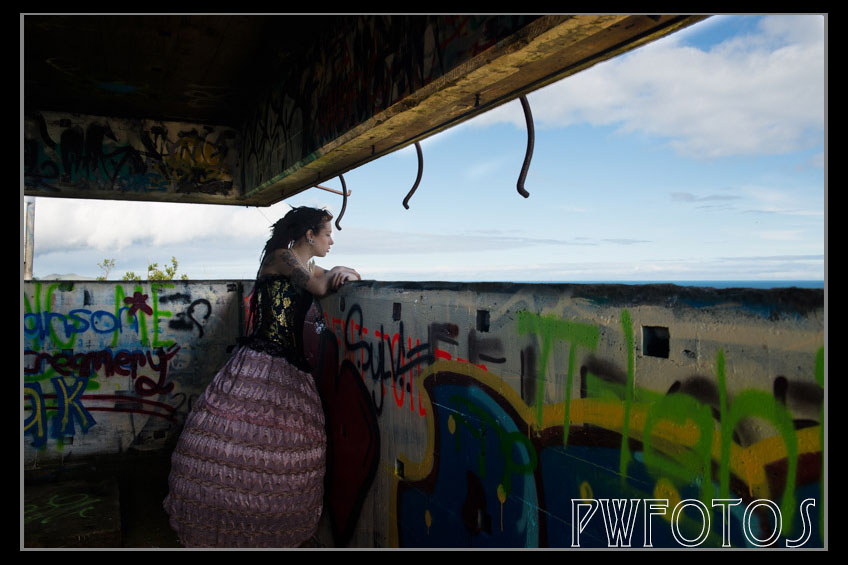
The second outfit that Kristara and I shot at Palmer Head was a old style lace and satin wedding dress. I bought it some time ago for a “trash the dress” shoot but it ended up not being used. Rather than shoot inside the building this time we shot outside starting with the backdrop of the graffiti walls and then on one of the roofs. The latter location enabled me to bring in a more natural background to the shots.
The days turned out very fine and the shoot was a great practise session for the upcoming wedding session as we ended you shooting at around 1:30pm under blue skies. As such it is was fairly typical of the sort of days that most brides actually want. Ideally I could have done with an assistant to help out as in a number of shots I really could have used a reflector to bring up some of the shadows. Still on wedding days you have to make do with what you have.
Kristara was very brave moving round the site in 6 inch heels, and I think that she real enjoyed herself. The wind came up a little during the shoot and we were able to use it for some advantage to billow out the long train on the dress.
Ever since I did the shoot with Megan at Palmer Head I had wanted to return there and try out some different concepts. Kristara and I had planned to shoot at the start of the year but somehow never managed to lock in a date when either our schedules or the weather could align properly. With time on my hands we managed to arrange a shoot for a Friday afternoon.
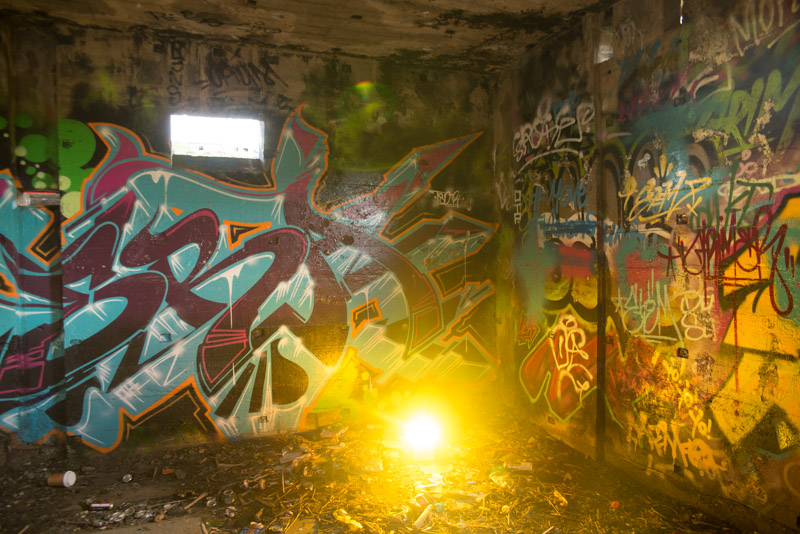
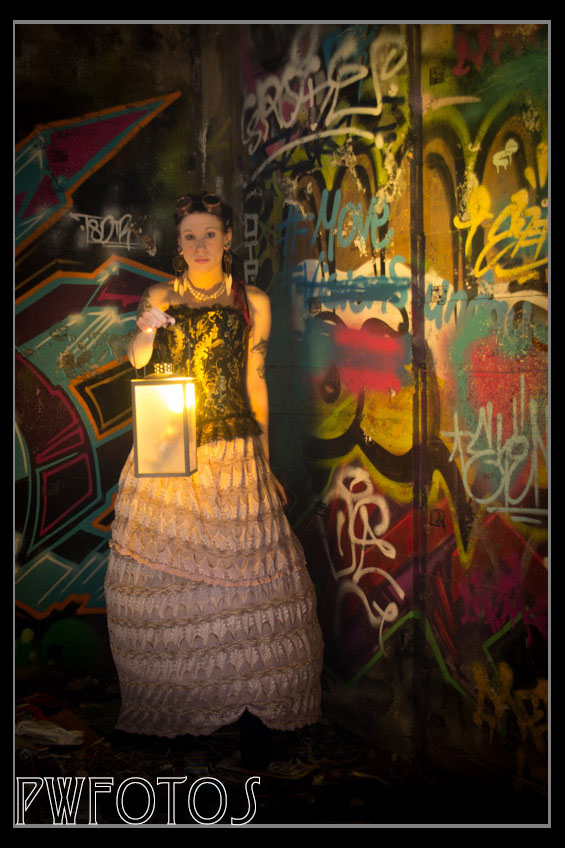
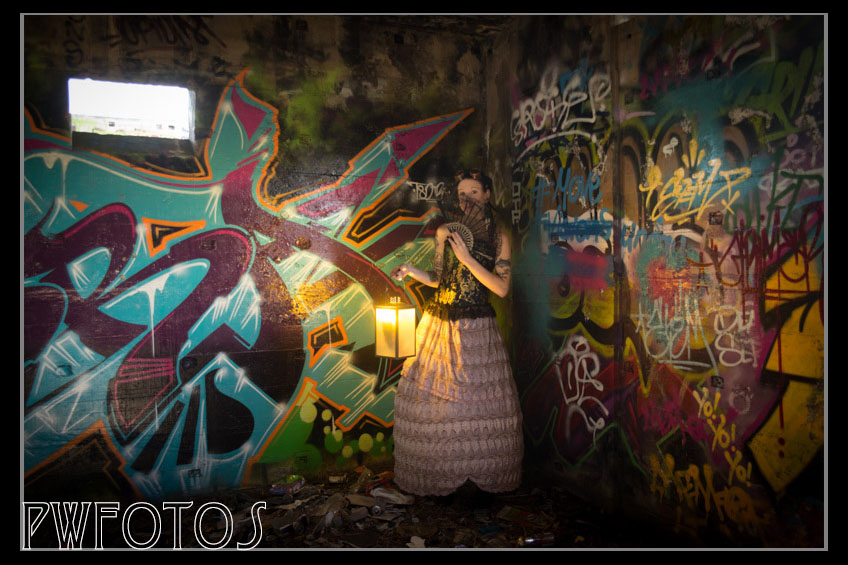
I wanted to go with two quite different looks. The first I wanted to utilise a homemade outfit that looks very Victorian. I thought that this contrasted nicely with the fact that Kristara has piercings and dreadlocks. Kristara added a set of goggles for a steampunk sort of look.
The initial test at full power
I planned on shooting inside of the gun emplacement and to add an extra dimension brought an old style lamp in which I has placed a speed light covered in an orange gell. The first shot the speed light was set to quite a high power and while it produced the desired effect it was real too bright. So the flash was wound back a little and the following image was produced.
Light solely from the flash in the lamp
While the shot worked there was too much falloff in the light and so I positioned a second flash in a bounce umbrella to my right and then played with the positioning and angle of it until it only provided a level of fill and did not over power the colours I was looking for.
We did run into a major issue with the light in the lamp in that something kept creating a circuit that caused it to fire randomly. I suspect that it was something to do with the metal of the lamp. I managed to get enough good shots but it was frustrating.
For the final shot we moved into the main chamber of the complex that would have housed the actuals guns and I shot Kristara looking out. This is actually a composite of two images with one being exposed for her and the other for the outside, as there was two much difference in the light levels to handle in a single exposure.
For the last five weeks I have been taking a break from work and so I thought that I would be able to fill the spare time with photoshoots rather than being restricted to the weekend. As it turned out it did not pan out quite as planned and most of the shoots I have got in have been on the usual days.
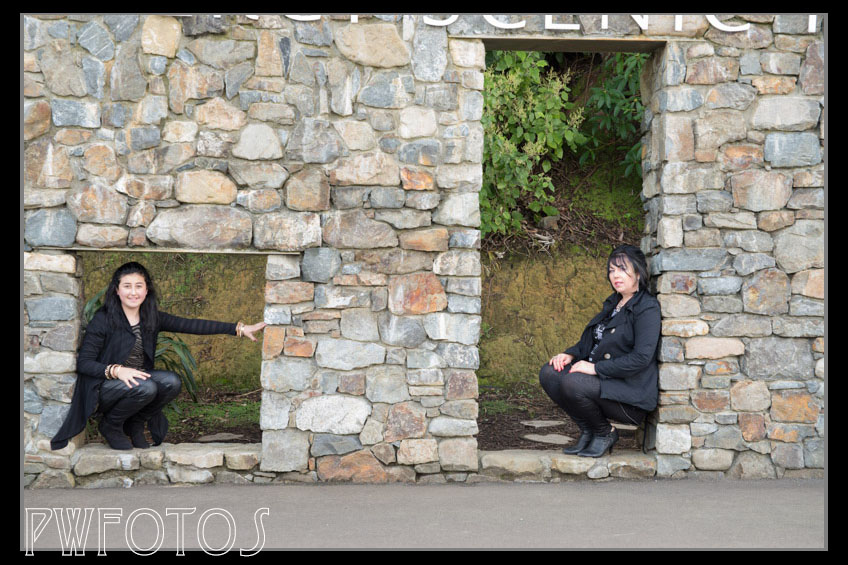
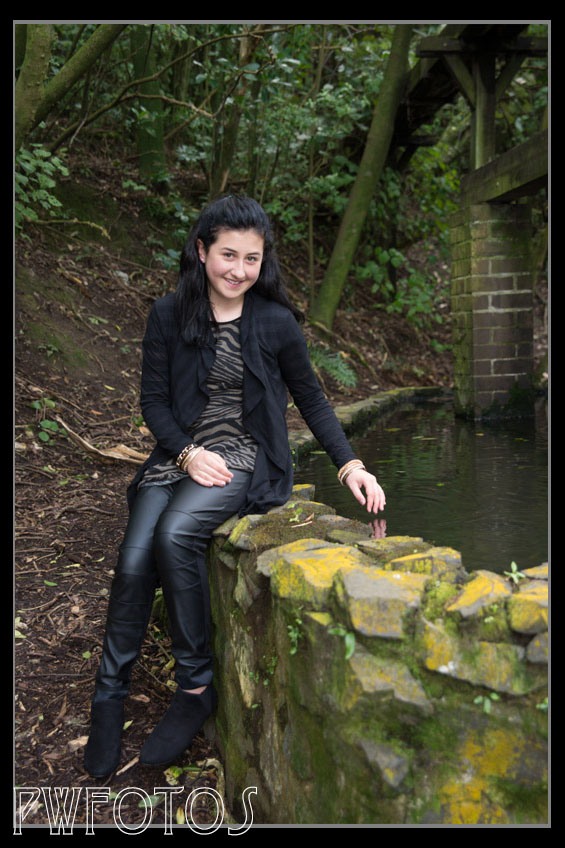
Rebecca approached me some time ago to see if I would do a shoot with her and I agreed I would. She then mentioned that she would also like to include her daughter as well.
When I found out that they lived in Masterton it was decided that we would shoot in a location around the Hutt Valley rather than travelling into Wellington. As the weather was not looking promising I decided to use Percy’s Reserve in Lower Hutt as I knew that it gave us both open space and also some covered areas should the rain start.
Rather than go for a strictly high fashion model look, I decided to produce a series of images that would fit well into the family type shoot. The images below are mainly shot using natural light with an off camera flash providing a little fill.
I thought that the gaps in the stone wall provided interesting framing for the two.
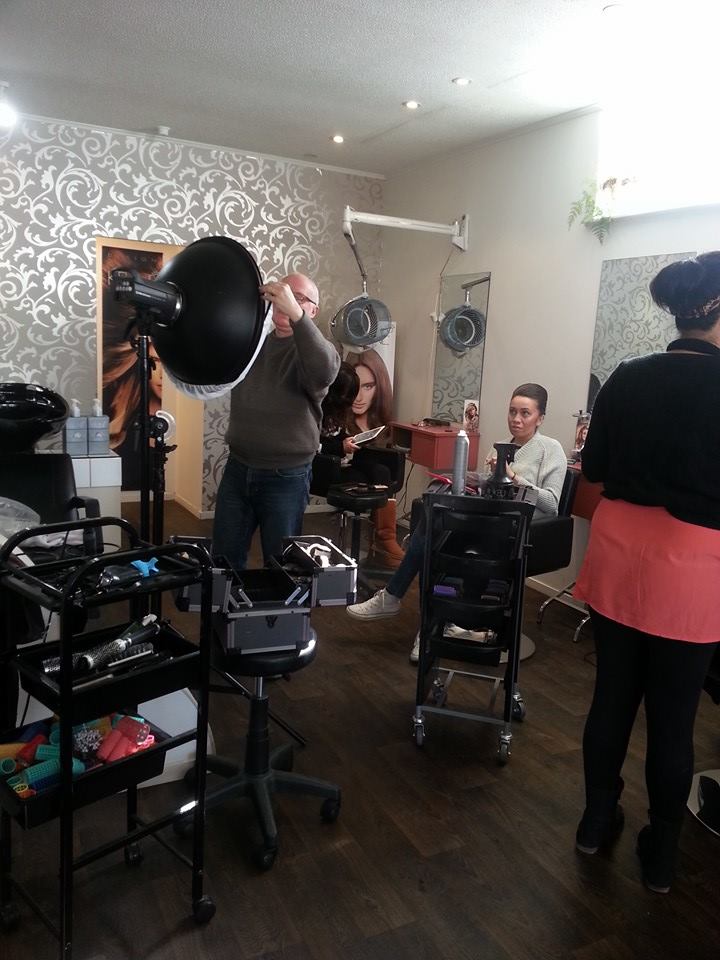
One of the things that I firmly believe in is if someone helps you out then you should return the favour. Tiffany Williams, who is the makeup artist who helped me out on the Book Queen series, works at Tawa Hair Salon. They wanted to do a series of shots that promoted what they could do and I was more that willing to help out. The images from the shoot were intended to be used both on Facebook and in print.
Setting up for the shot. In the end the beauty dish was not used.
So last Sunday I ended up at their salon for the shoot which consisted of three female and two male models.
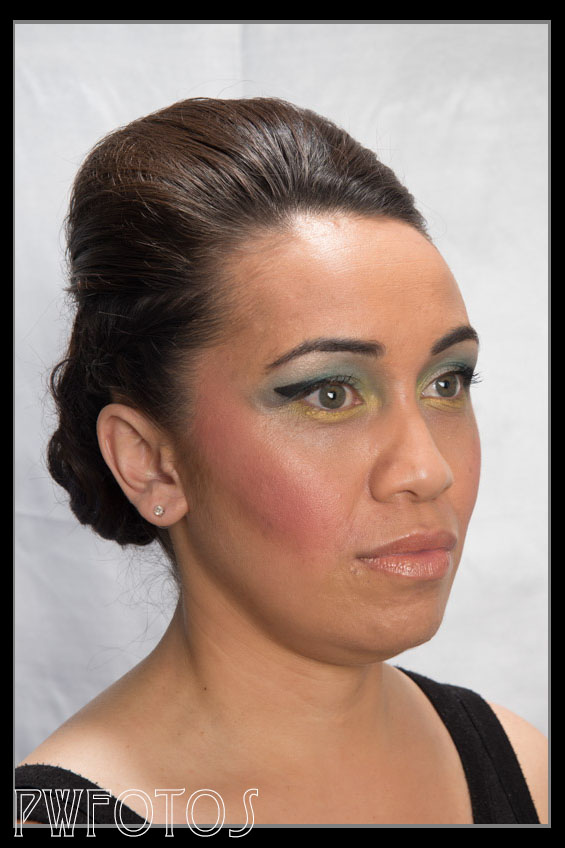
Taking photographs of hair dressing is quite tricky. While it is simplistically a portrait you are trying to bring out the details in hairstyles and this can present an issue depending upon the colour of the hair.
The original intention was to shoot each model on a number of backdrops so I set up a white, blue and multi-colour backdrops in such a way so it was a simple matter of changing them. This would enable them to use the same image in different setting. As it turned out the white background was the only one suitable for all models.
This pullback shot shows the position of the hair light.
I used a simple two light setup. My main light was slightly to camera right and was in a 1×1 metre softbox. A second light was fitted with a small gridded reflector and mounted on the end of a boom arm. This was then positioned either above or on the opposite side of the model to bring out the highlights in the model.
I did experience some issues with my gear early in the shoot and there was a couple of minutes of panic as the camera refused to fire. Fortunately it resolved itself however it did reinforce the need to ensure that you have back of key gear available.
I am quite pleased with the results and I hope that the client is as well.
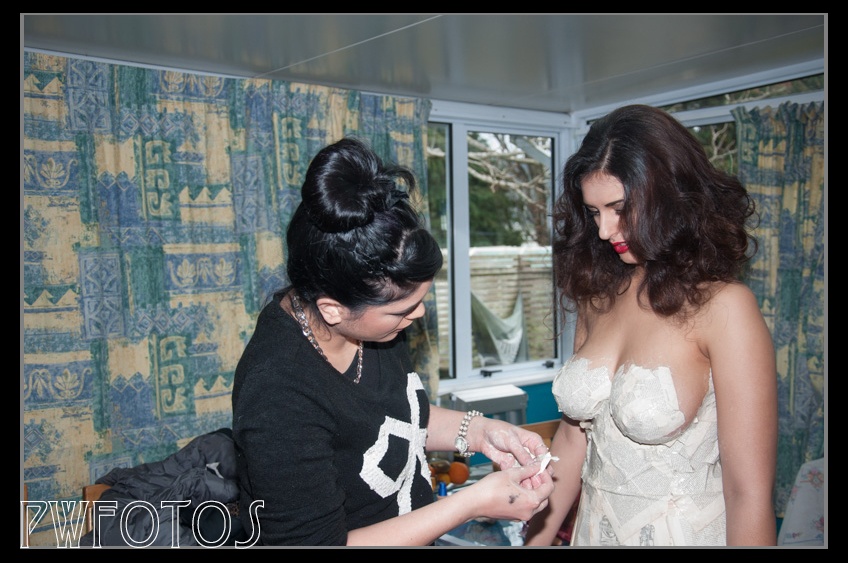
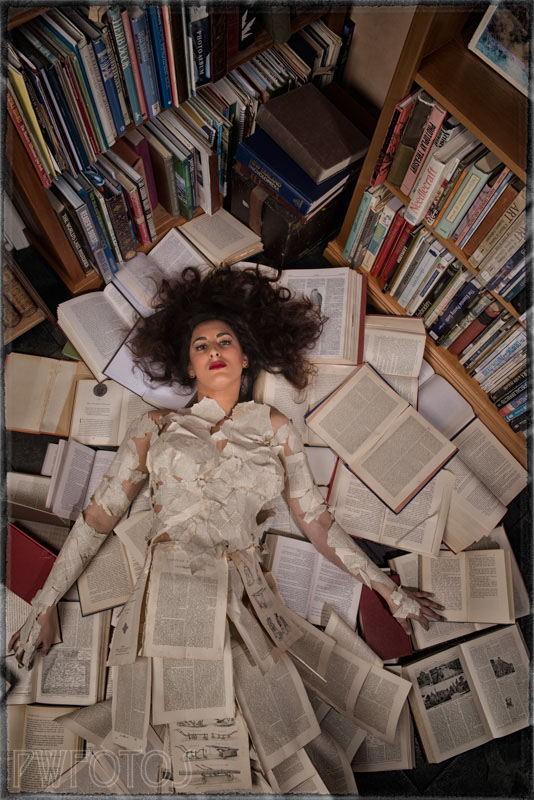
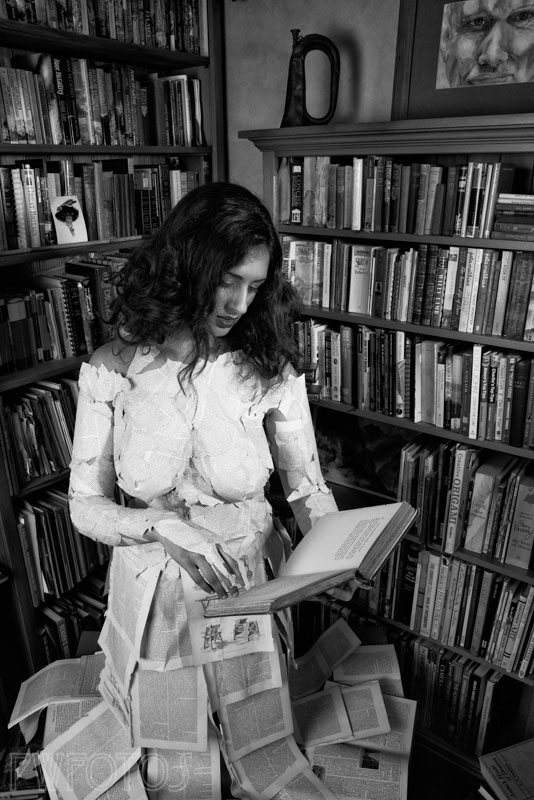
For some time now I have been mulling over a concept that involved a model and a lot of books. Fortunately each year Heretaunga Rotary Club hold an annual book fair and my wife and I help out. Through this process I was able to grab six boxes of books that were either too old or in too bad a condition to be sold, and therefore were destined for scrap.
Tiffany starts the process of attaching the paper
The books sat in my garage for a couple of months while I tried to come up with the idea. Eventually the concept emerged of a person who was so engrossed in the books that she became part of them. I had seen an image of a girl covered in print and so I showed it to Tiffany Williams who is a very talented makeup artist. Once she agreed to come on board we set a date and I cast for a model. My call was answered immediately by Grace who I have worked with on a number of occasion as a makeup artist but this was to be the first time as a model.
The paper is almost complete
I had initially envisaged that we would cover her whole body in the print but then decided that only her upper body was needed in this way and that I would make a skirt to cover the lower half. I made a simple skirt out of calico and then glued pages from an encyclopaedia to it. In order to create the look of a library I moved a bookcase into our entranceway so that it could line up with another one that we already had there.
We made up a simple paste out of flour and warm water and Tiffany spent the best part of an hour gluing strips of paper to Grace. While she was doing this I built a throne out of the books and fashioned a crown.
The images came out pretty much how I had envisaged them. In photoshop I fixed up and extended the backgrounds to come up with a selection that I really liked. A couple of them will now be entered into upcoming photographic competitions.