Tag Archives: composite images

In print again

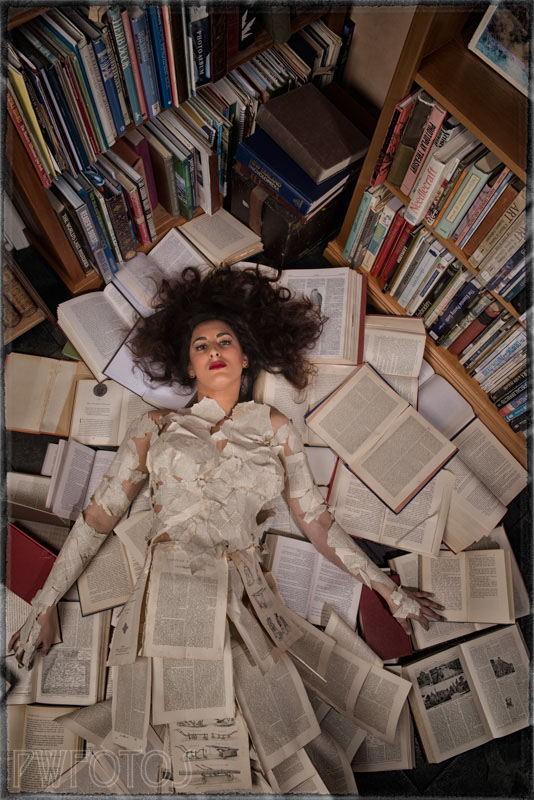
This is another post that is a little overdue in being completed, but is part of my New Year resolution to get more content on the site.

The completed “Buzz at the Hive” image

Each year the Photographic Society of New Zealand publishes a hard copy book that profiles images submitted from its members. The number of submissions always exceed the available space so it is quite an achievement to get an image selected.  Each year the book includes a special section where your are asked to submit to a theme. The theme for the 2018 edition was “Kiwiana”.

For my overseas readers New Zealanders refer to themselves as “kiwis” (coming from our national bird and not the shorten version of kiwifruit). Kiwiana is a set of images that depict those things that we would instantly recognise as part of the culture.

When the theme was announced I know instantly what I wanted to submit. A classic Kiwi toy is a wooden pull-along called “Buzzy bee”, and our parliament building executive wing is called the Beehive. Therefore all I had to do was capturing buzz at the hive.

The Buzzy Bee

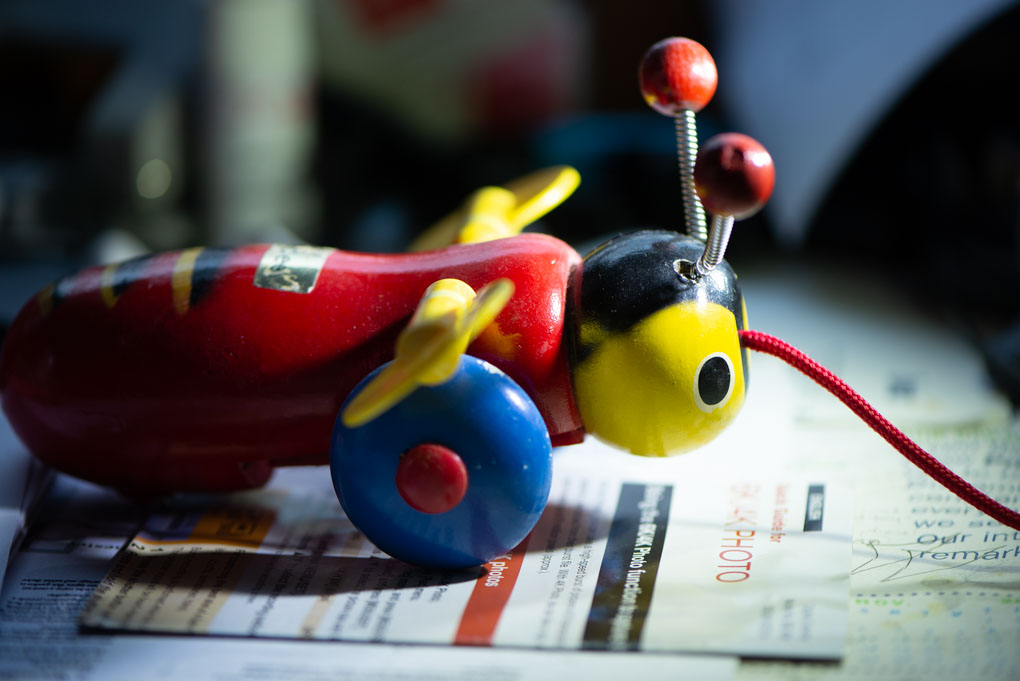
The process was relatively straight forward. I figured out the angle I wanted with the camera on a tripod and then shot a blank plate of the buildings. As I wanted the image reasonable in focus across a wide range the camera was set at f20. I had to take several images so i could remove the tourist who were milling around it.

The Parliament complex with the Beehive in the background

I had originally planned to attach the bee to a cross pole by way of fishing nylon, but my wife rightly pointed out that this would be very hard to control. We therefore settled on clamping it underneath to the boom pole. She then proceeded to wave the bee round as I took multiple shots.

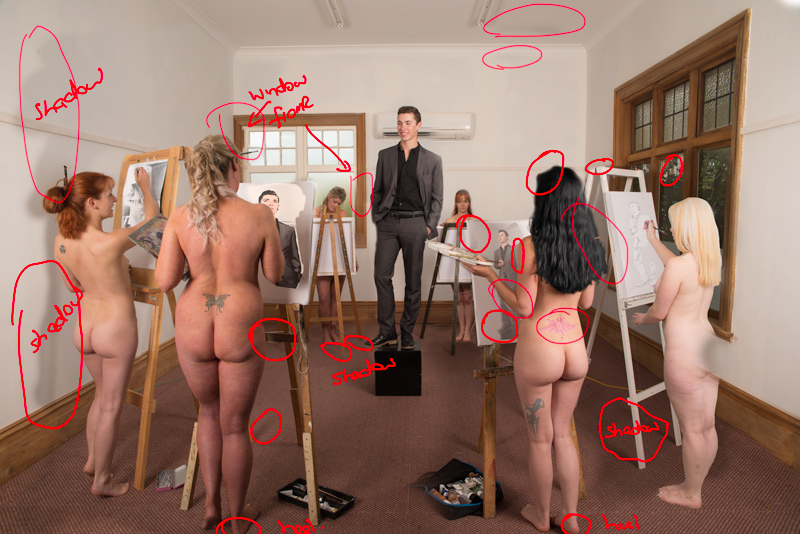
Once back at the office I downloaded the images and then went through and worked out which worked best. It was then a relative simple matter of loading the images into a stack in Photoshop and masking out what I didn’t want. As the images had all been shot in the same location this was a relatively simple process with the only area requiring more work was were the pole had attached to the bee.

Then to make the image more realistic I add shadows to the ground under the bees closest to the camera.

I had high hopes that the image would be selected and was really pleased that it was. That made the third image selected over the years for the publication.

The Naked Art Class – Part 2 : Building the image

The Naked Art Class
The Naked Art Class

Sometimes the best way forward, is to admit that what you are doing has gone of the rails, and the best way to fix it is to start again.

This was certainly the case when I started out to build the composite of the Art Class together. In Part One of this blog post I went through how the image was shot and that because a number of models had been unable to make it, I had to shoot it as a composite and assemble it in Photoshop.

The early draft image

I selected the best images in lightroom and starting with the elements closest to the viewer, combined them as layers in photoshop masking out what I wanted to show through. After an hour I has a reasonable first cut. In order to save space I had only copied in the part of the element that I wanted rather than leaving a full layer.

I had an issue with shadows on the wall but other than that the image looked ok. The problem was that I did not want the viewer to immediately see that they were only two artists. Despite the fact that they had changed hair styles it was too obvious.

With Sian (redhead) adding a couple of extra tattoos and changing her hair colour made sufficient difference. But nothing I did really worked with Kylie so at that point I contacted Renee (who has been sick on the day) to see if she was available to shoot.

Once I had that image and tried to incorporate it the composite started to fall apart.

The image at the point I abandoned it
The image at the point I abandoned it.

I could not get the light to look consistent across the image and elements were not lining up. I also realised that I had cropped off the heels and needed to enlarge the canvas at the bottom and rebuild the missing part of the heel. Then I discovered that some of the elements on the layers that I had discarded was actually needed. After 45 minutes of struggling and getting nowhere fast I decided that the best approach was to scrap it and start again.

This time I started with the empty room which I enlarged slightly at the bottom so that I had space to deal with the missing heel. I placed the  girls at the back first, balanced the exposure and then moved forward. Admittedly incorporated Renee into the image was the hardest element as she was not shot in the same environment and some more work is still needed there, as the feet are not there yet. Unfortunately feet are the hardest part of a composite to get right, and the usual techinques (not showing them, or making the area around them very dark) are not available to me.

Given that I have plenty of time before I have to exhibit the image I am sure that I will get it looking right by then. If you want to learn more about composites then the best resource I have found are the videos produced by Aaron Nace at www.phlearn.com


Success at Central Regional Salon

The Central Region of the Photographic Society of New Zealand (PSNZ) basically covers the Lower half of the north island. I believe that the boundary is just below Taupo but it does include the East Coast city of Gisborne.

This year I entered both a print and a digital image into the Open Category of the salon, and had another image included in the Hutt Camera Club’s print set. I am really stoked with the results.

Because my Club was hosting the conference I actually got to help out with the judging session so was on hand to hear the comments of the judges who actually had no idea who had shot the images.

My print of the “Late for the Ball” image really resonated with the judges and it scores a merit and came third in the competition.

The print of this image actually looks better than the digital version

The  story behind the image can be found on this blog post.

My “Waiting for the model call” image was included in the Club set with the overall set coming second in the category. The story behind this image can be found on this link.

The final hanger shot is quite different from the earlier version

Finally my image entitled “The Fall” got an “Acceptance” in the Digital Category. Not as high as I would have liked but the standard of the images in the section was very high.

The fall
The fall

This image was actually a late substitution. I had intended to enter the hanger shot into the category but when it was selected for the Club entry I was under the impression that it could not go into an individual competition. Unfortunately by the time that it was discovered that this was allowed, it was too late.

The success has spurred me on to enter the images into consideration for NZ Camera which is the actual print publication of PSNZ.

Double success at final club judging

Last Tuesday was the final judging of the 2014 Ladder competition and I had two images entered. I was very pleased with the results as both images received “Merits” (which is the second to top score an image can achieve).

The set topic for the round was “From beneath” and I submitted this image taken at the old brickworks in Melbourne.0218_L4_S_EncasedClimb

For the second image I decided to enter my “Late for the Ball” into the Open category.Late for the Ball_Small

Very pleased with the overall results, however they were not good enough to actually win the competition.

Mixed results in Creative Focus

The Creative Focus Competition is a nationwide competition organised by the Pukekohe Camera club that has an aim of promoting photography that pushes the boundaries of traditional images both in terms of in camera techniques as well as post processing. The competition is in its second year.

Last year I entered four images and all four received acceptances, so i had high hopes of being able to repeat that process again. I entered four image again in a category they referred to as “fusion” however the more common term that should have used was composites.

This year I was not as successful having only two images (shown below) being successful. At first I was disappointed by this but then I learned that they had received twice as many images as the previous year. This meant that their rejection rate had to considerably higher as all the successful images are printed in a book after the competition.

Autumn_FallingLeaves
Autumn Goddess

The stories behind the image can be found in Autumn Shoot and Late for the Ball articles Late for the Ball_Small

Late for the Ball

Late for the Ball_SmallSome times the inspiration for a shoot seems to come from random events. A couple of months ago I saw a box of old patterns in a book sale and bought them. My wife had been talking about using them to cover other objects and I instantly thought that it would be quite cool to make a dress out of them. My daughter then dashed my plans by telling me that patterns generally only contains half of a side because you folded the fabric in half to produce the whole piece.

Knowing that it would be difficult to completely cover a model in a single pattern the concept emerged of a girl that had run so late for the ball that they were literally trying to sew the dress around her.

Posing with the Black & White lingerie set

Rather than post a casting call I approached a model (Suzie) and makeup artist (Crystal) who had both expressed interest in working with me. I had coffee with Crystal to go over the details of the shoot because I knew that hair & makeup would be quite unusual from what she had normally done for photoshoots. I knew that I would be compositing the body but I wanted the face to be from a single image. This meant that I wanted one side to be completely made up while the other was bare.

I sent a photo of Suzie and the dress to Crystal and left it up to her to come up with appropriate makeup. I did want to be slightly theatrical with the look in that I wanted large style rollers in the hair.  Crystal informed me that such things are not really used anymore but what is used really didn’t work with the look anyway.

The studio I had booked for the day is in an old house so I knew that I wanted to use the room as is. I collected a number of props from home (some under strict instructions from my wife such as her dressmaking scissors were not to be used to cut the patterns) and staged it to look like a sewing room.

The final selected pose

Suzie had brought a number of sets of lingerie so that we could see what they looked like under the patterns, which were attached to her with double sided tape.  We selected one red and a black/white combination to try out. We started with the red set.

I had decided that the way we were going to shoot it was to do the patterns first and then the dress. I was shooting tethered into lightroom which meant that we could see a larger sized image than on the back of the camera.

Suzie took up different poses and once we had them I went through and selected which one I liked the best. Suzie then got changed into the other lingerie set and we shot a few images based around the poses we liked the best from the first series.

Wearing the dress
Wearing the dress

After looking at both sets it was apparent that the red lingerie set produced a much stronger look.

Suzie then put on the dress and we concentrated on getting as close to the chosen pose as possible. Lightroom made this a lot easier as we were able to compare the two images side by side. With the help of Crystal checking the images it did not take long before we had what I thought was a reasonably good match.

Once I had the images loaded on the home computer it was a simple matter of bringing them both into a single file and masking out. I increased the saturation in the lipstick and painted Suzie’s finger nails.

It was quite a fun shoot where pretty much everything went to plan. Thanks to Crystal and Suzie for their assistance in bringing this together.


Just Hanging Around

The finished image

The original inspiration for the shoot by Alessandra Favetto.

Last Sunday I has a full day in a Lower Hutt studio to produce images that will be entered into national competitions. The first was inspired by an image I saw in the July issue of F11 magazine by Italian photographer Alessandra Favetto.

I has long held the view that models are often treated as mere clothes hangers, and so I knew that I could use the image as a base. However I wanted to have more than one person in the final image and to have the models hanging from a rack of some sort.

I posted the image in a modeling Facebook group and as I suspected got an immediate response. While I had initially thought that I would cast three models I ended up selecting five. Past experience from shoots had taught me that it was unlikely all five would make it to actual shoot day.

I also knew that the shot could be something that required assistance so I managed to elicit the help of fellow photographer Alan Raga.

As I suspected would happen, in the week leading up to the shoot one model discovered that the timing clashed with a family event and a second one sprained her wrist and ended up in plaster. A third model then failed to respond to any of the communications sent out in advance of the event, and simply didn’t show up on the day. This was exactly the issue that I had spoken about in my recent blog post on “Tips for models“.

The initial shot
The initial shot

In the end Summer & Renee turned up right on time.  I had asked the models to bring a number of outfits so that we had a good variety. Renee brought a small suitcase while Summer only brought two (both of which were very similar). We selected initial outfits and the girls got changed. I had to ask Summer to go and change her bra because she had a purple one on under a white top.

In terms of preparation this was going to be a very easy shoot because no hair or makeup was required. I knew that it would require several images to be taken though and then composited together. Past experience in this area has taught me that when you plan to do this having the lighting, camera position and focal length consistent between all shots make it so much easier in post.

The staging for the shoot was very simple with a large fabric backdrop that extended onto the floor and covering a small platform for the girls to stand. The hangers were suspended on another backdrop support. Once the girls were in position we raised the support up to create the illusion that they were hanging from it.

hanger-2
The illusion of being suspended

The main light was a large octobox set just left of the camera and high. The fill light was set camera right and down low. I was shooting tethered into a laptop with the camera mounted on a tripod.

Once we had the shots of the girls on the hangers we removed the platform and positioned two high backed chairs in a similar position to where each model has been standing. The girls then raised themselves up and I took the photo.

I had originally envisaged three models on the rack but  decided that there was room to shoot four so both Renee & Summer got changed and we repeated the process again.

Putting the images together was relatively simple process as the hem of the skirts provided a good point to merge the images. The hardest part was blending the backdrop and in future I will chose a material that is much more consistent in colour.

As often happens when you look at the images in post you realise that there was something that could have been done better during the shoot. In this case it was the realisation that the dress chosen for Summer in the second shot (orange) was actually hanging next to her in the first series. Fortunately colour is easily changed in photoshop.

The competition it is being entered into closes on August 13 so I still have a little time to tweek it further before then.

It was a very smooth shoot and it only took 40 minutes to get all the images we needed. Thanks to Renee, Summer and Alan for making it an enjoyable event.