My last three posts have covered the wedding of Taylor and Kristi. I had envisaged that the story what stop with the ceremony, but as I was writing it, I realised that there was a fourth part. Namely how do you select and edit the images that she will present to the couple. This post specifically about that process as I hope it will be helpful to anybody who shoots a large number of images at an event.
Please note that this is my approach to culling and that other people have different techniques. I’m not saying that my way is any better than anybody else’s; it is just something that works for me.
It also based around the arrangement that we had with the couple for the delivery of images. The wedding was to be “unplugged” meaning that we were the only people there taking photos. We were also delivering the images electronically and then the couple would chose and print their own images. This meant that the couple were not involved in the selection process. Part of being unplugged though was a guarantee that we would deliver a “sneak-peak” set of images within a day so that the couple could share on social media.
As I mentioned in my previous post, we were using four cameras to cover the wedding so the first task was to download the images from each card, and then take a backup of it before the editing even started.
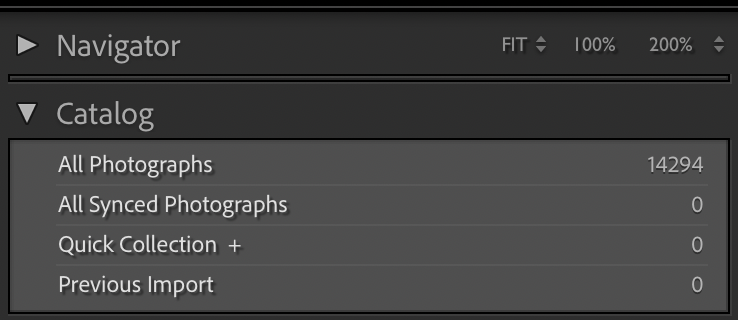
To download the cards I used the “get photos from camera” import option in Adobe Bridge. It was only after all cards had been transferred that I then switched to Adobe Lightroom and imported the RAW files into my wedding catalog. Doing this two step import resulted in all of the images being in the category of “Previous Import” in Lightroom. While it would have been possible to import directly from the card it would have meant that only the last card cards images fell into this category.
In total we had just under 3,000 images imported. Now to start the process of culling.
The first stage is to remove the absolute dud images that obviously have issues with them (such as way too dark, or out of focus). I do this quickly by scrolling through the images in the library and pressing the X key to indicate that the photo was rejected.
As we had promised to deliver the sneak peak on the day following the wedding, I was also on the look out for any stellar images that we could use in the sneak peaks. These were identified by giving them a rating of 2.
Once I had gone through all of the images I had about 200 rejected images that were then deleted, and around 30 images for the peak. I reduced that down to 26 which were then exported and delivered to the clients.
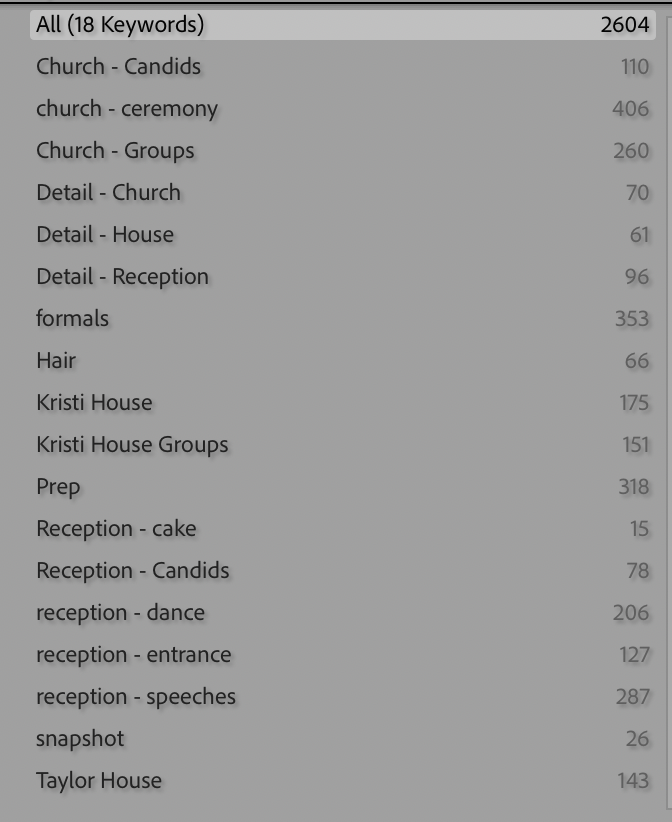
It was now time to cull the images and select those that would tell the story of the day. I created a set of keywords that would enable me to split the day into various activities and which would also be used in the export later on. These were then applied to all of the images.
The keywords were then used to filter all of the images, so that I was only concentrating on each section individually, rather then trying to handle the entire day in one go.
With documentary photography you are trying to tell the story of the day. I went through each of the keywords and rated them using the following scale:
3 stars – An image that was a good candidate for the final set 2 stars – A duplicate image not strong enough on its own 1 star – Not suitable for delivery
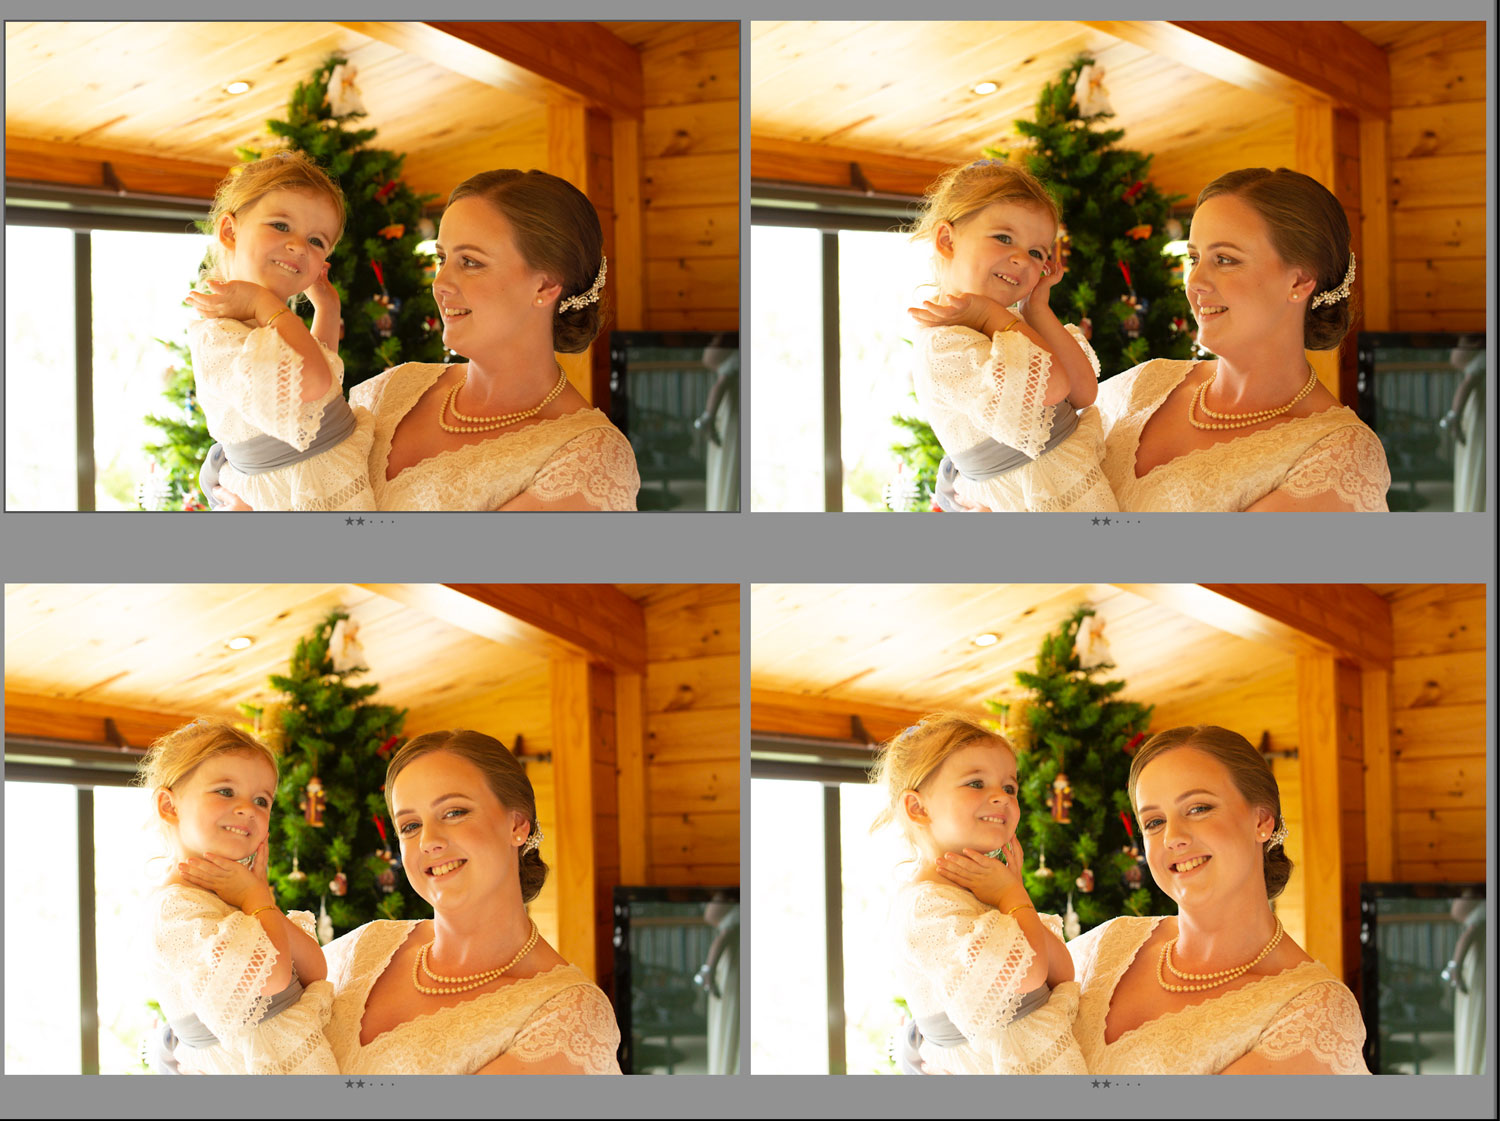
Lightroom has two shortcuts that let you quickly view multiple images. Highlighting two images in the grid and then pressing C will bring them up side by side. Highlight more images and pressing N brings them all up. You can then select each individual image and rate it by simply pressing the appropriate number on the keyboard.
In addition to the keyword filter I was also filtering on “unrated” which gave me a clear indications of the ones that I had not looked at yet.
After all of the images had been rated, I then set the filter to only show those with a 3-star rating. I would then look through how the story flowed and if I felt that an area was light I would go back to a 2-Stars and change the rating on some of them.
Equally if I felt that there were two many images telling the same part of the story then I would downgrade some of them.
This is exactly the same process that I use on any of my model shoots and it has worked well.
I was super stoked at the start of the month to discover that one of my images was on the cover the June 2018 edition of NZPhotographer. While I knew they were going to include some images inside, I was not aware that they would choose one for the cover.
Earlier in the year I had met with one of the founders of the company that owned the magazine and after I showed her my work she asked if I could be interviewed.
Of course I said yes and ended up receiving a list of questions and then given the opportunity to submit a range of images. They pretty much printed the whole interview, which is great.
When the issue came out I let the various models featured know about it and they are all stoked to be published (even if the magazine is only available in digital format).
This year I submitted and was successful in achieving the licentiate level within the PSNZ Honours system. This was the combination of a number of years working towards the goal, although inconsistently. In this post I am going to give a fairly honest account of what happened along the way in the hope that it will help other people going for their honours.
I first got interested in applying for others in 2012 although I cannot remember exactly when. The convention in 2013 was going to be in Wellington and I always said that if I was going to the put the effort putting a set together that I wanted to be able to pick the certificate up in person.
By this time I had moved through the beginners and intermediate grades of the Hutt Camera Club winning at both levels. Based on the fact that a number of my images had got acceptance is in competitions outside of the club, and honours within it, I felt I met the minimum requirement set out in the guidelines. I also believed it when other photographers told me I was good enough to put forward a set.
As most photographers do when they begin this journey I downloaded the reference material from the PSNZ website. Unfortunately anyone who had read it will know that it can be extremely confusing at times.
I then went through my Lightroom catalogue and identified around 30 images that I thought were good enough for consideration. I was lucky enough to have Simon Woolf offer to assist me in the process and so one lunchtime I visited his Wellington studio with printed copies of all 30 images.
He laid them out over the floor of the studio rejecting quite a few, that I quite liked. After about 40 minutes we ended up with about four definite possibilities and a number of other images that even needed work or he recommended I re-shoot.
Even back then I had too much of confidence in my photography that I now recognize was bordering on arrogance. While I fully accepted that Simon had a lot of experience, I was not completely in agreement with some of the choices and changes that he was recommended.
Some of the selected images intended for the original set
At the same time there was a group of 12 other photographers at the Hutt Camera Blub who are working towards the L level. Despite being a member of the group, for some reason that I now cannot remember, I did not take the set much further. When it became obvious that a combination of the timing of the convention and the fact that I’m was not all impressed the speakers, I put the set aside and took it no further. The group was very successful and all bar one achieved their Licentiates that year.
The 2014 Malborough convention was occurring at the exactly the same time as my daughter was representing New Zealand in Roller Skating, so in the lead up to it I did not take the set any further.
However come September 2014, when the program for the Tauranga convention was released, I made the decision that I was attending and I decided to pick the set back up. Again I started with the ones that Simon had chosen and again went through the library catalogue for images shot in the last two years.
At the time it appeared that print sets had a higher success than digitals so I had every intention to submit prints. Unfortunately a series of home appliances failing around home in the December meant that this was not feasible and I would be forced to submit a digital set instead.
The problem that I was facing was that during the time since the discussion with Simon my photography had developed further and I had established that my main focus was with people. I took the set to a fellow photographer and we initially tried to integrate the old and new images but it became obvious that the old set did not represent my photographic style now.
Anyone with that familiar with the PSNZ honours system will know that there are several levels. The Licentiate is the lowest level. It is expected that you demonstrate proficiency over a range of photographic skills. At this level a theme is not required. The Associate level is at a higher level and does operate on a theme. There is no requirement to have one level before moving onto the next, and there have been a number of photographers who have been successful got their Associate without first achieving the Licentiate.
It became obvious that with the images we were now leaning towards were following a theme and my friend was of the opinion that my photography was strong enough to submit an Associate set.
Taking their advice we ditched virtually every image from the original set and selected 12 images that I believe ran together. We structured the set so that it flowed with the use of colour.
One of the recommendations in the guidelines is to seek advice from a number of people with regard to your set. I approached Bruce Girdwood who at that stage was just a member of the judge accreditation panel, and he agreed to look at the set.
He came back with the honest advice that the set was not strong enough for the Associate but that there was a possibility to make a Licentiate set out of it. We agreed to drop two images and he also recommended tweaks to a couple of other images.
It is at this point that I know I made a fatal mistake. When submitting images for competitions you should not be so in love with them that you cannot see the flaws nor take advice about them. As far as I was concerned I had selected 10 great image, the colour provided a flow between the images and I could easily reel off the various approaches that were taken amongst the ten.
This slideshow requires JavaScript.
My expectations for success were so high that I actually started mapping out the images that I was going to shoot that year to submit for an Associate. It is therefore hit me like a lead balloon when I opened the letter from the Honours Board telling me that I have been unsuccessful. The letter contained the following explanation:
“The board felt that the theme dad distracted the photographer from the requirements for Licentiate as set out in the guidelines, namely those relating diversity of approach etc. to demonstrate overall competence with the camera. Your individual images are mainly of a very good standard, but each did have some small fault apart from 9 which was considered to be especially strong. The last image was considered to be out of context with the rest of the set and the weakest one was identified as Jelly Belly, where the arm and pillo beyond the torso are distracting and the composition generally is not strong. You are clearly a competent photographer of the subjects you have shown but the Board would like evidence of that competency in other disciplines.
The letter made me real angry. The only thing that you could call a theme was that all of the images were of women, but there was diversity of approach. That anger continued through to the convention when I saw the successful sets. It became obvious to me that the Honours Board viewed diversity as being someone who shot different genres. When you are in negative space you also look at other people’s images and see the flaws and wonder how they got through.
About a month later after the convention I was able to get some further feedback from a person present at the judging. This strictly breached some protocols but at least it let me see where I had gone wrong.
The problem started what the very first image and then went downhill with the second one. This image was titled Jelly Belly and it hangs on the wall in my bedroom. I really like this image so much that I actually ignored separate comments from both my wife and a fellow club member that there were issues with. Unfortunately by the time your first two images have been marked down the set is pretty much over.
Now some people have the ability to pick themselves back up again and try the next year. Well I would like to think that was me, but the reality was that it wasn’t, and I did not do anything else leading up to the 2016 Convention in Queenstown. However seeing the honours suits on a wall there inspired me two again try. But time I was going to go right.
In May 2016 I had the opportunity two take part in a photographic exhibition with my wife at the Odlin Gallery in Lower Hutt. In preparation for that I purchased 12 brand-new mattes with the intention that they would be used once for the exhibition and then again for a print set in the Honours. The majority of images within the exhibition were street scenes shot in various countries you have visited earlier in the year.
After my previous disastrous effort this time I have decided to not only take advice but to take it early enough maybe would make a difference. As Bruce Girdwood had been appointed to the Honours Board I approached another member of the Judge Accreditation Panel (Shona Jaray) to see if she would help. So on a Saturday morning in July I travelled to her farm in Waikanae with a set of 12 images that I hoped would be the base of a new set. Others were still encouraging to go straight for the Associate but the first meeting with Shona dispelled that notion.
My initial idea for the set was still too stick within the genre pf people but too separate the images quite clearly into separate groups such as conceptual, straight and classic portraiture and Street Photography. This fell apart when she assessed that none of the street images were of a high enough standard to be acceptable. By the end of the session we had five images that could possible make the set.
Fortunately Shona has good contacts on the Honours Board and was able to confirm for me that diversity was not restricted to different genres, but if you were shooting in one then you had to show different approaches. As I spend just about a hour a week watching Youtube photographic videos, were was no shortage of ideas to try.
As it would happen on the way back from Shona’s place we stopped for lunch at a small cafe. The owner and location was so brilliant that I asked if I could photograph him and that image ended up in the final set. I knew that the images we had selected meet the standard portrait style so it was now time to look for the alternatives.
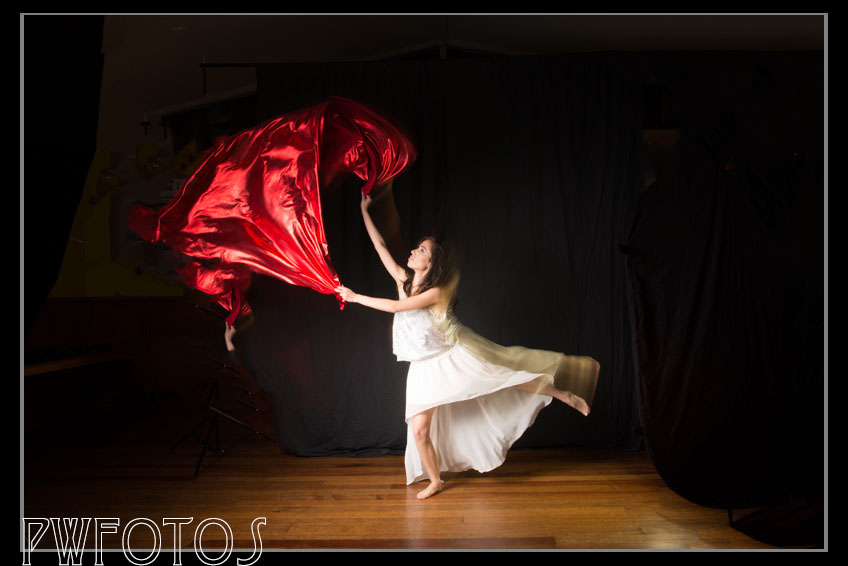
After seeing a video on using long exposure with studio flash, I booked studio space on two occasions to try this approach with different models. (You can read about the first shoot here and the second one on this link). Then during a Lindsay Adler video she used a macro lens for portraiture I decided to see what I can could create. The result was a striking image that you can read about here.
In September I was also fortunate to be able to attend a workshop at the regional convention run by Esther Bunning on creative portraiture what the models present I had a play in capture camera double exposure. You can read more about this here)
All through this period I was also submitting images that I was considering into both club and local competitions to see what reactions they received. I was also taking into consideration comments that the judges made. For example on image was flipped in the final set as a judge said that it made a better composition that way.
This was the original “face in the cape” image
Come November I figured that my set was finished and I had an arrangement of 10 images sorted. Shona was unavailable at this time so I sort the advice of fellow club member William Wright. As before I took full size images around to his place.
The set that I had settled on
He was generally happy with the set however he was initially concerned how the image “Late for the Ball” (Bottom row second from left) fitted in with the others.
The image has been in the set right from the start. However as Shona had also expressed a similar comment, the image was pulled. This is despite the fact that this image had won a merit at the Central Region 2 years before.
William suggested that I should bring a black and white image into the set and I decided that a nude would be a good addition to the set. Bringing in that image into the set required a little shuffling round.
I thought that at this point we were almost there but then William pointed out that there was an issue in the last image on the top row. There was a line running down the image, as well as a white object in the corner that was distracting. The line was actually the corner of the pillar.
I made several attempts to fix the image in photoshop but in the end decided to replace it with a image taken of Sian at a body painting event, however that agains required some adjusting in the layout.
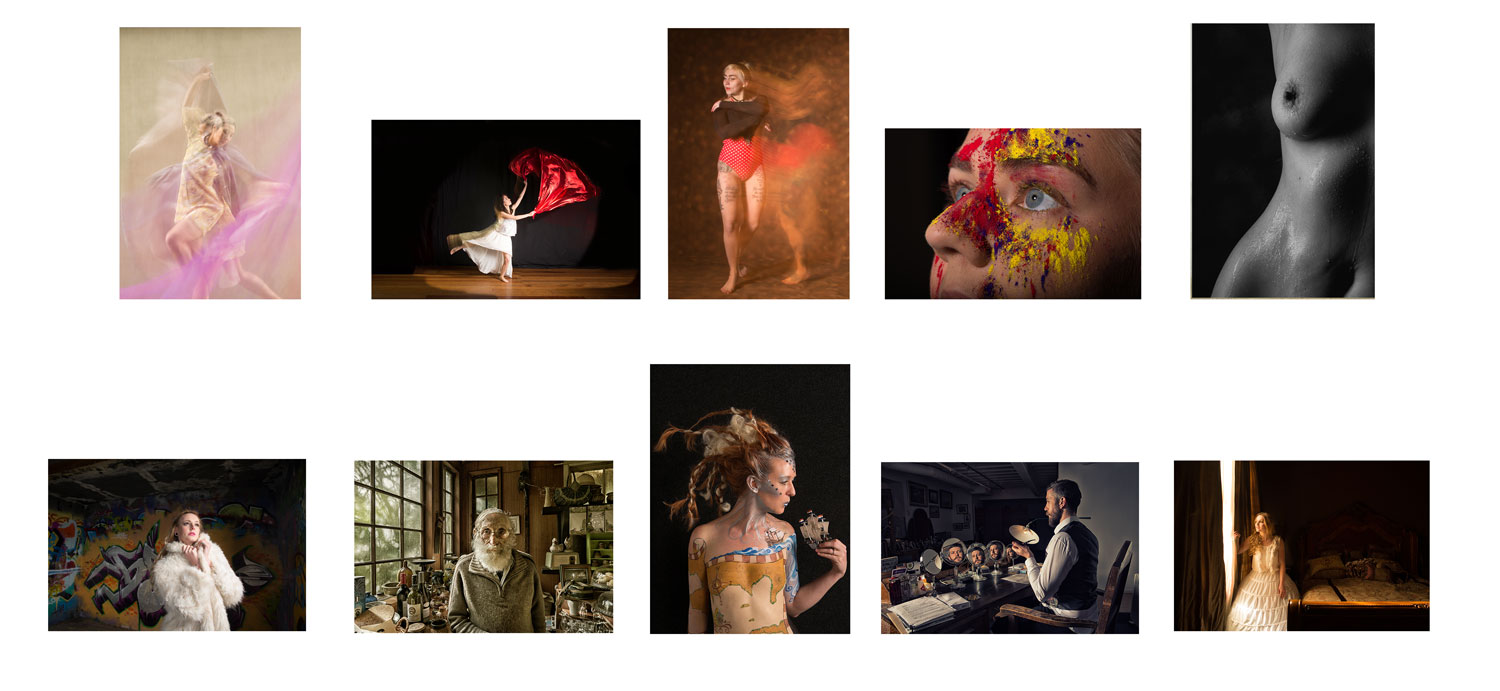
I initially came up with this layout, however when we looked at the colour tones decided that the black & white nude suited the bottom row than the top.
It was a long process, and along the way a lot of highly successful images were considered and rejected. In the end it worked because my set was one of 40 successful ones. Given that there were 100 sets up for consideration I was extremely happy with the result.
There are literally hundreds of articles and tutorials on the internet about how to use light to achieve various looks. If you have been studying lighting then you should be familiar with such terms as “hard vs soft light’, butterfly lighting, Rembrandt lighting and a host of other styles and approaches.
Now most of the articles focus on helping the photographer achieve high quality images in an environment where you have time to achieve the look you want. What these articles don’t tell you is how do you set the lighting to meet the requirements of the client. While you may think that they will both be the same, in reality there can be quite a difference.
In this article I am going to look at the lighting choices that I made for the Body Art Rocks Conference and explain why I made them.
With the conference I was shooting two quite different types of images namely:
Ones documenting the event as it unfolded, and
A series of images of the final creations suitable for the artists and models to display in their portfolios.
Once I knew what I was shooting I then could look at what key factors I would need to consider, which turned out to be quite different.
Documentary Shots
The essential element in documenting the event was ensuring that I had sufficient images to clearly showed what had happened over the three days. The reality in capturing images that are intended to document something is that even a poor image is better than none, however you do want to try to get as good an image as possible.
Knowing that I would be moving from room to room and encountering different ambient lighting conditions, and I would be shooting subjects from a range of distances and focal lengths. This meant that the only lighting that would be of any practical use was on-camera flash.
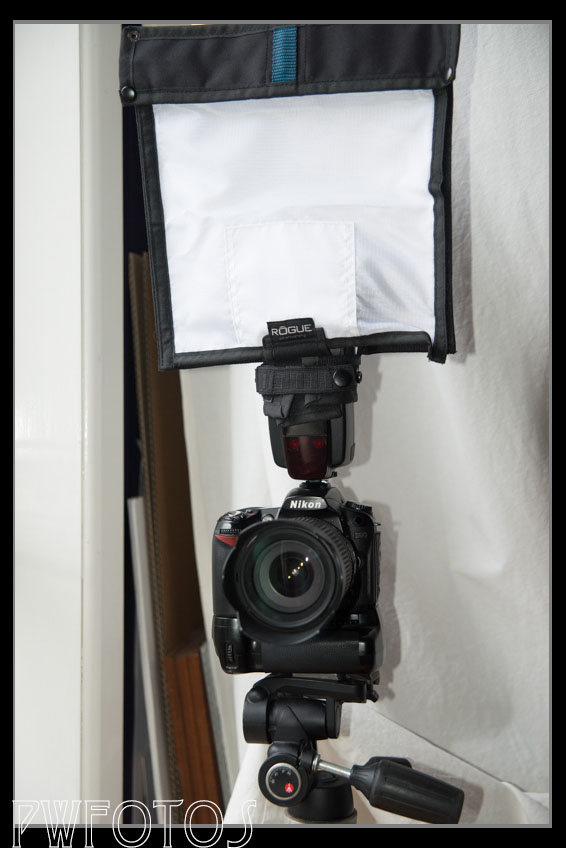
The rogue flash bender and diffusion panel fits over the camera mounted speedlight
Now on-camera flash is generally one to avoid if possible as it is a very harsh light and not the most flattering. You need to soften the light in some way. Generally to soften the light you need to increase the size of it relative to the subject. To do this I used a Rogue flash bender and diffusion panel. This fits over the speed light and spreads the light out resulting in a softer light.
It does reduce the amount of light that the flash generates slightly and this can muck up trying to get the camera to handle the setting. I generally do not like shooting TTL when I have flash and so shot the whole weekend in manual mode.
Initially this did require some trial and error to determine what was the best setting for each of the rooms as well as for shots taken close up as opposed from afar.
For the close up’s the most important thing was ensuring that the image did not over expose the subject and at the same time the flash did not wash out the colours that the artist was painting.
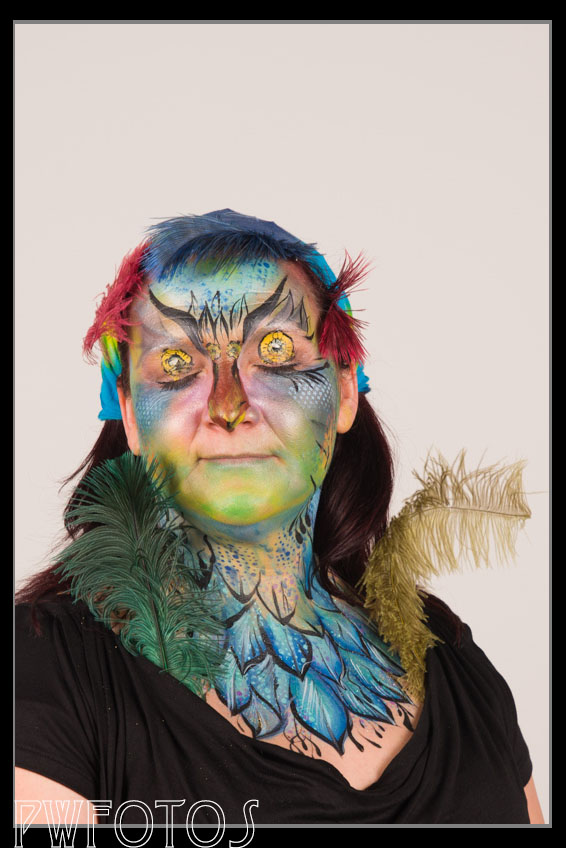
The lighting in this image is quite even and the colours have been maintained. As this was shot in a dark room the ISO was high (f5.6 1/100 ISO 800)
Despite the fact that the zombie is quite close to the wall the diffusion panel had softened the light so that strong shadows are not generated. To ensure that the image was not blown out the iso was quite low (f5.6 1/100 ISO 100)
Final Images
The final images were intended to be used by the artists and models in their portfolios. The key to producing images for the artists lay in ensuring that their work was presented in the best possible way. As the model had essentially become their canvas it was more important to bring out the colours.
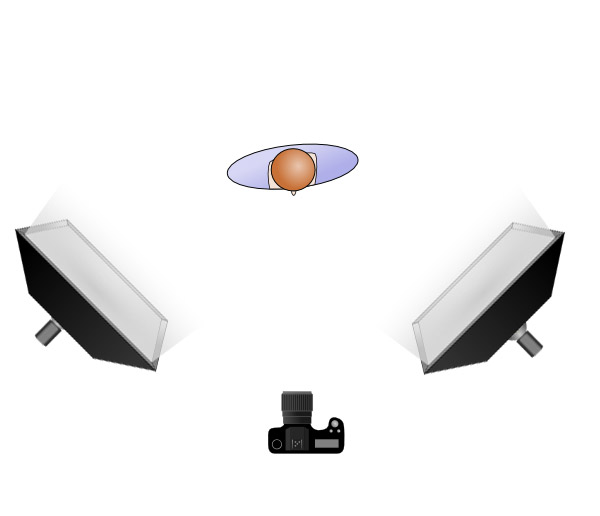
These images were going to be shot in one location and that meant that we could set up studio lights with big soft boxes on them. However we had to fit the shots into the conference programme which meant that we could not muck with the lighting on each subject. Essentially you have to set up a “production line” environment where the subject comes in, you take the image, and then move onto the next subject with the minimum amount of effort.
To do this you create a lighting zone and shoot everyone on the same setting. This was achieved with two strobes set to the same power and positioned on both sides of the camera as shown below.
This essentially creates the light zone which was metered at f7.1 1/100 and ISO 100. It means that the model would be correctly exposed no matter where they stood in the zone.
With this lighting arrangement in place it was a very quick routine to move the model on stage and then take the photos without any mucking around between models. When you have 17 models to shoot in 15 minutes this is essential.
The big disadvantage of this approach is that you don’t get the shading in the light that eliminates it being called “flat” lighting. In this case I was not actually worried about that though because as I have already said, the purpose of the photos is to more to record the art than the canvas.
Ideally the areas chosen to take these images would not be used for other things but that was not the case and at other times it was used as one of the workshop areas. This meant that we were relying on the white wall to be the backdrop rather than putting up a backdrop.
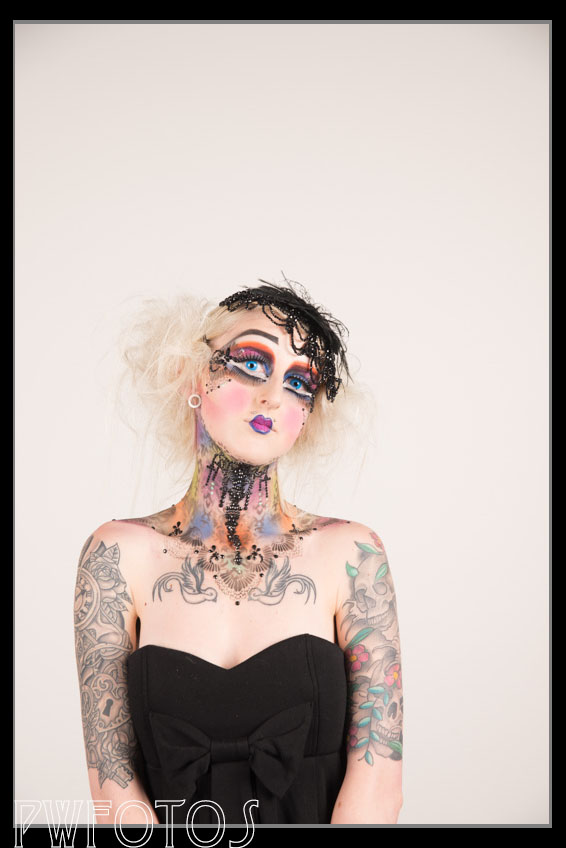
For the most part this work however we did run into an issue of getting separation when the model had light coloured hair.
While the image is fine with regard to the painting the overall effect also employed the hair and we are losing detail as it is blending with the background.
Now while shooting on the Saturday I had not realised the extent of this issue, and therefore had to correct it in post. But on the Sunday I anticipated it and handle it in a simple way. Firstly I told the two models that had blond hair that we were going to shoot them last, and then once we had shot them both on the white, I turned one of the lights around and shot them against the black panels that made up the side wall.
This shot against the black panel provide good separation of model to background. The lighting is more dramatic because it uses a single light camera right and a silver reflector on the left.
Had I been using a backdrop then I would have mounted a darker colour and had it sitting at the back so that it would have been a very quick job to change it over.
Over the last five years I have worked with quite a number of models who have ranged from absolute beginners to those that are very experienced. While I do not claim to be an expert in this regard I thought I would share some tips for those getting into the model game based on my experiences. These are all from the viewpoint from the photographer as you will appreciate. I welcome any comments others may have.
Be realistic in your expectations
Brynn is a professional model who for the last 8 years has travelled the world being paid to appear nude.
While stories like the girl being photographed at the World Cup being offered a lucrative contract do occur, the reality is that for most girls the opportunities to actual model full time are extremely rare and in New Zealand limited. Most of the offers you will receive from photographers will be for TFP sessions. This is a very old term that stands for “Time for Prints” which actually comes from the film days. In return for their time the model would receive hard copy images to use in their portfolio. Now days it will be generally be digital files.
Generally speaking you will only receive actual payment from a photoshoot under the following circumstances:
It is commercial shoot where everyone is getting paid, or
You are an experienced model with a solid portfolio and references behind you
A full nude shoot
In the event that you can get paid then the amount that you can charge is totally based on the level of experience that you bring.
For everything else just go along and enjoy the experience and learn from it.
I have shot Kat on a number of occasions and would recommend her to others because she is very reliable (as well as stunning)
Be reliable & honest
For most photographers reliability will be their number one issue with models and the worst thing you can do it get a reputation as a “flake”. Once the details of a shoot have been agreed it is very important that all parties stick to them. The most important is actually turning up on time and being in a state ready to shoot. Communication is key here to ensure that there are no misunderstandings.
If I am arranging hair & makeup for a shoot then the start time we agree will be when you arrive and the Make-Up Artist (MUA) starts their work. But if we have agreed that you are doing your own hair & makeup then the time set will be when I expect to start shooting. Under such circumstances you need to turn up ready to shoot.
Now we all know that things can happen but if they do let the photographer know as soon as you can. Never, under any circumstances, simply not show up to a shoot. If you do change your mind, be honest with the fact. Do not make up some lame excuse that you think sounds plausible because quite frankly we have a list. You would be amazed how many emergency hospital visits happen to models.
The sad fact is that many people think that because the shoot is not paid that it is somehow a lower standard of responsibility than a paid shoot. The reality is that while no money is changing hands all of the parties are giving up things to take part and therefore there is a cost. If a model gets a reputation of being unreliable when it comes to shoots that she will personally benefit from, then there is absolutely no way she is going to be recommended for paid work.
Practise your craft
Janelle really knew how to express what I wanted with her poses and facial expressions during our TFP shoot that when I had some paid work I did not hesitate to involve her
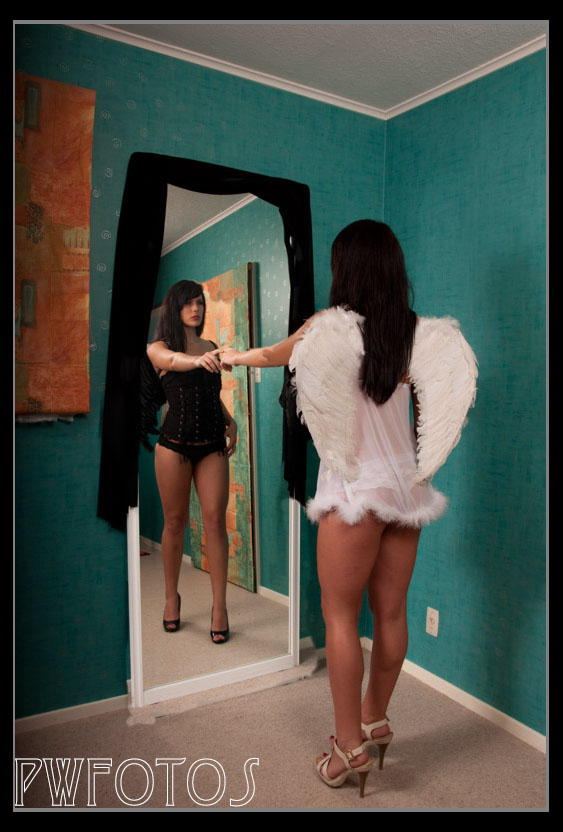
Dancers quite often make good models simply because they know how to isolate parts of their bodies and use them to create expression. Dancers achieve this control through countless hours of practise. Really experienced models operate in a similar way in that when a photographer asks them for a particular look or pose, they can instantly achieve it. The way that they have done this is with practise. Now some of this will be at photoshoots but not all. Practising in front of a mirror is valuable because you get the instant feedback on what you are doing.
Know your limits and be prepared to stick to them
Most models will be required to have some images in their portfolio that show a little skin. Some people have body issues and won’t get undressed with the lights on while other people can walk around in front of complete strangers in the nude without batting an eyelid. We are all different and it is important when you are starting out to know how far you are comfortable to go when agreeing to shoots. This can fall into several area such as:
The amount of clothing worn ranging from fully clothed to fully nude
The poses requested and the angles that the photos are taken from
The subjects of the images.
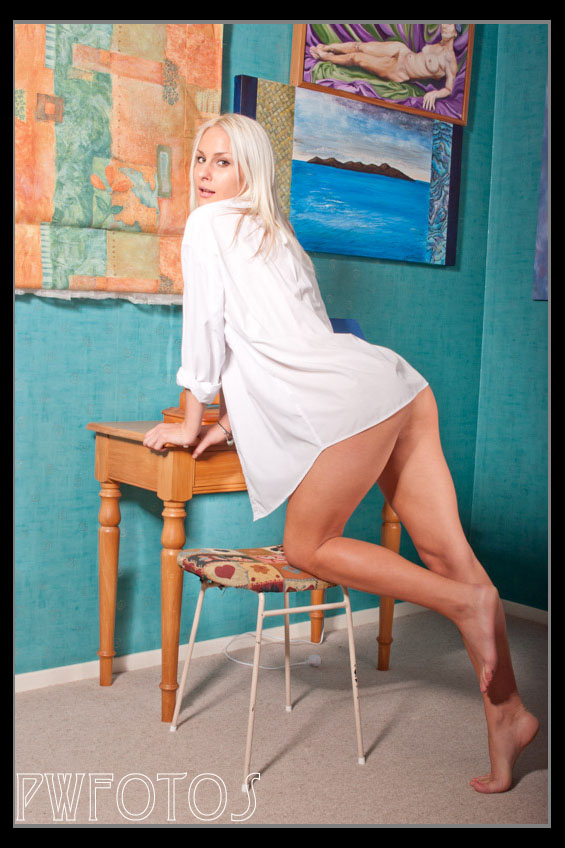
This shot of Aleks is relatively tame but a slight variation in the pose and only a slight movement to my right the image would be exposing a lot more than perhaps the model wants to show.
It is also important that when you are discussing shoots that everyone is clear on what the terminology means. For example “implied nude” means that the photo gives the impression of the model being nude when in fact they may not be. A close crop of a naked back may not show the fact that the person still has clothes on. However some people think that implied nudes mean that the model is actually naked and items are covering the strategic bits. While the end images may be similar the actual shoot itself will be quite different.
Once you have established those limits and agreed them with a photographer then it is important to stick to them. That is not to say that once you have done an initial shoot at a particular level you will not want to try again and push the boundaries a little further.
Don’t appear to have double standards
This actually leads on from the previous tip. If you have set a limit on what you say you are comfortable with then don’t have images that show you will go past it. I see this so often in model portfolio on sites like Model Mayhem where in the profile narrative the model states that they do not shoot nudes, when in the portfolio there are nude images. Now that quite clearly says to me that this model has a double standard. It is better to be upfront and state something like you are prepared to shoot nudes but only under certain circumstances and then outline what those are. For example some models only shoot nudes with photographers they know and trust, or will only shoot them in a paid shoot.
Respect limitation on the images
This has happened to me on a couple of occasion and believe you me it is really annoying to the photographer. During the process of producing the final images you may be shown unedited versions for selection purposes, or you may be given final images with watermarks on them. Now I realise that you may be dying to show your Facebook friends these images but if the photographer has shown you them for your selection, DO NOT share them. You will eventually get the images that both you and the photographer want to be seen and only these should be out there.
And if you get an image with a watermark NEVER remove it.
Be Safe
Finally as I have a couple of daughters, “be safe”.
In the 1990’s there was a cop show called “Hill Street Blues” and every episode would start with the officers being briefed. The sergeant would always finish with the words “Let’s be careful out there”. While there are a lot of very good and sincere photographers out there, unfortunately there are some real creeps out with camera’s who prey on models. There are some simple rules that can keep you safe.
Try to meet beforehand in a public place to talk over the shoot. If you get a bad vibe from the meeting then end the discussion there,
Ask to take a friend along. This is especially important if the location of the shoot it remote.
Now I know that not all photographers will actually allow you bring along a friend but I always do for the simple reason that if a model in uncomfortable it tends to show in the images. There are however a couple of caveats. Firstly I tell them that I will put the friend to work as an assistant, and secondly I will generally not allow male friends to shoots that involve lingerie or nudity. This is for the simple reason that I have found that models get uncomfortable when their boyfriends are around and you are trying to create a connection with them.
In the days before digital only professional shooters working for newspapers and magazines, and wedding photographers, would have been concerned with planning how they were going to process their images. For the rest of us it was very simple. We had a 36 exposure film and once it was shot you sent to the lab for processing. A couple of days later you had (hopefully) 36 images back.
Skip forward a little over 15 years and now we have cards capable of holding in excess of 5,000 images and when you couple that with a spray & pray attitude to shooting then an average shoot could generate a lot of images.
In this blog post I am going to run through my workflow in the hope that it may be of some use to readers. By no means is this the perfect workflow and others may have different suggestions, all of which are quite valid. In reality workflow is about finding what process works best for you.
The flow below is from a typical model shoot for which I will shoot between 100 to 200 images, or for a wedding somewhere between 500 and 1000 images will be in the order. In the contracts that I sign I commit to give the other party completed images within 4 weeks, and I generally give them a high and low resolution version of the image. Usually I will also produce a sneak peak within 7 days of the shoot for posting in social media.
My workflow actually starts with the ethos that where possible I will try to get it right in camera. This means that once I get the model into position and even before I take the first image I looking for distractions or items that I may want to fix up later. While a lot of things are relatively simple to fix in the computer, the reality is that even a simple fix taking only 1 minute to fix in Photoshop adds up to a lot time if you have to apply it to 60 images. It is far better to spend 5 minutes at the shoot getting it right.
For a model shoot I will generally shoot everything onto one card but for a wedding I will use a separate card for each part of the service as well as using the second slot of my D600 to replicate the other card. This is just a safety procedure.
So after the shoot then this is the workflow:
I download all the images from camera to computer. If the shoot only involves a single card then this will be done via Lightroom (LR) import, however if it is a larger shoot (such as a wedding) I will use Bridge to load the images from the card, and then import into LR from the saved location. Generally I will create a new folder for the shoot and save all the RAW files into a subfolder. The LR import has a preset in it that adds all the copyright material. Also in order to keep my images better defined I have separate LR Catalogues for models, weddings and paid commercial work.
Once the import is done I ensure that a backup is taken of the drives.
I will then use the LR grid view and go through the images very quickly and look for any that have obvious errors with them. These get flagged as rejected and once the first review is complete are deleted from the machine. In the whole process these are the only images that are actually deleted from the machine.
I will then go through the images again and this time I will use the rating system. I will set the LR filter to display only those images without a rating set, so that I can jump around the shoot if I want. Images that I believe are suitable for editing receive a 3. Those that I am unsure of will receive a 2 and those that I do not wish to proceed with get a 1.
Once this process is complete I will then change the filter to only show those with a 3 and I will look at the set as a whole. If there are images that are very similar then I may downgrade some to a 2. If I feel that a particular look needs some additional photos then I will go back to the 2 selection and elevate one. For a model shoot this is generally quite a quick process however with a wedding it will take longer as I need to ensure that my total set captures the day and the people who attended.
Once I have selected my images for editing I will start the processing. Generally I will start with global setting such as exposure which if I adjust on one image I will then generally apply to all of the images from its set by synching the adjustments. After these global setting has been done then I will work on each using the other adjustment tools. I generally do not crop the images in LR because I prefer to do that in Photoshop (PS).
When the LR editing of an image is complete I will change it’s ranking to a 4. That way if I do not complete all the images in one session I can use the LR filters to show me where I am up to.
I will now export the images as full size jpg’s into a folder called “Finals” and in the process change the names and generally have “HR” at the start of it. This stands for High-Resolution and is the set of images intended to be printed. I will them open each document in PS and do any adjustments that I think are needed such as removing blemishes or objects I don’t want in the image. I will set the crop tool to 6in by 4in and then crop the images. I save them at Quality 12.
I now go back into LR and import in the High Resolution Images. I then select them all and Export them but this time I precede them with “LR” for Low Resolution. I will set the JPG quality to around 75% at 96dpi and I will set the physical size to be a maximum of 800 pixels on the longest length.
Once the files are complete I open these images in PS and run an action against them that adds a border and my watermark to the image. These are saved at quality 8.
In December last year I read an online article about a US photographer who discovered that an artist had painted some of his photographs and was selling them in a gallery. As the price being asked was $US4,000 we are not exactly talking about chicken feed. Now in this case there was no question that the painter had copied the photos because several of the images involved exact replicas of photos of people wearing bunny ears. (You can find the article here).
This was clearly wrong, but it does raise the question is copying always wrong and when does it cross the line from being referred to as inspiration.
I believe that Inspiration is where you take something as an idea and then develop it and try to put your style on it. Copying is where you reproduce an image whether in totality or a major part of it.
In my opinion “copying” is only okay if you are using it to practise ideas and techniques, as long as you do not then claim to have created the final image yourself.
In fact this concept is quite old. The masters of painting all practised as apprentices by copying the works of their masters and those that have gone before them. Pablo Picasso produced some amazing copies of old masters when he was in his teens that are a million miles away from the cubist style that he would become famous for. In fact Picasso said “good artists copy, great artists steal”.
This has been taken to mean that you take something that someone else has done and then build on it. The source of the inspiration does not need to be in the same field of art. When we visited the Melbourne Art Gallery I say a small porcelain statute.
If you have been at either camera club or around photographic circles for a while you will realise that most serious shooters tend to sneer a little at those who have their camera permanently in the Auto Mode. It becomes a huge sneer when they see a top of the line DSLR (that they can’t afford) stuck in Auto mode.
Now given that camera manufacturers have spent many years and countess millions on perfecting auto mode you may be wondering “What is wrong with Auto”.
Put simply nothing most of the time. By my very unscientific reckoning around 80% of the time it will probably generate an ok image and some of the time it will generate a stunning image. The odds are also that given pixels are free, you will shoot a lot of images and therefore the odds of getting good ones increase dramatically.
The issue is that when the camera is in auto, it is in charge and its computer is making assessment that while you will get a perfectly exposed image, that image will be useless to you. So how does this happen?
Firstly you need to understand that the camera has absolutely no ideas what you are aiming it at. Its sole purpose is to produce an image that is perfectly exposed based on a theoretical representation of how the number of shadows (blacks), highlights (whites) and mid tones are expressed in the final image. You will have
seen these if you have looked at the histogram on the back of your camera.
According to the theory a perfectly exposed image will contain some information in the shadows, some in the highlights but the majority in between. This is like the top image above. In theory the other two graphs show incorrect exposure because they contain either two much highlight or too much shadow.
Now to achieve this result the camera has three things that it can play with, namely aperture (f-stop), shutter speed and ISO. Aperture is the size of the iris opening in the lens. Shutter speed is the length of time that the shutter is open, and ISO determines the sensitivity of the sensor to light.
The major issue with letting the camera chose the shutter speed and aperture is that you have no idea what combination it is going to come up. Each full s-stop lets in either twice or half the amount of light of the ones either side of it. Shutter speeds also acts in the same way, in that each value tends to be either half or double the time of the one before or after it.
To achieve a perfect exposure the camera will let in a fixed amount of light, but this is not a single combination but rather an option of several as shown in the table below.
Assuming that a combination produces a perfect exposure then the yellow highlighted cells represent those that will expose the sensor to exactly the same amount of light. A setting of F2.8 at 1/1000s will actually give exactly the same exposure as F22 at 1/15s because as you half the light coming in via the aperture you are doubling the length of time the shutter is open.
Full F-Stops
F1.0
F1.4
F2.0
F2.8
F4.0
F5.6
F8
F11
F16
F22
Shutter Speed
1/1000
1/500
1/250
1/125
1/60
1/30
1/15
However an image at the F2.8 1/1000s will look completely different than that shot at F22 1/15s depending upon the subject. The former setting is much more suitable to capture a bird in flight but will have too little depth of field for a landscape, whereas the F22 1/15s will provide lots of details for the landscape but is unlikely to even show the bird as anything other than a blur.
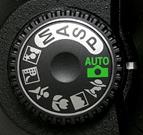
If you want to have more control over the image then it is best to shoot in either aperture priority or shutter priority mode. In these you set one value and the camera controls the others.
However if you are not comfortable with moving completely to choosing your own settings then there is an alternative. Use the scene modes that many cameras have and select the one that closely resembles what you are shooting. While this is still a full auto mode you are actually telling the camera what is likely to be more important. For example the sports mode tells it that the action is likely to be moving and therefore it should do its first set of adjustments to aperture and ISO before dropping shutter speed.
There is little doubt that Social Media is a valuable tool in any business marketing arsenal. Unfortunately the message that it is part of a suite of delivery methods seems to be lost on some people. I am amazed at the number of photographers who set themselves up in business using nothing more than a camera and a Facebook page and then wonder why they struggle to attract the clients they want. Maybe the answers lies in my comments below, which I will admit have very little scientific research behind them, but are my own opinions, and I may offend some people with them.
Not all your clients use it. I know that this will come as a shock to young people who seem to be glued to social media in all forms, but not everyone uses Facebook. In fact with scares over privacy there is quite a portion of the population who take delight in being the ones that don’t have an account. While you can look at a Facebook page without an account they don’t make easy for you.
Your clients may not be able to use it Now if you are shooting newborns and your market is new mums then this may not be an issue (because the odds are they will use the home computer). But if you are shooting weddings, portraits, models or commercial work then you may run into the issue that many businesses, having realised how much time is wasted on Facebook, have set up their systems to not allow people to view it from their work computers. And let’s face it lots of stuff that occurs outside of work hours is actually organised in it.
It looks cheap & nasty
I may be old fashion but I do equate quality with what I am expected to pay for something and when I see someone using something free yet expecting people to pay then I see an instant mismatch.To me it says that you are too cheap or lazy to bother designing something better or getting someone else to do it for you. It does not show me that you have any creative thoughts in anything other than the images taken. It says nothing about your style other than you like to get things for free.
You have no control over it
Let be clear about this. As you have not paid to be on Facebook the page is owned by them and they set the rules. If you breach one you can end up being banned or you can have your page completely taken down. Sometimes it is easy to break their rules, because you think that you are doing something that everyone else is doing (like asking for the most “likes” on an image).
The design of a Facebook page suits Facebook and not you. If you apply a rule to the newsfeed page the actual content is actually led than 50% of the width of the page. The timeline page is marginally better. The compression routines on images quite often cause distortions.In the two years that I have been on Facebook they have changed the look of the site at least 3 times as well as the way that items are fed to the page. In recent months Facebook changed the routine that determined what people saw in their newsfeeds and sites saw their reach drop to around 15% of what they were previously achieving.
Other people can wreck your efforts very quickly
Finally this is a really important one. When you have your own website you can pretty much control the fact that other people (apart from hackers) can have an influence on it. Facebook pages on the other hand are easily sabotaged. This can be done a number of ways.
Someone reporting the pages or an image and you getting banned or the image removed
People posting malicious comments on your posts
I know two photographers who had this happen to them in the last 12 months.
So should you abandon Facebook?
Absolutely not! Just use it for what it was designed for and that was posting quick status updates that keep your name out there but link it back to a website when you really want to show what you can do, who you are, and what you have achieved.
Earlier this year a lady on a Facebook forum posted an image and invited comments. I told her honestly that I did not like it as the highlights were seriously blown, there was no focal point in the image and that it did nothing for me. She took a little umbrage at this because for her the image was fine. The reason for this though had to do with the back story behind the image that I was not aware of. Because there was nothing in the image that grabbed my attention I had judged it essentially on the technical merits.
This was further brought into focus when I helped out with the Phil Jacobs Benefit. Donated to be auctioned where images by some well known New Zealand photographers and in fact one of the images came from a reasonable well known set. What struck me was that several images if entered into a competition today would likely be given a “not accepted” grade. So this got me thinking about what makes a good image and how should we view it.
I believe that when we shoot with our cameras we essentially have the choice to take snapshots, documentary images or create photographic images. When entering an image in a competition the last thing you want to hear the judge say is that it is a snapshot because generally it is a derogatory terms in such circles.
But what is the difference and why it is important. Basically I am going to define the terms as such.
This image was deemed to be a snapshot in a competiton entitled “In the Kitchen”
A snapshot is a photo that records a person, event or location that’s primary purpose it to capture a point in time. The main value is the image lies not in what is on the screen (or paper) but rather in the emotional connection that the viewer has with the background that the image represents. As the adage that a bad photo is better than no photo totally applies to snapshots, we will accept poorly composed, or lighted images.
A documentary image is also a photo that records a person, event or location however it is not intended to stand alone but rather it will be used along either text or other images to tell the story of the event. Sometimes these images are strong enough to stand alone but not always and again the same adage as above applies.
Same category of the competition but the judge liked this image
A photographic image is also a photo that records a person, event or location, however the image is strong enough to not rely on a knowledge of the background story. A photograph also has to be technically perfect to the level that the photographer was attempting.
So does this matter. Bruce Girdwood who is a very talented photographer and judge spoke to the Hutt Camera Club earlier in the year and he stated that you should make images based on what you like and not what another judge thinks because ultimately it is you that you are trying to please.


 This year I submitted and was successful in achieving the licentiate level within the PSNZ Honours system. This was the combination of a number of years working towards the goal, although inconsistently. In this post I am going to give a fairly honest account of what happened along the way in the hope that it will help other people going for their honours.
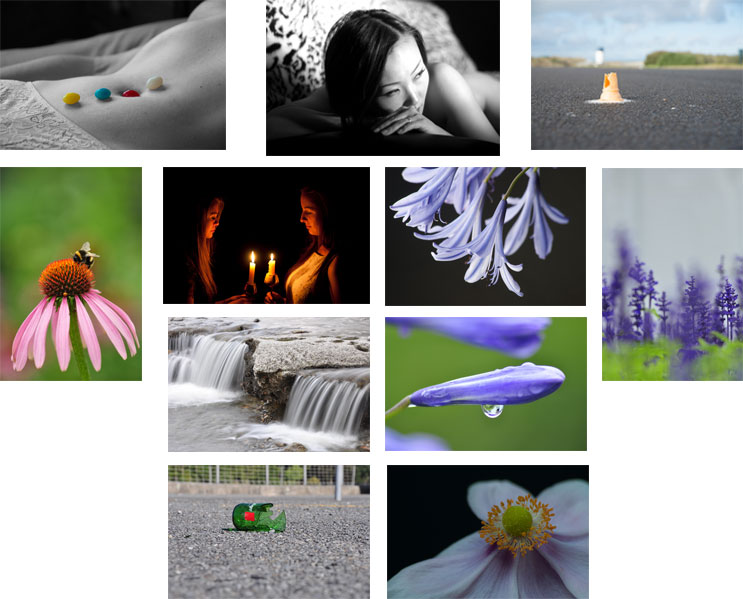


 The image has been in the set right from the start. However as Shona had also expressed a similar comment, the image was pulled. This is despite the fact that this image had won a merit at the Central Region 2 years before.
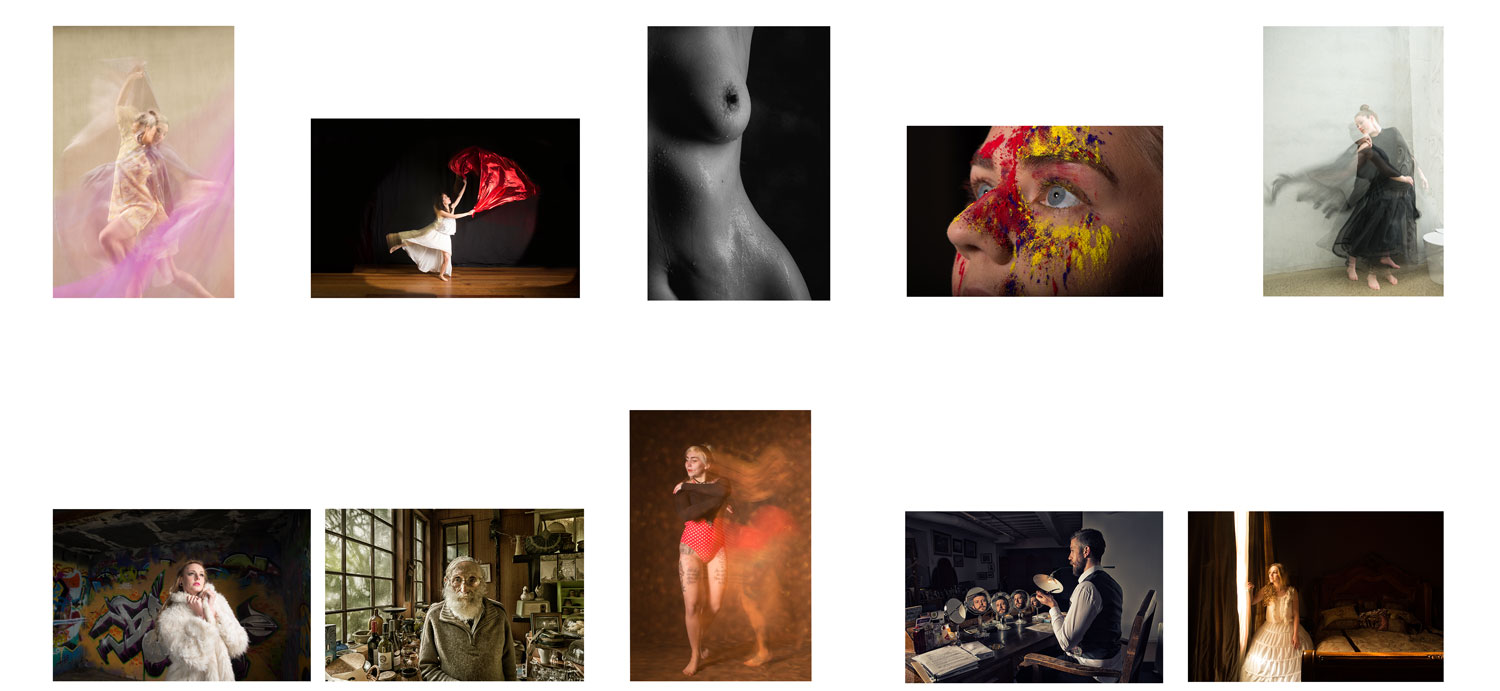


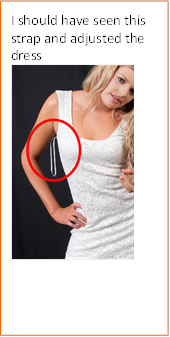 e a lot of things are relatively simple to fix in the computer, the reality is that even a simple fix taking only 1 minute to fix in Photoshop adds up to a lot time if you have to apply it to 60 images. It is far better to spend 5 minutes at the shoot getting it right.
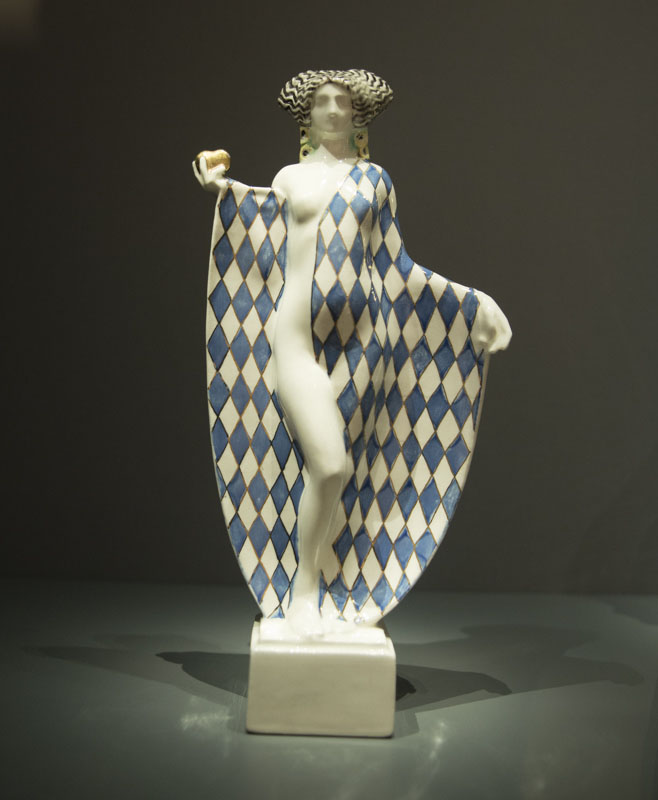

 If you have been at either camera club or around photographic circles for a while you will realise that most serious shooters tend to sneer a little at those who have their camera permanently in the Auto Mode. It becomes a huge sneer when they see a top of the line DSLR (that they can’t afford) stuck in Auto mode.


