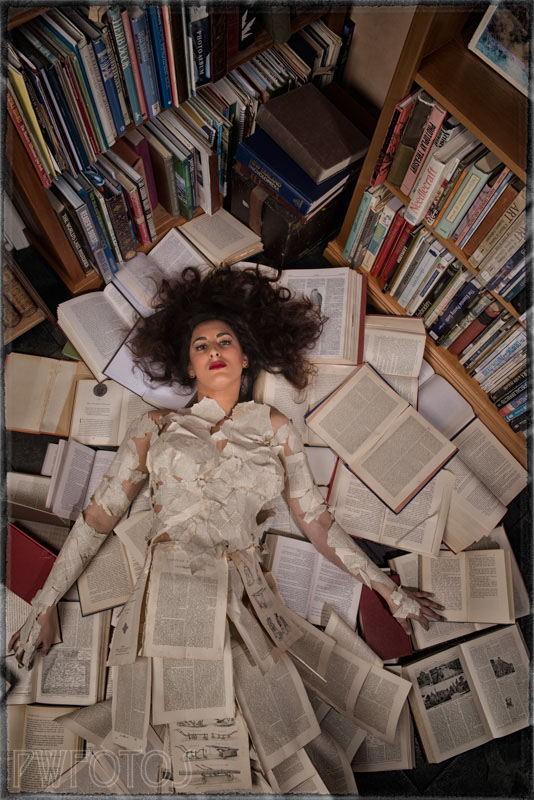
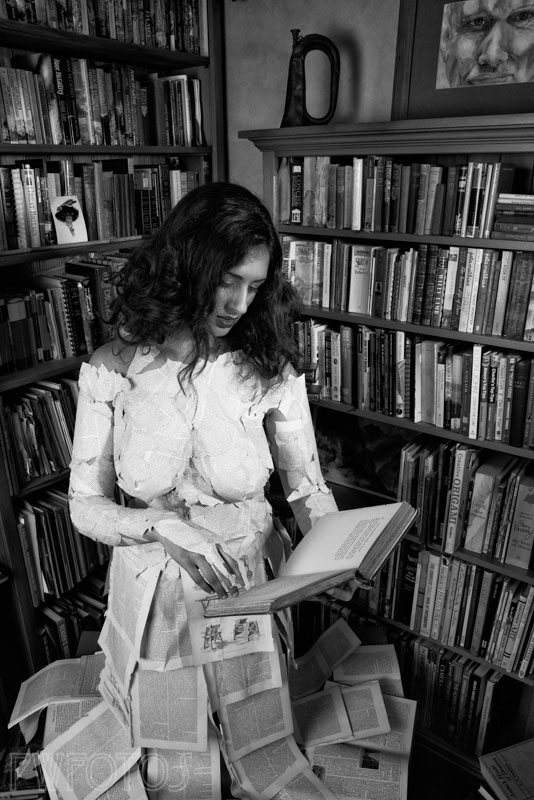
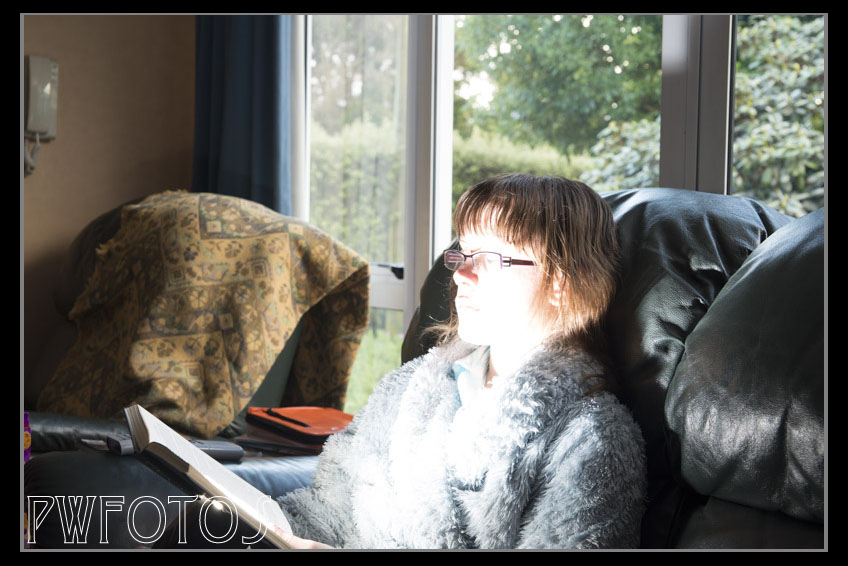
For some time now I have been mulling over a concept that involved a model and a lot of books. Fortunately each year Heretaunga Rotary Club hold an annual book fair and my wife and I help out. Through this process I was able to grab six boxes of books that were either too old or in too bad a condition to be sold, and therefore were destined for scrap.
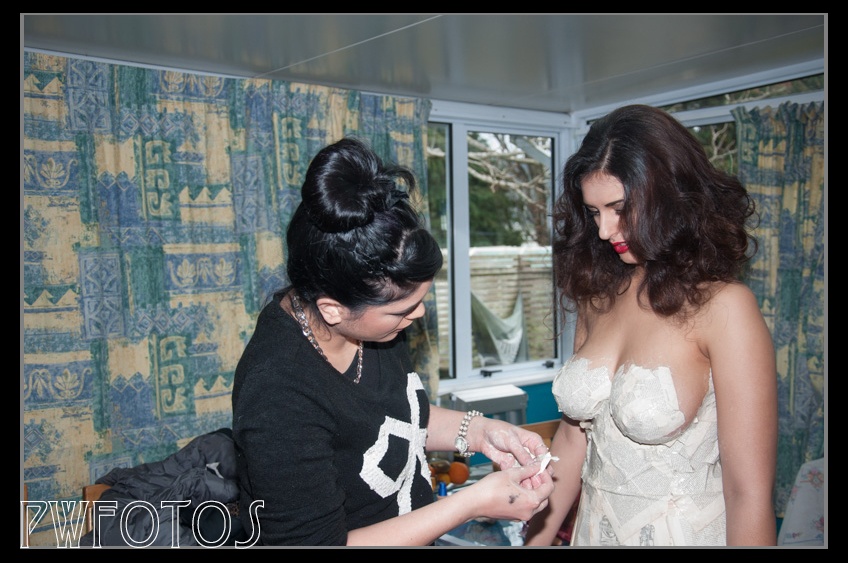
Tiffany starts the process of attaching the paper
The books sat in my garage for a couple of months while I tried to come up with the idea. Eventually the concept emerged of a person who was so engrossed in the books that she became part of them. I had seen an image of a girl covered in print and so I showed it to Tiffany Williams who is a very talented makeup artist. Once she agreed to come on board we set a date and I cast for a model. My call was answered immediately by Grace who I have worked with on a number of occasion as a makeup artist but this was to be the first time as a model.
The paper is almost complete
I had initially envisaged that we would cover her whole body in the print but then decided that only her upper body was needed in this way and that I would make a skirt to cover the lower half. I made a simple skirt out of calico and then glued pages from an encyclopaedia to it. In order to create the look of a library I moved a bookcase into our entranceway so that it could line up with another one that we already had there.
We made up a simple paste out of flour and warm water and Tiffany spent the best part of an hour gluing strips of paper to Grace. While she was doing this I built a throne out of the books and fashioned a crown.
The images came out pretty much how I had envisaged them. In photoshop I fixed up and extended the backgrounds to come up with a selection that I really liked. A couple of them will now be entered into upcoming photographic competitions.
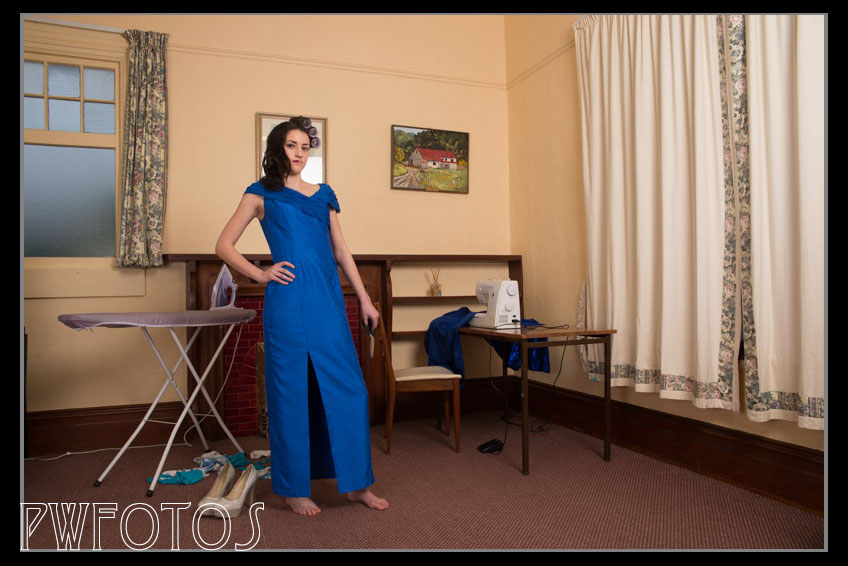
Some times the inspiration for a shoot seems to come from random events. A couple of months ago I saw a box of old patterns in a book sale and bought them. My wife had been talking about using them to cover other objects and I instantly thought that it would be quite cool to make a dress out of them. My daughter then dashed my plans by telling me that patterns generally only contains half of a side because you folded the fabric in half to produce the whole piece.
Knowing that it would be difficult to completely cover a model in a single pattern the concept emerged of a girl that had run so late for the ball that they were literally trying to sew the dress around her.
Posing with the Black & White lingerie set
Rather than post a casting call I approached a model (Suzie) and makeup artist (Crystal) who had both expressed interest in working with me. I had coffee with Crystal to go over the details of the shoot because I knew that hair & makeup would be quite unusual from what she had normally done for photoshoots. I knew that I would be compositing the body but I wanted the face to be from a single image. This meant that I wanted one side to be completely made up while the other was bare.
I sent a photo of Suzie and the dress to Crystal and left it up to her to come up with appropriate makeup. I did want to be slightly theatrical with the look in that I wanted large style rollers in the hair. Crystal informed me that such things are not really used anymore but what is used really didn’t work with the look anyway.
The studio I had booked for the day is in an old house so I knew that I wanted to use the room as is. I collected a number of props from home (some under strict instructions from my wife such as her dressmaking scissors were not to be used to cut the patterns) and staged it to look like a sewing room.
The final selected pose
Suzie had brought a number of sets of lingerie so that we could see what they looked like under the patterns, which were attached to her with double sided tape. We selected one red and a black/white combination to try out. We started with the red set.
I had decided that the way we were going to shoot it was to do the patterns first and then the dress. I was shooting tethered into lightroom which meant that we could see a larger sized image than on the back of the camera.
Suzie took up different poses and once we had them I went through and selected which one I liked the best. Suzie then got changed into the other lingerie set and we shot a few images based around the poses we liked the best from the first series.
Wearing the dress
After looking at both sets it was apparent that the red lingerie set produced a much stronger look.
Suzie then put on the dress and we concentrated on getting as close to the chosen pose as possible. Lightroom made this a lot easier as we were able to compare the two images side by side. With the help of Crystal checking the images it did not take long before we had what I thought was a reasonably good match.
Once I had the images loaded on the home computer it was a simple matter of bringing them both into a single file and masking out. I increased the saturation in the lipstick and painted Suzie’s finger nails.
It was quite a fun shoot where pretty much everything went to plan. Thanks to Crystal and Suzie for their assistance in bringing this together.
The original inspiration for the shoot by Alessandra Favetto.
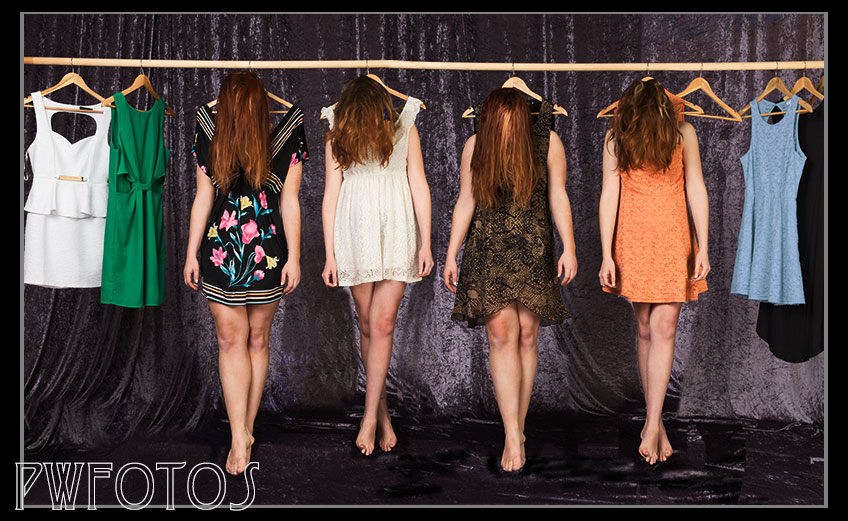
Last Sunday I has a full day in a Lower Hutt studio to produce images that will be entered into national competitions. The first was inspired by an image I saw in the July issue of F11 magazine by Italian photographer Alessandra Favetto.
I has long held the view that models are often treated as mere clothes hangers, and so I knew that I could use the image as a base. However I wanted to have more than one person in the final image and to have the models hanging from a rack of some sort.
I posted the image in a modeling Facebook group and as I suspected got an immediate response. While I had initially thought that I would cast three models I ended up selecting five. Past experience from shoots had taught me that it was unlikely all five would make it to actual shoot day.
I also knew that the shot could be something that required assistance so I managed to elicit the help of fellow photographer Alan Raga.
As I suspected would happen, in the week leading up to the shoot one model discovered that the timing clashed with a family event and a second one sprained her wrist and ended up in plaster. A third model then failed to respond to any of the communications sent out in advance of the event, and simply didn’t show up on the day. This was exactly the issue that I had spoken about in my recent blog post on “Tips for models“.
The initial shot
In the end Summer & Renee turned up right on time. I had asked the models to bring a number of outfits so that we had a good variety. Renee brought a small suitcase while Summer only brought two (both of which were very similar). We selected initial outfits and the girls got changed. I had to ask Summer to go and change her bra because she had a purple one on under a white top.
In terms of preparation this was going to be a very easy shoot because no hair or makeup was required. I knew that it would require several images to be taken though and then composited together. Past experience in this area has taught me that when you plan to do this having the lighting, camera position and focal length consistent between all shots make it so much easier in post.
The staging for the shoot was very simple with a large fabric backdrop that extended onto the floor and covering a small platform for the girls to stand. The hangers were suspended on another backdrop support. Once the girls were in position we raised the support up to create the illusion that they were hanging from it.
The illusion of being suspended
The main light was a large octobox set just left of the camera and high. The fill light was set camera right and down low. I was shooting tethered into a laptop with the camera mounted on a tripod.
Once we had the shots of the girls on the hangers we removed the platform and positioned two high backed chairs in a similar position to where each model has been standing. The girls then raised themselves up and I took the photo.
I had originally envisaged three models on the rack but decided that there was room to shoot four so both Renee & Summer got changed and we repeated the process again.
Putting the images together was relatively simple process as the hem of the skirts provided a good point to merge the images. The hardest part was blending the backdrop and in future I will chose a material that is much more consistent in colour.
As often happens when you look at the images in post you realise that there was something that could have been done better during the shoot. In this case it was the realisation that the dress chosen for Summer in the second shot (orange) was actually hanging next to her in the first series. Fortunately colour is easily changed in photoshop.
The competition it is being entered into closes on August 13 so I still have a little time to tweek it further before then.
It was a very smooth shoot and it only took 40 minutes to get all the images we needed. Thanks to Renee, Summer and Alan for making it an enjoyable event.
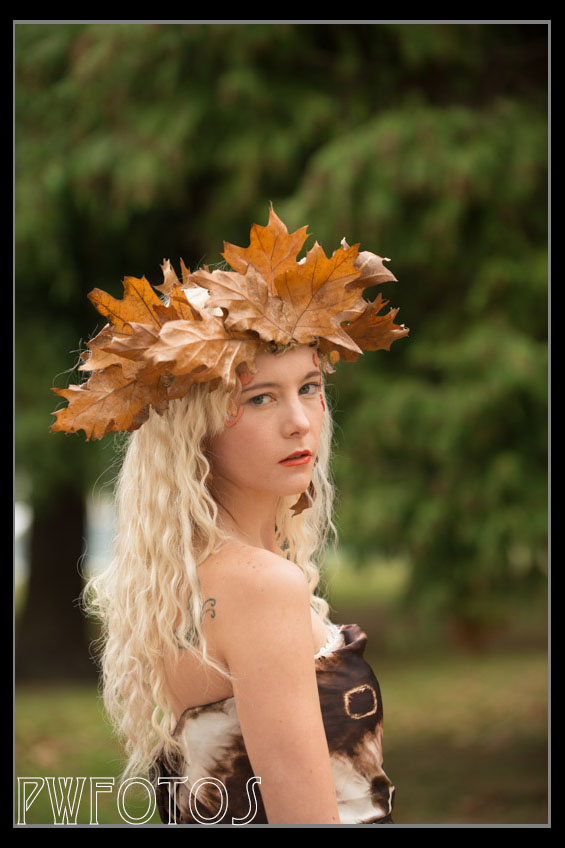
I have for some time wanted to do a a shoot that incorporated autumn colours and fallen leaves. Over Easter Saturday I managed to set up such a shoot with Kat Kellock as the model and Grace Krishnan once again providing hair and makeup.
There were several locations that I considered as I wanted somewhere that had an avenue of trees, not too much in the background and with trees that would preferably have leaves of different colours. From several possibilities I chose an area in Maidstone Park Upper Hutt which I scoped out on Friday morning, as well collecting a selection of dried leaves from which I intended to make a headdress. As i was able to find the twine I wanted I entered up platting together several lengths of rough string until I got the look that I was after.
The completed headdress
I knew that we could be running into an issue as the weather in the week before had been dreadful and the forecast for the weekend wasn’t great either.
Fortunately the Saturday stayed dry, although the ground and the leaves were wet. This was a shoot where I had decided the whole costume and it is quite amazing what can be achieved with a couple lens of fabric. We had a few issues with makeup but eventually we got to the park. As we were outside I chose to use my 70-200mm mounted on the tripod. This meant that I was able to get images that let let Kat pop out from the background.
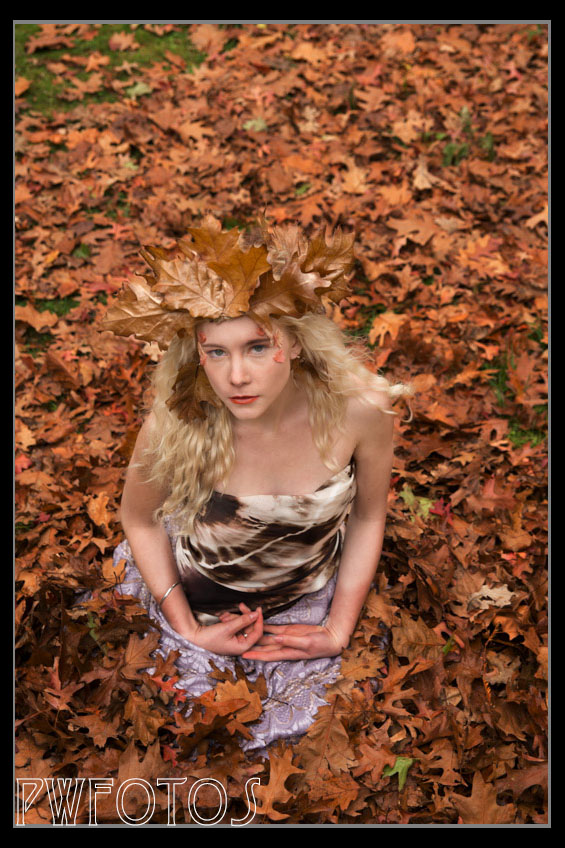
I had wanted to get a shot of leaves raining down which ended up being a lot harder than imagined many due to the fact that the leaves stuck together so rather than falling individually they came down in groups. Grace and my daughter helped with the process as shown in this pullback scene.
With a little manipulation in Photoshop we need up with the final image.
The final composite
I then had Kat get on the ground and I shot from higher us. We actually put a tarpaulin on the ground and then covered it with leaves.
Everyone seemed to enjoy the day and the shots turned out great.
Regular readers of this blog will know that through this year I have been shooting images for a competition based on recreating Fairy stories and legends. While I already had done one image from the tales of King Arthur, I still wanted to do one around the character of the lady of the lake.
Megan agreed to help out to produce the image below
While it looks a very simple image, the actual execution was somewhat difficult. As it was still winter we decided to shoot inside in my bathroom. This is not a very large room and in fact the bath itself is not full size so getting Megan under the water proved an interesting challenge (as she is quite tall).
Lighting was also a challenge. My main light was a beauty dish boomed out over the water. Despite the fact that I had a polarising filter on in the first shot this was still producing too distinct a reflection. The answer was to turn the light over and bounce it off the ceiling.
The blue in the image was achieved by lining the white bath with a blue tarpaulin.
Earlier this year I attended the ImageNation conference and got to see the work of Alexia Sinclair, an Australian fine art photographer. What really impressed me was the level of staging that she did in her images. While she did use photoshop to finish the image, she went to great lengths to actually complete most of the shot “in camera”. I asked why she went to the effort rather than simply compositing the whole image. Her simple answer was that it looked better that way.
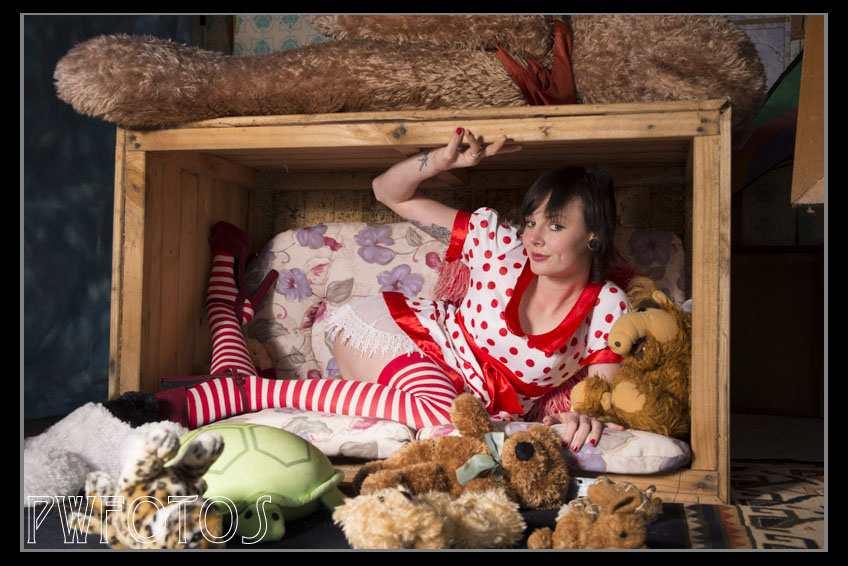
Now I do not consider myself a lazy photographer but I have not tended to go to into a great deals with my sets or costumes. Rather I have tried to find a location instead. So I thought that it would be fun to actually stage a themed shoot and Megan agreed to be my doll on the same day that we shot the crane image mentioned in the last series of blog posts.
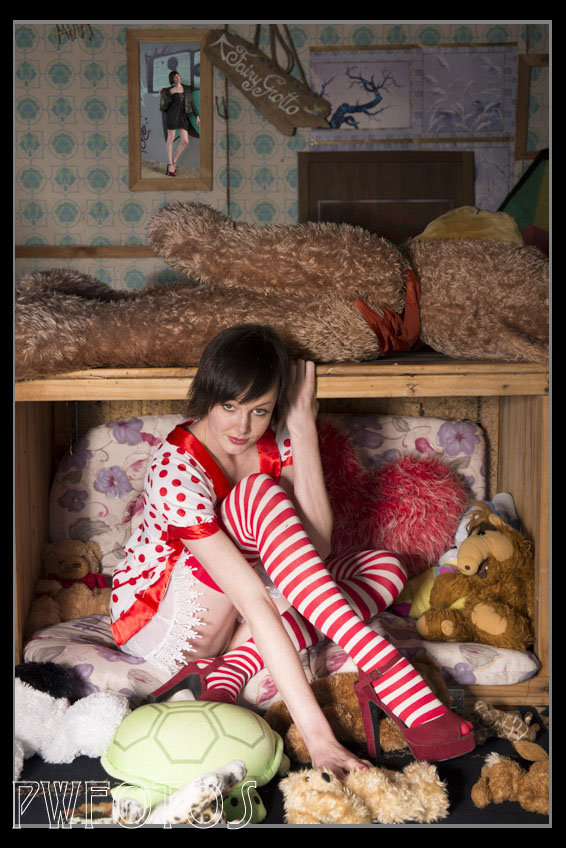
I hired a costume from Anything Goes Costume Hire in Upper Hutt and spent the best part of two hours converting our garage into the set. The hardest part was actually moving the box into location as it was quite heavy. My daughter (who just turned 17) had kept most of her stuffed toys so they were brought out of storage along with bringing back a very large Teddy that we had donated to the kids room at our church. As I knew that little details would be important in the image I took several shots from the planned locations before Megan arrived and checked them for things in the background that would cause distractions. These were removed.
Lighting for the event was mainly natural as the garage faced towards the afternoon sun, but it was also supplemented with a main light with a beauty dish that was boomed down low so that it would reach into the box.
Part way through the shoot we turned the box upwards and Megan and a large assortment of toys were stuffed in. For these shots the main light was moved to point down into the box.
I was quite pleased with the results. Apart from the last image in the sequence below, most are pretty much straight out of camera and only needed minor tweaking to levels in Lightroom.
Over the last three posts I have been outlining the steps that I went through to put together a composite image based around the story of paper cranes. Having shot the cranes as outlined in the last post I was ready to out the image together.
When I had laid out the test composite I had started with the front image and worked backwards. This was a serious mistake as it meant that I was having to mask out very large areas of the image. I was also discovering that the tree I had shot against was not actually working in the image.
The answer was simple. Start with my background image first and move forwards, and in fact forget about the tree.
The first two layers of Megan and the background went together relatively easily although something was nagging me about the lighting as it seemed to not be consistent. But I couldn’t out my finger on the issue because as far as I was concerned I had been very careful in what I shot. Then when I was re-reading my earlier blog post I realised what the issue was. I had chosen a tree that was taken with the sun immediately behind me when in fact the correct location for the other images was with the sun to the left of the image. Once I swapped out the image the level of lighting in the two images matched up much better.
Megan had actually changed positions slightly with the two books but I was able to pick up her face from the lit shot and mask it over the original one. I then used a “clouds” filter to put in an effect for the cranes coming out of the book.
The cranes were brought in one at a time and their background was masked. To get a great variety of colours a number had a hue/saturation adjustment applied before being copied in.
Finally it was a simple matter of rearranging them to in the final image as shown below. There is a still a couple of weeks to go before it has to be entered into the competition so I may still do some more tweaks to it.
This is the third instalment in the process behind a composite image. The first part “Getting set up” can be found here and the second instalment “Shooting the background” is found here. The actual shoot took place on August 25th but other commitments have not allowed an earlier post.
The shoot involved Megan as my willing model and also my daughter Samantha acting as assistant (and behind the scenes photographer). Despite the fact that this was to be a composite image I was actually trying to achieve as much as possible in camera. There were basically three shots to be done on the day namely.
Model reading a normal book
Model reading the book with the flash gun (as detailed in the first post of the series)
Model and paper cranes.
Because I was not sure what would be the best angle to shoot from we were going to recreate the shots twice. I had factored this into the shots I had taken earlier with backgrounds.
As I knew that I was not going to be using the actual background I set up a large blue tarpaulin to act as a blue screen for me. This was to make the process of cutting the subject out easier but it does rely on having a reasonable consistent colour. Because the area was actually in shade I knew that this was not going to be the case so I place one of my lights to light this background. It was angled so that it would not spill light onto my model.
My main light was used a beauty dish over which I had placed a yellow gell to give me a warmer light. I placed this light directly in line with the sun so that the images had the same lighting location as the backgrounds I had shot previously. For the second shot I had hoped to trigger both the main lights and the speedlight at the same time but unfortunately one of my triggers refused to work so they had to be fired separately.
For all these shots the camera was set on a tripod which was set at exactly the same height as the park backgrounds had been shot at. This would ensure that all the angles would be consistent.
Fortunately this was the only technical issue that we ran into on the day. The biggest challenge that we had to face came with shot three. The paper cranes had been strung together on a single wire and though we tried several approaches to attach them to the book and various light stands they proved difficult to handle, and the results were not exactly what I was looking for, but there was the hope that it would work in post.
Later that night I downloaded the images, chose what I considered to be the best and started to prepare a rough composition. I think that this was a bad move because I was too tired and so I made mistakes that meant that two days later I essentially started again. What was confirmed though was that the head on angle was the best for the images, that the tree in my garden was not working and that I would use all of the backgrounds trees, and that the cranes had not photographed well at all.
The conclusion was that the process needed more image and that I needed to shoot individual paper cranes and composite them.
So yesterday I set up to shoot the cranes. I used two background supports and balanced a length of wood on it from which I which I could hang a crane. Again the main light was a beauty dish positioned in roughly the same direction as the week before. This time I used a piece of red card as the background which was light with a second light with a bounce umbrella. The camera was set on tripod at roundly the same height as the weekend. I allowed the crane to rotate on their strings and also swung them a little. That way I would get different angles to use with the same lighting.
Finally I felt that I have all the elements for the final image to be built.
This is the second post that is going behind a composite image that I will be shooting next weekend. The first part can be found in this post. Due to the earthquake that Wellington had on Friday I had an unexpected day of work so it provided me with the perfect opportunity to sort out the background for my image.
No ideally the whole image would be shot on location but as I will be using gelled strobes as the main light, and I don’t have a portable power pack, I am somewhat limited to a location within reach of an extension lead and power socket.
I have decided that a tree at the bottom of our garden would be a base but as you can see the background is not that attractive.
We do live close to a park and so that enabled me to locate a suitable background. In order to try to replicate the light conditions I went out at the exactly the same time as the shoot will be.
Now the key to a good composite is consistency so I put a 50mm on the camera and found the distance from the tree that I thought would best frame the subject. I did this from two locations as I am not sure at this whether a head one or a side image is going to give me the best result.
I noted that when I was head on to the tree that the Sun was directly overly my left shoulder and when I was lined up for the side view it was directly behind me. This will be useful for Sunday should the day prove to be cloudy, as it will give a direction to place the main light.
Once I got to park I tried to locate a suitable tree that would be the base of the background and then angled myself to it based on the Sun. The first two were not ideal as there were distracting items in the background.
I eventually settled on a suitable tree, and measured out the desired distance and set the camera on the tripod. I was using the tripod because this meant that the angles that I would be shooting would be consistent.
The test shot revealed a problem with a road behind, in that cars were appearing in the shot. I therefore had to make sure that I could see gaps in the traffic before clicking the shutter.
When I am shooting with lights I tend to shoot around F9 but as I am not sure what setting I will be using on Sunday I set the camera in Aperture priority and I took a range of shots at different f-stops from 5.6 to 9. I also rotated the camera and took a similar range in portrait mode. This means that I can match the focal lengths between the ones shot with the model and my replacement backgrounds.
With the sun directly behind me. The tree is this image is actually brighter than the real location but this is not so much of an issue as it is the background I am really interested in.The tree with the sun over my left shoulder. The light on this shot is very similar to the real location.
Next weekend I am going to be shooting the final images for a competition in October and while I will show you the final result once it was finished, I thought I would also share some of the pre-shoot preparation.
In my final image elements will be flying out of a book and I wanted a burst of light to accompany them. This will be done using a speedlight to provide that part of the light and Cokin filters to colour it. My daughter was roped in to be my model for the day.
I found a couple of old books that no one wanted as I was going to destroy one in the process. In order to create a gap through the whole book the easiest approach was to clamp the book shut and use my jigsaw to cut a section out.Gaffa tape was then used to secure the speedlight to the book.I knew that full power would be way too strong at the range so the speedlight was set on 1/32 power and a test show was taken. The result was an overblown image so it was obvious that I needed to dial it down further.The power of the light was reduced to 1/64 and while this time the light output was still hot but we were getting there. I knew that adding the filter would have the effect of reducing the light.A Cokin Blue filter was placed over the hole on the inside of the book. This tinted the light but was still not exactly what I was looking for.I added a Cokin Red filter knowing that the combination should produce a purple light which is exactly what it did.
The final results are still a little hot but I was not worried about that. I now have a good starting point to tweak them on the day of the shoot. Plus these shots were taken inside on a dull day, when the actual shoot will be outside so the natural light will have a greater influence as well.