Tag Archives: photography

Shoot with Zaniah

One of the things I am vert mindful of is that the model in a TFP (time for print) arrangement does need to get something out of the shoot. This is particularly so when they helping you out with personal projects where the images may end being quite different from the usual style.

With the Zodiac series I knew that the images were being heavily post processed, to keep the consistency of the set, but that was going to mean that the images with not necessarily be those the model would want for say a model portfolio. Therefore I make sure that we set time aside at each station to shoot images specifically for the model model.

After shooting the Libra images Zaniah got changed into her own outfits and using the same lighting and background I shot her with two different outfits.

Late last year I have found a sequinned mini dress in a thrift store in Melbourne and I thought it would be great to incorporate that into the shoot. Zaniah was game even though the dress was a little small for her and we had a bit of fun shooting it. We also incorporated some old suitcases as props

We were so keen to shoot that we have actually taken quite a few images before we realised that the tag from the shop was still on the dress and quite visible in a number of shots. A simple facts in Photoshop but it was a good reminder that it does pay too carefully look before taking photos.

Afterwards I had of a bit of play with the with one of the images and composited into a road scene but I’m not sure if it really worked out nonetheless it was a fun try.

Zodiac series – LibrA

When I posted the call for the Libra in the Zodiac series I literally had quite a few models say that it was their sign. So many in fact that my original concept was to do a shoot with three models rather than the usual one or two.

Libra is normally depicted with a set of measuring scales so in my original concept I was going to have one model holding the scales and the other two lying in the weighing cups. Unfortunately that concept did not advance mainly because I couldn’t find any scales (at the price I was willing to pay from them).

In the end I decided that I would make some and I found a suitable bowl in a thrift store and bought a small length of chain and some split pins. I thought it would be a simple matter of putting it together. I had not factored that in the bowl with stainless steel and that it was incredibly difficult to drill through. While I did succeed my drill bit got so hot that the piece of timber I had under the bowl caught fire when it went through.

Unfortunately I was only able to buy one bowl so therefore it became obvious that I was going to only use one model and I would have to composite the final image together. At the time that the shoot was to happen Zaniah agreed to be my model.

The major advantage of being able to shoot in the studio is that you don’t have to break down each time. Therefore it lets you try things out ahead of time.

I used my manikin to test lighting and I also tried out different backgrounds to see how they would look in the final image. It was necessary to actually take these images all the way through into Photoshop and Nik software to see the full impact. In the end, all of the pattern backgrounds ended up to dominant so I settled for a white seamless backdrop.

Lighting for the shoot involved three lights. My two 400 watt Elinchrom strobes were positioned in line with Zaniah but feathered to only light the background. The main light was my Godox AD600 at a very low setting which was sitting to camera right, with no modifier on it. This is because I wanted very clear shadows on the backdrop.

It was then a matter of positioning Zaniah, putting the scale in one hand, taking the photo and then doing the same with the scale in her other hand.

Sometime before I had borrowed a skull and when I saw it sitting in the office I thought it would add a life and death element to the shoot so I balanced it with a small fern.

With consistent lighting and Zaniah holding a fairly static pose, it was easy to compose it the two images together and I was really pleased with the end result.

As often happens when you stop looking for something you end up finding them and a couple weeks after the shoot I actually found the scales that I had planned to use.

Zodiac series – first Scorpio shoot

Although the Zodiac set was being done as a personal project there was another goal in mind. That was to submit the finished set for the associate honours with in the Photographic Society of New Zealand. For a print set there was a requirement that the set must hang together.

Although most people think of the year starting starting in January, the Zodiac signs have Aries as the first sign. When you map the signs into their elements you end up with the following structure

AriesTaurusGeminiCancer
LeoVirgoLibraScorpio
SagittariusCapricornAquariusPisces

To maintain consistency in the seat I had decided that all of the images on the second row would have heavy shadows, and like my Leo image it would be the shadow that showed the nature of the sign.

I initially thought that I would make the tail out of cardboard because all I really needed was a shadow. And then decided though that I wanted to have some substance to it because I was not sure which angle I would be shooting it at. Therefore I drew a pattern and made a a scorpion tail using some old material. I did make one mistake and I pinned the material the wrong way around and when I pulled it together realised that the pattern was on the outside. I used some wire to create a frame to support the tail and then connected it to a lightstand.

It was in a matter of trying to determine what sort of light was needed to create a sharp shadow. As was to be expected a bare bulb or a small bowl reflector produced very sharp edges on the shadow.

I then worked on what was the best position of the light that would enable me to create a clean cut out of just the shadow. This did require me to move the stand further away from the backdrop, which did result in a less defined shadow.

For my initial shoot Kimberley had indicated that Scorpio was her sign. Unfortunately arranging a time to shoot proved to be difficult and we tried to do it when we were both attending the post Covid catch up.

The problem with this was that she had already agreed to do another shoot with a different photographer, so the amount of time that we had to play with the settings was limited. Furthermore while the studio has a full set of lights week none of the triggers to work on my camera. So therefore I was limited to the one light I has taken in.

In the end I got a useable image from it but merging the two images together proved to be difficult as there was a lot of variation in the quality of light between the two. I therefore decided to shoot it again when I had more time. That will be the subject of another post.

Zodiac series – Pisces (NSFW)

When I posted the call for the Zodiac series one of the models who answered for Pisces was Kristara. That reminded me that I had already shot her in an image that pretty much fitted the brief. The only thing that I needed to add to it was a couple of fishes to make the usual Pisces symbol.

Fortunately we have a fishpond right outside the house and so I thought it would be easier just to photograph the fish as they came up to the surface. I needed to use a polarising filter on the camera to cut down on some of the water clear but I thought that I had managed to get a usable image despite the fact that the pond was quite dark

I discovered how much of an issue the dark pond would be when I tried to incorporate the fish into the image. There was no way of separating them from the background easily without the image looking fake.

So I decided that I needed to get them on a lighter background. This meant catching the fish and putting into a plastic container.

The only problem with the approach was that the net would pick up a lot of materials floating in the water at the same time.

I had wanted to use two fish but in the end used the same image twice to create the pattern. In Photoshop I placed the fish in an area where there was nothing else, but also copied the background around this area. This was then placed in a layer above the fish and the opacity decreased to let them come through. The benefit of doing this was that the light reflecting on the water was consistent.

I was really pleased with how the image came out.

Zodiac series – Saggitarius

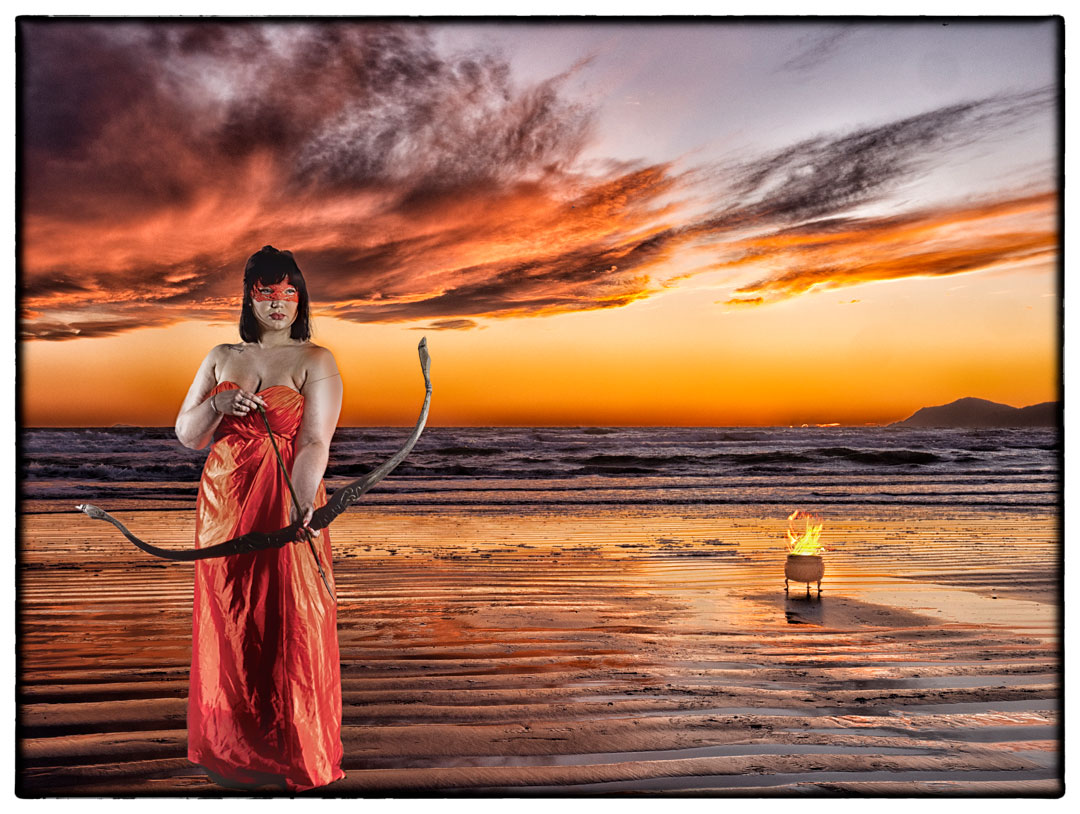
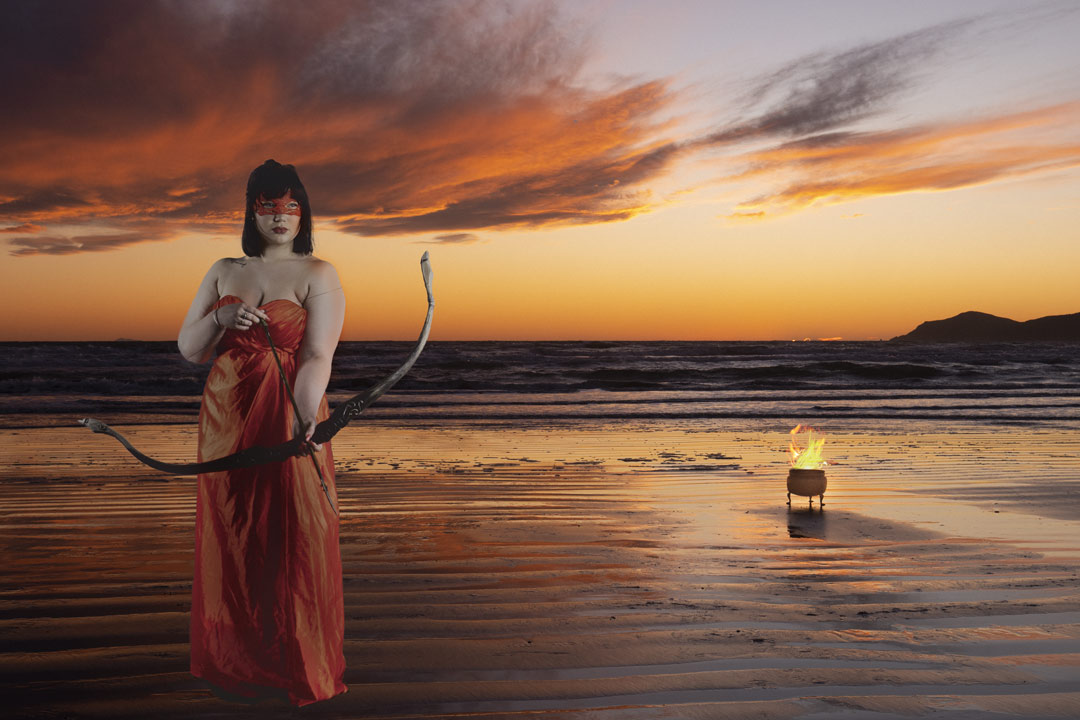
Of all of the shoots in my Zodiac series Sagittarius was the one that I had the clearest idea of what I wanted to shoot right from the start. Sagittarius is known as the archer but it is also a fire symbol. Therefore the colour red was going to play a strong part in the image and I wanted to extend it not only to the subject but to the background. I actually discuss this with model Brie two years before the actual shit took place.

In an ideal world I would’ve been able to arrange the model and the location at the same time, and create the image in camera. However, in this case we were dealing with trying to find an ideal sunset, with right tide time as well as the models availability. The location was fairly easy to choose as there are glorious sunsets on the Kapiti coast however this is 40 km from my home in Upper Hutt and a similar distance to the models home in Wellington. Therefore I decided that the easiest way to do this was to shoot the model in the studio and composite the background in.

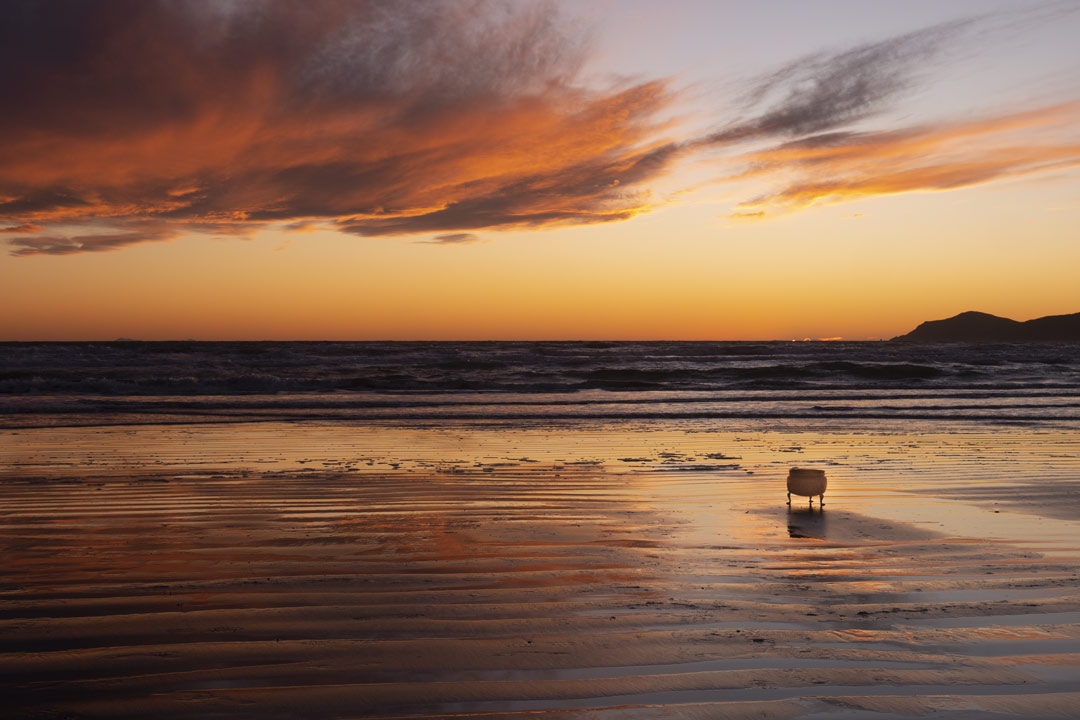
A member of my camera club lives on the coast, so on a Sunday afternoon, when I suspected that the conditions would be right I got them to check. She confirmed that the skies were clear with a slight amount of cloud therefore we headed over to the beach.

The key to getting the composite right was to ensure that the camera was in the same position for both shots. On the beach I place the urn in the line that I wanted Bree to be in, using the grid in my viewfinder. I then recorded how many paces where to the camera. I also took note of how high the camera way.

Over the course of 30 minutes I took a whole string of images as the light changed. Once I got home I took them into Lightroom, chose the one I wanted and then tweaked it to the look I was going for.

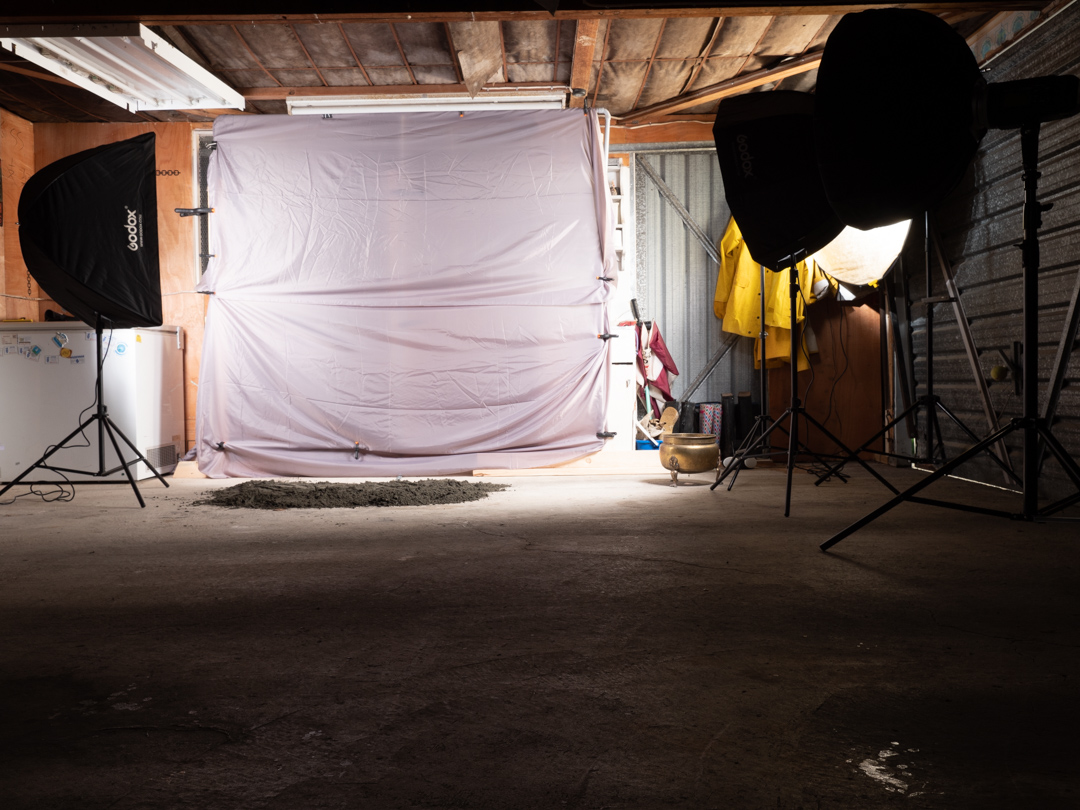
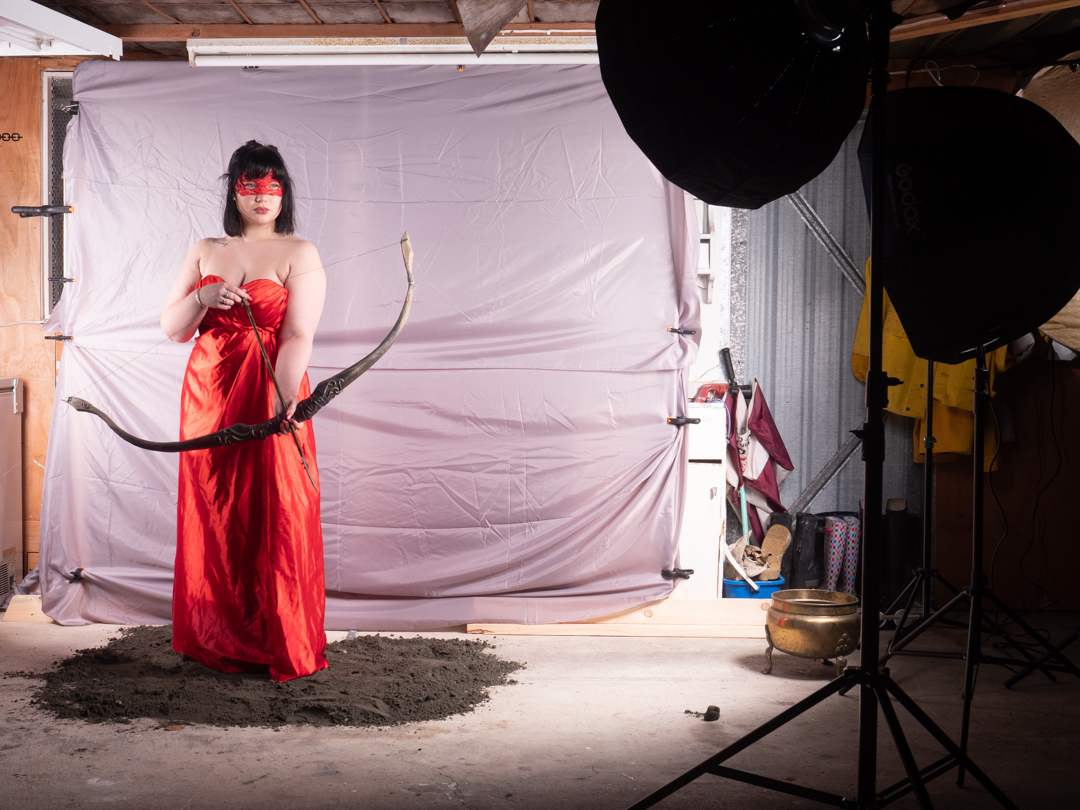
Having got the background it was now time to bring in Brie. I had rented a bow from a film prop company and brought out the red ball dress. I had to set up in the garage to give me enough room to replicate the beach.

The lighting looks a little complicated but it is not really. I had my two Elinchroms positioned on either side of the backdrop aimed at it and feathered so that there would be not light spin on the model. The main light was my AD600 in a 85cm softbox positioned camera right.

Finally to mimic the warm tones coming from the sun I had a gold reflector angled towards Brie which was being lit with a speedlight inside a gridded 7inch round reflector.

I had the camera set to the same settings as at the beach, which inside eliminated all light, then I metered each light individually

I didn’t had Brie step into the shot, we moved in the final lights and tested what it look like. Once I was happy with the settings we started shooting.

One of the trickiest elements to blend in a composite is the ground, so to make it slightly easier I had gone to a local beach and grabbed a whole lot of sand. I then wet this and spread it out on the floor under Brie’s feet. That way she was already grounded and it would be much easier to blend into the final scene.

I wanted to ensure that we had several options so I zoomed the camera in to make Brie larger in the frame. In the image you can see the position of the pot that was used to line up her with the background.

In Photoshop, I removed Brie from her background and placed her in the scene. Then there was several adjustment layers to match her both in terms of brightness and colour.

I then added some shots of fire from my collection to make it appear that the pot was burning. Finally I used Nik software to get the final image.

It is really great when an image that envisaged over two years before finally comes to life.

Zodiac series – Virgo

My next shoot in the Zodiac series was for Virgo which the star sign that I share with my daughter. She often complains that I never include her in shoots so this was a perfect opportunity.

I wanted this to be a complete image so I spent some time building a set in the studio. I even made a bracket that let me hang a light from the back wall. The irony of this is that very little of the set ended up being seen in the final square cropped image.

The lighting for a set came from my 7 foot umbrella positioned behind me to fill up the set. I positioned a number of gelled lume cubes behind props to make them look like they were generating the light. The main light was my Godox AD600 in a 85cm softbox which was actually positioned outside the window essentially creating a Rembrandt light.

Samantha’s outfit was made from an old wedding dress that I had taken apart. The bodice was still in one piece but the shirt consisted of a long length of fabric pinned at the back.

As Samantha ended up being faced away from the main light, I added a speed light in gridded 7 inch reflector aimed at Samantha to provide some additional lighting.

I had borrowed a vintage typewriter to add as a prop and so I wanted to incorporate that. It was looking very dark so I ended up pointing a lube cube on a low power at it.

If you are wondering about why the various images have a different color toning this is quite deliberate. I had planned to make it look like a night screen so the camera was set to tungsten white balance and the key lights were gelled with a full CTO gell. While I liked this in some requests I did end up playing with the colour balance in Lightroom and warmed some of the images up.

Foil shoots with Sian

This is the final post about the shoot with Sian and a bag full of foil. sorry that you have had wait some time for it, but life and Covid got in the way. You can read the setup to the shoot in this part.

After shooting the Cancer images I had Sian stand up and drop the tape over her. There was plenty of this to go around and if was quite easy to cover her.  

While this had been easy using the cassette tape, this foil proved more cumbersome to manipulate as the length of it were longer. A pair of scissors was needed to essentially cut the end of the foil from that lying on the ground. 

For the final shot I had Sian lying on the top of the foil and I can reposition the camera out on a boom arm to shoot straight down using the Lumix app on my iPad. I have use this app number of times and it is great as you don’t longer need to be behind the camera.

I repositioned the lights as Sian was now in a completely different location to before and I brought in some additional colour gels using my Lime cubes. I had learned from an earlier shot that the cubes got very hot and that you could not put the gel directly against the light so I made a holder out of a gel holder and a the head of a selfie stick which worked well.

The final image was exactly what I wanted and I was pleased with the results. My wife was also pleased with the shoot because the next day I bagged up all the foil and gave it away to another photographer that I know so it is no longer taking up space in our garage.

Zodiac series – Cancer

My previous post went into the setting up of the foil shoot so in this one I will only concentrate on the image itself. For the shoot I had decided that I want to incorporate an actual crab. Buying one was out of the question cost wise, however my wife mentioned that she thought her Aunt had a brass one. Turns out she was right and we picked up a very ornate brass crab that actually was a long unused ash tray.

For the set I needed to have several shot options available. While I had envisaged that it would be a landscape oriented image, I also shot several images portrait oriented with Sian both standing and kneeling. For these we didn’t need to modify the lighting in any way.

We then moved into the main shoot where I had envisaged Sian being covered by the crabs. The first step was to get her in position and then adjust the main light as she was now much lower than before. I also had to change my shooting angle to be much lower as well. As the final shot was to be composited together the camera was locked onto my tripod.

We stared with a shot with Sian with no crab on her, and then I took a number of images moving the crab around her.

Having all of the shots I now selected the ones that I wanted and loaded them as layers in Photoshop and then masked each layer so only the crab came through.

The star sign Cancer is governed by the moon so I went into the Lightroom catelogue and found some images I had taken of it. I then pulled some astro shots and put them all together. Because I had used a dark background and not lit it the masking between the foil and the stars was made somewhat easier. It was then a matter of changing the colours in the image to look like they were lit by the moon.

Overall I am really pleased with now the image came out as it was essentially how I have envisaged it. When I posted the image, I was expecting one my astro photographer friends to point out that you would not that level of stars on a moonlight night. Fortunately no one did.

Foil shoots with Sian (Setting up).

This will be a post in three parts. The first will go over the setup for the shoot ans the other two will cover the actual shoots. As such you will not see any finished images in this post. Rather the images will show the progress of the setup.

If you keep an eye out it is quite possible to acquire interesting props from the most unusual materials. What I was working for Whittaker’s Chocolate I visited Lamprint which in one of the companies that print the chocolate wrappers. 

Labels are printed on a large roll several across and then in the final part process they cut into secret rolls. At either side of the main roll there is an amount of silver left over. This was being cut off and put in a bag for dumping.

When I saw it I instantly thought it would be great to repeat my tape shoot but this time with reflective metal and coloured lights. So I asked if I could have some foil. 

The next day Shaun delivered a small bag to me. I said thanks, but told him that I was thinking of a much larger quantity. The next day he came back with the larger amount.  Now ideally I would have had a shoot sorted out straight away, but in reality the bag sat in the garage for quite a few months, until my wife got sick of it and told me I needed to use it and then get rid of it.

The full bag of foil spread across the floor.

So I when Sian came round for the Dressmaker shoot I asked if she would like to do a shoot using the foil and she agreed.  I also found out that her star sign was cancer, which is one of the water signs so I knew that I could make the foil look like water with the right lighting. 

When my daughter left home, I claimed the family room back as my studio. The great advantage of this was that I could set it up over a number of days rather than trying to do everything in one go. It also means that I can take my time setting lights and trying different combinations before the model actually comes. In this respect my dress dummy is quite useful, although I have to be careful as it is shorter than a regular person.

As I knew we were going to be shooting two different concepts in the same session, I want to minimise changeover so I hung the backdrop for the second session and then placed a blue fabric over it for the first. I needed three pieces of fabric to do this and while they did not match that didn’t matter as the background would be fairly dark anyone.

I also placed blue fabric on the floor before covering it with the foil. This is because I had planned to shoot from above at some stage and I wanted the flexibility. Having the blue meant that if it did show through it would fit with the theme rather than work against it.

It was now time to set the lighting. I had planned a three light setup and when I use such a combination I always add them one light at a time. I start with a setting and shutter speed that will eliminate all of the ambient light in the room. That ended up being 1/100 at f6.3.

The setting that removed all ambient light.

I has positioned two lights near the floor to light the foil and these were both covered with blue gels. There was no real metering to these lights. rather they were adjusted until I got a look I was going for.

Light left
Right light

The main light was my Godox AD600 in the 24″ softbox on a boom arm. During the testing it was positioned camera right. It was providing quite a nice light and was also picking up some of the background. This was not an issue as I was going to replace the background anyway.

All lights in play

The advantage of taking the time ahead of time was that when Sian arrived we were pretty much ready to shoot. In fact the only change was to reposition the main light from camera right to camera left.

In my next post I will cover the first shoot with Sian, which was for the Zodiac series.

In print again

2020 – The Dressmaker

Each year the Photographic Society of New Zealand (PSNZ) produce a 160 page coffee table book that includes images submitted from their members. You are allowed to enter two images for consideration but only one can be selected.

Each year around 350 photographers submit images so I was chuffed to have my image of the Dressmaker selected for the 2020 edition. This is currently being printed in Hong Kong and will be distributed in October.

This will be the fourth year in a row that I have had an image appear in the issue, and the fifth image published overall. I consider that a good result considering how tight competition is for space in the book.

I can’t wait until October to see the image on the pages.

2019 – Gemini
2018 – “Buzz at the Hive”
2017 – Reflections
2014 The role of the model