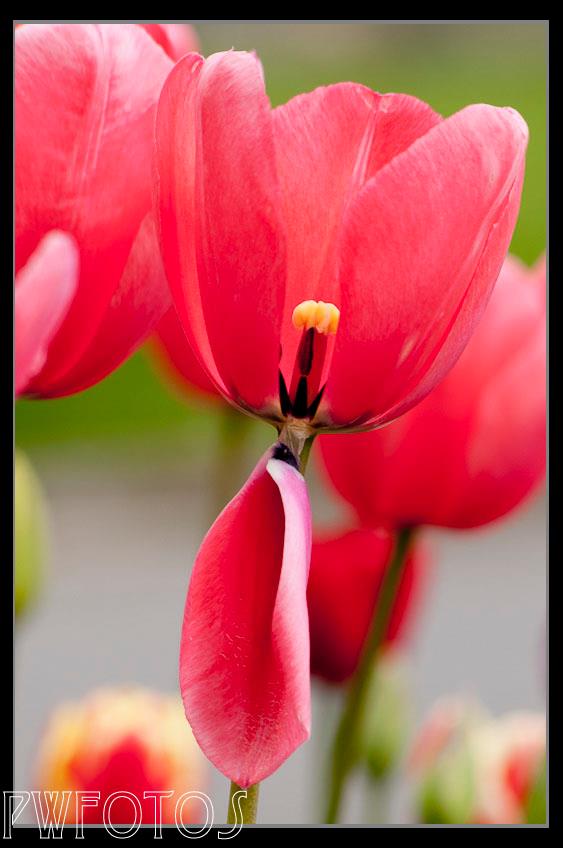
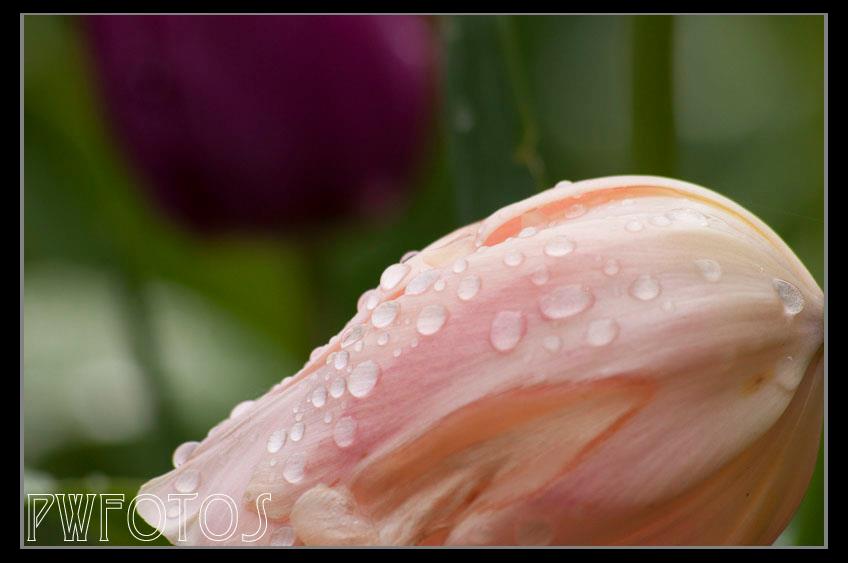
Every once in a while it is nice to get out of your normal shooting mode and try something a little different, so when Sunday morning dawned bright and clear I encourage the whole family to go on a trip into the Wellington Botanical gardens.
Those that know Wellington will know that at this time of year the gardens are awash with color especially the tulip beds. I decided to take along the only macro lens I have in my possession and get in close. This is not the easiest as the lens is a Sigma 70-300mm lens that between 200-300mm can be flicked into a macro mode. DOF at this range is extremely narrow and a tripod is almost a necessity.
We made the gardens after lunch and managed to time it just right with the sun going in and out of cloud. When it was out it was at a nice angle to back light the flowers. My 16 year old daughter even got in the mood and went around shooting the flowers on her ipod touch. I would have to say that it did not do such a bad job.
We were not the only photographer there that day. Fortunately we had all but finished when the cloud started dropping rain again.
This morning I discovered why it is that I like to shoot either people or sports. I hate waiting around for something to happen, and spending a lot time staking out a location is not for me.
The reason was that I had decided that todays “photo a day” would be of the old steam engine that was pulling the Daffodil Express which is an annual trip from Wellington to Carterton to coincide with the Carterton Daffodil Festival.
I had checked the details of the trip and it was supposed to leaving Wellington at 8:40am. I was not aware that it was stopping anywhere so I assumed that it would arrive at the Silverstream bridge around 9:00 (given that the normal Wairarapa unit takes 25 minutes from Wellington to Upper Hutt and that included two stops).
So at 9.00am I was standing on the Silverstream road bridge waiting. I had selected a position that I hoped would give me a good shot and clear of power lines as much as possible.
I waited, and waited, and waited. I even got so bored that I attempted the shoot the Paradise ducks flying around.
Eventually after at least 30 minutes of waiting the train appeared and raced across the bridge. I managed to capture a couple of shots before it was gone.
In many ways shooting events like this is similar to a wedding. There are a couple of key moments that only last a couple of seconds and if you miss them you can’t ask for them to backup so that you can reshoot.
As I went back to my car a more serious train enthusiasm summed it up. “One hour of waiting for 35 seconds of action“.
Later in the day I decided to go back and shoot the return but this time I would go on a rail over-bridge and knew exactly when the train was coming through. Although even then it didn’t run to time. I was quite pleased to capture it head-on, and then when I turned around saw a modern unit waiting for it to cross the tracks. So my final image was the old and new of train travel in Wellington.
Since the dawn of digital there are lots of photographers who have seen a market in teaching amateur DSLR users and have decided to enter it. With a fancy website or Facebook page there is plenty of demand. Courses range in price anywhere from $30 to $4,500.
The problem is that the old saying “those that can do, those that can’t teach” does not apply because for many they can “do” it, just that they cannot “teach” it.
A few weeks ago a friend forked out not an insignificant amount of money on a workshop that didn’t live up to expectations.
This got me thinking as to how I would evaluate potential workshops. I hope that these ideas will be of value to readers. Please note that I have both attended and organised a number of workshops so these items comes from “both sides of the fence” in terms of experience.
What is the level of the course aimed at relative to your level?
This is really important because it goes to heart about what you are likely to get out of the event. And you need to be honest. If you have absolutely no idea about what an f-stop is or the effect it has, then an advanced course will not be for you. Two things will happen. Firstly you will not be able to keep up, and secondly you are likely to slow down the whole course, which will not go down well with the other participants. I once attended a workshop on Photoshop retouching that people who ranged from those that had used to the program for years to some who had no idea how to use a mouse. Needless to say it was a painfully slow session and little was learned from it.
If you are a more advanced shooter, then the odds are that you will already know quite a bit of what will be covered. What you need to consider is how much you think you will gain from the “marginal” learning’s in the course.
How many participants are their likely to be?
Too many on a course and your start to feel like the paparazzi
Generally for a workshop this will be stated because they will have set a maximum. From experience I have found that a ratio of one tutor to five students is the maximum that you want to allow for a hands-on course. Otherwise the group is too large to give everyone a fair go. Even if it is a seminar the smaller the group the more opportunity there may be to get the specific questions you have answered.
What is you learning style? It is widely accepted that people have different ways of learning. Some pick up things better by seeing them in action, some by listening, some by reading at their own pace, and some by doings, or combinations of all of the above.
If you know which is you strongest area then that will help is deciding if the event is right for you, because if you learn best by doing, then a hands-on session will benefit you far more than a sit down seminar.
Check out the presenters
Now this is a biggie because ultimately the success or failure of the course rests with them. Don’t simply look at the event promotions website and references. Do a Google search on the presenters and find out what they are like. If possible see if you can find reviews from previous attendees that are not linked to promotional material, because quite frankly no one is going to put “couldn’t teach” on a promotional website.
It is very important that you look beyond they images, because unless it a show session only, you need to know that they can impart that knowledge to others. I know plenty of great photographers who could not present if they tried.
Also just because they are from overseas does not automatically make them an expert. In fact sometimes it can work against them because styles can be quite different between countries.
Is anything else offered? Sometimes the value in a seminar can be extended beyond it so it useful to bear that in mind. The presenters of a glamour workshop I attended over a year ago maintain a Facebook group which is still active and they are available to answer follow up questions. Other presenters may have member only areas for former attendees.
Is it value for money?
I have left this one for last because quite frankly it is the most subjective. At its core are value judgements about how much you are going to get out of the course and how much you value your time.
I have attended two days workshops that cost $2,000 and thought they were great value, and yet attended a two hour one that cost $35 and thought it was a waste of time and money. So in terms of looking at the price consider the following:
A smaller hands-on workshop will always cost more than a seminar but generally you will take more out of it because of the interaction with the presenter.
Workshops that involve multiple people (hair, models etc) will be more expensive than a single presenter.
Can what you learn on the course save you time in the longer term. This is particular important when you are more experienced because what you are going to pick up will only be a portion of the course. For example if you learned a technique that saved 5 minutes processing per image and you normally shoot 200 images a session, then that is the equivalent of 16 hours, and if your normal rate is $50.00 then that is $833.
Is the charge reasonable? This does not mean is it cheap. If the tutor is a professional photographer then it is reasonable that the full amount earned on the course equates to the time they have put into it, plus any outgoings that are likely to be incurred. What is not reasonable is when there appears to be a super profit built in as was the case of a course I saw advertised for $1,500 per head. When I crunched the numbers there was $16,000 unaccounted for.
What are the alternatives? For example a three day workshop will set you back thousands, but you can purchase a video of a three day workshop from CreativeLive for $US179.
Last Saturday I spent most of the day at photoshoots that involved 3 models in 3 set ups and came away with only two images. Now it wasn’t a total failure caused by gear failure. Rather I was acting as an assistant and the shoot was being conducted by Sharyn Reeve (www.bySharyn.com).
Sharyn is a very talented Wellington photographer and Photoshop wiz. We have done a few shoots together one of which she was brave enough to be my model.
The processed image taken by Sharyn
Now anyone who knows me, knows that I have been shooting for a number of years, and have a reasonable portfolio of images. So they may be wondering why I was assisting on a shoot, when that is often synonymous with students. Put simply to learn and also because I enjoy shoots.
You don’t always need to be behind the camera to learn at a shoot. In some ways it is often easier to learn if you are not behind it because generally when you are there you are concentrating on getting the shot. What I tend to learn most from Sharyn is posing techniques, and more importantly the instructions to get particular facial expressions. What I hope I am able to give back to her to suggestions on light setups and poses. Sharyn is also not one of those photographers who will not take on board any suggestions (unlike other photographers that I will not name).
A shot from the morning session.
It was a good opportunity to also test out some new gear that we had purchased recently. On Saturday Sharyn had a new 150cm Octobox Softbox and I had a new lighting boom. We were both surprized that we could use a speedlight inside of the octobox after a studio strobe decided to play up. The boom proved really useful when Sharyn wanted an hair light that was lower than the model rather than having it angled down. It is also a good opportunity to double up our gear to produce better results and also the extra pair of hands come in handy with setting light modifiers.
In this third instalment of the Gear Trap I am going to look at the various modifiers that are available when you are shooting with some form of artificial light.
Light is described as being hard or soft basically depending on how intense it is at the edges. If you look at the shadows cast by an object you can easily see this. Hard light will cast very sharp edges to the shadow, where a soft light casts shadows with a gradual fade off at the edges, or now shadow at all.
Whether light is hard or soft is actually a function of the size of the light source relative to the subject. It is through the use of modifiers that we can modify the light source. Below I will give you an introduction into the main sorts of light modifier. It is by no way a complete list.
Bounce Umbrella The bounce umbrella looks exactly like the one you would use to keep you dry in the rain with one big exception. They are generally lined with black on the outside with white, gold or silver on the inside. A white lining will reflect light at the same colour that it hits it, whereas the silver produces a colder (blue) light and the gold a warmer (red) light. The umbrella works by spreading the light out. Of the three linings silver does produce the harshest light.
A bounce umbrella main purpose is the spread the light source over a greater area. Its name comes from the way it is used. The flash unit is attached to the centre stem of the umbrella and is actually pointed away from the subject. The light hits the inside of the umbrella and then bounces make onto the subject.
Umbrellas can spread the light out but they are sometime a little cumbersome to use especially in crowded areas.
Shoot Through Umbrella A shoot through umbrella is made from white material and the flash is mounted in exactly the same as the bounce umbrella but the whole unit is positioned so that the umbrella faces the subject.
Essentially a shoot produces a light similar to a softbox, and you can position the umbrella reasonable close to the subject. The major disadvantage that shoot throughs have is that unless you modify them there is no effective way the direct the light.
A nikon sb600 speedlight inside a softbox has filled in the details on this image taken late in the day.
Softbox
Softboxes are normally made of black material with the inside line with silver. The strobe goes in a small hole in the rear. The front is mush larger than the back and is generally covered with a white material. In some models a second white panel can be fitted between the light and the outer covering.
Softboxes come in all shapes and sizes. They produce a very soft light which is also relatively easy to control the direction of.
Beauty Dish
A beauty dish is a round metalic dish that is scalloped on the inside. The strobe is mounted in the middle. A panel directly in front of the strobe directs all the light into the bowl whereby it bounces out in lots of directions. This produces a light with few shadows. Beauty dishes were extremely popular in the 1950/60’s and were used to produced most of the Hollywood glamour images taken at the time.
A snoot has been used to provide a very focused light.
Snoot
This is a cone shaped devise that fits over the end of the light and directs in a much narrowed beam. It is very similar in concept to the spotlights that you see in the theatre. When used in such a way the light it produces is every hard, with little fall off at the edges. They are therefore used primarily as an accent light, or a hair light. A honeycombed grid can be fitted to them if you wish to soften the light slightly.
So what is the light modifier to use? Sorry but that is a question that will end up with the same answer. “It all depends on the look you want”. A particular 3 light set up may have a beauty dish as its main light, a softbox filling in some shadows and a snoot to act as a hair light (which is intended to provide separation from the background).
Also different subjects will require different modification. For example a women in her 50’s would generally not look as good if shot in the same light as a girl in her teens.
One final word of warning though. If you a looking to buy a softbox for your speedlight don’t buy the really little ones that clip over the flash as they make very little difference to the quality of the light.
In this second post on gear I am going to look at lighting because after lenses, lighting is another very common question on the Facebook group. They normally run along the line of ” I have a group of people coming in for a shoot. What lighting do I need?”
Unfortunately in all honesty this questions is almost one with the same answer as “how long is a piece of string” because quite frankly the answer lies in what you want to achieve. Lighting is actually more of an art than a science, and the ability to see and manage light is what sets the great photographers apart from the average masses. So in this post I am not going to provide a lighting solution, rather I am only going to look at the types of light available.
At the simplest level you need to have enough light hit the sensor of your camera to provide the level of exposure that you will need. This will either be from a natural source (ie Sun) or some artificial source, or a combination of both.
So the very first thing that you need to decide upon is what sort of shooting you predominately do. If it is mainly outside, or where there is a lot of light, then you may not need any additional equipment other than something that can reflect light. However, if you predominately shoot people or events that occur inside then some form of artificial lighting may be needed. I say “may” rather than “will” because it is possible to shoot inside using the light that is available if you shoot close to a window, or at a very wide aperture or use a longer shutter time.
Assuming that natural light is not available then you have three possible main light sources. These can be classed as
Ambient Light
Continuous Light
Strobes
I will look at each one in more detail. I am going to split the strobes category into speedlights and studio strobes because although they are essentially the same light source there are important differences between them.
Sometimes any light source will suffice.
Ambient Light
This is the light that is available in an area. Inside this would mean any light coming in from outside or from standard room lights. I would not immediate discount the effects that be gained from what we would consider to be normal house lighting.
Pros
Does not need any additional gear, other than a reflector to use.
You can see what the light is doing.
Cons
Not necessarily available in the quantity, or location you need. You need to be very careful because our eyes see in a much wider exposure range than the camera can.
You can end up with big differences in the colour temperature of the lights. Our eyes will adjust for this but the camera cannot. Therefore it is vital you always take a grey card image to get the white balance correct.
Continuous lights
These are lighting that are turned on and stay on until turned off. Some are fitted with dimmers or have multiple bulb arrangements that enable the light output to be adjusted. For some you can also purchase light modifiers.
Pros
You can see the effect that the light is making on the subject.
You do not necessarily need to buy specialised gear, and as such the price you pay for them can be a lot cheaper. For example you can use the type of halogen work lights sold in hardware stores as cheaply as $20.00. For further information there is also quite a range of do it yourself projects on www.diyphotography.net.
Cons
The major disadvantage with continuous lights is heat. The units tend to get very hot, which can make them dangerous especially if you are working in an environment with small children around. Note however that in recent year LED panels have come available that get around the heat issue.
The light output will not be as powerful as that delivered by strobes.
Speedlights
Speedlights provide very portable lighting
These are the small external flash units that can sit in the flash adapter on your camera. There are generally models made by the camera manufacturers as well as cheaper models make by third party suppliers. The more advanced units can access the metering systems of the camera and adjust the flash power accordingly. I should say that you get the best lighting out of speedlights when you couple them with a trigger that enabled them to be fired when not mounted on the camera. Most have a manual mode that lets you adjust the power output in a range of six stops.
Pros
Very portable lighting solution especially when used in Off Camera mode.
Generally more powerful that continuous lights.
Can access the metering system on the camera.
Cons
Not as powerful as studio strobes, and you can run into colour issues once the batteries run down. This can also affect the recycle rate (the time it take for the flash to recharge)
You do not see the effect of the light until the flash fires.
Studio Strobes These are the big brothers of the speedlight which were generally used in a studio, hence the name. They come in a wide range of power output from 200watts up to 1200 watts. Apart from the very cheap models most units come with a second light referred to as modelling lamp, because its purpose is to give you an idea of how the light will fall.
Pros
Most powerful of all the light sources
Provided the units have modeling lamps them you can see the effect of the light.
Generall consistent light output and colour each time they are used.
Cons
Unless you buy very expensive units that have batteries most studio strobes need a power supply available.
They can be expensive if you buy well known brands rather than “Trade-me” models.
Hopefully this information is useful to you. Light modifiers will be the topic of the next post in this series.
Every year the six photographic clubs in the Wellington area hold an annual competition where each club enters one image in each of ten categories. The 2012 competition was organised by Wellington Photographic Society and held on August 23rd.
My images were selected by the Hutt Camera Club to represent them in three categories namely
Urban
Red, Green, Blue
Time
I was delighted that on the night they all did very well. The image in the Urban Category (right) came 3rd while the images in the other two categories (shown below) won.
Winner – Red, Green Blue category
In speaking to the judge afterwards it was apparent that I had been able to create images that created an immediate reaction with the viewer, and which grabbed their attention. This was exactly what I had wanted to achieve.
The shot entered in the urban category was shot in Auckland when I was attending a conference there. It was not specifically shot for the contest but was rather in series I took as part of my “photo a day” challenge. It was taken in the top end of Elliot Street. The staircase so much reminded me of all the television series set in American cities such as New York or Chicago.
The shots in the other two categories were specifically shot for the competition. This blog already contains background information on both images which you can find under RGB, or Time.
Winner – Time category
The final shot above was actually modified right at the end because after I printed it I decided it needed some added punch. That was the change the eye colour to blue. This proved to be a correct decision as the judge commented that it was the eyes that drew the viewer into the image.
These shots were a very collaborative process and I want to express my thanks to Maya and Freya for modeling for them, and special thanks to Sharyn who assisted with some of the post production on them.
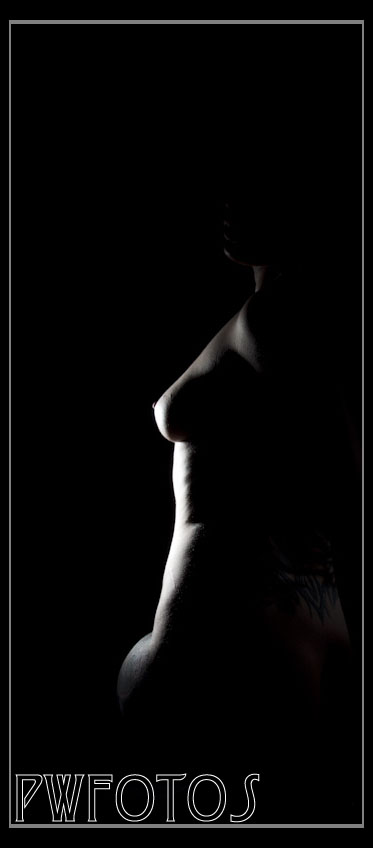
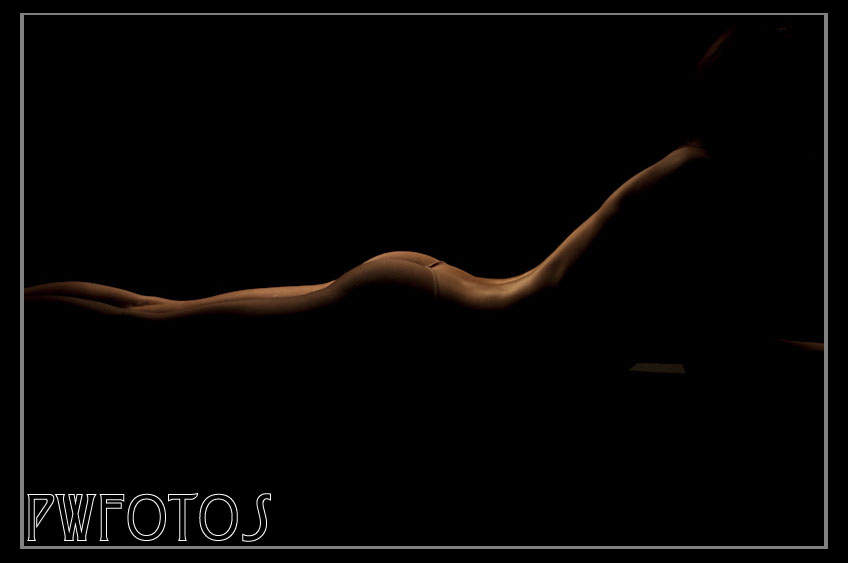
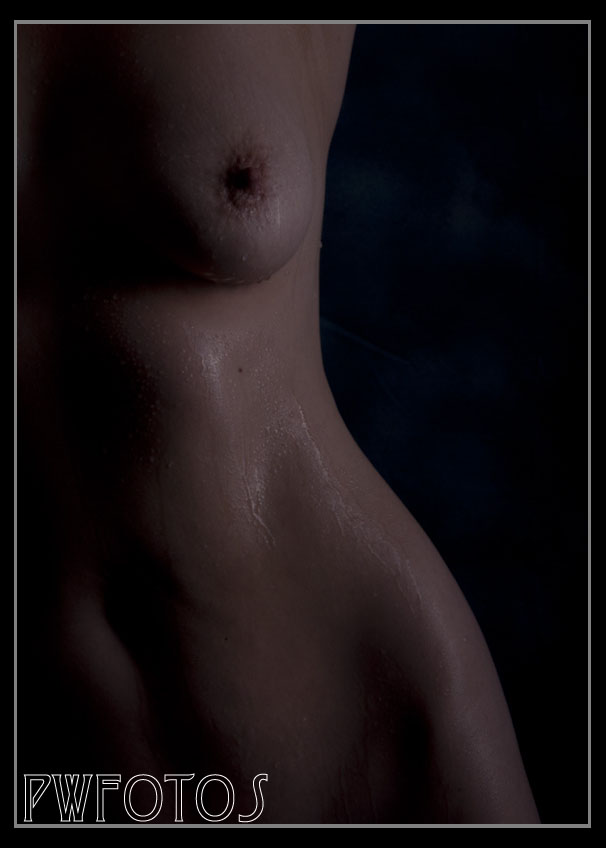
One of the particular style of images I like to shoot are referred to as Bodyscapes. Basically they are low light nudes where only a part of the body is shot so that it becomes an image of curves rather than of the total body.
From the models point of view bodyscapes never include the face, or enough of the body for them to be easily identified.
Technically they can be a challenge to shoot because unlike a standard studio shoot you can’t meter the because it is not a perfect exposure you are looking for. You also can’t use the histogram because it will be seriously distorted by the amount of black in the image. So you basically have to take images on a trial and error basis.
Yesterday I was watching a rerun of a session that New Zealand photographer Sue Bryce did a couple of months ago as part of a workshop on www.creativelive.com. In the particular section she was talking about marketing your business and particularly how to promote through social media, websites and blogs.
She was a firm advocate of the benefits of blogging, but she did state that you needed a clear idea of what the purpose of the blog was. She also stated that she thought that most photographers blogs were actually aimed at other photographers, rather than clients, and that they were simply an exercise in self gratulation. Sues own blog can be found at http://www.inbedwithsue.com/blog/.
This really got me thinking about this blog and where it had developed without really a clear goal. It started as an extension to the posts I was making on my Facebook page as I wanted to provide context around the images I was taking. It has now moved to include the various articles and random thoughts that I have from time to time. Most of these are aimed at other photographers.
I had also wanted to create a website and using a blogging engine was the simplest way to achieve that.
Now as photography is my passion, rather than something I am trying to make money out of, this blog does not focus entirely on getting work. However this is not to say that I do hope that by showing examples of my work through it, that work will not come my way.
In fact I am a firm believer in karma and that by helping others through this blog that the good will be returned to me in some form. I have certainly found that connections I have made with people have resulted in good things happening.
I would be interested in your own thoughts on this.
The image with this post was a competition entry for a contest run at Wellington Photographic Society where we were given a range of objects to incorporate in images.
This morning I did a photoshoot with Renee out at the Massey Memorial on the end of Miramar peninsular. The memorial is made of white marble and in many ways has a resemblance to a Roman structure so this gave me the ideas of creating a composite image.
The morning was high overcast which has the advantage that the lighting would be very even. In fact I used my light meter to discover that the light was a consistent F8 in each of the gaps where I wanted Renee to stand.
Unfortunately it also meant that the light was very flat. I had hoped to use flash to add a little punch but unfortunately I discovered that the flash triggers were still at home.
The camera was set on a tripod and then we shot about 6 images in each position. I used a remote to trigger the camera try to minimise an accidental move in position. Having the camera on the tripod meant that I could ensure that all of the elements (other than Renee) were constant.
Once I got home I selected an image from each location. Loaded them into layers in Photoshop and used a simple mask to created the image. As I didn’t like the sky that was easily fixed as well.
The finished image is my Shot of the Day for World Photographic Day.