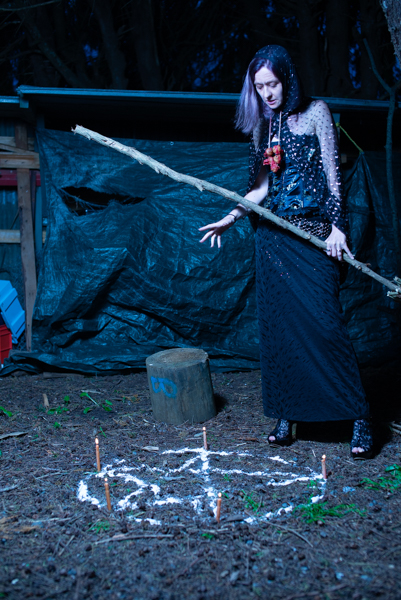
This is the fourth instalment in my 2021 Halloween Themed editorial.. The story continues:
The Witch takes Red back to her lair and puts her in a wedding dress so that she can be a bride sacrifice to Satan the Witches Master.
The witch pour blood over Red and it about to make deep cut.
For this part of the shoot I built a small seat inside the garage in positioned various prompts around the scene. I chose a green background because I knew that I was going to replace it and I hoped that using green would make it easier.
The lighting for this part of the shoot was a two light set up. The main light was positioned camera right at a 90° angle to the subject and provided the main illumination. At the rear of the room I had a 7 foot umbrella with diffusion set at a low power to simply fill in the shadows The image above shows what the shots look like straight out of camera.
These image were shot at f8 1/125s ISO200 to ensure that I had sufficient depth of field.
In Photoshop the image overall was darken and I added a rock texture to the rear. The image was then run into Nik Color Efex Pro to create the high texture image. Finally the moonlit LUT was added.
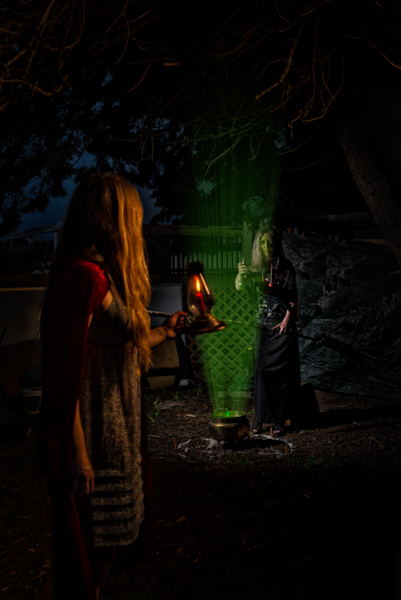
This is the third instalment in my 2021 Halloween Themed editorial.. The story continues:
“Red wanders into the forest. Hearing a strange sound she ventures towards it and sees a green glowing light and a strange lady hovering over a glowing cauldron.”
“The witch looks up and sees the candle awakening red to come closer. But when she is in range the witch casts the spell over read and she loses full control of yourself.”
The challenge with lighting this image was that I only wanted to bring the two characters out from the background but I did not want a lot of spill as that would ruin the impact. Therefore using a single large light source would have not achieved my look.
The lighting on the witch was the same as in the previous post and used a speed light in a small square soft box. I added a second Godox speed light in a 65 cm round softbox positioned camera right and just in front of Red.
The settings were slightly changed to f4.5 1/60s ISO100.
For the shot where the Witch puts the spell on Red, I changed positions and moved the Godox speed light in a 65 cm round softbox to be positioned camera left and just in front so that it would light up both of the subjects.
While the softbox was coming into the shot, I knew it would be an easy fix to remove it in post. Plus with it being so close to the subjects I knew that the fall off of light would be quite dramatic.
In post I cropped it down , darken down the background and then added a glow emanating from the cauldron using a mist brush that I had downloaded. I also applied a Moonlight Colour Look Up (LUT) which is one of the LUT’s that comes standard in Photoshop.
In the next post we move back inside for the sacrifice.
This is the second instalment in my 2021 Halloween Themed editorial.
The story continues:
“Deep in the forest the witch begins rituals for All Hallows Eve brewing up a strong potion and hoping that a suitable victim for her planned sacrifice will come along.”
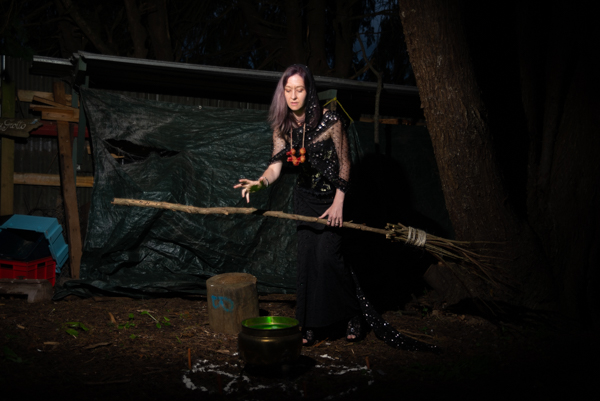
In my original planning for the shoot I wanted to have three witches reminiscent of the scene in Shakespeare’s Macbeth. Unfortunately I was not able to achieve that and Sian was the only one who was available. We had shot together before so I knew that she could bring the character to life. I constructed a mini see it in the back of our section and made her witches broom.
Please note that most of images shown on this page are outtakes that were not used so they have not been processed. with shoots like this you do end up with a lot of images that you will not use especially those when you were trying to achieve particular lighting look.
I used a single Godox speedlight is a small square soft box positioned camera right to illuminate Sian. A lume cube was placed inside the cauldron with a green gel to cast light from below. Halloween is one of the few occasions where you can get away with lighting a subject from below.
The settings on the camera did not change from the first shoot namely 1/100s f2.8 ISO100.
As the series was in intended for Instagram in post I cropped it down to a portrait orientation, darken down the background and then added a glow emanating from the cauldron using a mist brush that I had downloaded. I also applied a Moonlight Colour Look Up (LUT) which is one of the LUT’s that comes standard in Photoshop.
Each year in October I challenge myself to shoot something with a Halloween theme. Back in 2021 I took this one stage further and decided to shoot another story similar to what I had done earlier with the Dressmaker series. This is the story of Red and the Witch a modern interpretation of fairytales. It will be split over five posts as each used differing lighting techniques.
The story begins:
“Red was not the brightest girl in town and she had to habit of ignoring any type of warning that she was given. The main one was to not venture into the dark forest after dark and especially not around all hallows eve. Of course that is exactly what she did.“
I placed the casting cool on Facebook and Lexy was one of the ones who responded to it. In looking through the pictures it was obvious that she would play read.
We set up in the garage and she was lit using a 65cm round soft box with placed camera right. This insured that the light fell only on the model and did not spill into the background. The shorts were taken at f2.8 ISO 100 1/ 100s. The candlelight is real and was not advanced. They glass container that it was in dead cause a problem with reflection of the lights. Unfortunately there was nothing I could do about this other than toning it down.
The image was proceed through Nik software to increase the texture and boost saturation. You can see the original version below.
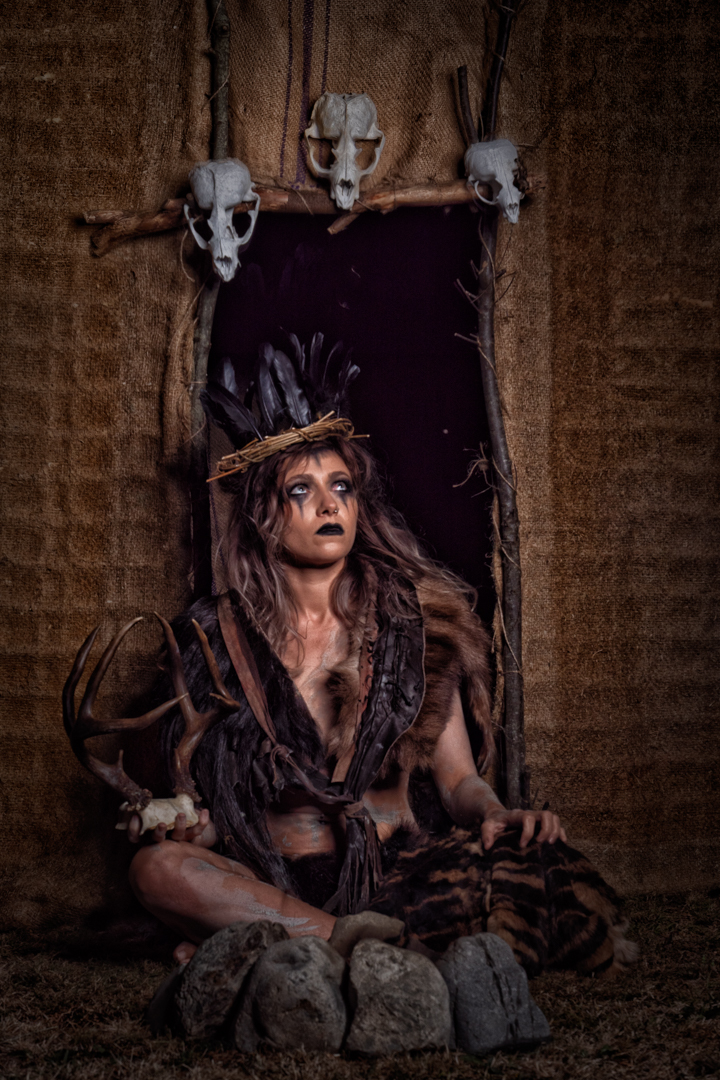
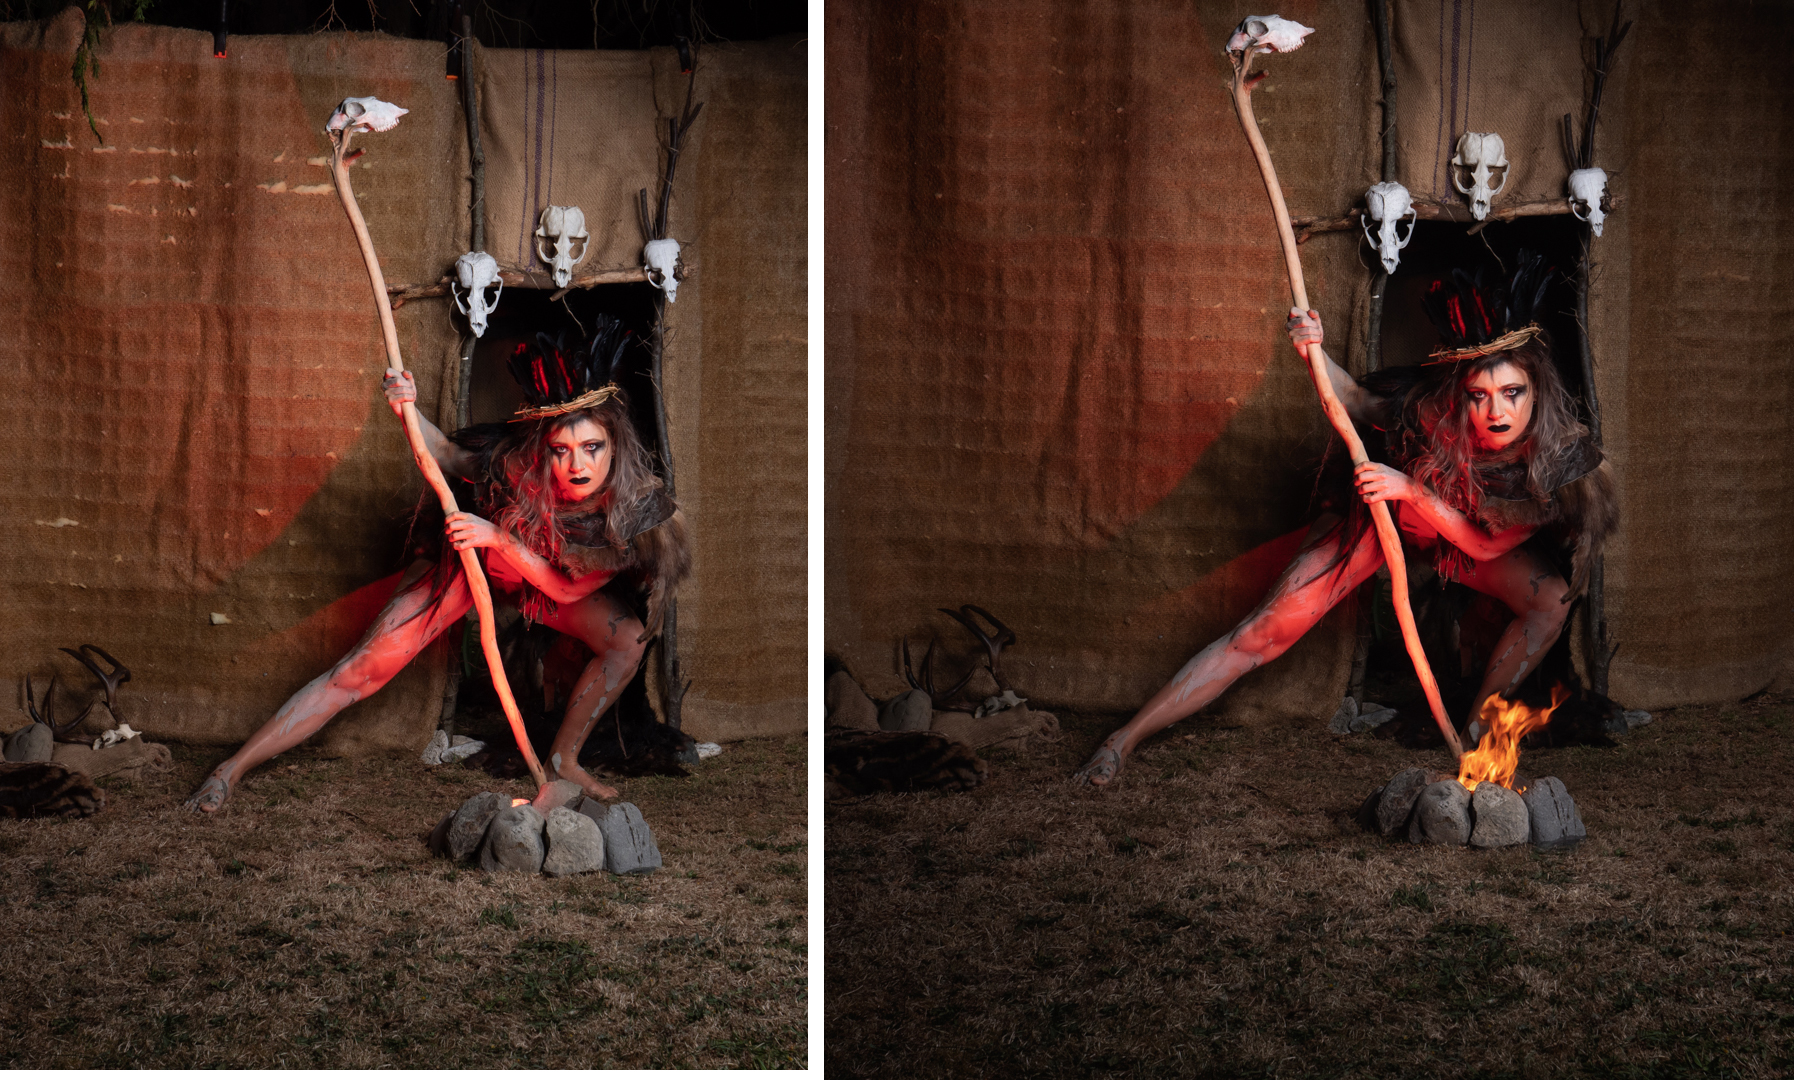
Ideas for shoots quite often start with prop and develop from that. That was certainly the case with my Sharman shoot which started when I was given some pieces of old fur costume that had been used by extras in the television series Xena Warrior Princess.
I knew that I wanted to do something tribal and primitive with them. And that developed into the concept of a witch doctor. The top of the costume was a single piece but for the bottom I glued pieces of the fur onto a nude coloured pantie. I made a headpiece out of dried vines embellished with feathers. In my original design I had antlers as part of it but for these proved to be too difficult to stay on the head so they were used as a prop instead.
I had shot with Casey before on two occasions and I know that she would be willing to play the part. I also recruited a make up artist Erin Gibbons to create the look for me. I used a previous image of Casey that I altered in Photoshop so that she could see what I was going for.
I wanted to create an authentic looking environment for the Sharma so I made the facade of a hut at the bottom of our garden. I used two lightstands with a crossbar to which I attached pieces of hessian that had come from a double mattress. This was sewed to the uprights.
I then used three sticks and sewed them around the doorway closing off the gap with coco sacks that I had. I finally adored the door with three seal skulls that we have found the year before.
I was concerned about wind and so I had the structure both tied to the fence and anchored down. Fortunately wind did not become an issue.
In front of the heart I built a small fire pit using rocks gathered from the river.
As I wanted to control the light, and the set was outside, it was necessary to shoot in the evening. My main light was Godox AD600 in a 1.5m octagonal softbox. In addition I had a small LED constant line that was simply used to assist the camera to focus.
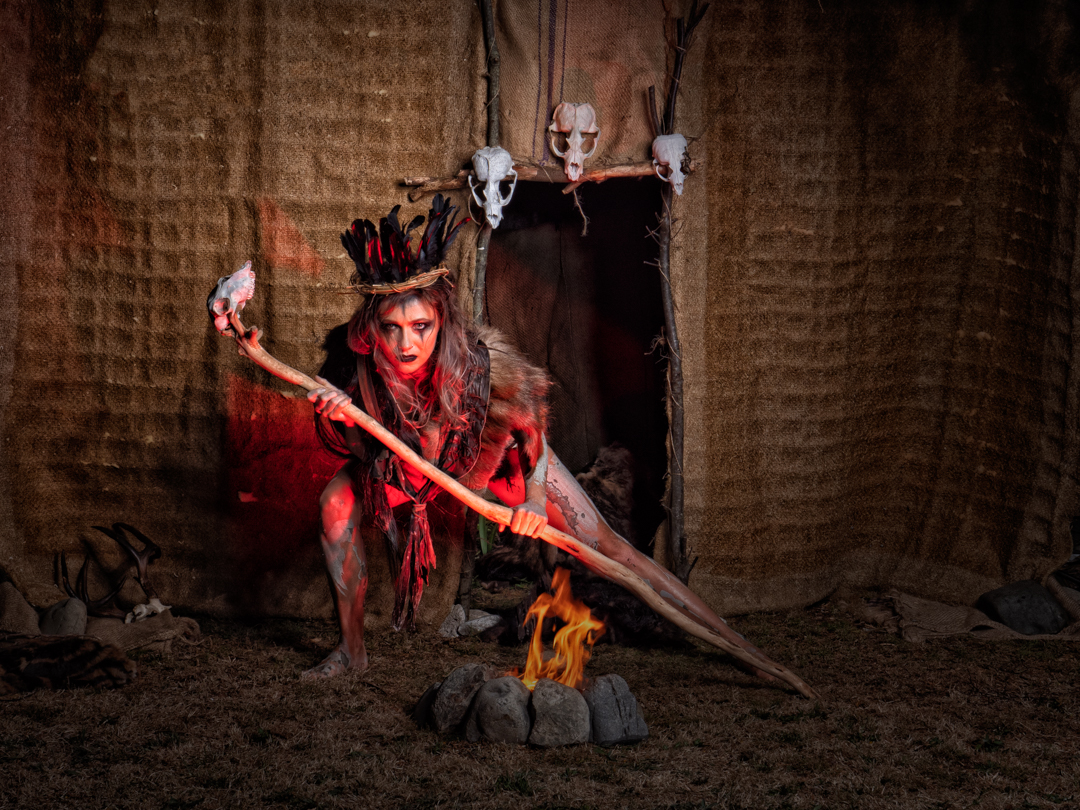
I wanted to have a real fire in the images but I also wanted to ensure the safety of my model. So in the initial shots a small lume cube with an orange gel was placed inside of thefire pit. This created a glow on Casey which I was unable to use in a composite if the actual fire. For this reason the camera was mounted on a tripod so that it would make compositing the images much easier.
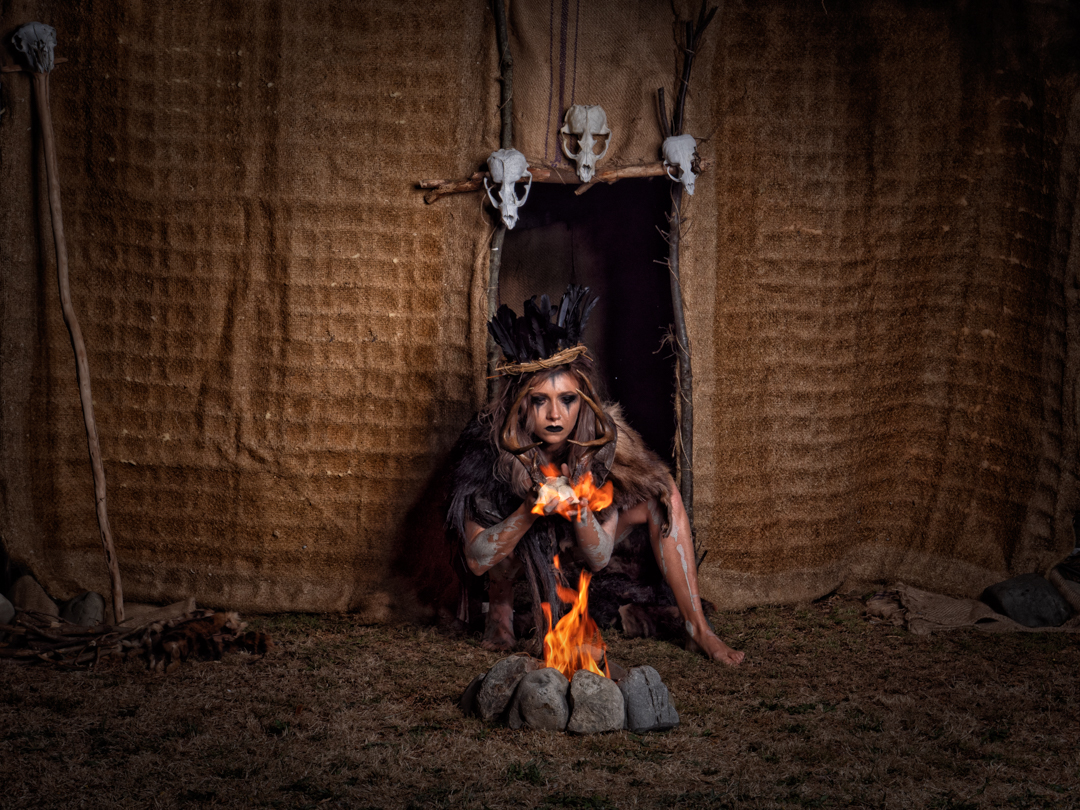
As often happens it took nearly an hour to apply the make up and then we move Casey into the garage to apply slip clay to her body relying on a hairdryer to speed up the process.
Casey really got into the character and this really brought my idea to life.
As it turned out Casey did interact with the fire and this added further to the series. Although in some images I also added more of it for effect.
From a technical viewpoint the initial images without the fire we shot at 1/160s f8 ISO 200. When the fire was added the shutter was slowed to 1/100 as the fire was not as bright as the LED.
I was really pleased how the images came out and they were well received when they were posted one was submitted for New Zealand Camera and it appeared in the 2022 edition. This is an annual print publication of the Photographic Society of New Zealand and it is quite difficult to have images selected.
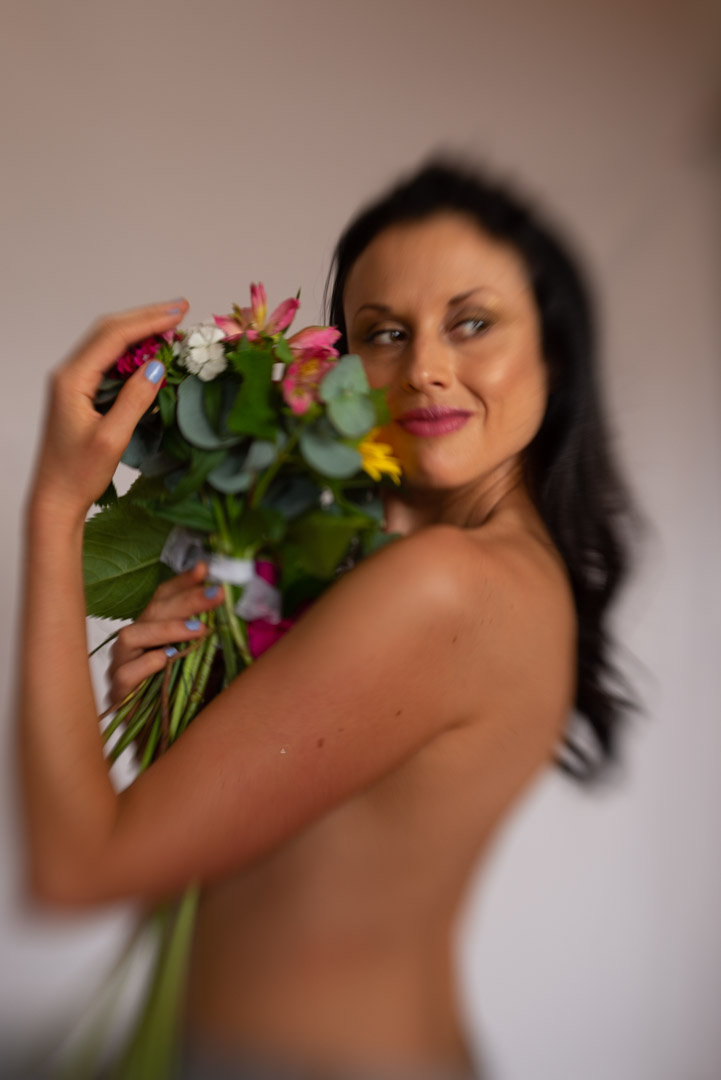
A couple of days before I was to shoot with Melissa she asked me if it was okay if the second photographer (Clara) could join us at the shoot. Clara had an idea that they wanted to use but had no lighting gear. I had no problem in helping another photographer out so I said it was fine and I would show Clara how to use my lights.
Clara’s idea was to shoot Melissa topless with a bunch of flowers strategically hiding her breasts. However when she arrived the small bunch of fake flowers she had were not gonna be sufficient, so while I was doing the skater shoot with Melissa she went off to the supermarket bought a bigger bunch.
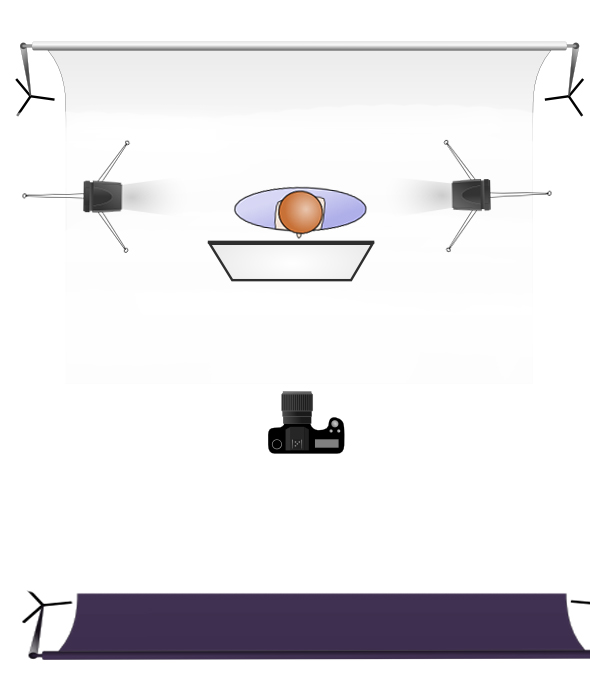
There was no need to alter the lighting setup with two lights on the backdrop and a main on Melissa. Although Clara was shooting with a Canon, the trigger I have worked seemlessly.
When I am shooting away from the studio I always take a back up camera which in this case was my Nikon d600. I also had my Lensbaby in the bag as well. I therefore decided to fit it and take some shots as I didn’t need to use the studio lights. The Lensbaby is quite tricky to focus it does produce an awesome result.
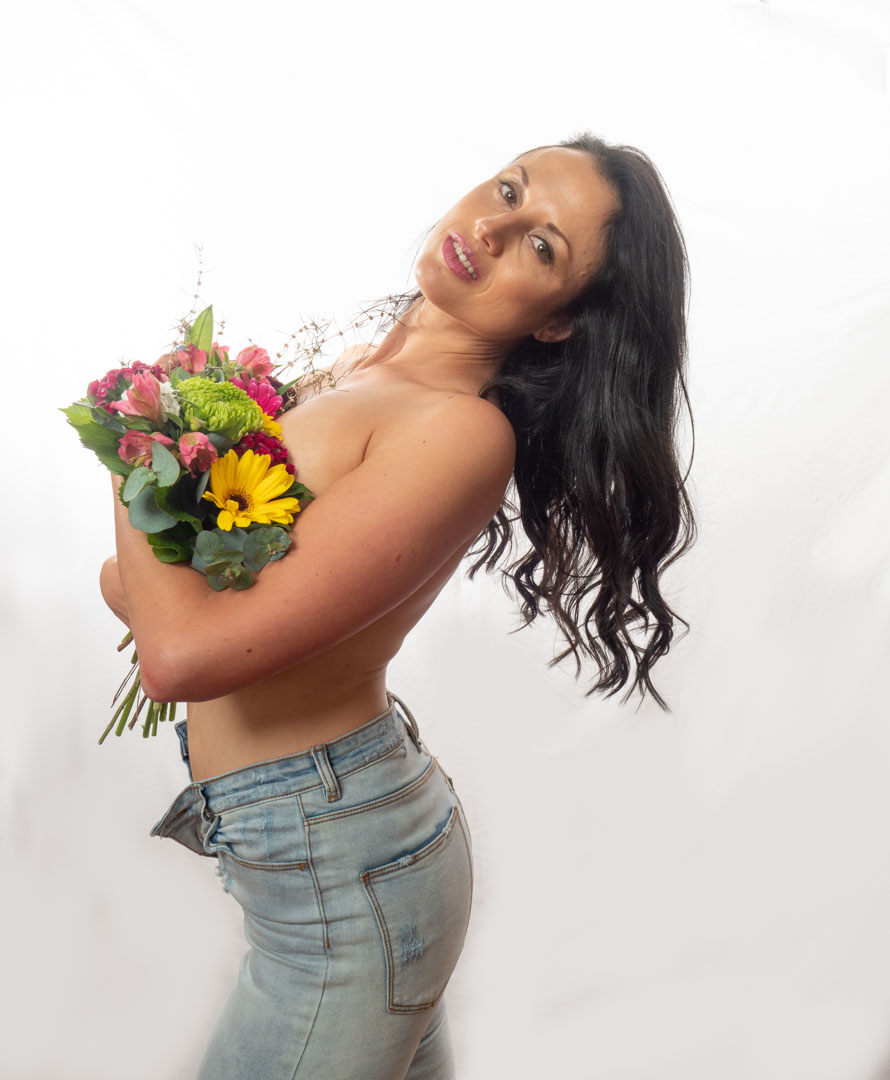
After Clara had finished I decided to take the trigger back and shoot some images of my own back on the Panasonic G9.
However in these I got Melissa to pose in completely different ways to what Clara had done so that she would have some alternative images. As it turned out these were the only images that Melissa got from the session.
I never actually saw the images that Clara shot so I’m not sure whether she actually got what she was wanting or not. Nor why she never gave any images to Melissa.
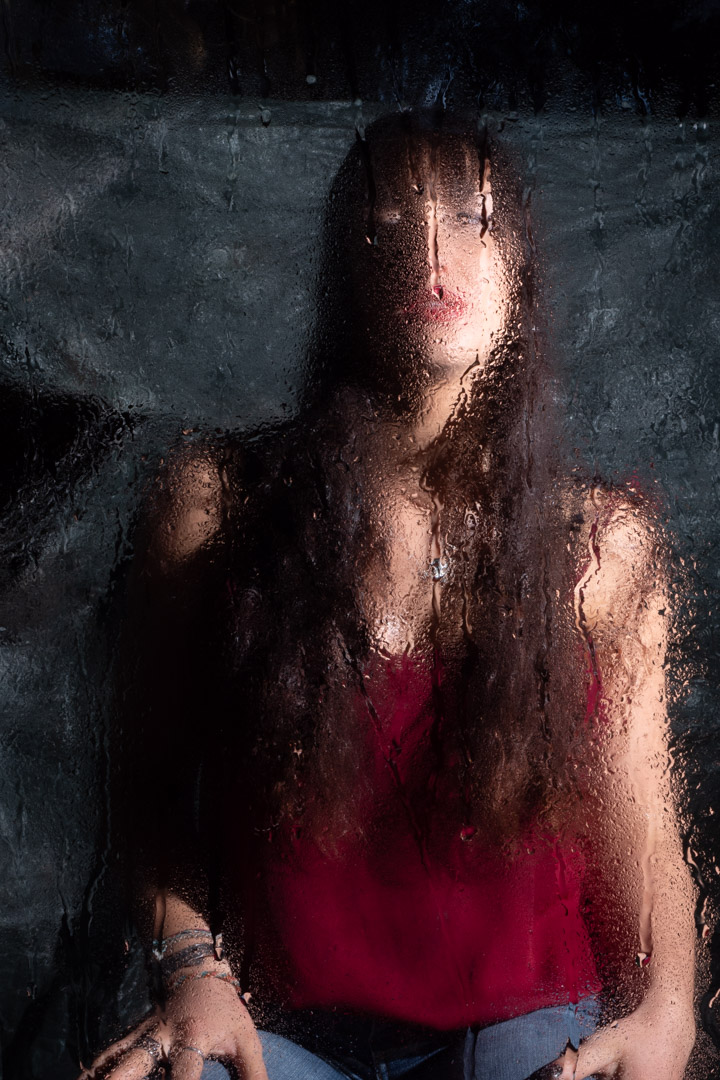
When Marianne and I started discussing options for her shot she said that she wanted to have a water look and showed me some examples that had clearly been shot in a shower. I agreed that we could do something similar and set to work figuring out how to do it.
Now the simple solution would be to shoot in an actual bathroom. Have done this is the past but one of the main issues you run into with such a shoot is having enough room to position the subject and lighting to the way that you want.
Fortunately I had an easy solution. When our main bathroom has been renovated, after a burst pipe, we had completely changed the shower. I had kept the door panel from the old shower as a possible prop for exactly this circumstances. So by using some upright supports and clamps, I was actually able to replicate a shower.
I chose an area under a large tree because this minimised the amount of natural light and let me have better control over the overall light. Generally speaking I will set the camera to remove all ambient light for only flash is used. When shooting outside this becomes more difficult and therefore any technique to limit the amount of natural light helps.
The main lighting was provided by two speed lights that were positioned on either side of Marianne and aimed so that they did not spill onto the glass. In order to avoid reflections on the front of the glass I positioned a large black backdrop behind the camera. As it turned out the light provided from the flash eliminated any reflections on the side of the glass facing the camera.
As we were not planning to shoot full body we positioned a stool and Maryann set on that. That gave the advantage that the lights and focus could be pretty much locked into place.
It was now a matter of applying the water. We used a spray bottle to apply water to both the glass and to Marianne and started shooting.
The glass worked really well and it is was a relatively simple setup so I am sure that I will use it again.
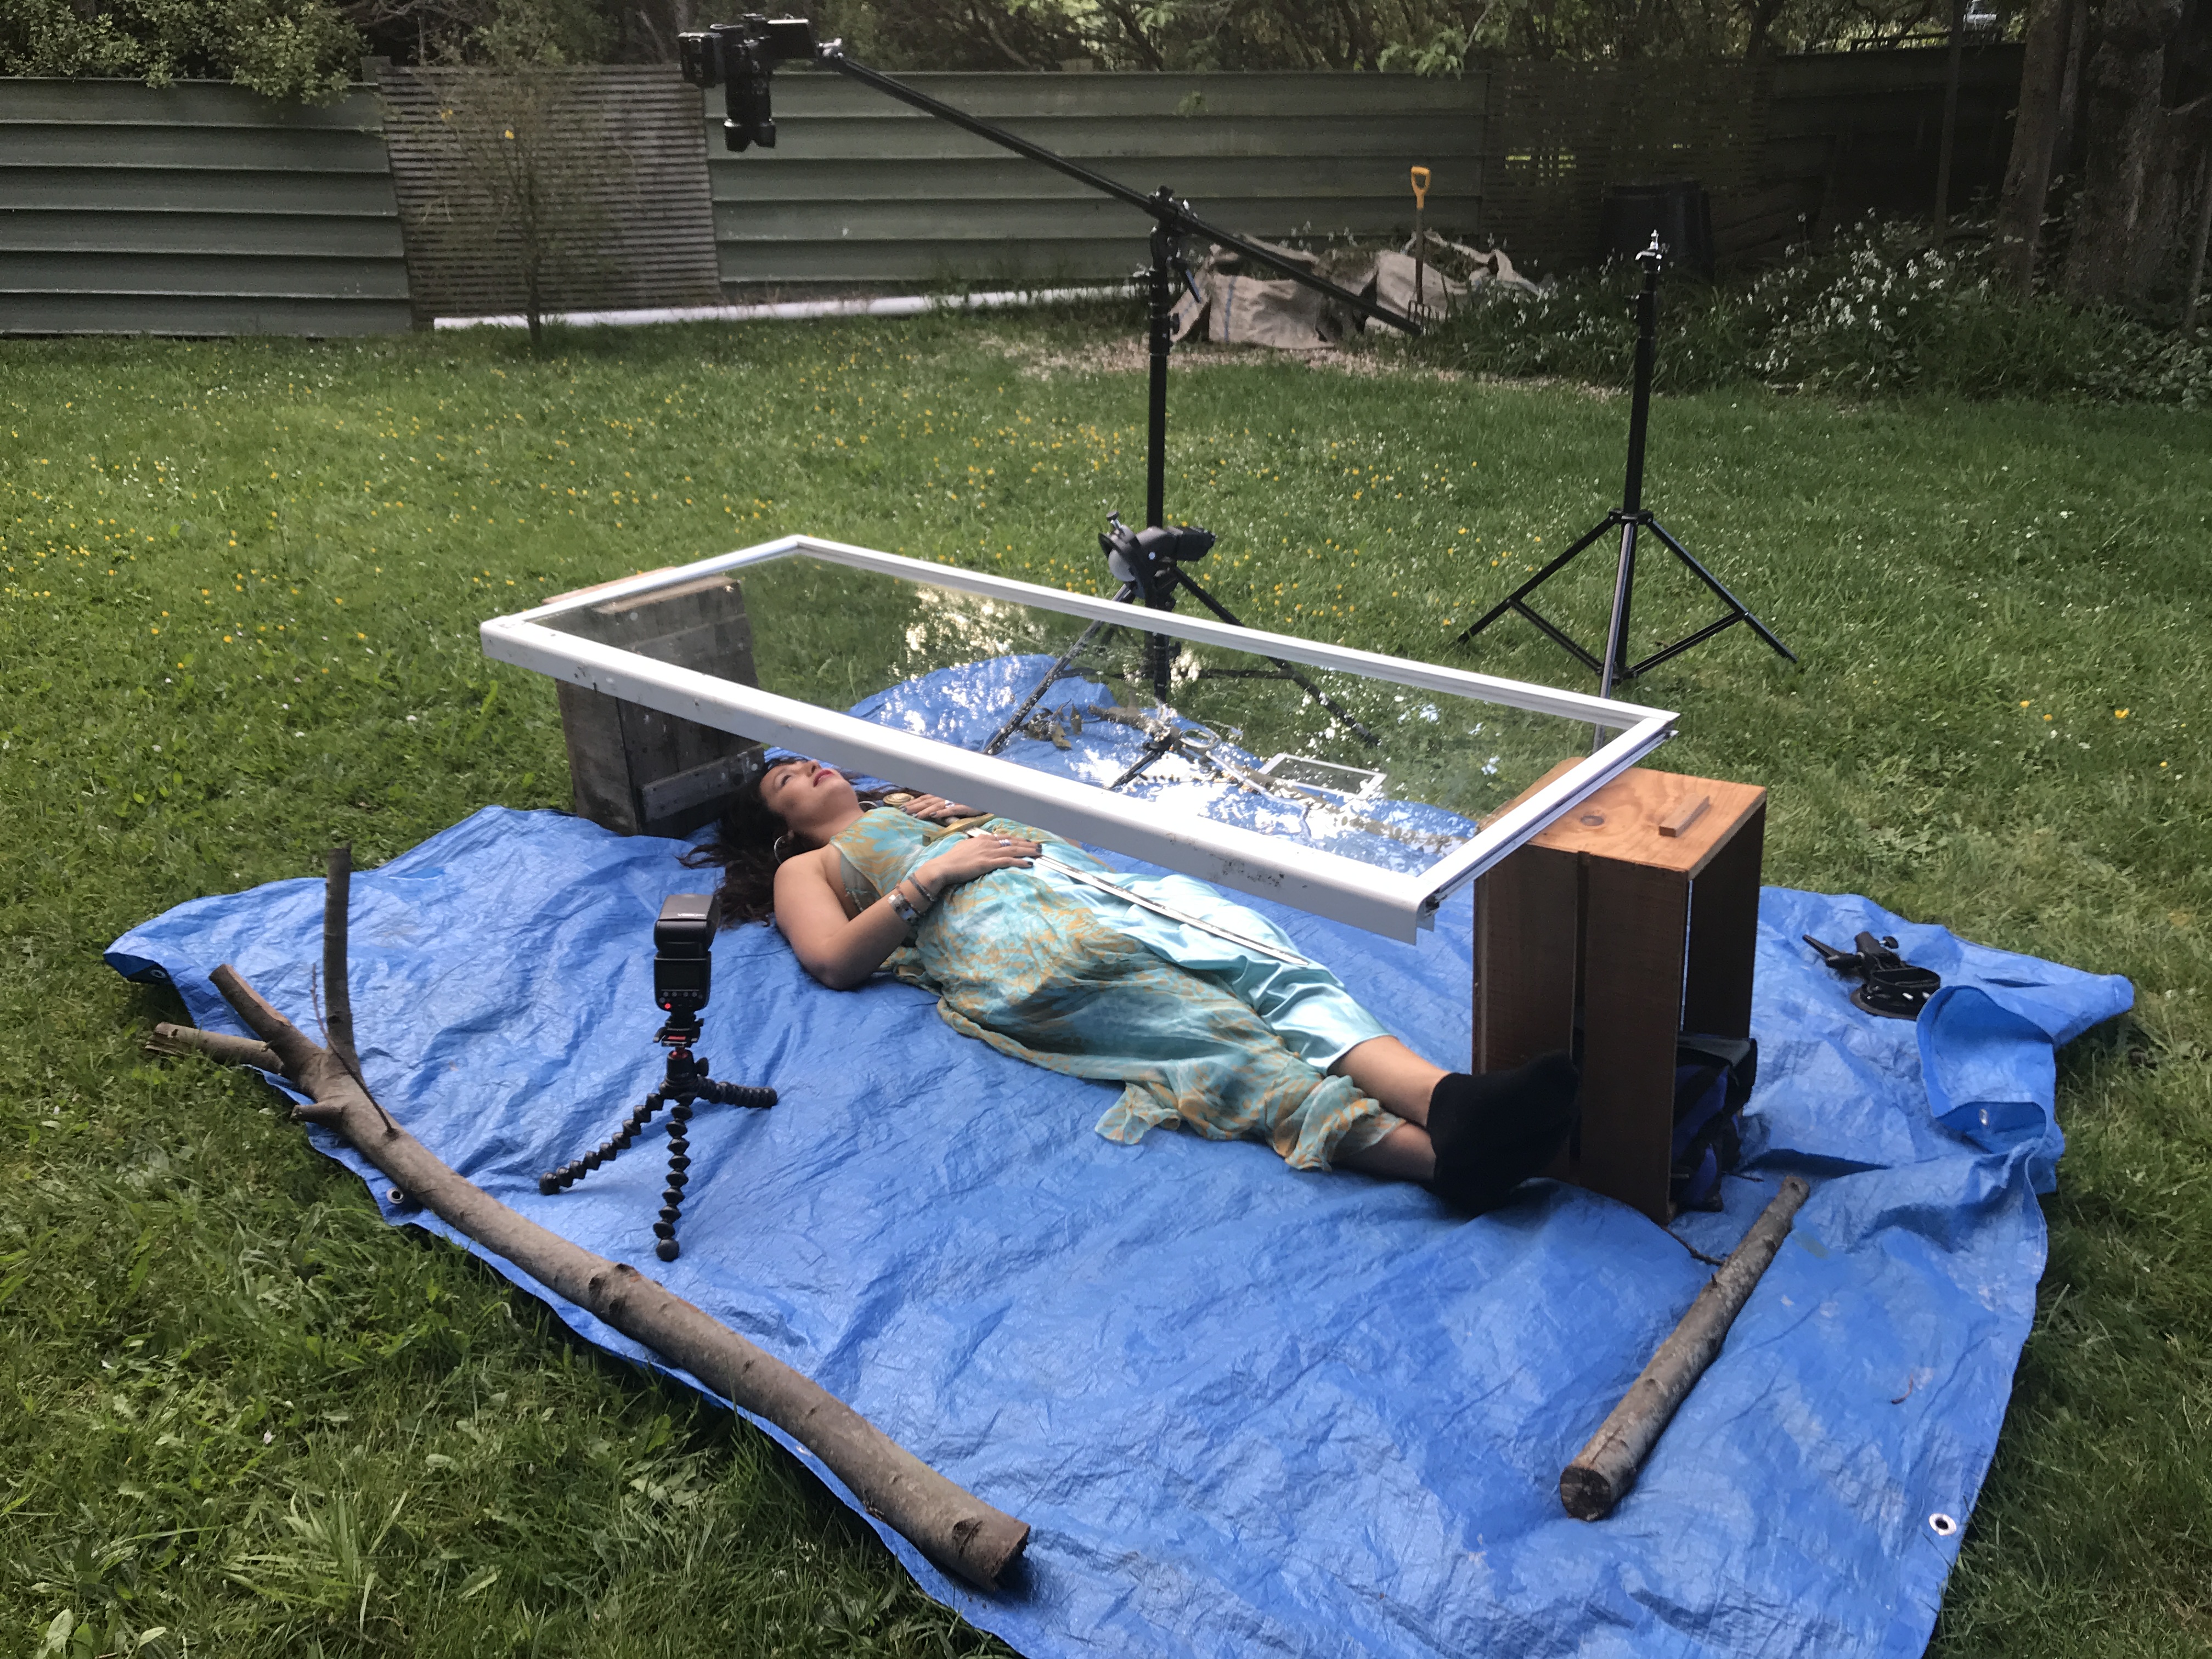
I then changed the setup to see if we could use it to replicate a model being under water. I had shot Megan a number of years before but that was in an actual bath.
I placed a tarpaulin on the ground and set the door on top of two boxes that made it high enough for Marianne to go under. I then positioned the camera on a boom and lights on either side of her. We then filled the top of the glass with about 1cm of water.
To try to mimic the water effect we placed a rolled up towel under Marianne’s neck so that her head was at the right angle. We then started to do a series of images before the local insect population decided were were on their dinner menu, and we were forced to call it quits.
While I ended up with some usable images I would have to say that work is still needed before I would be really happy with the technique. There were two main issues one of which is easier to solve than the other.
The first was that there was two much distance between the water and Marianne. By the time I had focused on her, the water essentially disappeared as it was completely out of focus. The result was an image that just looked soft. The answer would be to close the distance between the glass and subject.
The second issue in not so easy to fix. That is that the body changes shape when it is lying on the ground as opposed to being supported in water. Not sure what we do with that one.
Even though I didn’t come out with images exactly as I had hoped it was still a fun experiment to do.
One of the things that I am very mindful of when working with models on my personal projects is that the images produced from them may not be what the models would necessarily put in their portfolios. For this reason I always offer them a second shoot where we will photograph their concepts. This was the case with Marianne who was my model for Pisces in the Zodiac series.
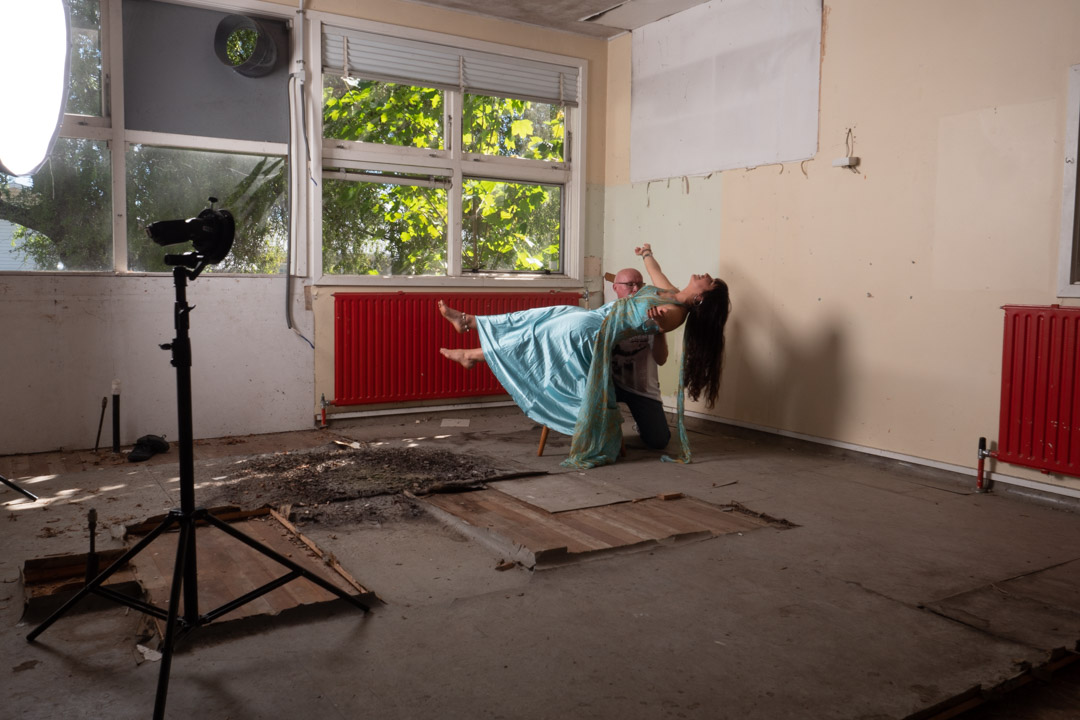
Marianne requested that we do a levitation shoot, as well as one involving a water look. Close to us is a disused scientific complex that I could get access to so I decided this would be a perfect location for the shoot.
Levitating a person is a relatively simply process and much easier than the food mentioned in my previous post. In its simplest form you take an image of the empty area and then have your model lie across a chair or stool. You them blend the two images together in Photoshop and mask out the support.
We used the dress from the Aquarius and Cancer shoot as it was quite flowy. This makes hiding the stool a lot easier and also makes the shot more believable if fabric is falling down.
The issue that we ran into was that Marianne could not balance herself far enough out. The solution was then to set the camera on a timer and I would support her. Her hair did present a problem so we ended up shooting with me in two locations and bringing those together in post.
I generally shoot my blank image at the end of the shoot so that I can be sure that the light falling on it is the same as for the other images. As can be seen in the images we were using two lights, in addition to the small amount of light coming in from the windows. The large light was in a 1.5m octabox to provide fill and the main light was a bare flash at a low power aimed at Marianne’s hair.
To make the job easier I also took a second blank with the light stands pulled back as you see they are not present in the final image.
We then turned around to produce another shot. Unlike the first this area was getting a lot of light from outside and I wanted to incorporate that in the finished result. So I set my camera at 1/100s f8 so that it would not completely overpower the light. I then positioned the Octabox camera left but had it on a very low power to only lift the shadows and not remove them completely.
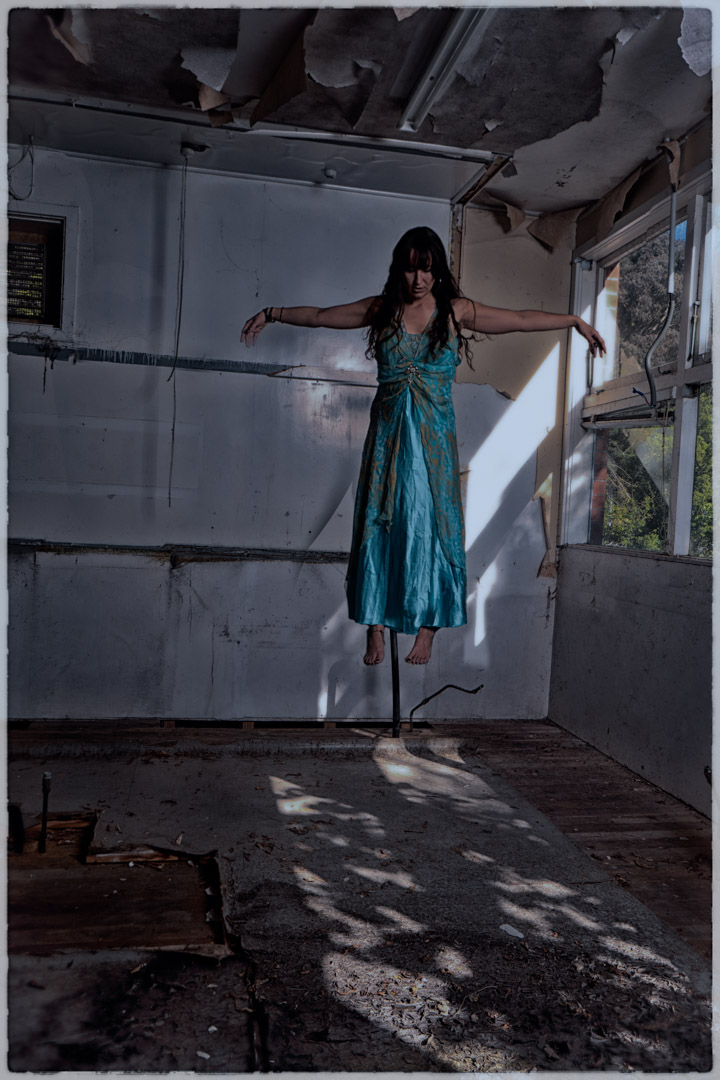
The concept behind this shot was to be a lot darker and spooky so I had Marianne stand on the stool with her arms stretched out and head down.
To get her feet dangling we then moved the stool out and had her sit on the top of a ladder. While this was not in exactly the same height as the stool, it was reasonable close.
Back at the computer the three images were merged together. As she was in a long dress this make blending the feet and the rest of her much easier. I decided to exclude the lace at the back of the dress.
I used Nik Software to really darken down the image and in the process made it look like it was shot at night with the light of the moon.
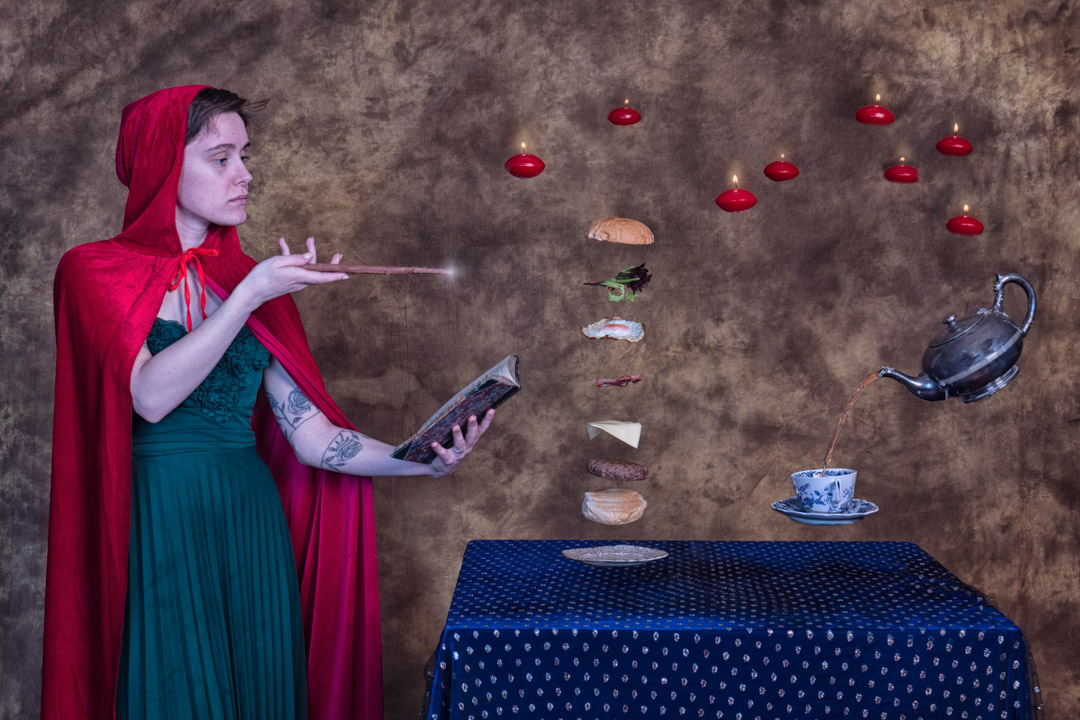
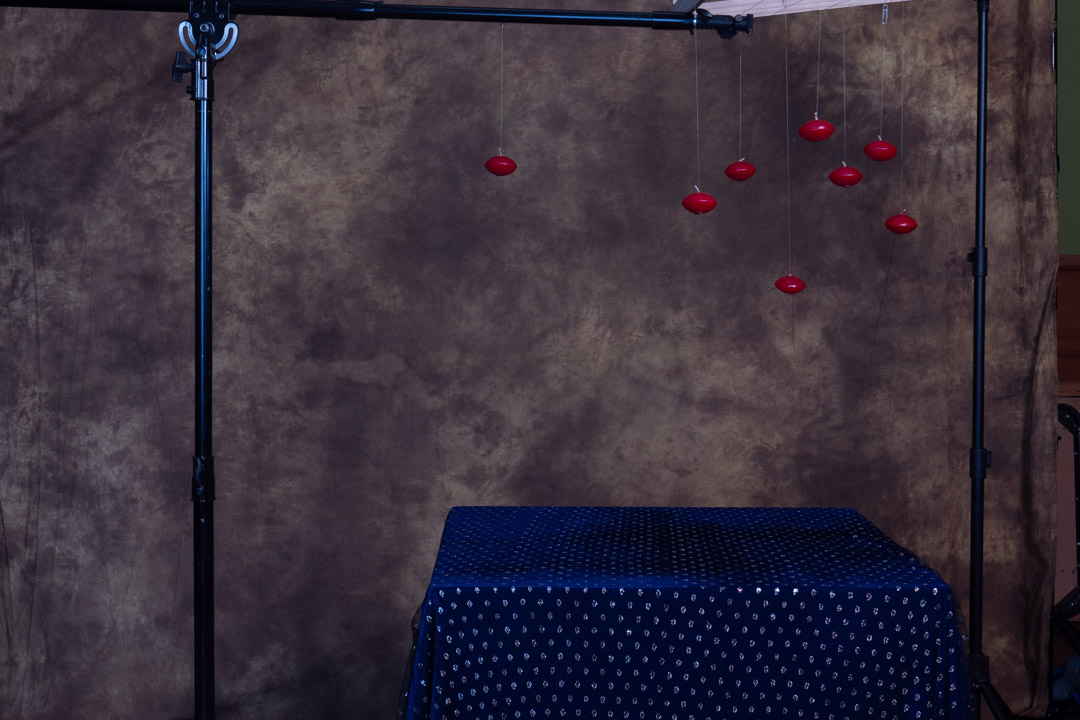
Each year I like to enter an image into the Wellington Interclub that has been specifically created for the event. One of the topics in 2020 was levitation. So I expected to see lots of images of models floating in the year, and decided to go with something different. That was creating an image where there was a reason for items to float, and no better reason than magic.
For the 2020 Interclub we had decided to do things a little different and some concepts were shot by a number of members working together. I had a reasonably clear idea of what I wanted and so I went online. grabbed some clip art and created a concept image. Everyone agreed that it was a great idea.
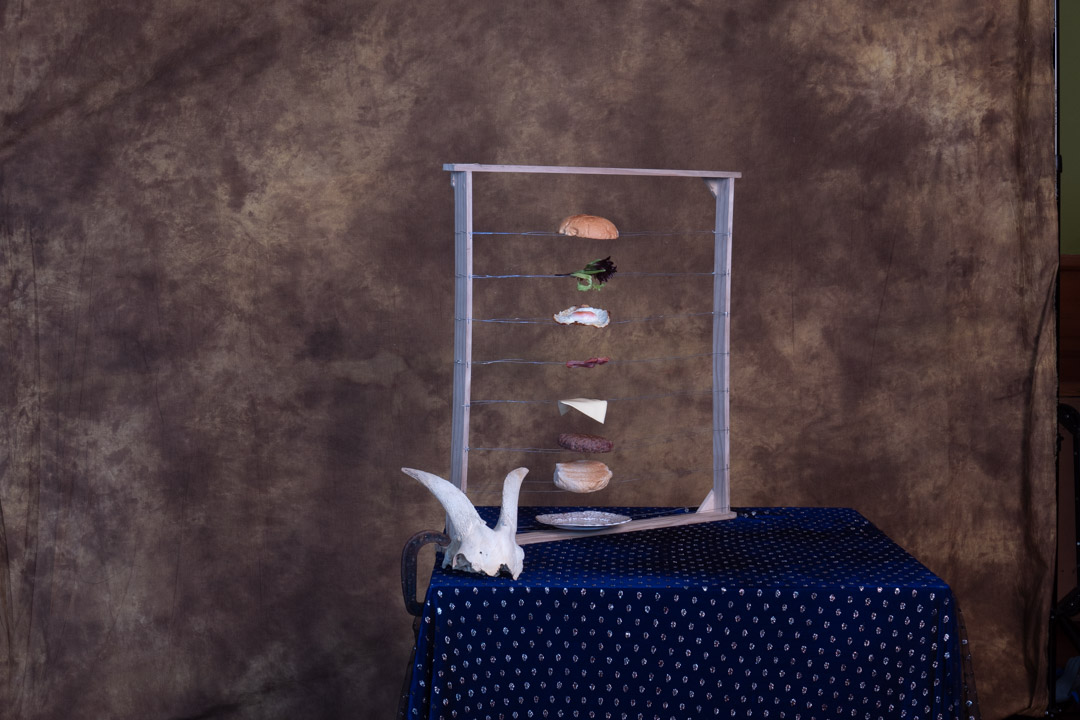
The first task was to assemble the props. The levitation of the food is done by building a frame and placing the individual levels on wire.
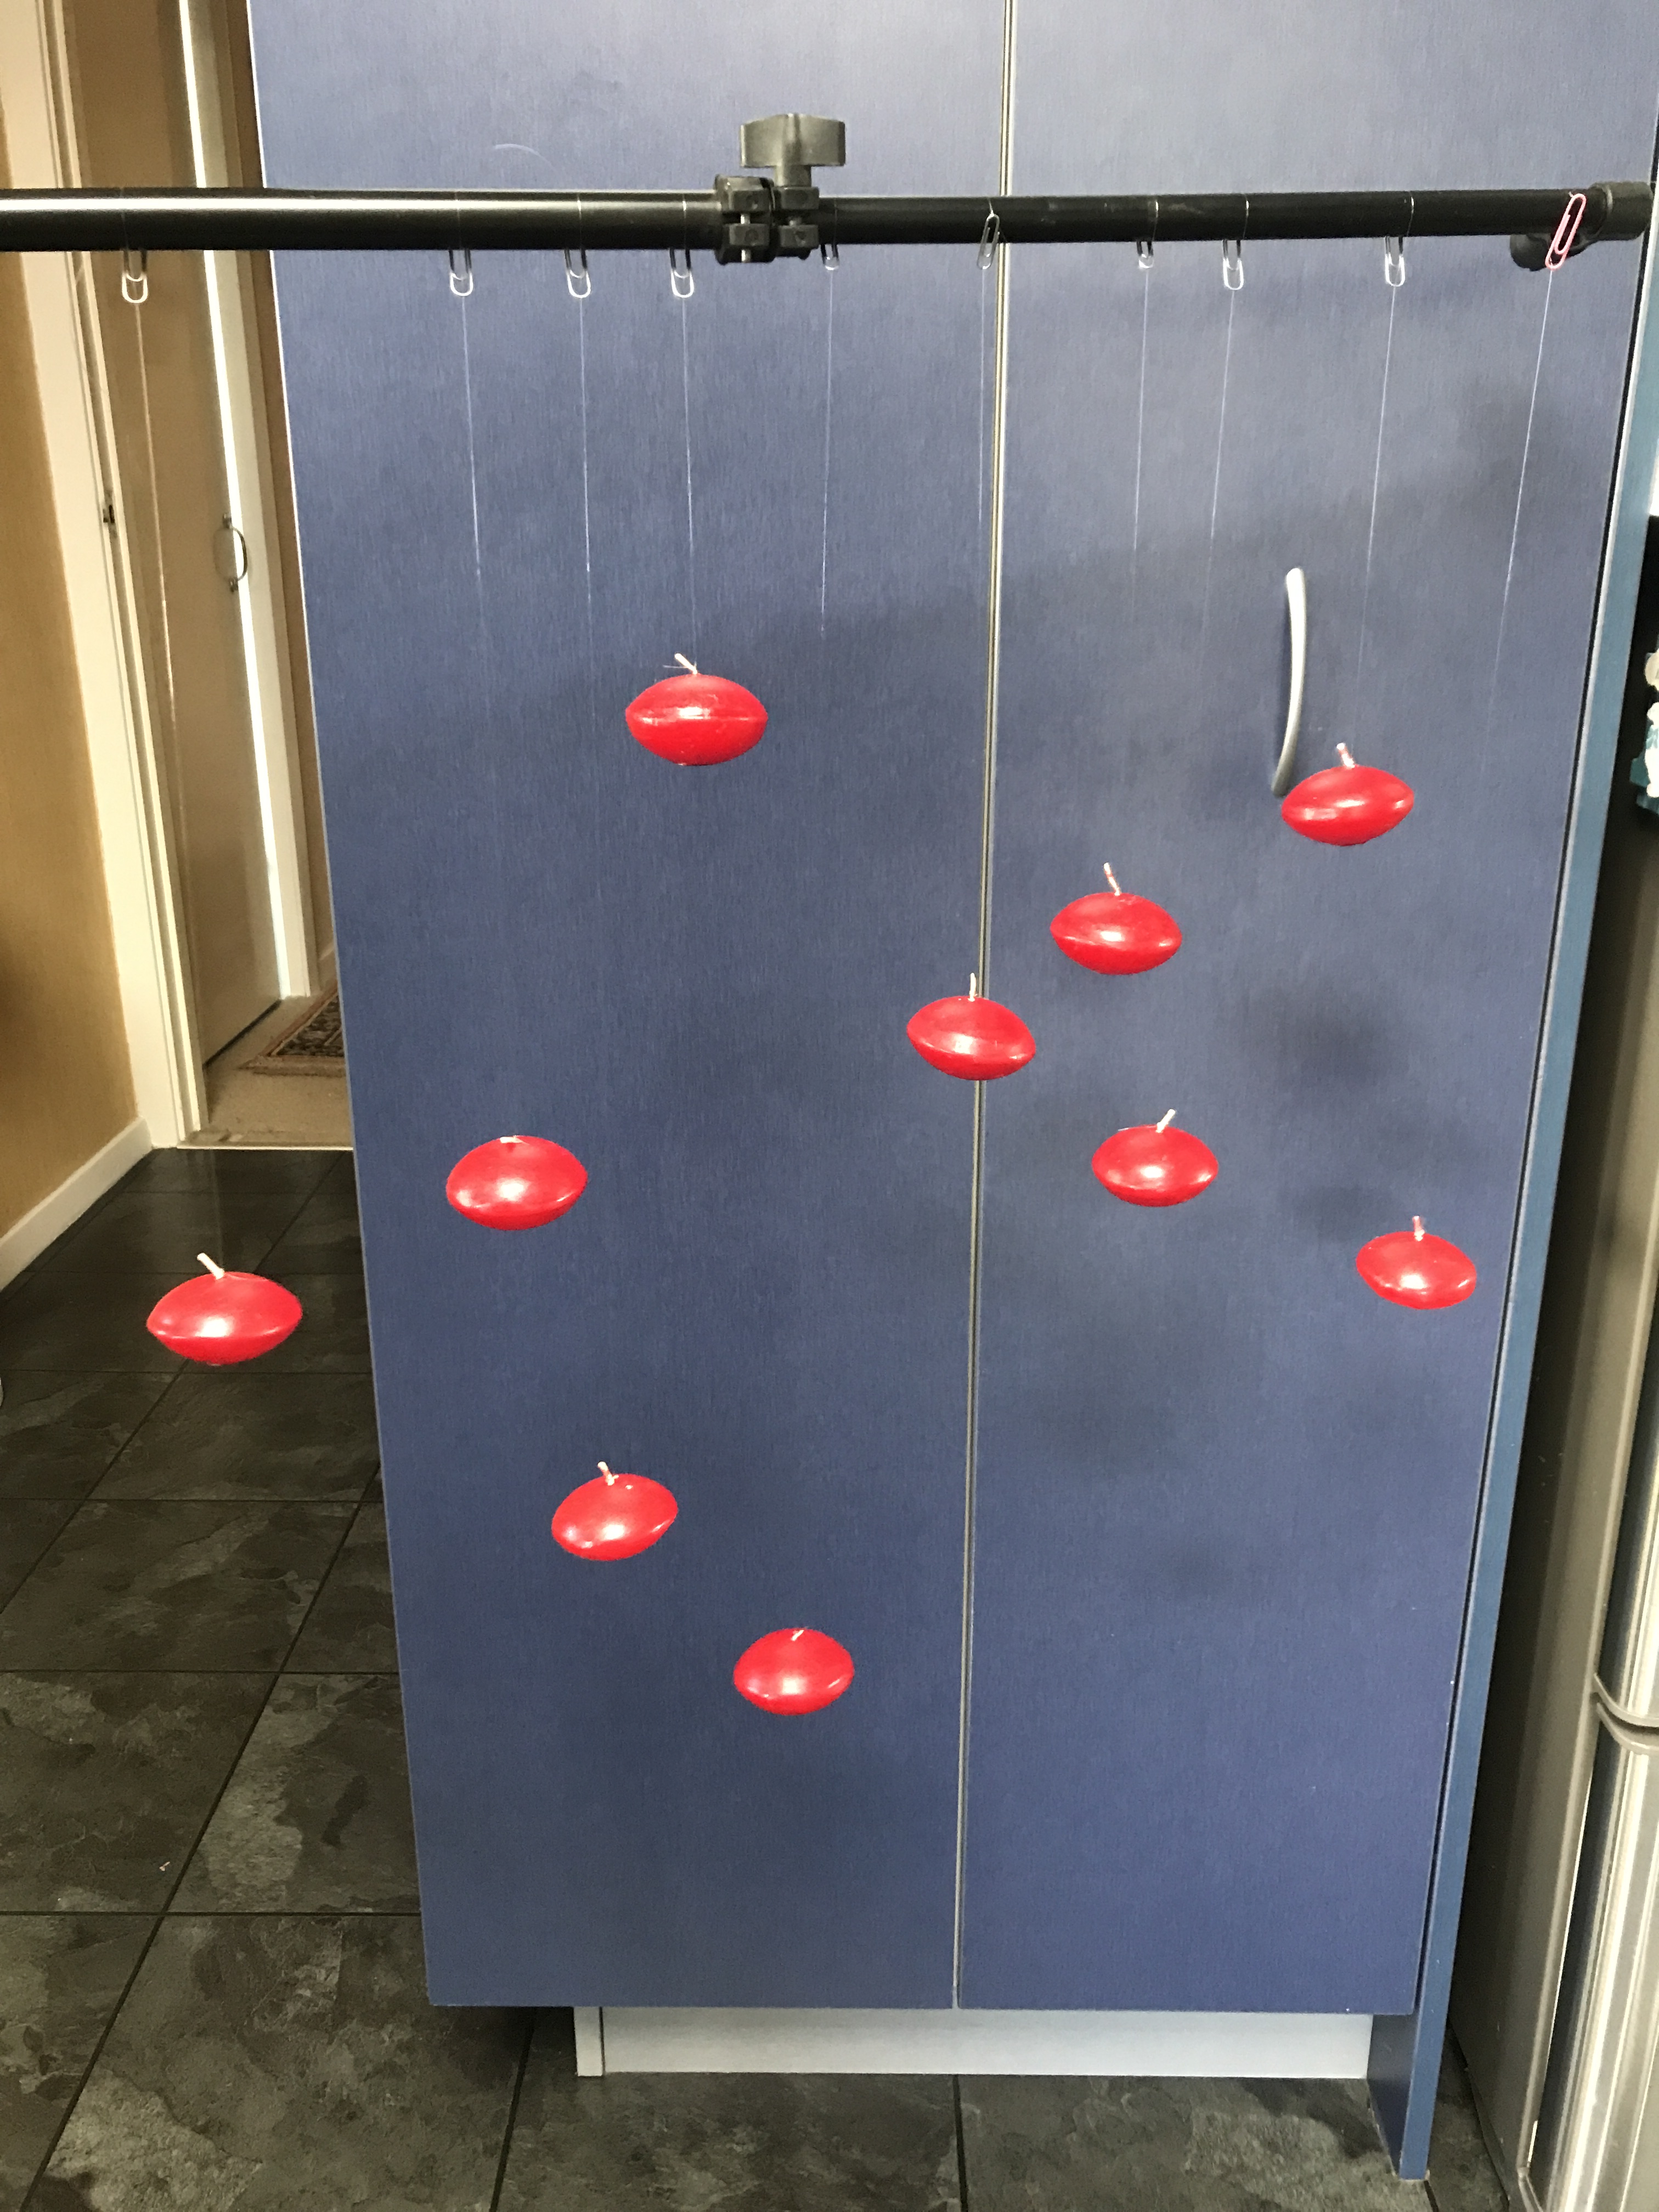
While not shown in the initial layout I decided that I wanted to add some floating candles to the screen. I managed to locate some cheap in the thrift shop and using nylon I tied them onto paper clips. This meant that they could be transported with tangling.
I found a silver teapot that came from my mother-in-law. I was then trying to work out how we could position it to get the angles right. While l was looking in a thrift shop I found a wire stand, and realised that if it was turned upside down, it would hold the pot at exactly the right angle and height.
For the shoot we had hired the camera club clubrooms as this gave us plenty of space to work in. The negative was that it meant that all of the lighting gear had to be taken down there. As I was not certain how much we would need, plenty much all of the lights were packed.
As it turned out three lights were used in the shoot. The main light was in a octabox camera right, with a fill light behind the camera shooting into a seven foot umbrella. A third light, with a snoot attachment was positioned between the camera and the main light, however this did not really add much to the screen.
The key to a good composite is ensuring that the lighting is consistent across the whole image. To ensure that we knew what the lighting on a finished image was we placed all of the individual elements on the table and took the photo with them. A long tube was used to substitute where the food would be.
We were shooting tethered and I had brought my 27″ iMac so we had a decent size computer to work on. One of the great features of the tether software I use is that you can place a previous image as an overlay. This means you can accurate position other elements.
Therefore the image we had taken of the whole table became the overlay for the next series of shots, starting with the food. Most items stayed on the wires apart from the cheese that did droop a little.
We knew that the trickiest element of the image was going to be pouring the tea, but in the end it was not that difficult. In fact the hardest part turned out to be getting the angles right on the cup.
If you are observant you will note that in the shots above there is a goats skull and human skull. These were placed on the table as ideas, however in the end we decided that the scene was becoming too cluttered. Fortunately I had taken a completely blank image so removing them later was not that difficult. The blank was also used to remove the stand on the cup and teapot.
After getting all of the elements on the table we then moved to the candles. I mounted the food frame on its side between two stands and the candles were placed around the scene. Again we had the overlay in place so that we could get an idea of how the candles would interact with the other elements. We then took a photo of this placement, which then was used for the next series of shots.
Now it would have been possible to use a single candle and move it around, however we did not do that. I wanted it to look authentic by using individual candles. Once we had the floating shot the candles were placed on the table and lit. Then we used a set of prongs to lift each candle in position.
We now had all of the images we wanted and it was now time to go into Photoshop. This was not all that difficult and simply involving opening the layers and masking out what we didn’t want. Using the overlay in shooting made this process even easier as the make did not not have to that precise in most case.
As I mentioned above the cup did cause some problems mainly because the angle when it was shot off the stand was slightly out.
The video below takes you through all of the layers that make up the Photoshop file.
At the end it was great to produce an image that was ver close to what had been planned. I would have liked to be able to tell you how it did in the competition. Unfortunately the second COVID outbreak resulted in the event being pushed back to March this year.
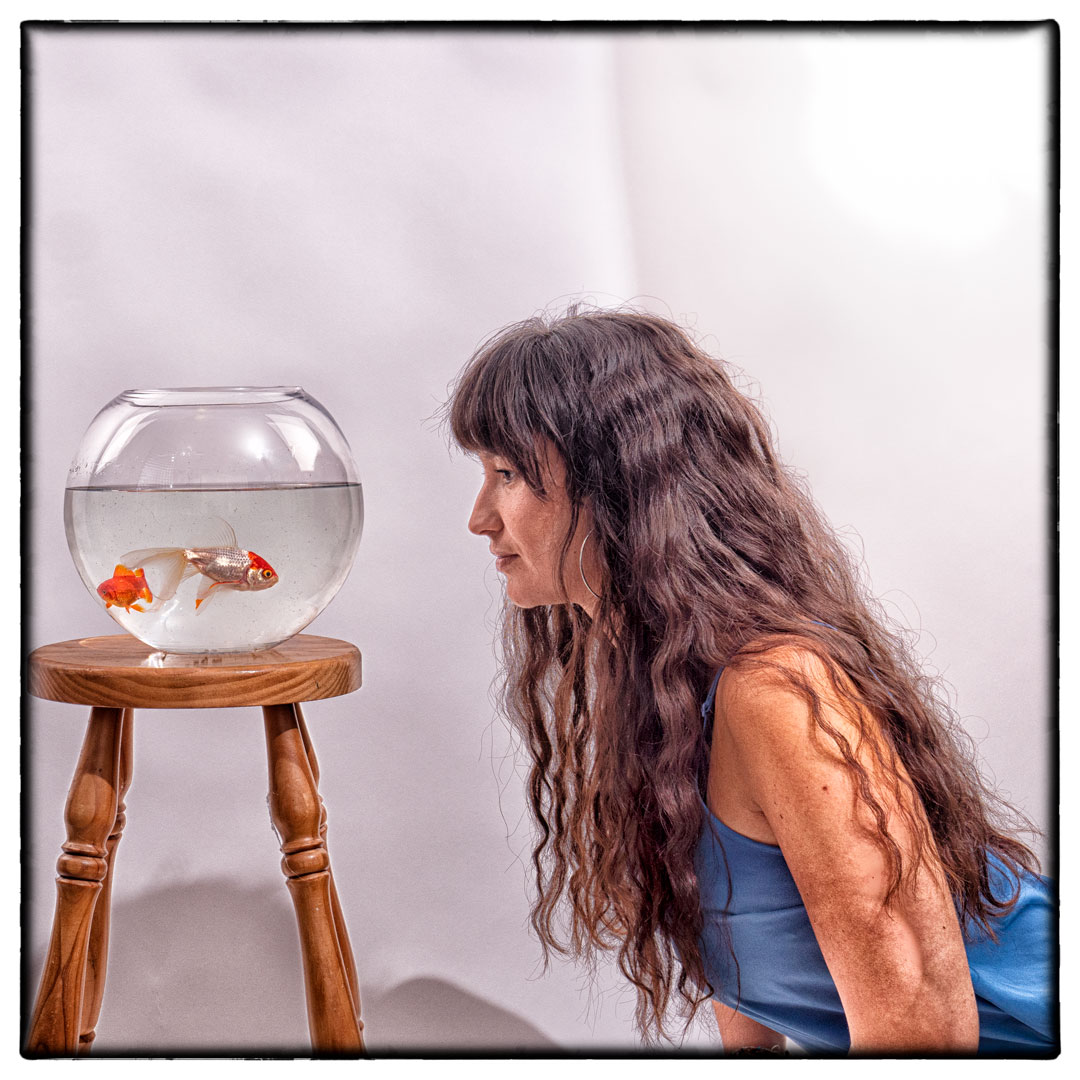
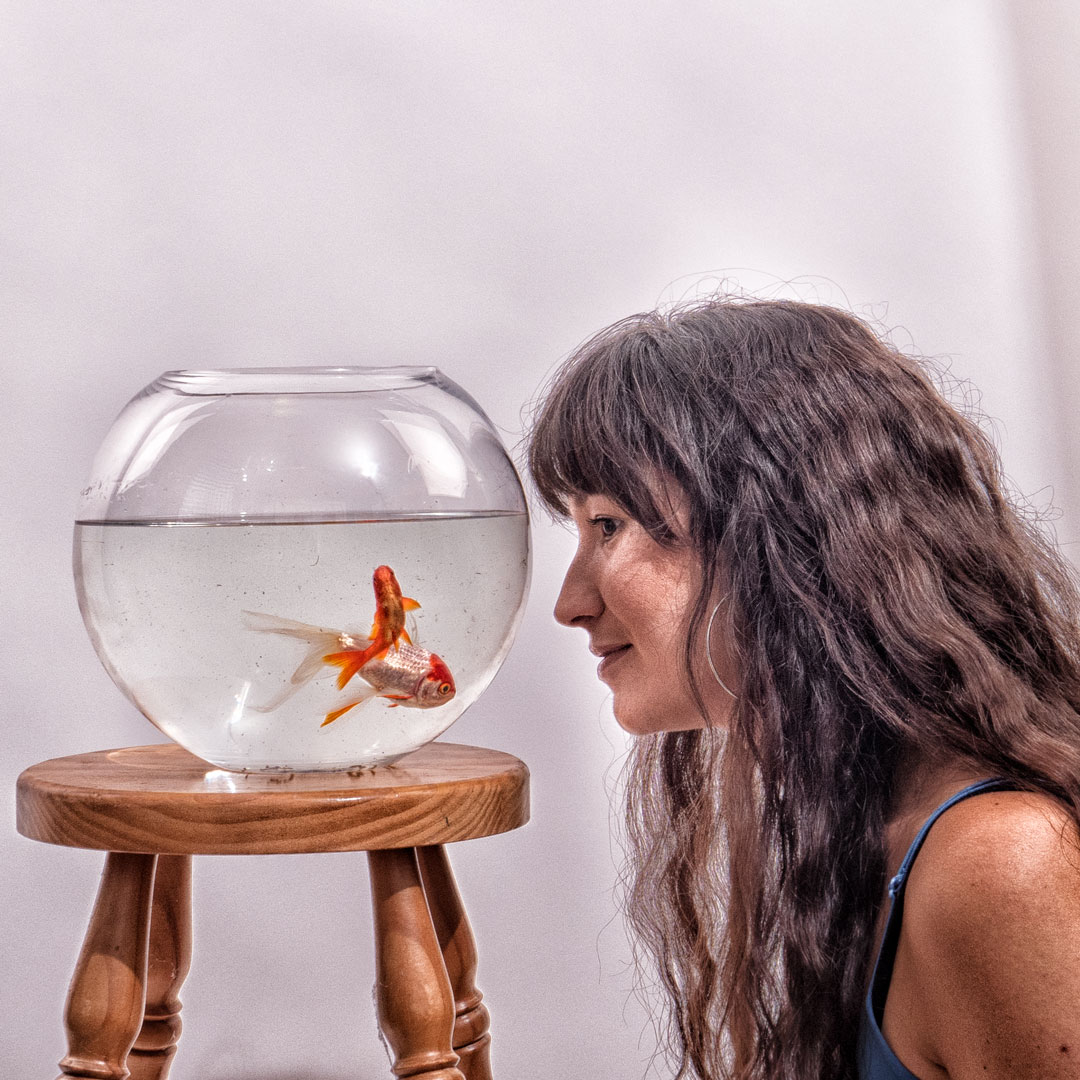
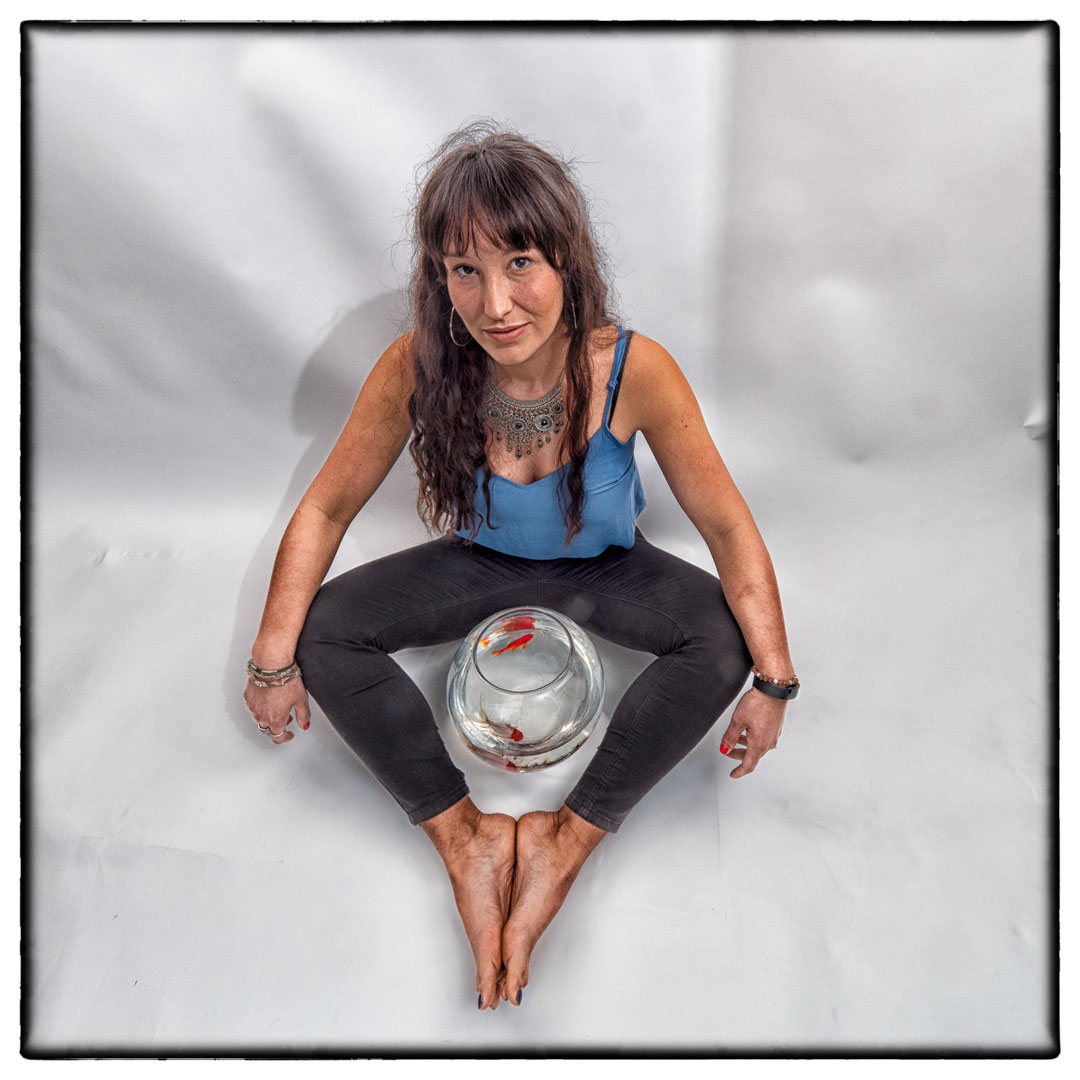
In previous posts I have told you how I went about planning for the Pisces shoot which would turn out to be the final shoot in the zodiac series. As it turned out while finding models of the Pisces was relatively easy, getting them to commit to a shoot day proved to more difficult.
A month nearly past between the test shoot and when Marianne arrived to do the final one. In that time I had also managed to acquire a fishbowl that better resembled what I had envisaged.
The bowl was actually larger than the one that I had tested and therefore heavier. I therefore decided against getting Marianne to lift it even though that is what we have practised. The goldfish had also become better at avoiding me so I ended up not being able to catch the large gold one that I was after, and instead had to settle with a much smaller one.
In my test shots there were two lights aimed solely at the background. However when I started to shoot I realised that if I pulled them further away that the scene was much more evenly lit. To get light on the front of both the bowl and Marianne I positioned my strobe camera right with it being bare bulbed and pointed at the ceiling. Essentially this created a large light source above her.
Although the light positions did result in reflections in the glass I was not worried about that as it did add dimension to the image.
Although I knew fundamentally how this image would fit into the set I wanted to ensure that I had a variety of images with different focal lengths and angles.
This included having Marianne holding the fish, as well as ones where she was sitting on the ground. Ultimately it was one of her lying on the ground that was selected to be the chosen image.
With Pisces finally shot I now had a complete set of the twelve signs, even though if I was to submit them both Cancer and Virgo needed to be reshot to fit with how the set was now looking.
The level that I am going for the Photographic Society of New Zealand honours has a very low success rate and part of that is the Honours Board’s desire to see a level of diversity in the images submitted. I started to think that the set was not diverse enough and this was confirmed when I took it to one of the members of the board who had just stepped down.
While it did not end up being a submitted set, the process of shooting the twelve image was very enjoyable and worthwhile.