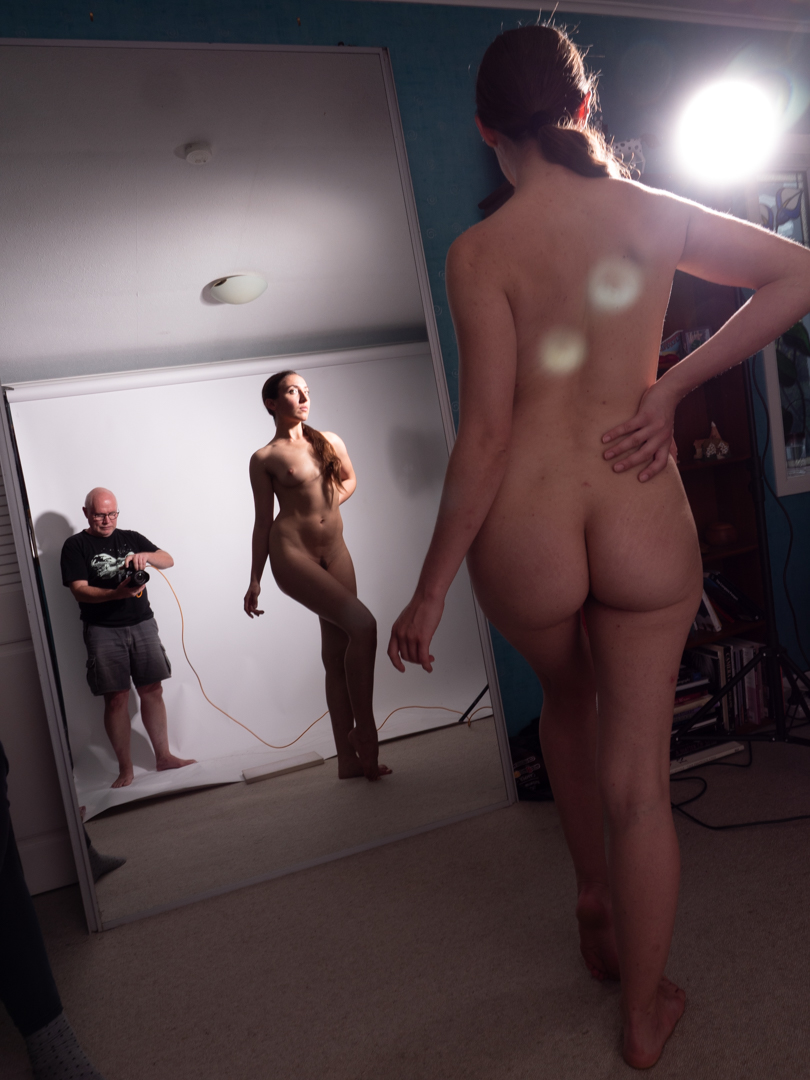
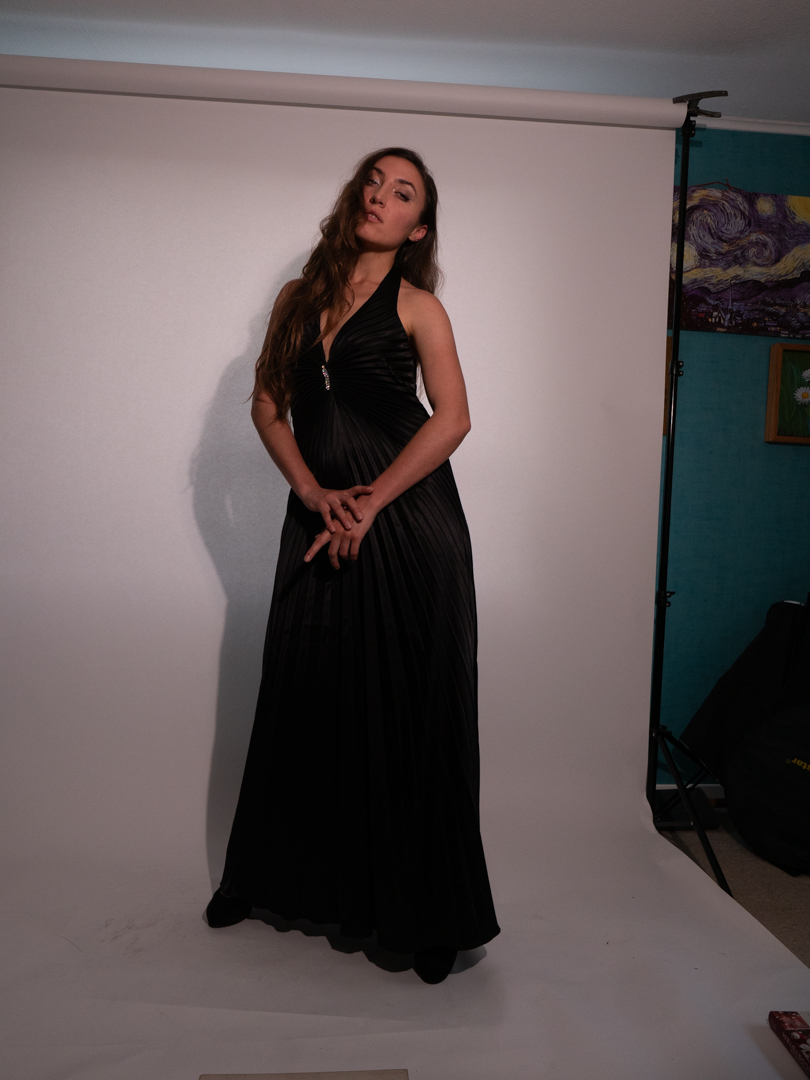
As I was researching helmet Newton to determine his style I came across an image that really took my fancy. It is called “Self Portrait with Model and Wife” and was shot in Paris in 1981.
Sometime ago I acquired a very large mirror that came out of the shop that was being refurbished. I knew that it would be perfect to try to recreate the image. While one of the other photographers (Helen) was shooting Johana I was working out the angles that were needed.
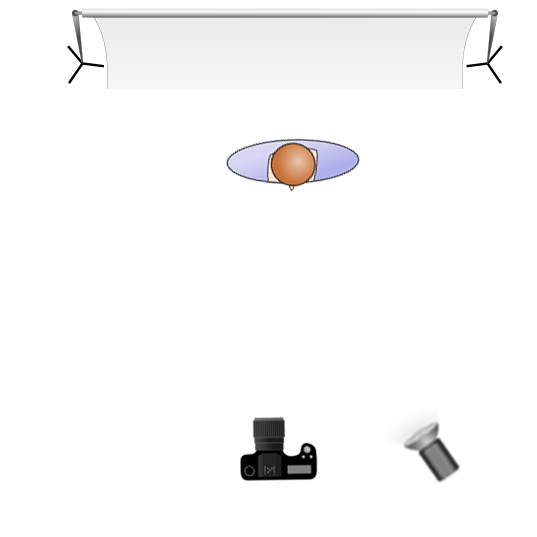
Lighting was going to be the challenge. I needed to ensure that both myself and Johemiane were lit especially as we were in quite different locations.
I initially tried to use the single lit positioned camera on the right. However, the image below shows that this created a number of issues. The lighting was very uneven and I was getting unwanted flares.
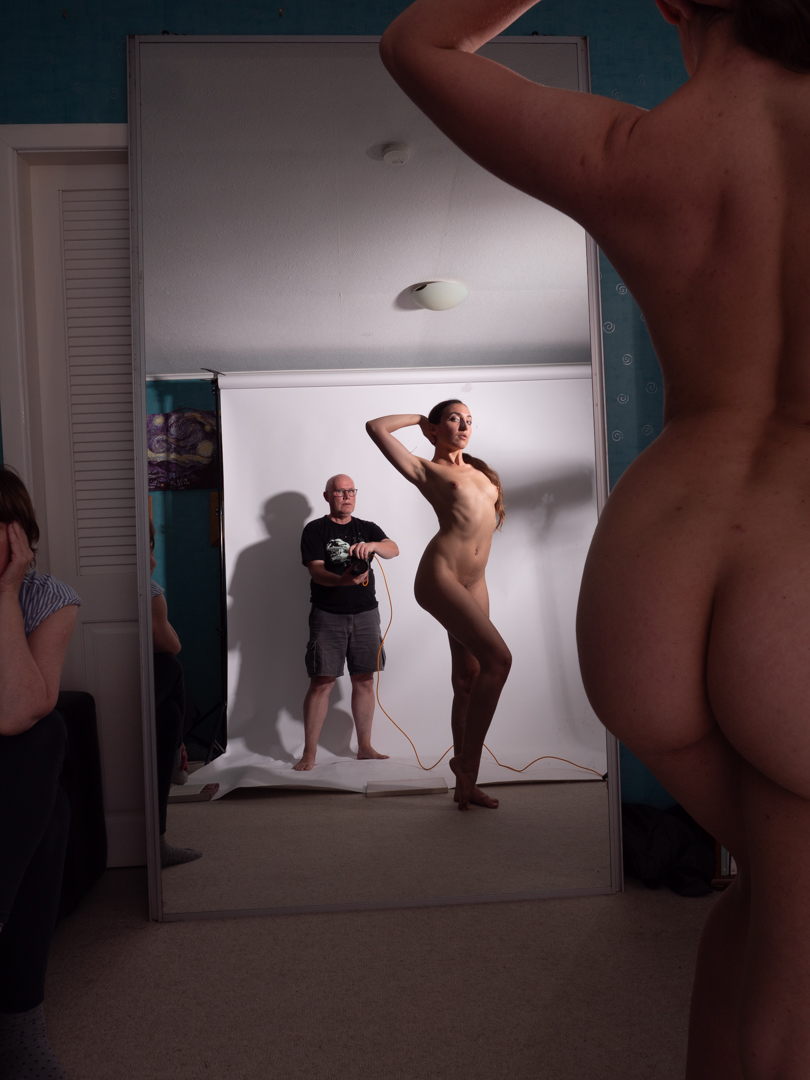
In order to eliminate the flare I moved the constant light so that it was in line with Johemiane. Then I placed a 65cm octabox just out of view so that it provided better light on her.
While it fixed one issue it presented a further two. Firstly there was no light on Johemiane’s back or on Helen who was acting the part of the “wife”. Secondly I will getting an ugly shadow on the backdrop from the constant light.
The answer was to move the large light. This was positioned next to me aiming it to just touch Johemiane. This provided lighting for her back. It also had the advantage that the light reflecting off the mirror illuminated her front. The same light also lit Helen.
It took about 15 shots to get everything right in camera.
I selected the final image. Then, I took it into Photoshop. I used Silver Efex Pro to apply the same black and white treatment. This was the treatment I had used on all images from the shoot. Finally to replicate the image I flipped my one.
In the final image you can see the code connecting my camera to the computer. A similar cable can be seen in the original photo however its purpose would’ve been completely different. In Helmet’s case the cord would have been to fire the flashes.
As I mentioned in the first post of the series, this whole shoot was intended to produce images. These images could be considered for the Wellington income print competition.
This image ended up being the one selected by the club to represent them. It came third in the round.
This is the third post covering the shoot where we were trying to produce images in the style of Helmet Newton. You can look at the previous post for the background to the shoot.
After we completed the domestic nudes images I moved into our lounge where I had another set up already in place. This consisted of my Godox AD300 strobe in a 80cm softbox.
As in the previous location there was no diffusion material on the softbox. This meant that the light was harder than you typically get. The settings on the camera did not change f5 1/100s ISO100.
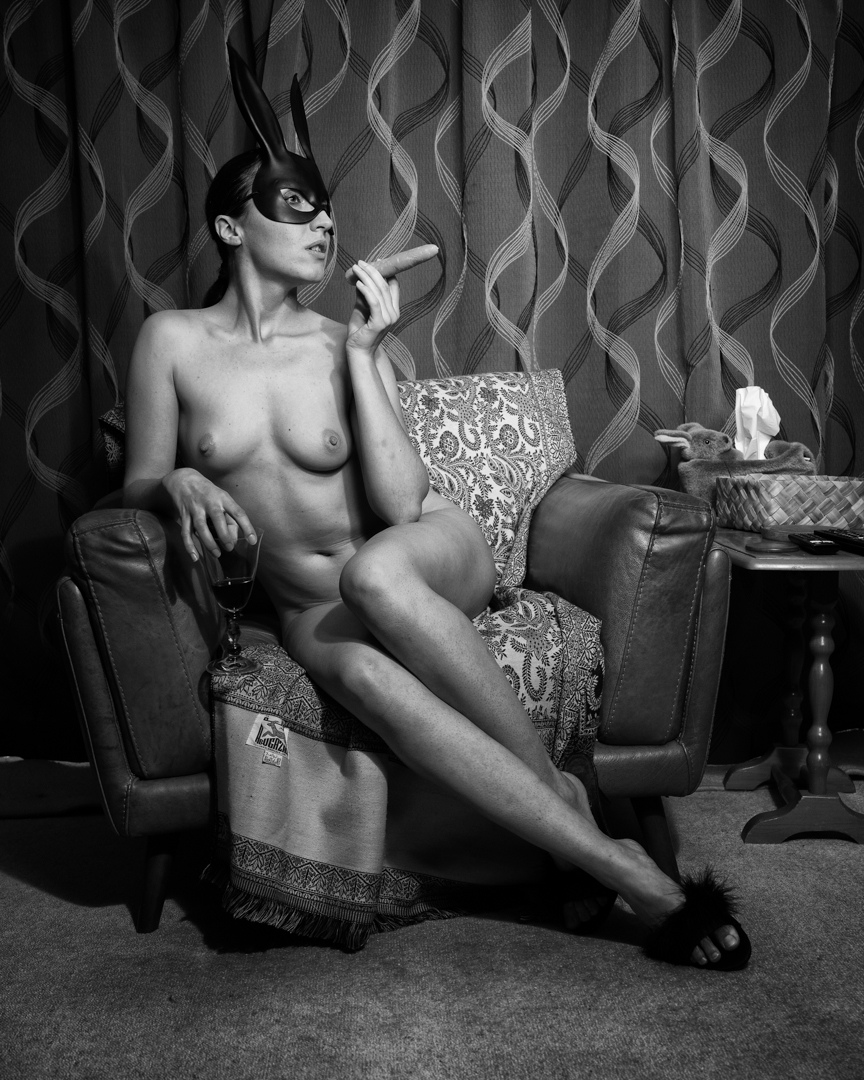
This image was not directly inspired by one of Helmet’s actual photos however they use of the bunny mask is not exactly original.
I positioned Johemiane on the chair and gave her a couple of props to interact with. She was absolutely brilliant at getting into character and this showed in the resulting images. The video below gives you a behind-the-scenes view of this part of the shoot.
The image came out exactly as I visualised it. As with the others it was coverted to a high contrast black-and-white image using a specific recipe I had created in Silver EffexPro.
In the next post we move to the most complicated shoot of the session.
This is the second post covering the shoot where we were trying to produce images in the style of Helmet Newton. You can look at the previous post for the background to the shoot.
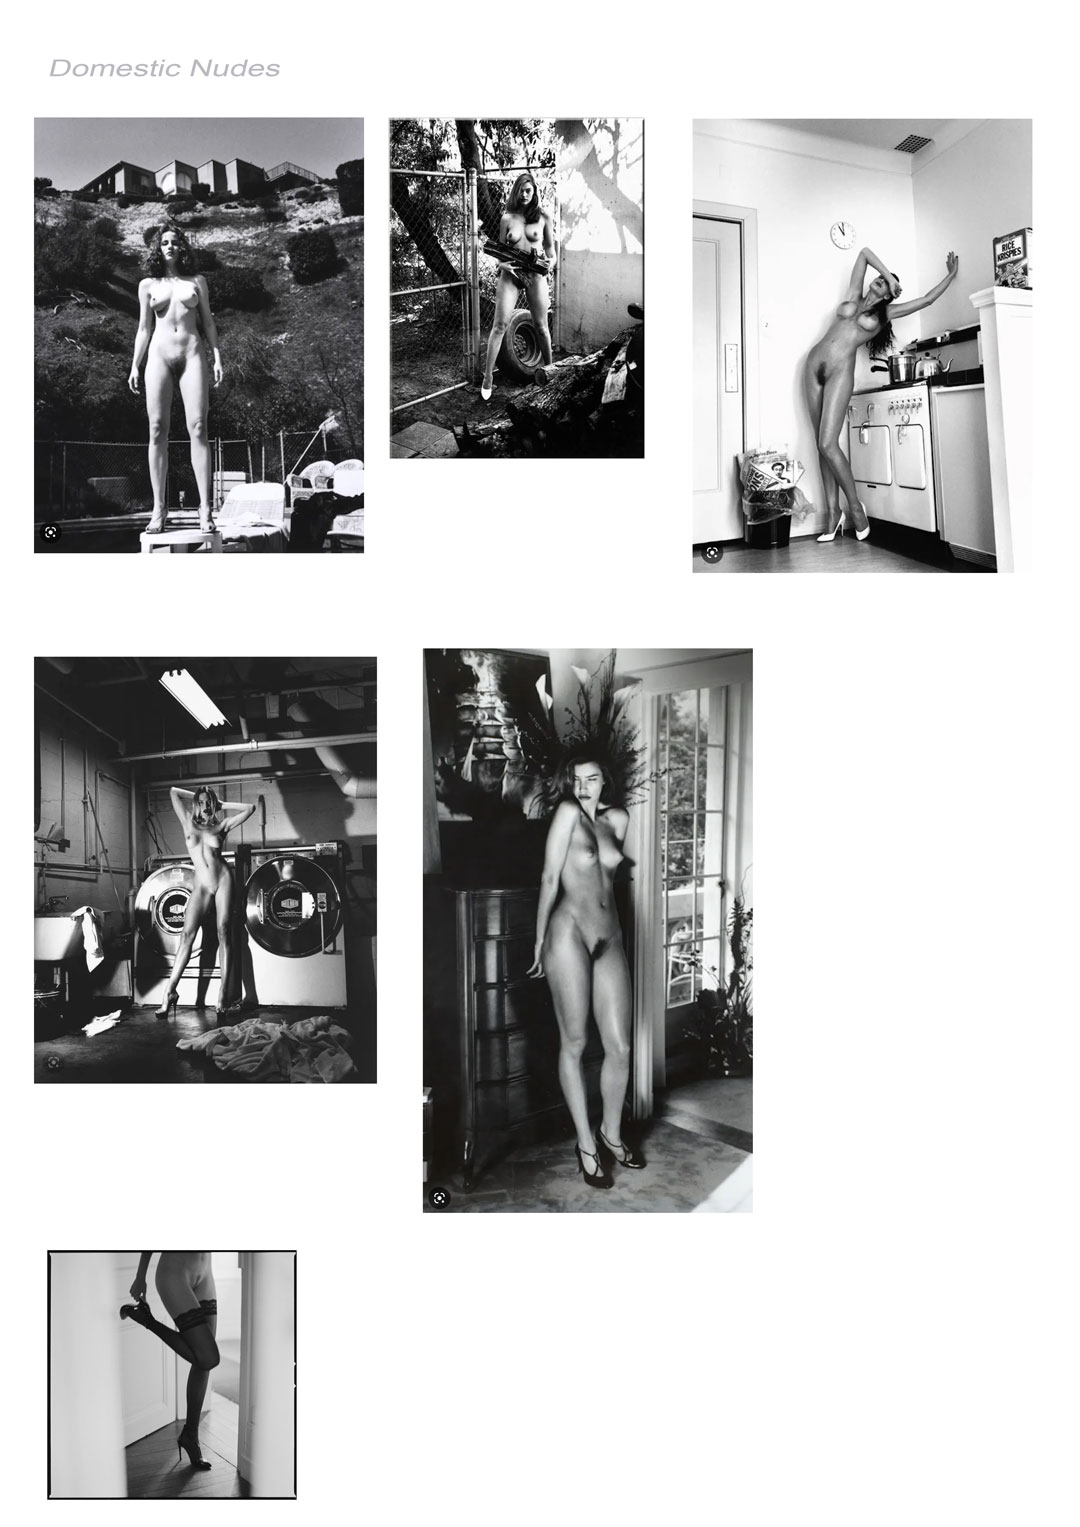
The first series of images were shot on a white seamless in what was obviously a studio. He had done another body of work entitled “Domestic Nudes” with subjects naked and more normal circumstances. In the second part of the show I wanted to recreate some of these.
I had only booked an hour with Johemiane to complete different looks. I knew that I could not afford to waste time mucking around with lights. Fortunately, I have a lot of gear. I was able to set up lights ahead of time in the areas I had identified as places I wanted to shoot. As they all walked off the same trigger I only had to move Johemiane, myself and the camera. I also swapped cameras to my Nikon Z6ii.
We started in the kitchen which turned out to be a great location. I had set up my Godox V1 speedlight in a 65cm softbox. I found that the speedlight is more than adequate in such a situation. To keep the light punchy there was no diffusion material over the front of the softbox.
The only issue I was dealing with was the reflection of the softbox in our garden window. To get around this problem I moved the light to minimise the effect.
We then moved into our entranceway and I had a Johemiane play the piano.
The setting for these images was f5 1/100s ISO100. This allowed some of the ambient light to enter the image. It prevented the photo from looking completely flashed up.
Each year the Camera club in the Wellington region have a print competition. The club that hosts sends out a list of 10 topics. Each club submits one print for each topic. Generally, the topics are fairly lame. However, in 2023, the Kapiti club decided to stir things up a little with the topic “In the style of Helmet Newton”.
For anyone unfamiliar Helmut Newton (born Helmut Neustädter; 31 October 1920 – 23 January 2004) was a German-Australian photographer. The New York Times described him as a “prolific, widely imitated fashion photographer whose provocative, erotically charged black-and-white photos were a mainstay of Vogue and other publications.
I heard about the topic before its release. A member of the Kapiti Club asked whether I could help them source models. I know that recreating some of his work would be very fun and challenging. It was it was a challenge I was very happy to undertake.
As chance would have it, as I was thinking about setting a shoot up, I was approached by Johemiane (@Johemiane). She was a professional nude model from the Czech Republic who was travelling through New Zealand. She was approaching local photographers to earn a little bit of money to fund her travel. I spoke with a couple of photographers from my club. I wanted to see if they were interested in sharing the costs. We booked Joanna for a two hour shoot. The first hour would be shared in the second hour was totally devoted to my own concepts. Because the lighting and arrangement in each shoot is different I have split the two hour session into a series of posts.
The first task was the analyse Helmut’s images to try to determine what was his style. Given that he started photography in 1936 and was shooting right through into the 1990s this was not a simple exercise. However when you looked at his most famous word there were two things that sprung out. Firstly they all portrayed women in strong/dramatic poses. Secondly the lighting was very contrasty and it was clear that he had deployed hard light a lot. While he was mainly known for black & white images, you could see the same style in the colour ones.
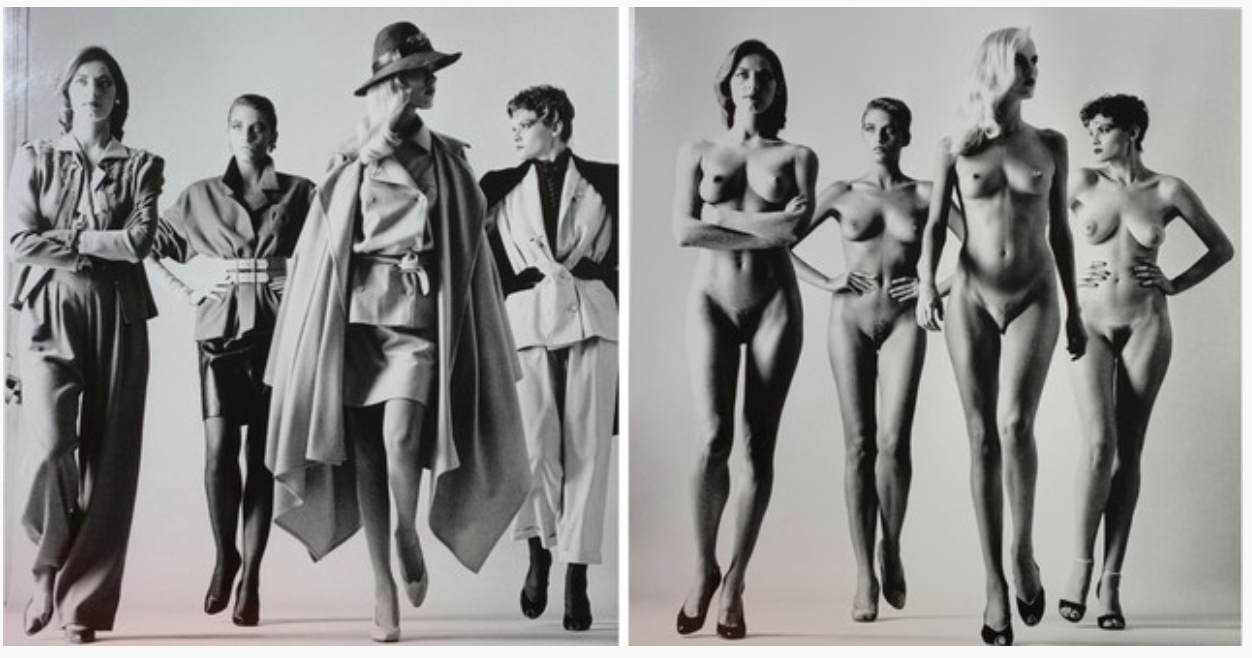
The first look I set out to recreate was an image entitled “They Come” shot in 1981. In his original image helmet had photographed four models in the latest Vogue fashions he then got them to repeat the same pose except they were fully nude.
The lighting in the image indicates that it is a single night coming from Camera left. They are short on a seamless white background. I see that exactly the same arrangement I initially positioned the light camera right. As this was part of the session with the other two photographers, I made things easier. I used a constant LED light that I had recently acquired. The idea was that they would not have to much about swapping out the trigger.
We started with Johemiane fully clothed. By using a constant light my settings where is f5.6 1/125s IS0800. The image below is an example example of what these settings produced. They were not exactly what I was looking for.
So I powered up an Elinchrom D400 and positioned it camera left. It was in a 7″ reflector which gave a very hard light. I left the constant light in place to provide fill.
I also determined that the black dress was not working so I had Johana change into a pink one.
It was there a matter of getting here to do a number of strong poses. As my usual practice I was shooting tether to the computer. Once the clothed shots were taken, we reviewed them in the computer, and chose the ones that we wanted to repeat nude.
The computer was positioned just out of shot but where Johemiane could see it. The other great feature with the Panasonic tether app is that you can select a previous image and use it as an overlay while shooting the next image. This meant that we could get Johana to adjust her poses to exactly align with the clothed shots.
Then in photoshop it was a simple matter of bringing the two images together.
Each year the six camera clubs in the Wellington region get together and hold a competition. The host club choses ten topics and then each club submits an image that meets the topic.
Like many other events, the 2020 Interclub was postposed due to Covid and ended up not happening until March 2021.
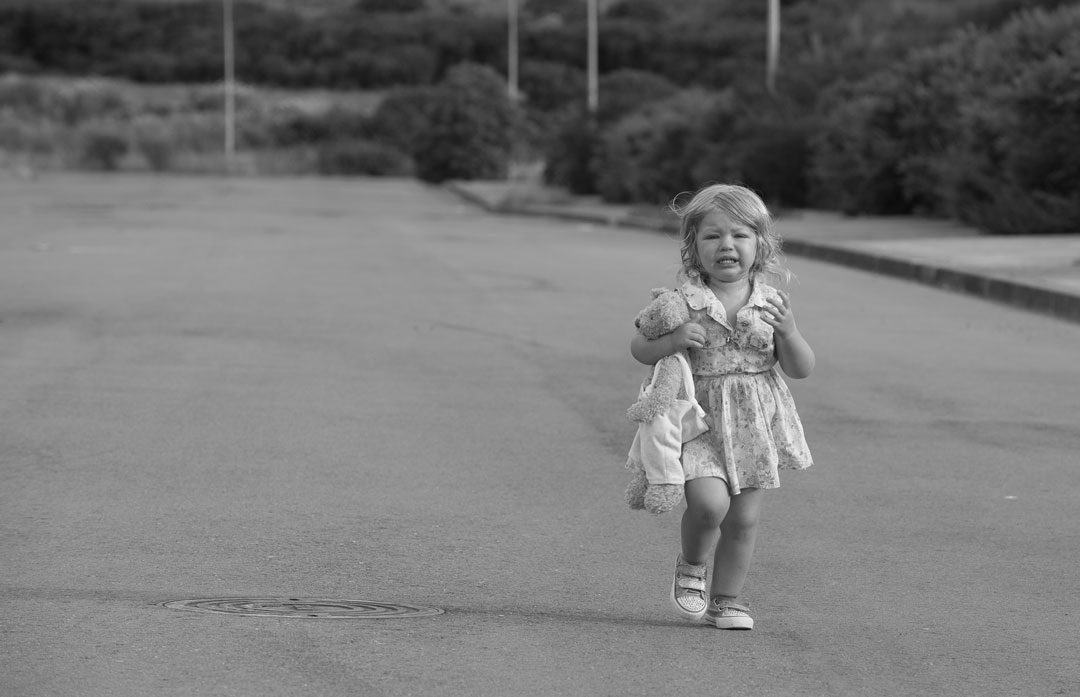
I had two images selected by the club to go into the event. The levitation one did not do very well, but my entry into the “An Emotion” category came first.
This image was shot a number of years ago. The little girl was the daughter of a model I had shot. I wanted to have her walking down the road, but when they arrived she had not slept well and point blank refused to co-operate.
The emotion in the image is real as she was really unhappy that he mommy had moved away from her.
Any before anyone gets too concerned about allowing a small child to wander down a road, this was shot in a new industrial area that was actually roped off to traffic.
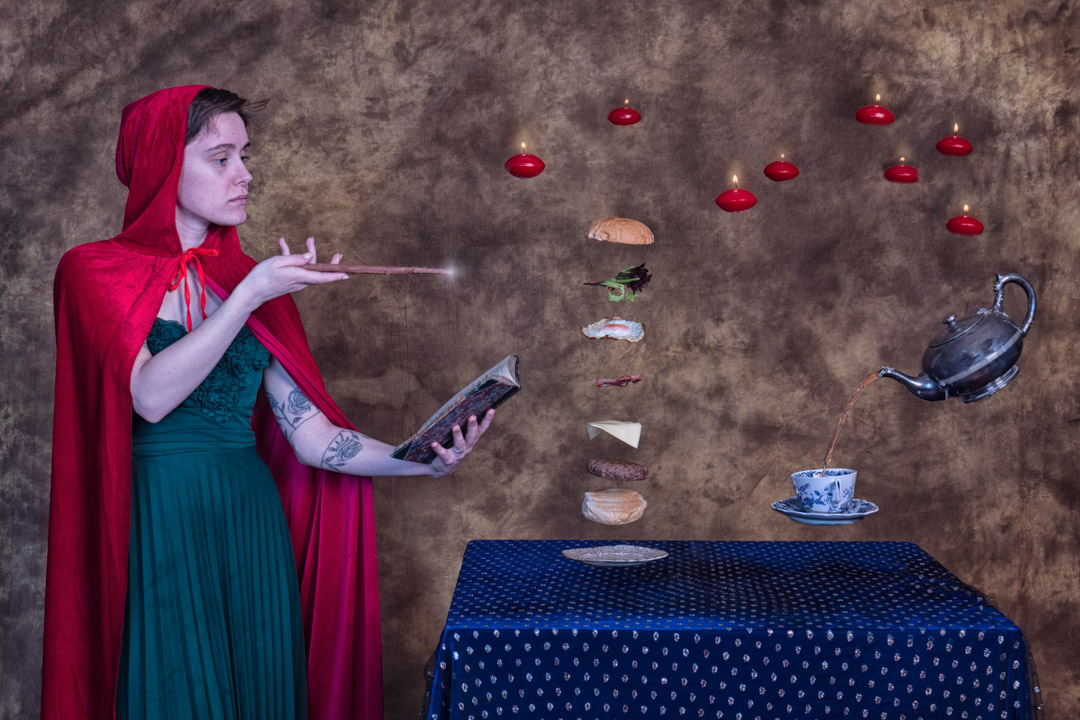
Each year I like to enter an image into the Wellington Interclub that has been specifically created for the event. One of the topics in 2020 was levitation. So I expected to see lots of images of models floating in the year, and decided to go with something different. That was creating an image where there was a reason for items to float, and no better reason than magic.
For the 2020 Interclub we had decided to do things a little different and some concepts were shot by a number of members working together. I had a reasonably clear idea of what I wanted and so I went online. grabbed some clip art and created a concept image. Everyone agreed that it was a great idea.
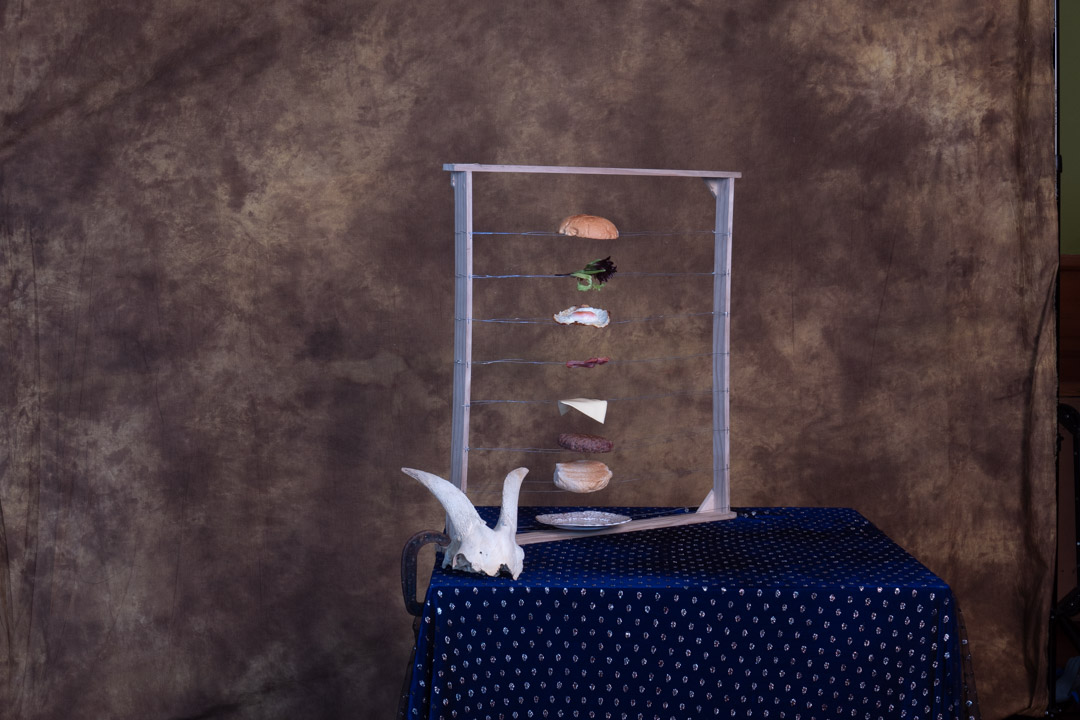
The first task was to assemble the props. The levitation of the food is done by building a frame and placing the individual levels on wire.
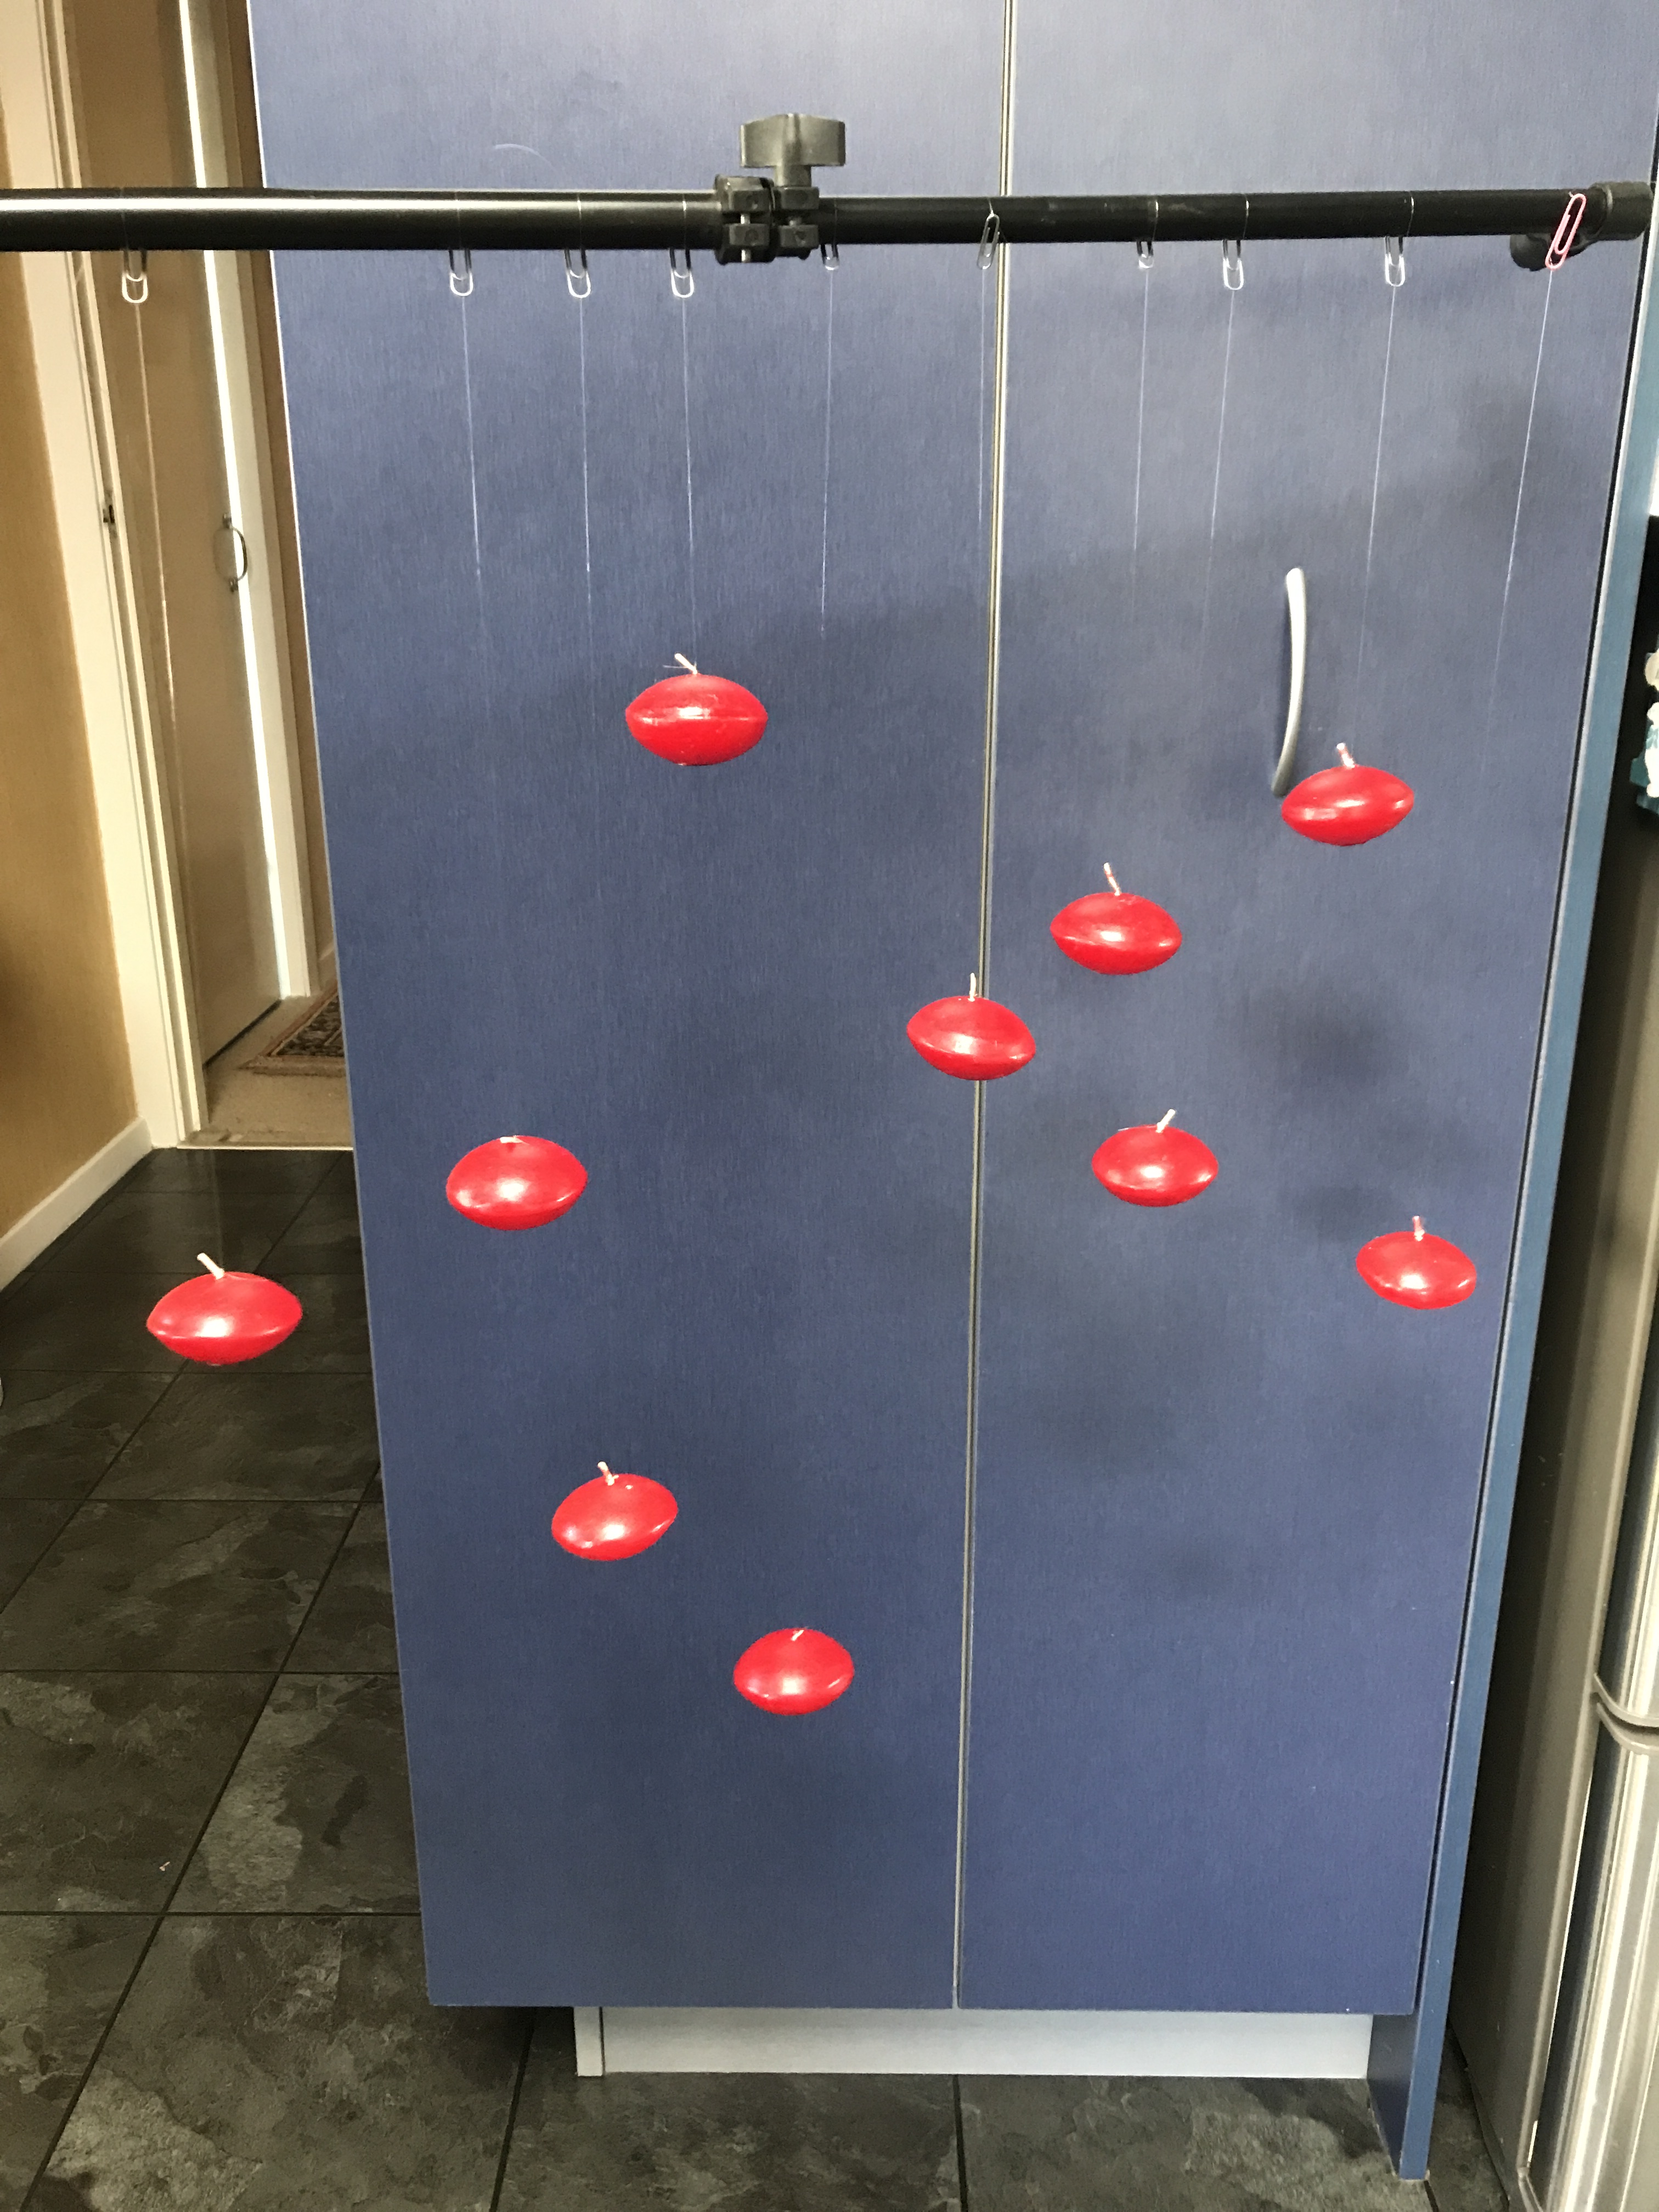
While not shown in the initial layout I decided that I wanted to add some floating candles to the screen. I managed to locate some cheap in the thrift shop and using nylon I tied them onto paper clips. This meant that they could be transported with tangling.
I found a silver teapot that came from my mother-in-law. I was then trying to work out how we could position it to get the angles right. While l was looking in a thrift shop I found a wire stand, and realised that if it was turned upside down, it would hold the pot at exactly the right angle and height.
For the shoot we had hired the camera club clubrooms as this gave us plenty of space to work in. The negative was that it meant that all of the lighting gear had to be taken down there. As I was not certain how much we would need, plenty much all of the lights were packed.
As it turned out three lights were used in the shoot. The main light was in a octabox camera right, with a fill light behind the camera shooting into a seven foot umbrella. A third light, with a snoot attachment was positioned between the camera and the main light, however this did not really add much to the screen.
The key to a good composite is ensuring that the lighting is consistent across the whole image. To ensure that we knew what the lighting on a finished image was we placed all of the individual elements on the table and took the photo with them. A long tube was used to substitute where the food would be.
We were shooting tethered and I had brought my 27″ iMac so we had a decent size computer to work on. One of the great features of the tether software I use is that you can place a previous image as an overlay. This means you can accurate position other elements.
Therefore the image we had taken of the whole table became the overlay for the next series of shots, starting with the food. Most items stayed on the wires apart from the cheese that did droop a little.
We knew that the trickiest element of the image was going to be pouring the tea, but in the end it was not that difficult. In fact the hardest part turned out to be getting the angles right on the cup.
If you are observant you will note that in the shots above there is a goats skull and human skull. These were placed on the table as ideas, however in the end we decided that the scene was becoming too cluttered. Fortunately I had taken a completely blank image so removing them later was not that difficult. The blank was also used to remove the stand on the cup and teapot.
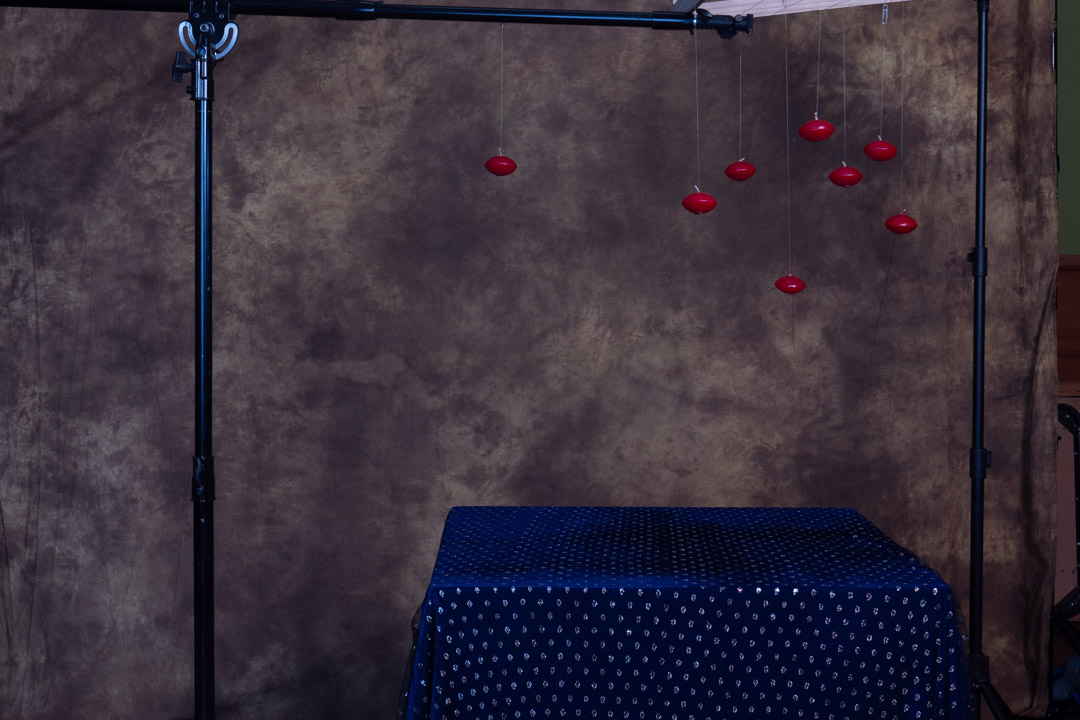
After getting all of the elements on the table we then moved to the candles. I mounted the food frame on its side between two stands and the candles were placed around the scene. Again we had the overlay in place so that we could get an idea of how the candles would interact with the other elements. We then took a photo of this placement, which then was used for the next series of shots.
Now it would have been possible to use a single candle and move it around, however we did not do that. I wanted it to look authentic by using individual candles. Once we had the floating shot the candles were placed on the table and lit. Then we used a set of prongs to lift each candle in position.
We now had all of the images we wanted and it was now time to go into Photoshop. This was not all that difficult and simply involving opening the layers and masking out what we didn’t want. Using the overlay in shooting made this process even easier as the make did not not have to that precise in most case.
As I mentioned above the cup did cause some problems mainly because the angle when it was shot off the stand was slightly out.
The video below takes you through all of the layers that make up the Photoshop file.
At the end it was great to produce an image that was ver close to what had been planned. I would have liked to be able to tell you how it did in the competition. Unfortunately the second COVID outbreak resulted in the event being pushed back to March this year.
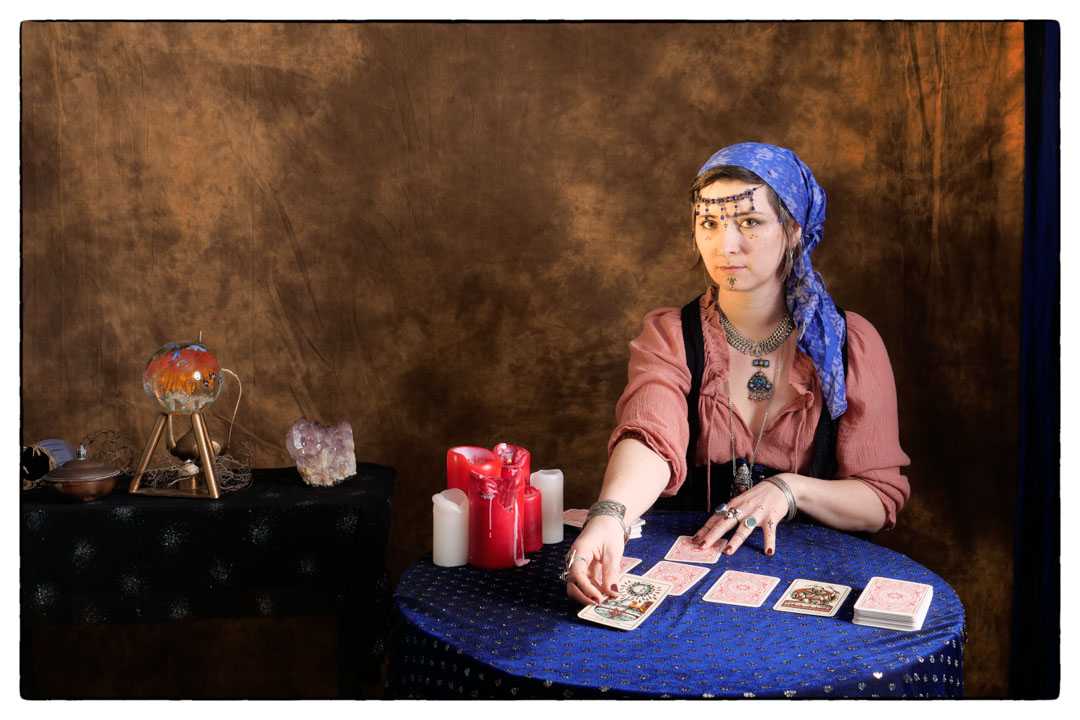
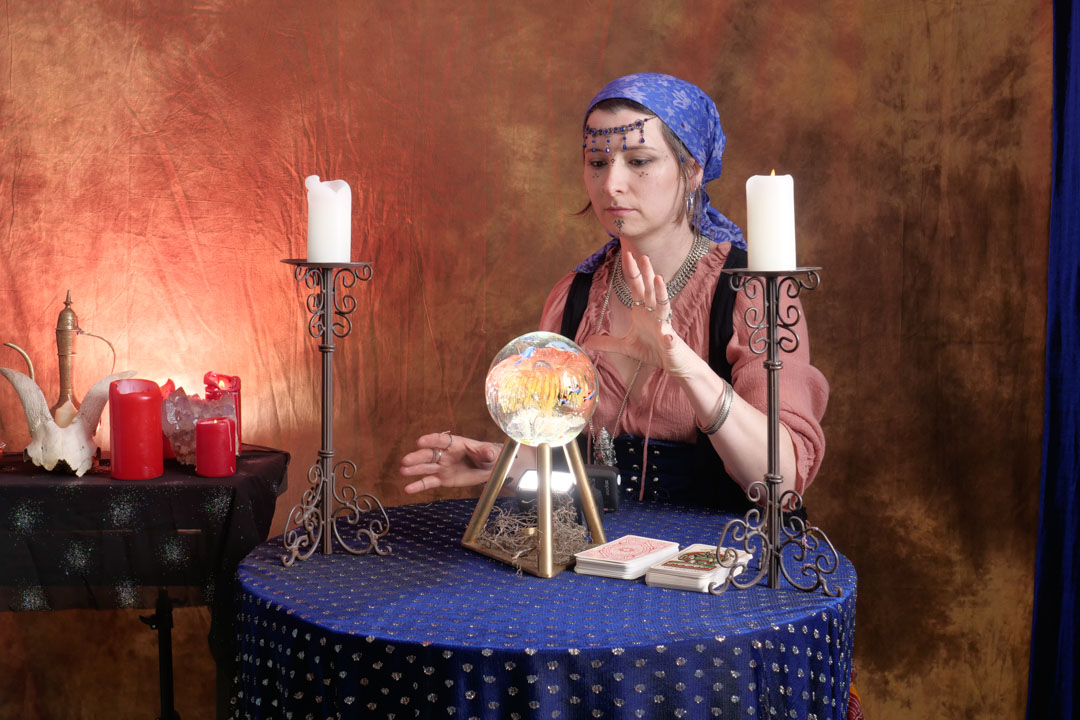
Generally speaking if I go to the effort to build a set and arrange a model, I will try to get more than one look out of the shoot. So when Neena came out for the Fortune Teller we decided to not only do a series with the crystal ball, but also ones with tarot cards. These I had borrowed from my daughter.
The lighting for the shoot was very similar to the first part, with the large octobox providing Rembrant lighting.
The difference with these sets of images was that I was free to move around and try different angles rather than being locked onto the tripod.
I have placed quite a number of candles on the table and so to replicate a glow that would come from them I positioned a gridded speed light that was gelled orange on the floor on a very low power and aimed at Neena’s face.
Although a lot of the candles were that there is very little light actually coming from them. I now realise that I should have added some flame in post.
I made one really big mistake with this shoot, and tat was not checking my camera setting properly before starting. For some reason the camera was set to JPG and not RAW so the amount of adjustments I would do in post was considerable less than what I would have normally done.
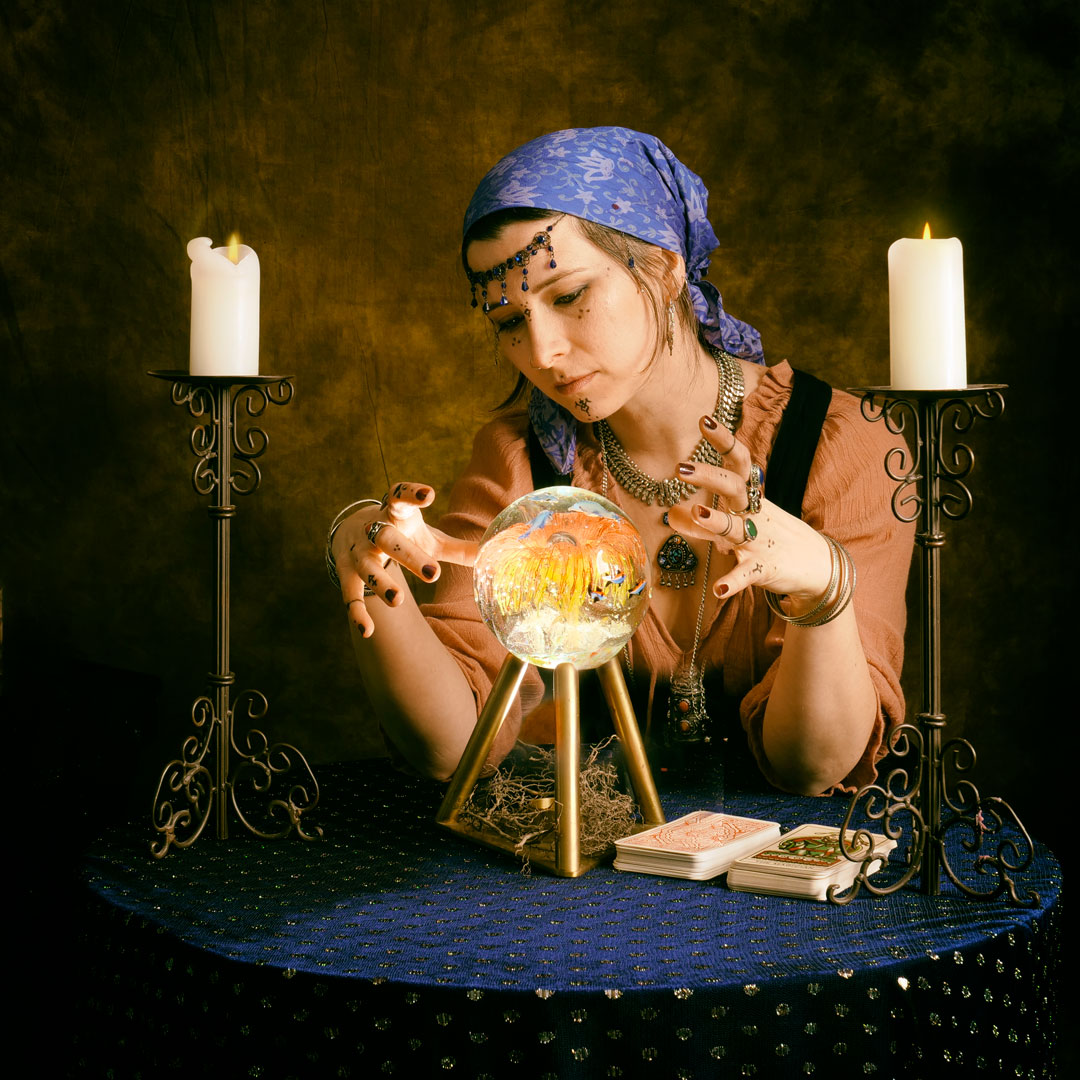
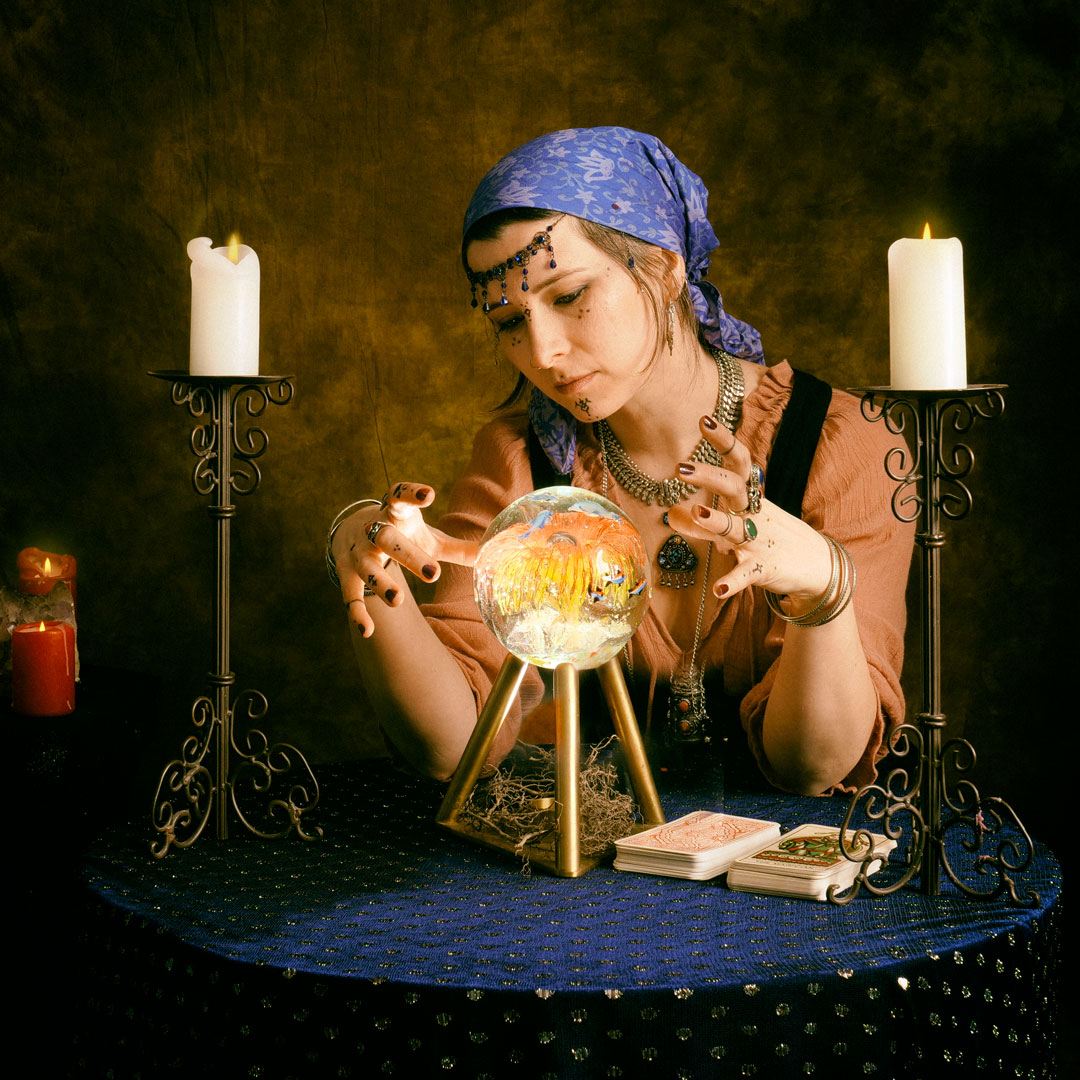
One of the topics in the 2020 Wellington interclub print competition was “illusion”. When I started to think about it the notion of a fortune teller came to mind especially one using a crystal ball.
Neena is a fashion/costume designer who I had met through the Fashion Collective. When I took part in the shot at Staglands in 2019, Neena had arrived in a gypsy style outfit which was exactly the look I was going for. So I reached out to her to see if she would recreate it for me. She agreed and we set up a date for the shoot.
I built a set in my studio so that we could cover any angles that I wanted.
I had decided to use a simple Rembrandt lighting for the main character. The studio is not wide enough to do this effectively however the room has a window in the right location. So i simply fitted a large October to my strobe and shot in from outside.
In addition to the main light I wanted the crystal ball to be omitting light and therefore I decided to position a speed light below it.
I wanted to have a circular table, which we didn’t have so I cut a sheet of plywood into a circle. This then let me drill some holes in the middle under which I then placed to lengths of timber below so that the speed light could fit between them.
I tested this will the stand I had for the ball and it seemed to work okay, although it was not as strong as I would have liked. The advantage of having the light hidden would have been that I could have produced the images in a single take and not had to composite anything.
As it turned out when Neena arrived she had a brass stand with her that looked perfect. The only problem was that the triangular base was solid. This mean that the light had to be positioned on the table rather than below it.
When I am working with multiple lights I always introduce them in the scene one at a time.
I then brought in the main light and played around with the staging of the set.
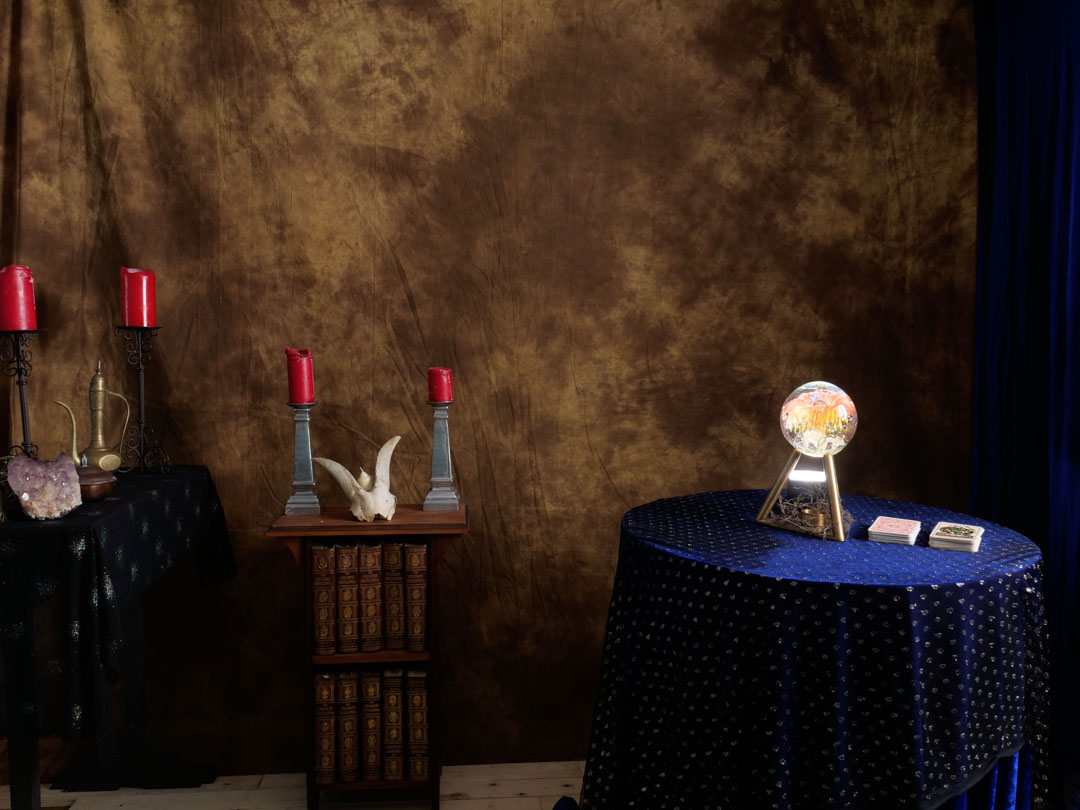
While originally there was quite a lot of items in the background I decided to simplify them as I would be coming in much tighter on my main character.
To get some extra impact from the candles on the rear table, I positioned another speedlight behind them which was gelled orange.
It was then a matter of taking a series of images with the light on the table aimed at the ball, and then a series where the speed light was removed.
Then in Photoshop the two images were brought together and the speedlight was masked out. Although the candles were lit the glow from them was a little dull so i gave it a little boost.
I then went into Nik software and added a old film simulation to it.
I was quite happy with the results but when I showed the image to some other people, the comment came back that the red candles on the right of the image were distracting. So in the final version they have been removed.
As it turned out it did not get selected for the category but I have no regrets as it was a fun shoot.
The final ladder competition for 2017 had the set topic of “into the night” which screams out astrophotography. But it also meant that these were going to be landscapes, which is not one of my main shooting areas.
On a clear night I headed to Owhiro Bay on Wellington to do the shoot. I had planned on shooting an orb in the foreground but in the end that image was not as good as the one as a simple landscape. There will be a separate post about the night shoot and my painting with light attempts.
In the end I only selected one image from the shoot, and for the second entry went back to a shoot two years previous at the base of the Pencarrow light at the entrance to Wellington harbour.
Going into the round I was tied for first place with another club member, so we both knew the relative results of our image would decide who won the award for 2017 Advanced grade photographer.
As it turned out the judge must have liked my images as both received Honours, meaning that I have successfully won the competition for the second year in a row.
This year I submitted and was successful in achieving the licentiate level within the PSNZ Honours system. This was the combination of a number of years working towards the goal, although inconsistently. In this post I am going to give a fairly honest account of what happened along the way in the hope that it will help other people going for their honours.
I first got interested in applying for others in 2012 although I cannot remember exactly when. The convention in 2013 was going to be in Wellington and I always said that if I was going to the put the effort putting a set together that I wanted to be able to pick the certificate up in person.
By this time I had moved through the beginners and intermediate grades of the Hutt Camera Club winning at both levels. Based on the fact that a number of my images had got acceptance is in competitions outside of the club, and honours within it, I felt I met the minimum requirement set out in the guidelines. I also believed it when other photographers told me I was good enough to put forward a set.
As most photographers do when they begin this journey I downloaded the reference material from the PSNZ website. Unfortunately anyone who had read it will know that it can be extremely confusing at times.
I then went through my Lightroom catalogue and identified around 30 images that I thought were good enough for consideration. I was lucky enough to have Simon Woolf offer to assist me in the process and so one lunchtime I visited his Wellington studio with printed copies of all 30 images.
He laid them out over the floor of the studio rejecting quite a few, that I quite liked. After about 40 minutes we ended up with about four definite possibilities and a number of other images that even needed work or he recommended I re-shoot.
Even back then I had too much of confidence in my photography that I now recognize was bordering on arrogance. While I fully accepted that Simon had a lot of experience, I was not completely in agreement with some of the choices and changes that he was recommended.
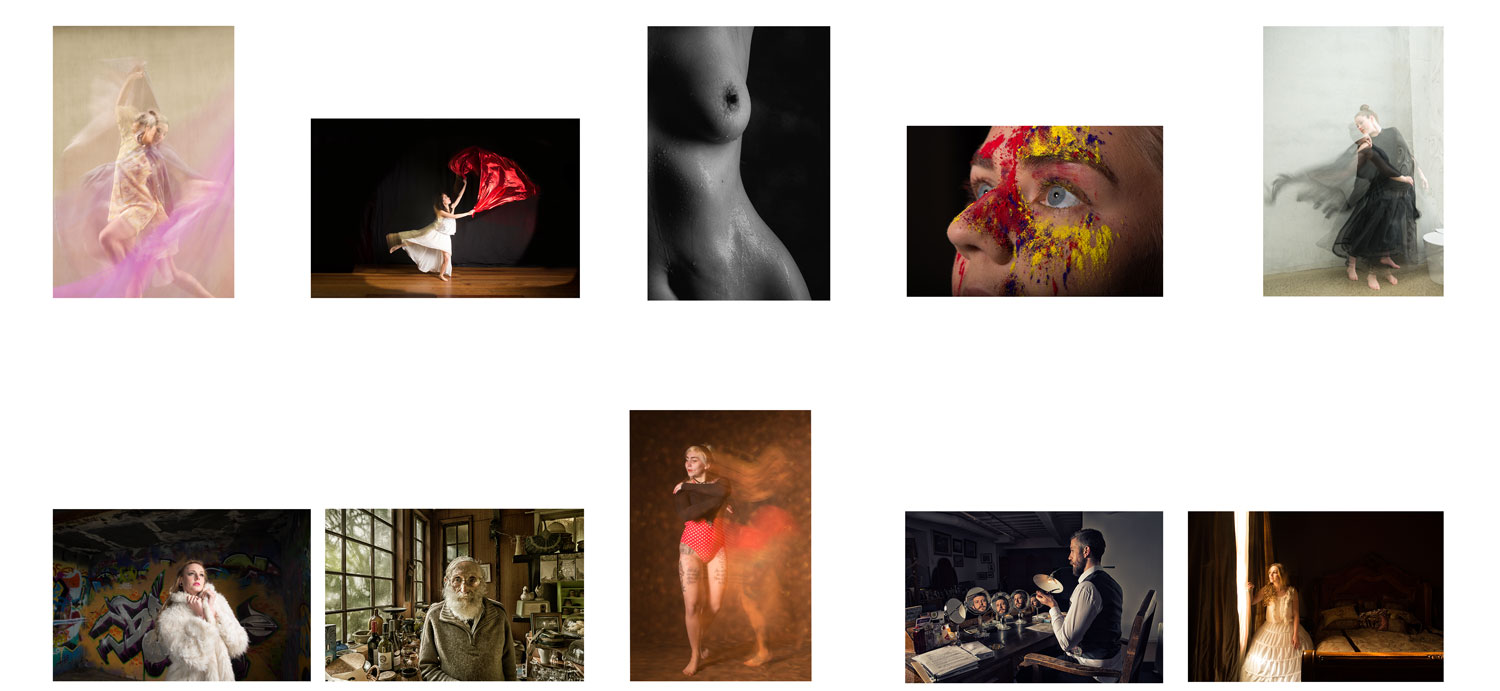
Some of the selected images intended for the original set
At the same time there was a group of 12 other photographers at the Hutt Camera Blub who are working towards the L level. Despite being a member of the group, for some reason that I now cannot remember, I did not take the set much further. When it became obvious that a combination of the timing of the convention and the fact that I’m was not all impressed the speakers, I put the set aside and took it no further. The group was very successful and all bar one achieved their Licentiates that year.
The 2014 Malborough convention was occurring at the exactly the same time as my daughter was representing New Zealand in Roller Skating, so in the lead up to it I did not take the set any further.
However come September 2014, when the program for the Tauranga convention was released, I made the decision that I was attending and I decided to pick the set back up. Again I started with the ones that Simon had chosen and again went through the library catalogue for images shot in the last two years.
At the time it appeared that print sets had a higher success than digitals so I had every intention to submit prints. Unfortunately a series of home appliances failing around home in the December meant that this was not feasible and I would be forced to submit a digital set instead.
The problem that I was facing was that during the time since the discussion with Simon my photography had developed further and I had established that my main focus was with people. I took the set to a fellow photographer and we initially tried to integrate the old and new images but it became obvious that the old set did not represent my photographic style now.
Anyone with that familiar with the PSNZ honours system will know that there are several levels. The Licentiate is the lowest level. It is expected that you demonstrate proficiency over a range of photographic skills. At this level a theme is not required. The Associate level is at a higher level and does operate on a theme. There is no requirement to have one level before moving onto the next, and there have been a number of photographers who have been successful got their Associate without first achieving the Licentiate.
It became obvious that with the images we were now leaning towards were following a theme and my friend was of the opinion that my photography was strong enough to submit an Associate set.
Taking their advice we ditched virtually every image from the original set and selected 12 images that I believe ran together. We structured the set so that it flowed with the use of colour.
One of the recommendations in the guidelines is to seek advice from a number of people with regard to your set. I approached Bruce Girdwood who at that stage was just a member of the judge accreditation panel, and he agreed to look at the set.
He came back with the honest advice that the set was not strong enough for the Associate but that there was a possibility to make a Licentiate set out of it. We agreed to drop two images and he also recommended tweaks to a couple of other images.
It is at this point that I know I made a fatal mistake. When submitting images for competitions you should not be so in love with them that you cannot see the flaws nor take advice about them. As far as I was concerned I had selected 10 great image, the colour provided a flow between the images and I could easily reel off the various approaches that were taken amongst the ten.
This slideshow requires JavaScript.
My expectations for success were so high that I actually started mapping out the images that I was going to shoot that year to submit for an Associate. It is therefore hit me like a lead balloon when I opened the letter from the Honours Board telling me that I have been unsuccessful. The letter contained the following explanation:
“The board felt that the theme dad distracted the photographer from the requirements for Licentiate as set out in the guidelines, namely those relating diversity of approach etc. to demonstrate overall competence with the camera. Your individual images are mainly of a very good standard, but each did have some small fault apart from 9 which was considered to be especially strong. The last image was considered to be out of context with the rest of the set and the weakest one was identified as Jelly Belly, where the arm and pillo beyond the torso are distracting and the composition generally is not strong. You are clearly a competent photographer of the subjects you have shown but the Board would like evidence of that competency in other disciplines.
The letter made me real angry. The only thing that you could call a theme was that all of the images were of women, but there was diversity of approach. That anger continued through to the convention when I saw the successful sets. It became obvious to me that the Honours Board viewed diversity as being someone who shot different genres. When you are in negative space you also look at other people’s images and see the flaws and wonder how they got through.
About a month later after the convention I was able to get some further feedback from a person present at the judging. This strictly breached some protocols but at least it let me see where I had gone wrong.
The problem started what the very first image and then went downhill with the second one. This image was titled Jelly Belly and it hangs on the wall in my bedroom. I really like this image so much that I actually ignored separate comments from both my wife and a fellow club member that there were issues with. Unfortunately by the time your first two images have been marked down the set is pretty much over.
Now some people have the ability to pick themselves back up again and try the next year. Well I would like to think that was me, but the reality was that it wasn’t, and I did not do anything else leading up to the 2016 Convention in Queenstown. However seeing the honours suits on a wall there inspired me two again try. But time I was going to go right.
In May 2016 I had the opportunity two take part in a photographic exhibition with my wife at the Odlin Gallery in Lower Hutt. In preparation for that I purchased 12 brand-new mattes with the intention that they would be used once for the exhibition and then again for a print set in the Honours. The majority of images within the exhibition were street scenes shot in various countries you have visited earlier in the year.
After my previous disastrous effort this time I have decided to not only take advice but to take it early enough maybe would make a difference. As Bruce Girdwood had been appointed to the Honours Board I approached another member of the Judge Accreditation Panel (Shona Jaray) to see if she would help. So on a Saturday morning in July I travelled to her farm in Waikanae with a set of 12 images that I hoped would be the base of a new set. Others were still encouraging to go straight for the Associate but the first meeting with Shona dispelled that notion.
My initial idea for the set was still too stick within the genre pf people but too separate the images quite clearly into separate groups such as conceptual, straight and classic portraiture and Street Photography. This fell apart when she assessed that none of the street images were of a high enough standard to be acceptable. By the end of the session we had five images that could possible make the set.
Fortunately Shona has good contacts on the Honours Board and was able to confirm for me that diversity was not restricted to different genres, but if you were shooting in one then you had to show different approaches. As I spend just about a hour a week watching Youtube photographic videos, were was no shortage of ideas to try.
As it would happen on the way back from Shona’s place we stopped for lunch at a small cafe. The owner and location was so brilliant that I asked if I could photograph him and that image ended up in the final set. I knew that the images we had selected meet the standard portrait style so it was now time to look for the alternatives.
After seeing a video on using long exposure with studio flash, I booked studio space on two occasions to try this approach with different models. (You can read about the first shoot here and the second one on this link). Then during a Lindsay Adler video she used a macro lens for portraiture I decided to see what I can could create. The result was a striking image that you can read about here.
In September I was also fortunate to be able to attend a workshop at the regional convention run by Esther Bunning on creative portraiture what the models present I had a play in capture camera double exposure. You can read more about this here)
All through this period I was also submitting images that I was considering into both club and local competitions to see what reactions they received. I was also taking into consideration comments that the judges made. For example on image was flipped in the final set as a judge said that it made a better composition that way.
This was the original “face in the cape” image
Come November I figured that my set was finished and I had an arrangement of 10 images sorted. Shona was unavailable at this time so I sort the advice of fellow club member William Wright. As before I took full size images around to his place.
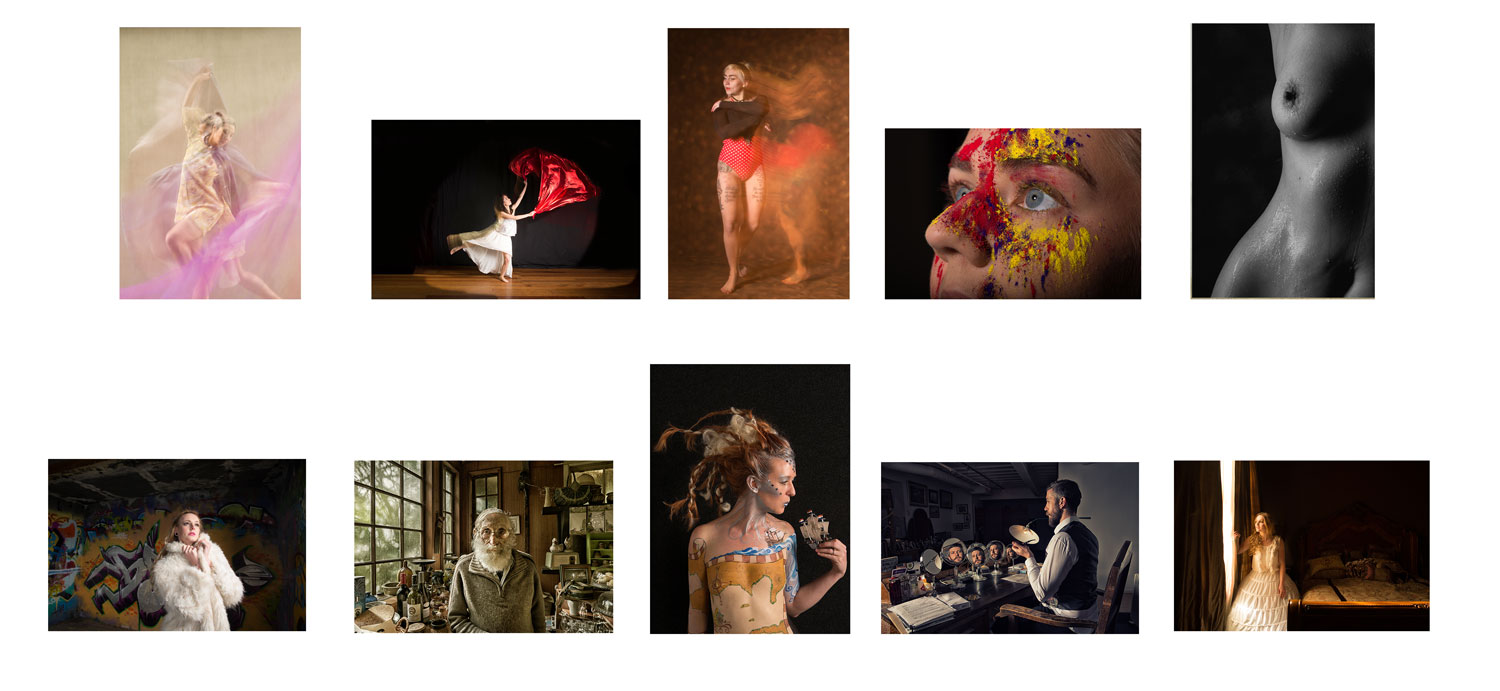
The set that I had settled on
He was generally happy with the set however he was initially concerned how the image “Late for the Ball” (Bottom row second from left) fitted in with the others.
The image has been in the set right from the start. However as Shona had also expressed a similar comment, the image was pulled. This is despite the fact that this image had won a merit at the Central Region 2 years before.
William suggested that I should bring a black and white image into the set and I decided that a nude would be a good addition to the set. Bringing in that image into the set required a little shuffling round.
I thought that at this point we were almost there but then William pointed out that there was an issue in the last image on the top row. There was a line running down the image, as well as a white object in the corner that was distracting. The line was actually the corner of the pillar.
I made several attempts to fix the image in photoshop but in the end decided to replace it with a image taken of Sian at a body painting event, however that agains required some adjusting in the layout.
I initially came up with this layout, however when we looked at the colour tones decided that the black & white nude suited the bottom row than the top.
It was a long process, and along the way a lot of highly successful images were considered and rejected. In the end it worked because my set was one of 40 successful ones. Given that there were 100 sets up for consideration I was extremely happy with the result.


 This year I submitted and was successful in achieving the licentiate level within the PSNZ Honours system. This was the combination of a number of years working towards the goal, although inconsistently. In this post I am going to give a fairly honest account of what happened along the way in the hope that it will help other people going for their honours.


 The image has been in the set right from the start. However as Shona had also expressed a similar comment, the image was pulled. This is despite the fact that this image had won a merit at the Central Region 2 years before.