In July 2021 I travelled to Nelson to attend the NZ IPP annual conference I had booked in for a workshop on the afternoon before the conference started but that ended up being cancelled when Covid closed our borders and the Australian speaker could not attend.
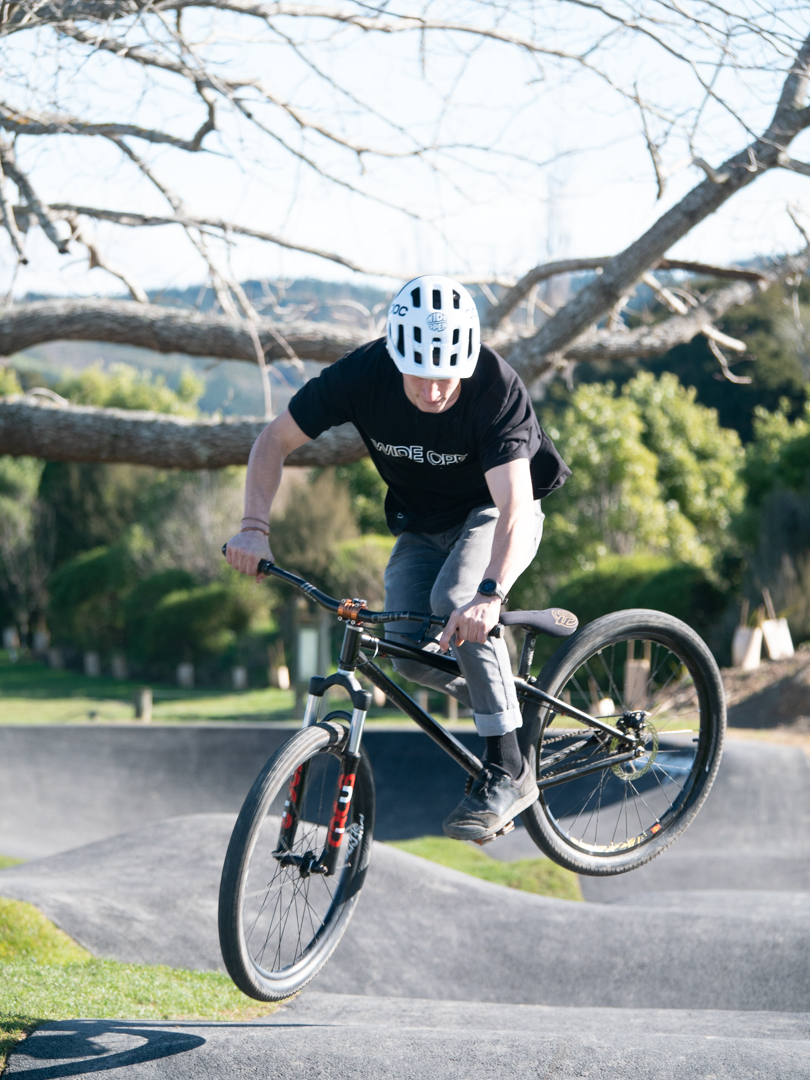
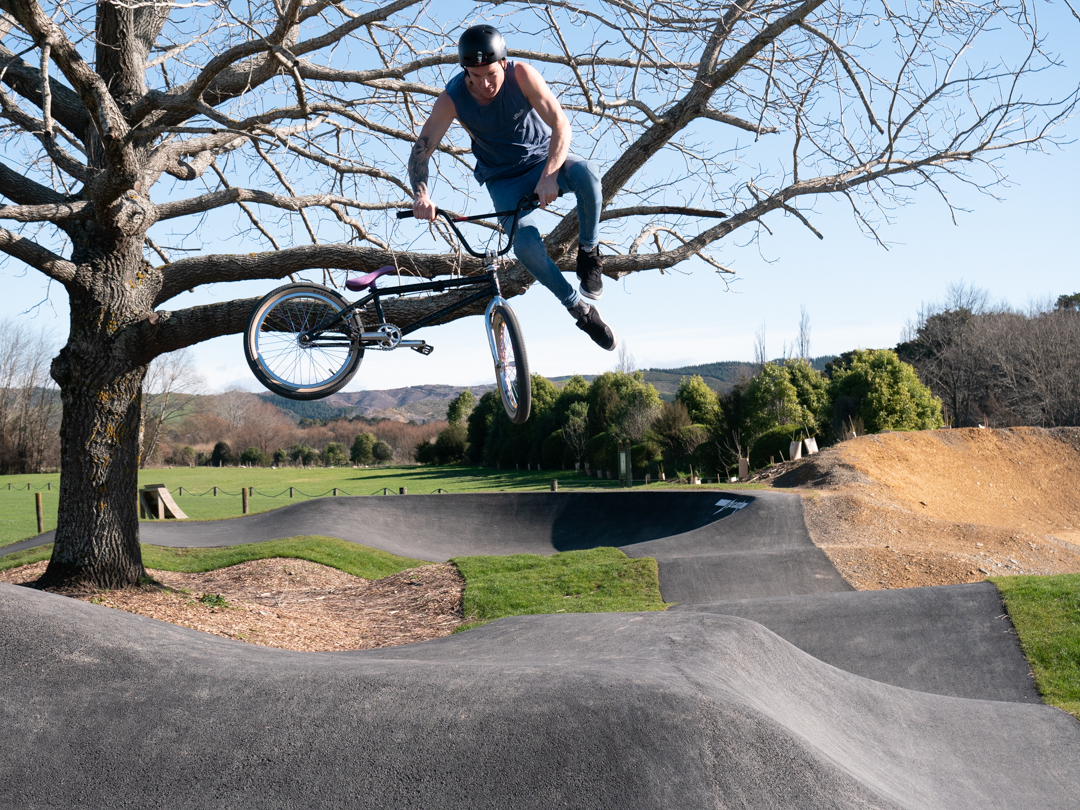
That left me free to attend a jump park shoot south of Nelson organised by Andrew Reid from Panasonic.
Unfortunately heavy rain in the days leading to the shoot meant that we could not shoot we had originally been planned because it was too dangerous for the riders and also would result in damage to the course fortunately Nelson City Council had developed a hard track as well so we use that.
We positioned ourselves around the track trying to avoid getting each other in shots and proceeded to snap away. It was a little difficult achieving good separation of the riders background elements such as trees. most of the images were shot at 1/640 second F4 at ISO 400. the cameras subject tracking most reasonable although it held if you positioned yourself with a ride coming straight towards you
Once everyone was bored with the action shots we tried something different shooting the riders jumping directly into the sun. This meant increasing the shutter speed 1/1600 to expose for the sky and f11to create the star effect of the sun.
It was a fun afternoon with a subject completely different to my usual models.
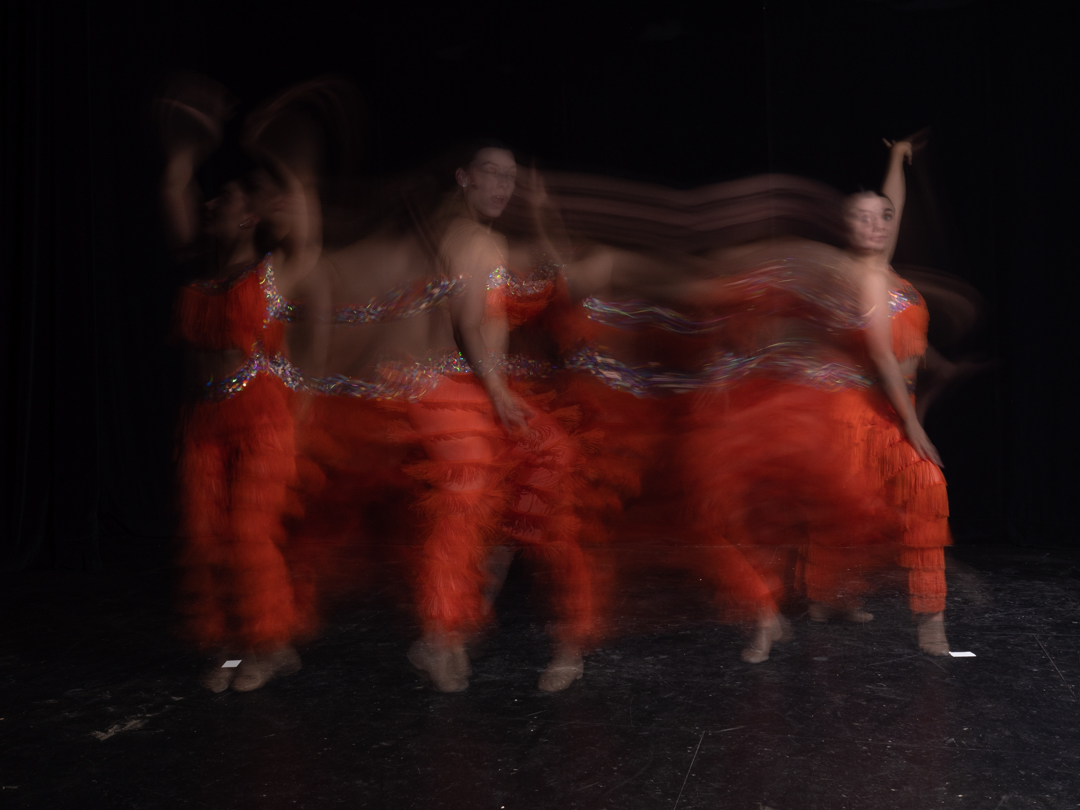
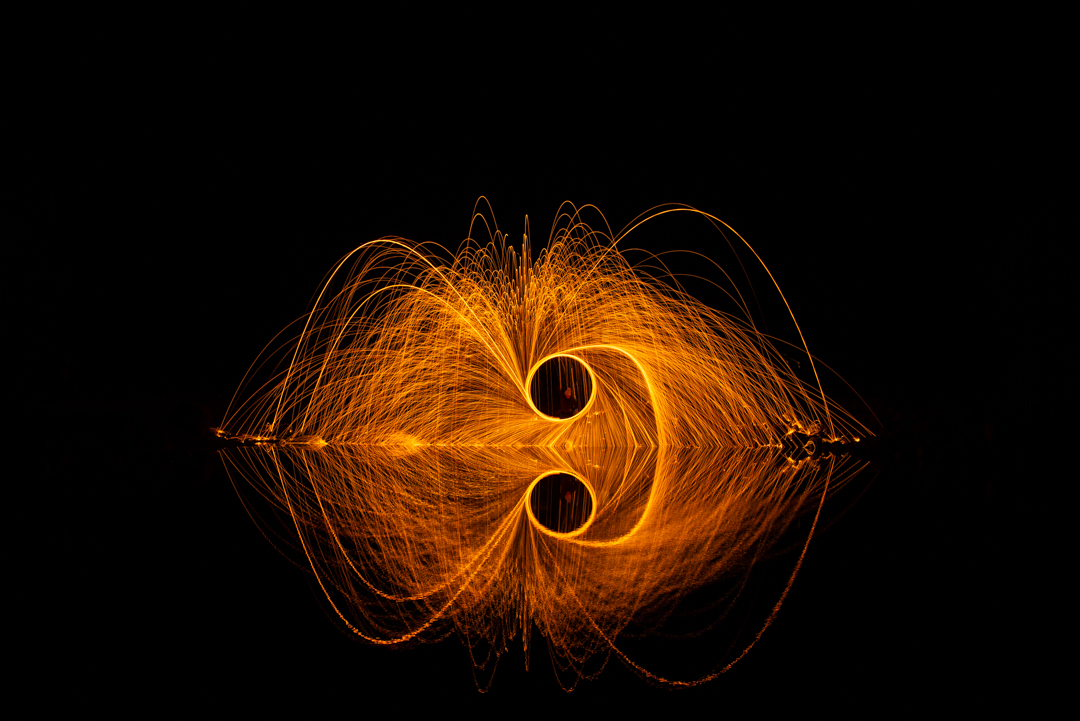
The third lighting set up was designed to create images that showed the movement of the dancers. The technique is both simple to understand and difficult to execute perfectly. Using long exposures, it uses a combination of flash (to freeze action) and a continuous light to allow the shutter to record the movement. Depending on whether you set the flash to fire at the start or the end of the shutter time determines where the image will be sharp.
We used the stage area as it gave us plenty of space for the dances to move we could utilise the dark curtains and it was well away from the other lighting stations so that the images would not be affected by those stripes.
This type of photography is quite tricky for the dancer as they need to a key point on the stage at exactly the right time that the flash fires. Therefore it takes a lot of shots and a good deal of luck to nail the perfect image.
As can be seen below a lot of the early images were not up to par.
2.5s f9 ISO200
With the second dancer I tried a slightly different approach and then relying on the flash firing automatically, I brought in my speed light light and manually fired several times while the shutter was open. this has the result of freezing the action at several points in the capture.
4s f10 ISO200
This type of photography is both fun and frustrating. You never know exactly what you were going to end up with. each image can be a surprise or let down. But it is in that not knowing that the real enjoyment comes.
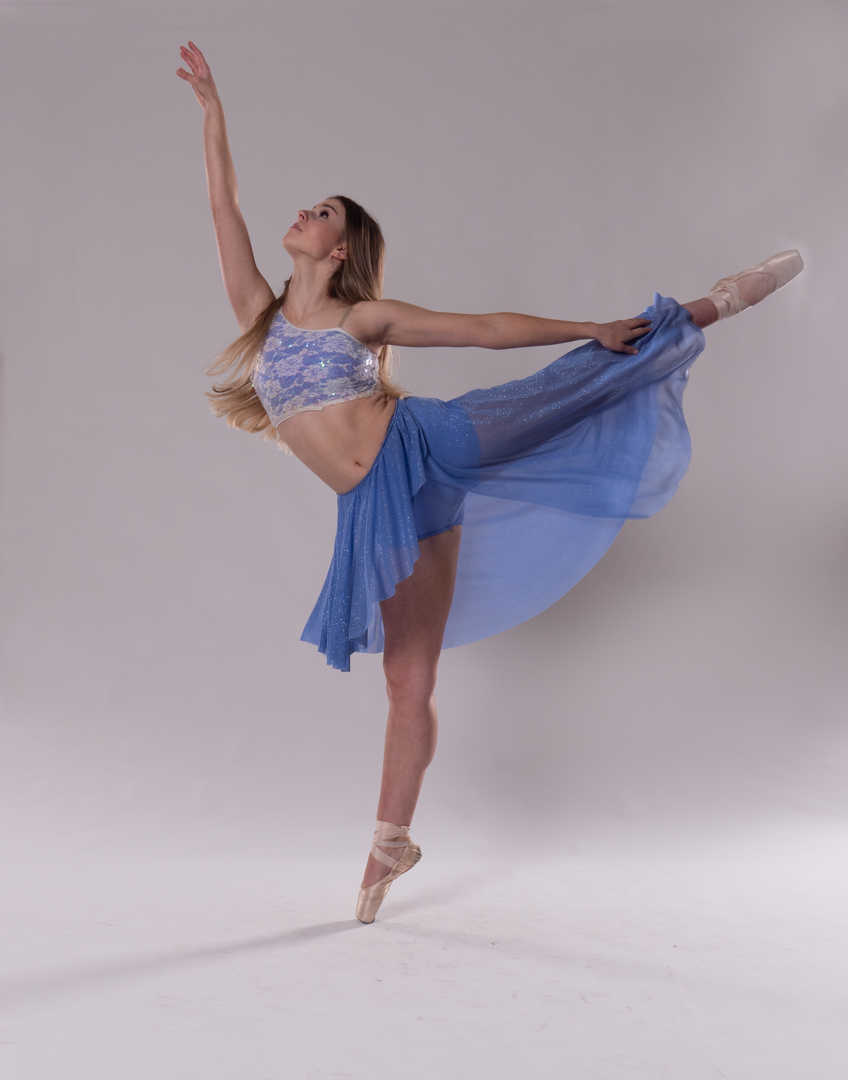
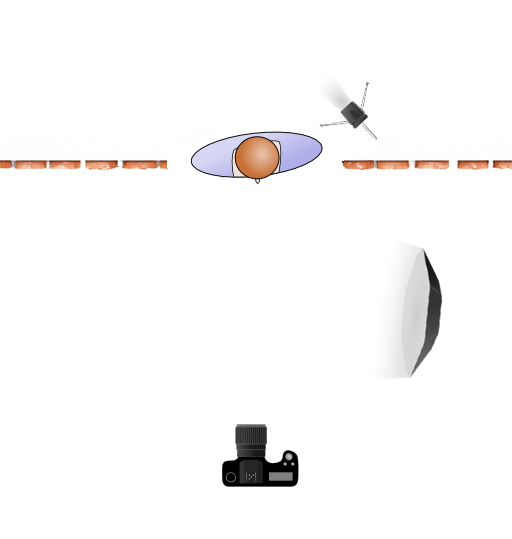
The second lighting set up was designed to create low-key moody portraits of the dancers. It used a single light in a 1.5m octobox that was covered with a grid to ensure that there was control of where the light went.
The background was a dark muslin fabric. Furthermore to enhance the shadows a black reflector was placed opposite the main light. This ensured that they was no bounce light coming on that side.
1/125s f9 ISO200
For my first shot I had the model sit on the floor which further feathered the light hitting them. For the second shot I had another dancer join in order to ensure focus I increased the aperture up to f9.
I was really pleased how these images came out. The key to the shot was really the use of the grid as this really enabled the light to be focused
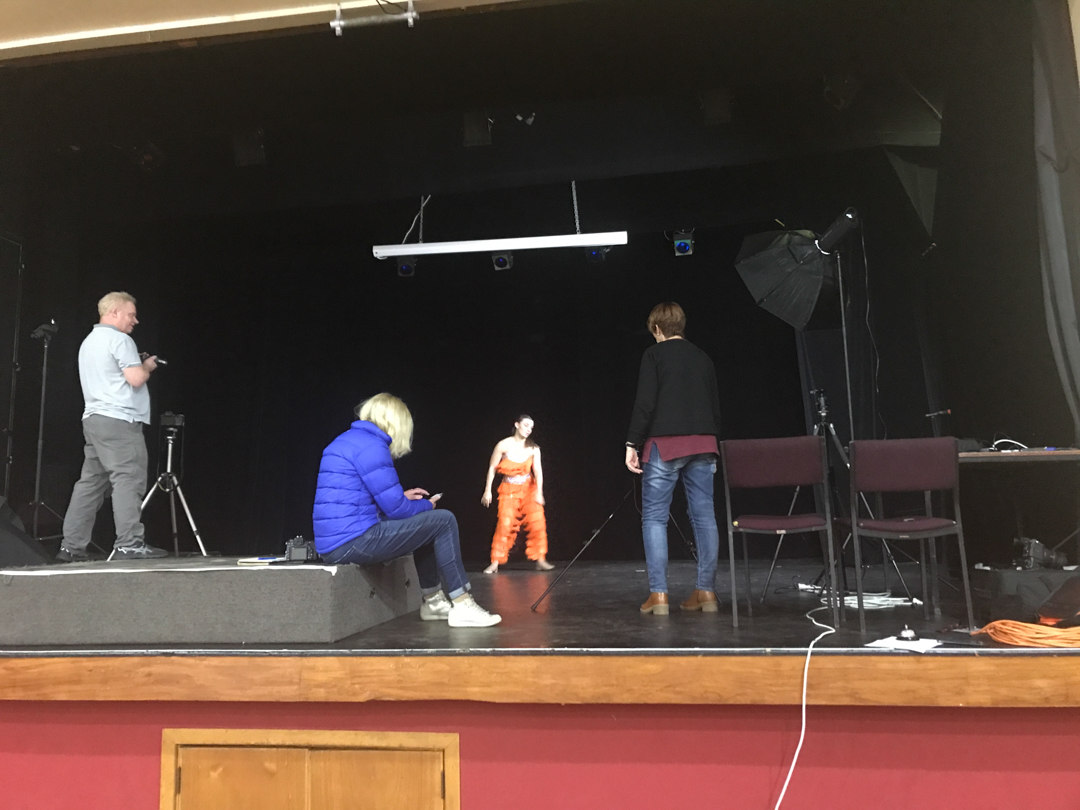
As I mentioned in a previous post, in July 2021 I travelled down to Invercargill to be the host and assist at a Photographic Society of New Zealand (PSNZ) dance workshop. The workshop was being run by Auckland fashion photographer AaronKey and was held in a large hall that had very limited natural light.
We set up three very different lighting setups and the participants rotated through them. As each station was designed to produce a different look I am going to cover them in three separate posts.
I was expecting to only be helping with the session but we had a participant pull out so I ended up taking part as well so that the rotations worked properly.
Aaron works for sunny and through its connections borrowed a whole lot of lighting that he bought to the venue. It took us nearly 2 hours to set up the three lighting positions.
The first set was on a plane white seamless background and employed a single light shooting into a 7 foot umbrella. This set up was designed the freeze motion with a high key look.
The first dancer tended to move across the stage or rotate in one spot so I was shooting her at f5.6. The second dancer was leaping so I changed to aperture to f8 to give me a better depth of field.
1/100s f8 ISO200
Under natural light shutter speeds of 1/100s or 1/125s would not be fast enough to freeze action. However when you are using studio lights this is not an issue as it is the duration of the flash that freezes the subject. Shutter speed only has an impact on how much of the ambient light comes into the image.
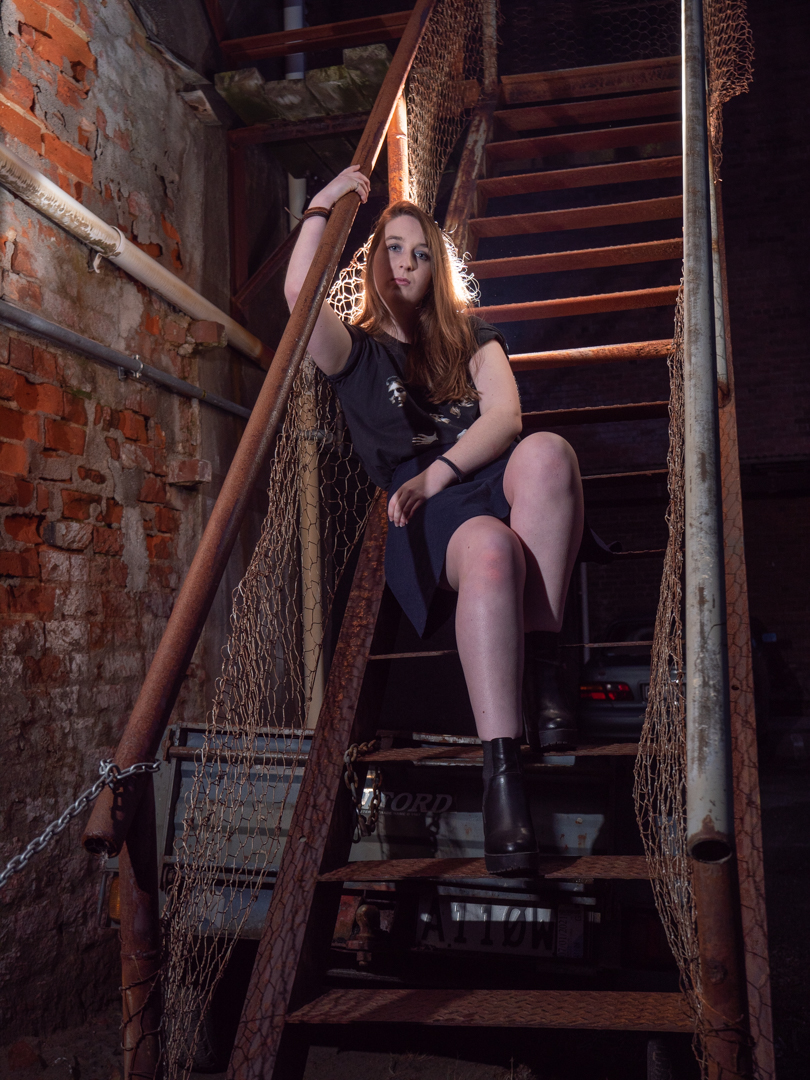
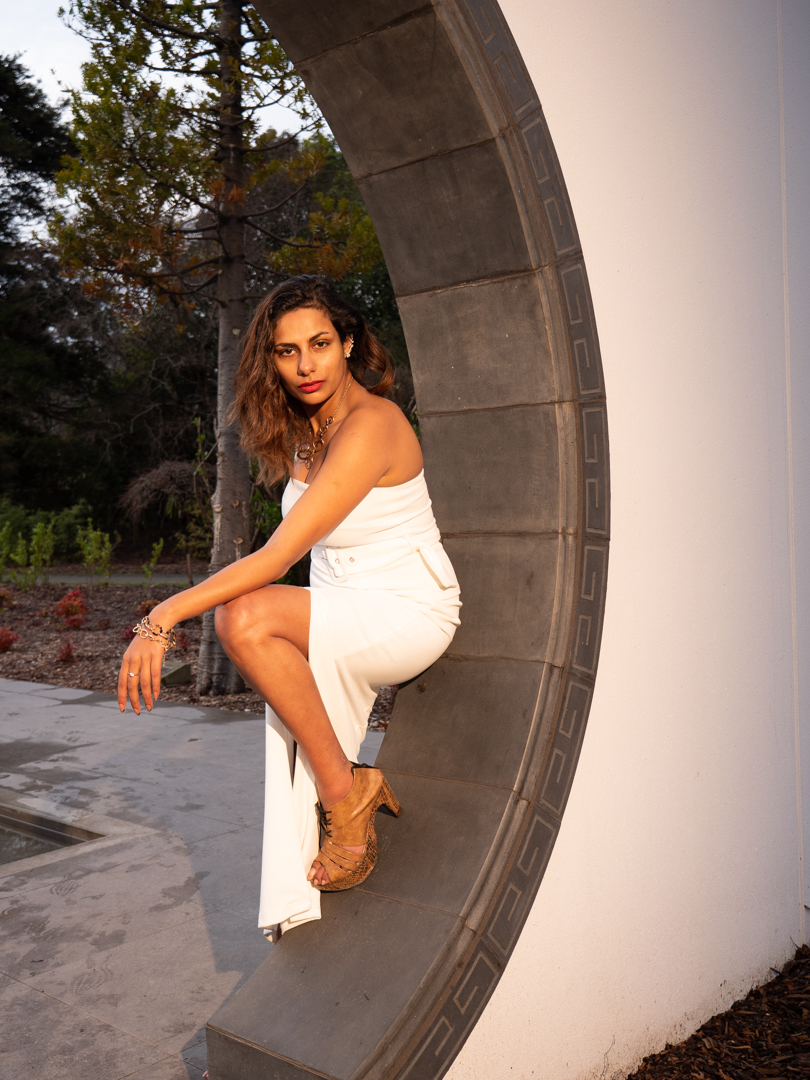
The second model who I shot on my trip to Invercargill was Samantha. She was looking for an urban theme so in the afternoon I had wandered around the town and found some interesting alleyways and rear areas that look promising.
f1.7 1/50s ISO800
We started in an alleyway an old door with peeling paint that provides a great texture. As the shoot had begun at 5:00pm, in the middle of winter, we were on the last light of the day hence I was shooting on a wide open aperture and slow shutter speed.
The next location was a rear parking where I found a set of stairs. By now it was quite dark so I used a video light on camera and a speedlight positions behind Samantha to light the back of her head.
F3.5 1/60s ISO200 Video Light & Speedlight
The final location was in an old warehouse that has been turned into a carpark. As in many cities the walls had attracted graffiti artists. I used the same video light as my main light but positioned a speedlight behind Samantha but aimed at the wall so that we would see some of the environment. Without that light it would have been a black space.
F6.3 1/100s ISO200 Video Light & Speedlight
The whole shoot took around 90 minutes even though we were moving from location to location. My earlier visit to Skype out locations paid off as I did not waste time figuring out where we could shoot.
Samantha seem to be pleased with the final images.
In July 2021 I travelled down to Invercargill to be the host on a Photographic Society of New Zealand (PSNZ) dance workshop. At the time I was president of PSNZ, and was also not working, so when I discovered that the Southland Photographics Society had their meeting on the Thursday before I travelled down early to visit them. That meant that I had the free day on the Friday.
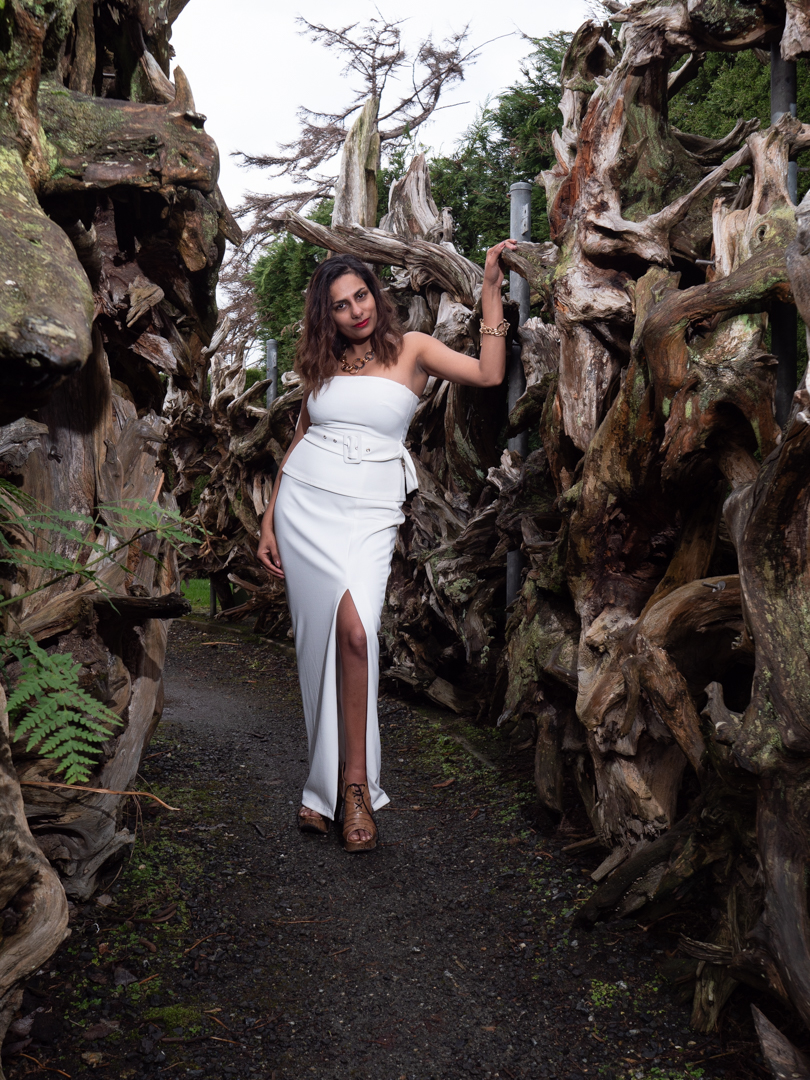
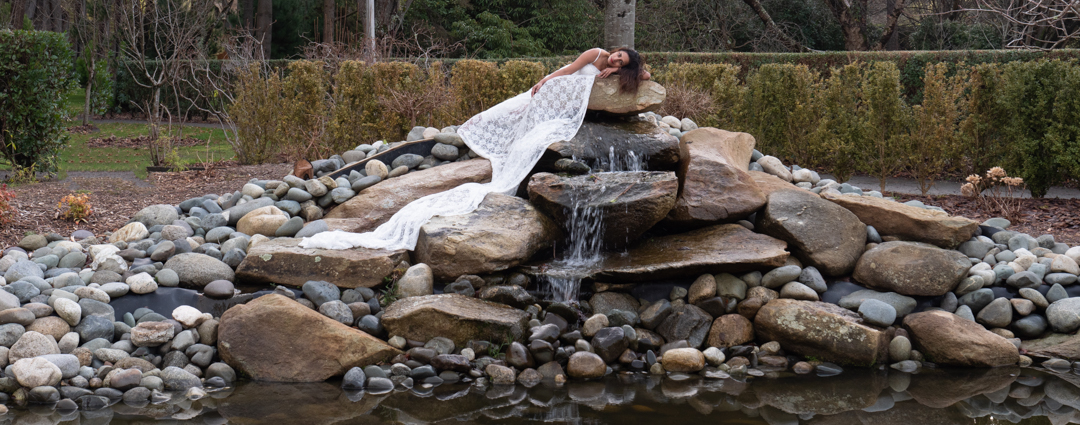
On a previous visit to Invercargill I had discovered an area of Queens Gardens called the Stumpery. They have arranged large tree stumps into an area that you can walk around and through. Essentially it is a botanical piece of art.
From that visit I knew that I wanted to shoot there so in addition to packing my usual clothes, and gear for the workshop, I packed several lens of fabric and a lightstand.
Via a Facebook modelling group I reached out to see if there were any models interested in shooting with me on the Friday and Raj replied. We arranged to meet at the entrance to the gardens and made our way to the Stumpery.
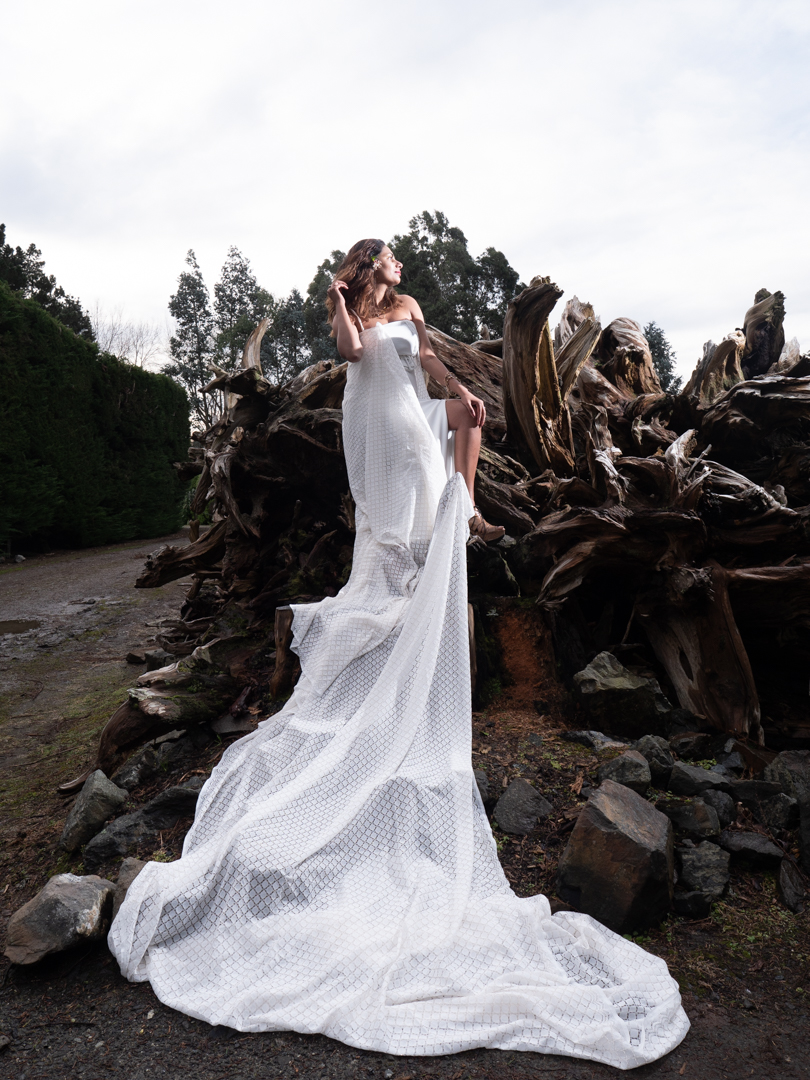
After sum initial shoots in the centre of the Stumpery we moved to the edge and started to bring in the longer pieces of fabric. She was keen enough to climb up on the structures. By this stage we were losing the natural light so I wedged the speed light after the side to add more light.
1/160s f5.6 ISO 200. – bare speedlight
Moved around the gardens to an area with a Japanese Asian influence and I used the archway to pose her. I covered the speed light with an orange gell to fake golden light.
For the final set of images moved to water feature and I use the second piece of lace that I had brought down. Again I used a bare speedlight to add a little bit of light to the image.
One of the things that’s important when shooting at any location is to look at how changing your angle can change the image. In the images above and below Raj is essentially in the same location but I have moved to a different shooting point and in the process change the feel of the images.
1/60s f6.3 ISO 200 – bare speedlight
It was a good shoot and I was pleased with the result.
Pano of nine images. 10s f2 50mm ISO3200 Nikon D600
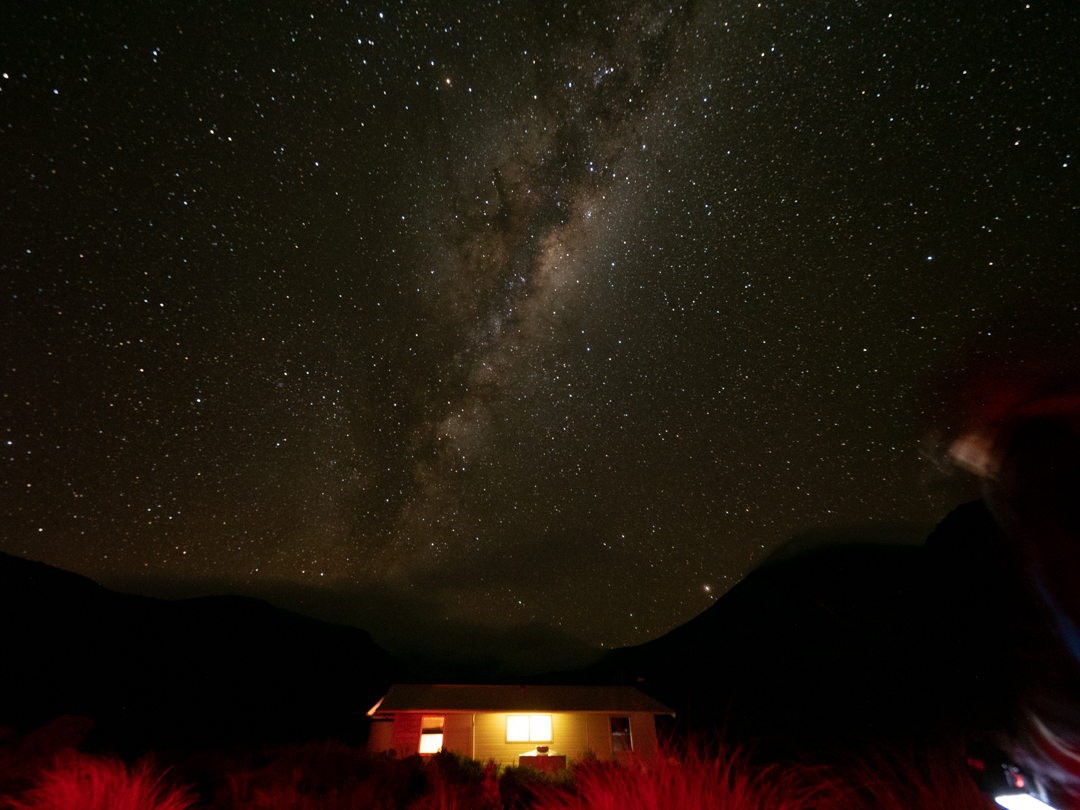
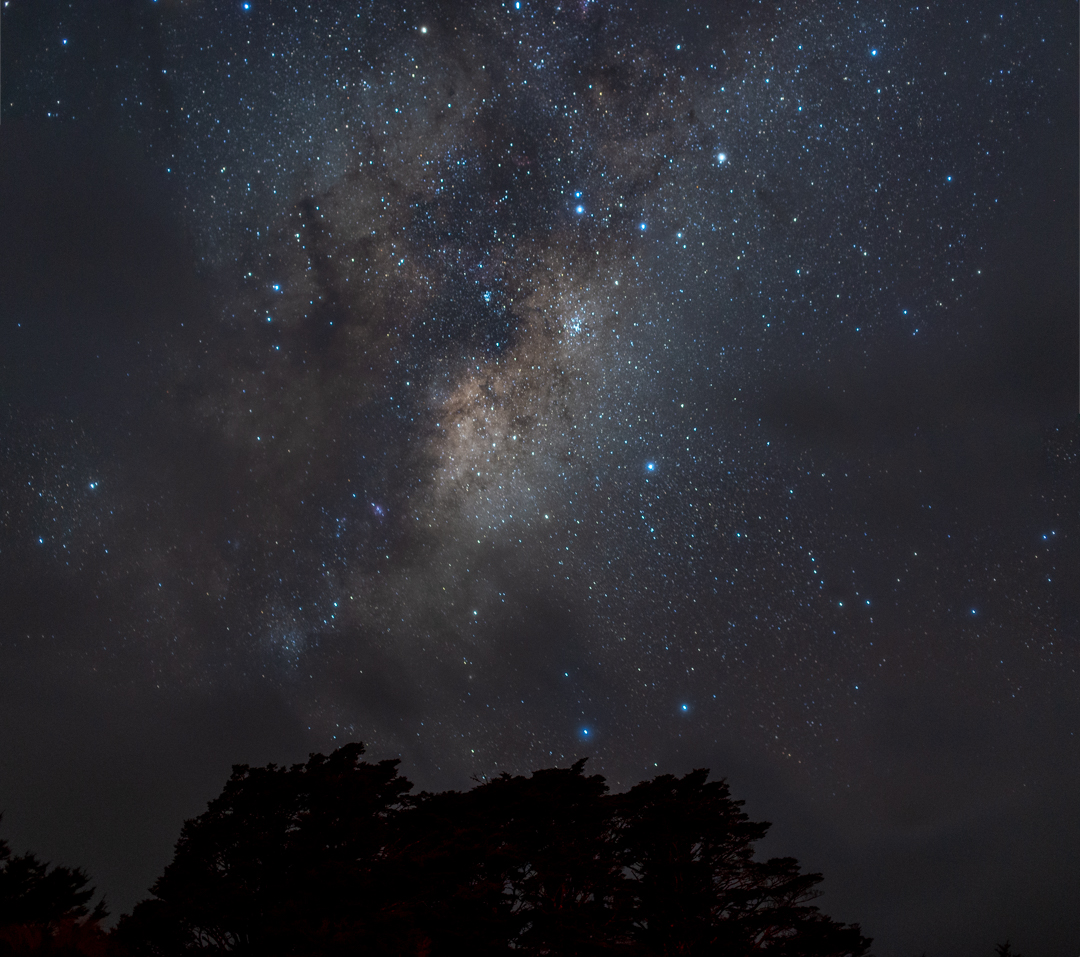
In June 2021 I travelled up to central North Island at Horopito to be the host on a Photographic Society of New Zealand (PSNZ) Astro workshop. I had shot astro before, so I had a fundamental understanding of how to do it but the opportunity to shoot on Mount Ruapehu was too good to turn down.
I am not going into the technical details of Astra photography here as it is quite complicated and they are plenty of other articles on it but put simply you have to use the widest lines you can have the west aperture and shoot long exposures sufficient to have the stars shout. Most of the really good images that you will see are the result of stacking lots of images together in specialised programs which I do not have.
After a briefing in the afternoon followed by dinner we headed around the mountain to National Park to a car park at start of the one of the tracks on what is referred to as the Tongariro crossing. Astro is weather dependent and unfortunately the gods are not in our favour. They had been cloud coming in through the day and when we arrived at the car park light rain started to fall. Number in the party gave it after that stage but the rest of us get it up and heat it out into the dark. We had literally gone no further than five minutes down the train when the clouds cleared and the stars appeared. That gave us the first opportunity to practice everything.
Astrophotography has an almost magical element to it in that when the photo appears on the back of the camera you can see much more detail than what you are seeing with the naked eye. I think that is what makes it so appealing.
When the clouds rolled in again we continued on up the track to one of the huts on the trail. One of the tricks with astrophotography is that if you want to improve an image then have a foreground element in it. I’m not sure what the people in the hut thought of the group of photographers camping out in the dark.
30s f2.8 14mm ISO3200 Lumix G9
I had taken both my Nikon D600 and Lumix G9 with me. The Nikon. was used for the main images while I had the Lumix set up for timelapse. Unfortunately the clouds limited that and all I got was a two second clip.
Timelapse
Day two of the workshop started after lunch with a session on post processing the images. Then late in the afternoon we headed back around to National Park where we stopped for dinner. We head up to The Château and walked up the track to the Tauranga Falls. unfortunately the weather was still not playing ball and we only managed about 10 minutes at the falls before the cloud packed down once again. At that stage most people gave up and we decided to head back to our accommodation for a little social.
Pano of six images. 20s f2 50mm ISO3200 Nikon D600
When we got there we discovered that the cloud above the area was clear and so we were able to shoot for another hour. The grounds had a lake in the and David (the presenter) had brought with him some steel wall so I final shoot we created our own stars.
6s f8 50mm ISO3200 Nikon D600
It was quite an enjoyable weekend even if the weather did not play for. Most people did manage to either get some usable shots or at least improve on the techniques which ultimately is the goal of any workshop.
I met Chris at the very first Wellington Cosplay Photofest where he came in an stormtrooper outfit from Star Wars. You can read about that shoot here.
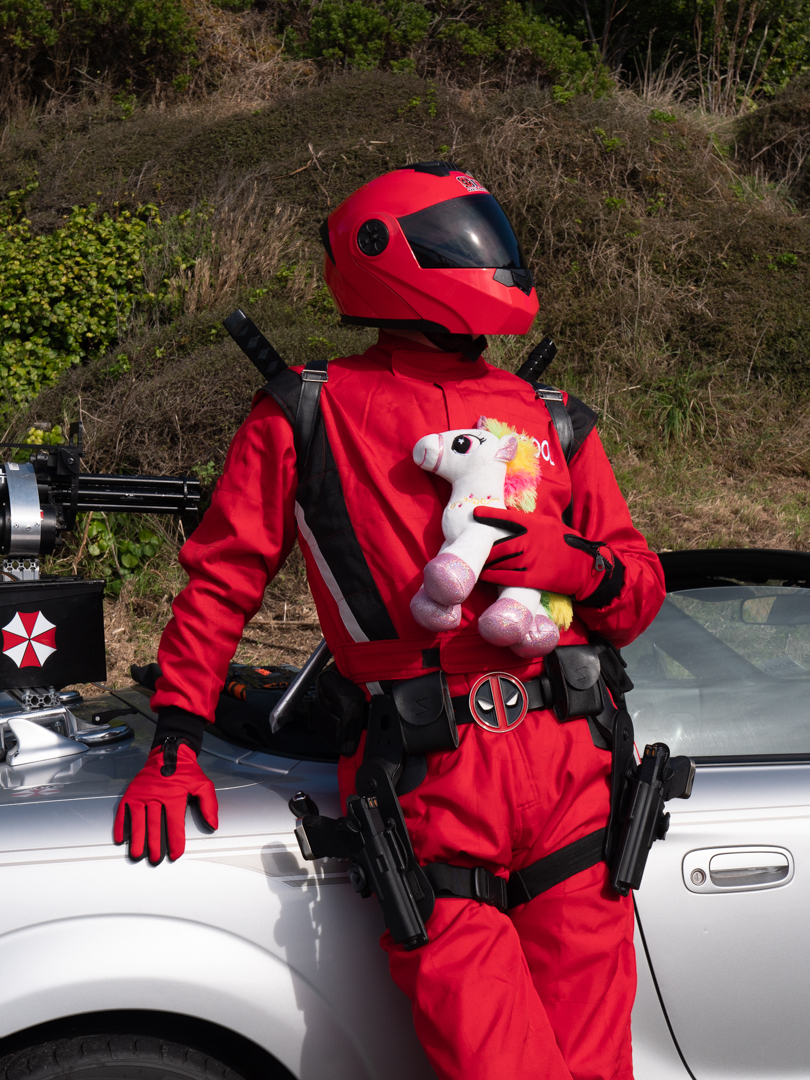
In May 2021 I organised a location shoot for my camera club at the World War 2 gun emplacements at Fort Balance on the Miramar Peninsula. I reached out to Chris and he came along in his own creation Stigpool. This is a combination of the Stig character from the Top Gear television series and Deadpool.
Chris had a fully kitted car to go along with his character so we started at the roadside with some shots there. These were all shot under natural light 1/200s at f8.
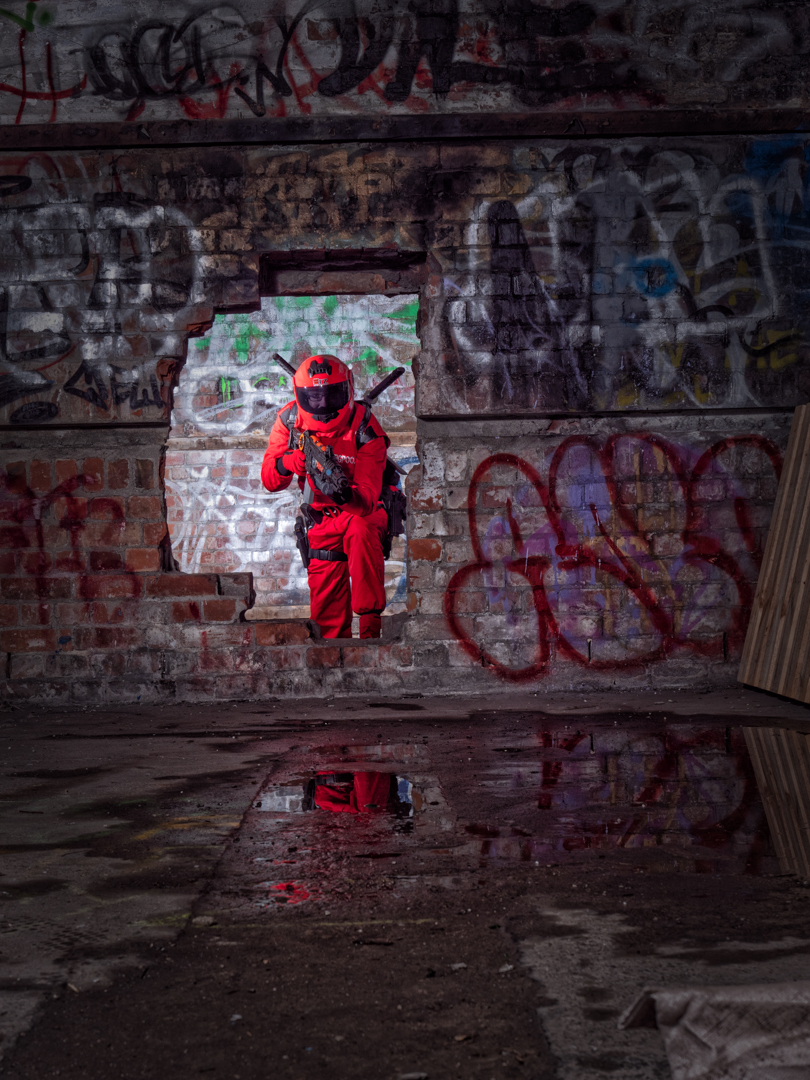
Then we moved up into the bunkers in shoot at several locations initially outside.
We then moved inside the complex and I positioned Chris and let him with a speed light in a small soft box on a light stand to the side. Positioning of this light was very important to avoid reflection within his visor. For the inside shots the settings were 1/125s f7.1 ISO 200.
The words on the floor were a complete coincidence but they worked in so well with the character.
For the final shot I had Chris climbing through a hole in the wall. The main light was again positioned to the side with a small speedlight in the room behind him to provide separation.
Shooting a character in a full face helmet is quite tricky as you cannot rely on the eye detect that modern mirrorless cameras. Fortunately my Lumix G9 switches to head and body detection when it cannot lock onto the eye.
It was a fun day and everybody seemed to enjoy themselves.
One of the benefits that comes with belonging to a camera club is that occasionally you get given the opportunity to shoot somewhere where you would not normally be able to.
At the 2021 Photographic Society of New Zealand National Convention in Christchurch one of the offsite options was entitled industrial photography. We were taken to a fabrication factory that was closed for the day but where a number of staff had come in to use the tools that they do every day for us to photograph the sparks that they generate.
All that was asked in return was some images that they could use in their marketing and promotion. (the final image on this page is the one that presented to them).
In many of these shots they were deliberately making more sparks than would happen in normal use. Obviously having pieces of molten metal flying around is potentially dangerous so we will given plenty of advice of where to stand and importantly not to stand.
We were also told to focus the camera without looking through the lens as some of the bright light particularly with the welding torches could damage your eyes.
This was a perfect opportunity to try long exposure to capture the sparks and flight. The images were captured on a tripod at 1/10s at f16.
I did want to capture one particular image for the set I was submitting so I took long light stand and a Lume cube so that I could light up the worker. The Lume cube is pretty indestructible so I knew that it could handle the situation.
The final image of the welder was actually a composite of three images put together so that we could maximise the effect of the sparks.
The sports my daughter has played has had a big effect on my photographic journey. When she was a lot younger it was shooting a netball game that showed a good digital SLR could be and resulted in us purchasing her first one.
She went on to artistic rollerskating which pushed my gear and my own understanding of how to use the camera even more.
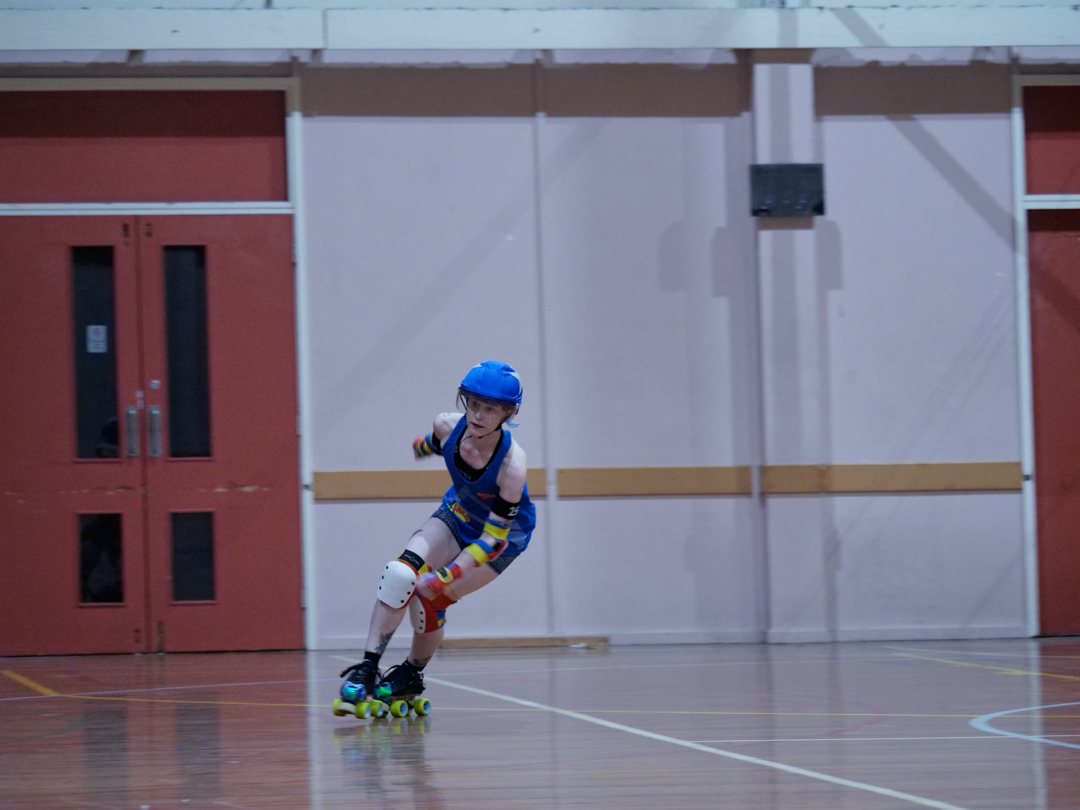
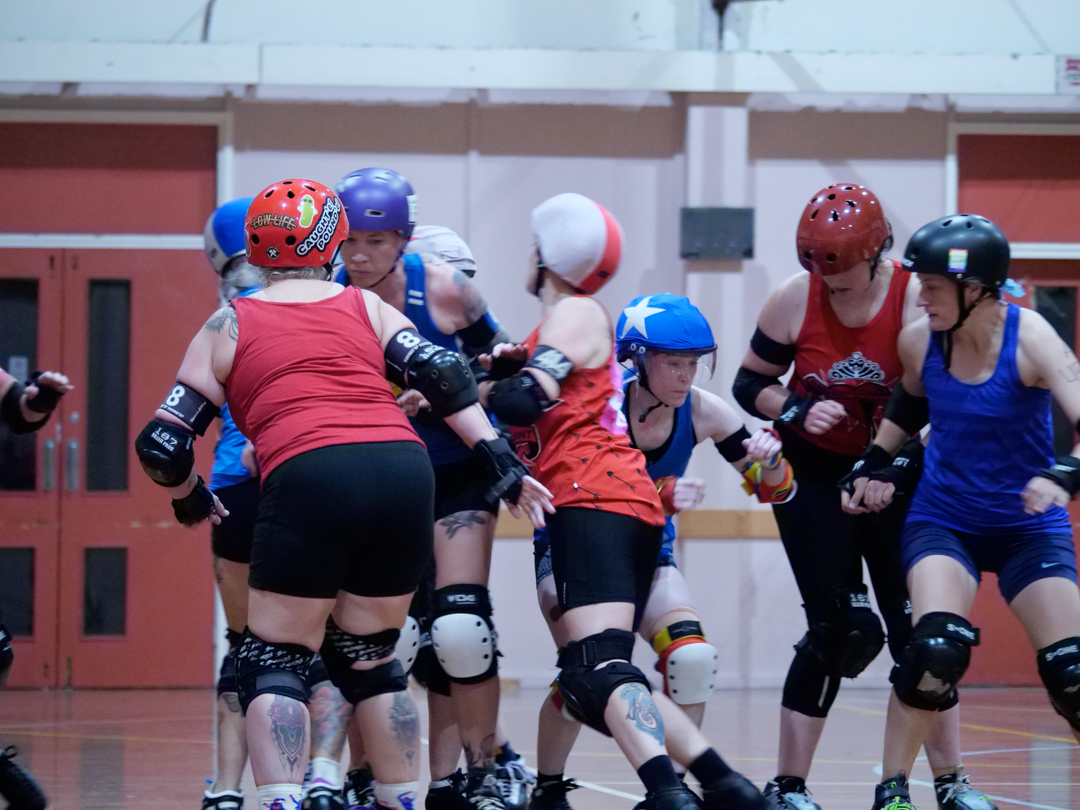
She eventually gave up the rollerskating when she went to university in 2021 she got interested in rubble Derby. In theory this is a low contact sport played mainly by women who all take on different personas for the games.
Unlike many of the others Samantha could skate very well so she ended up in the position of Jammer (denoted by the star on the helmet) who is person who once they have made it past the other skaters (called blockers) score points.
I had photographed Roller Derby on two previous occassion and found that it was even more challenging to shoot that roller skating. So when Samantha invited me to of their training sessions. I decided to give it another go as I could try out different settings without the pressure of delivering any images.
All of these images were shot with my Panasonic G9 using a 100-300mm lens. This is a full frame equivalent of 200-600mm. I had a setting of f4 and played with shutter speeds of 1/125 and 1/200s to freeze the action with ISO provisions the boost (2500 at the lower end and 4000 at the upper).
Focusing what the main challenge and ultimately you end up taking a lot of images and rejecting them.
Sport is a great way for anyone to learn how to use their camera on the fly and particularly the limitations that the gear will give you. You make lots of mistakes but in the process you learn heaps.