When I book a session with a model especially one where I’m spending some time setting up the studio I would generally try to maximise our time together and shoot multiple outfits
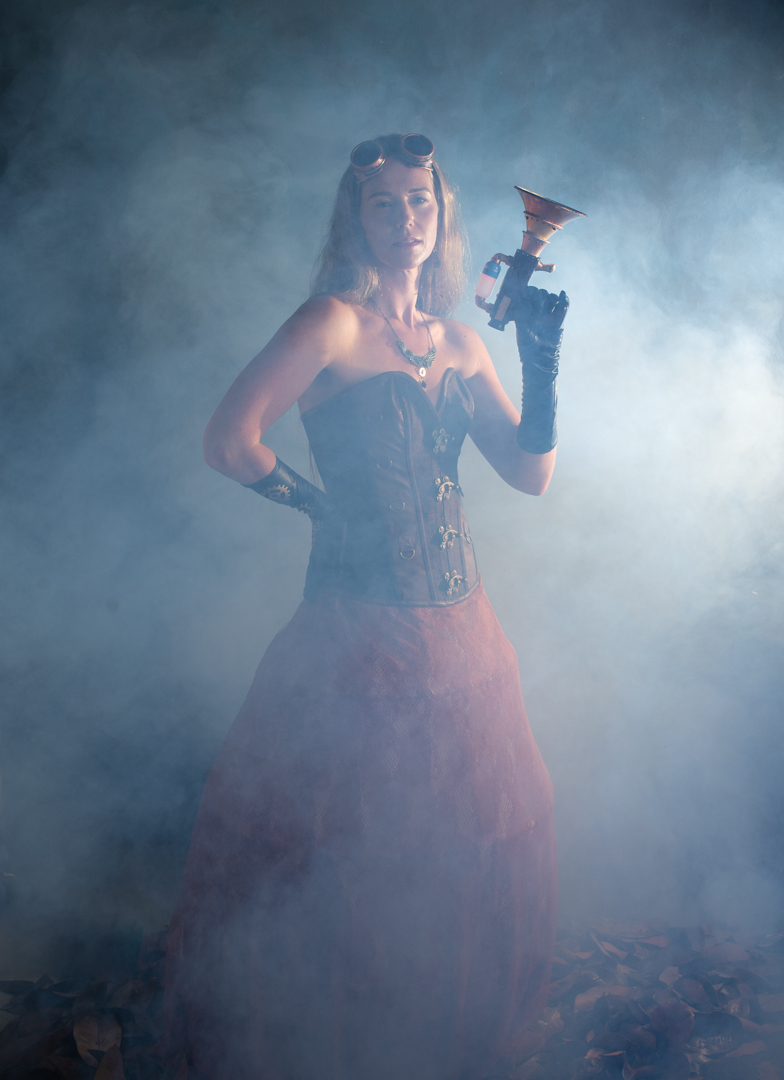
When we started planning for Rachel to come out for the bird lady she happened to mention that she had some steam punk goggles and gloves and so we decided to incorporate them on the day
We swapped out the top half of her costume. We replaced it with a leather corset. I brought in a prop gun that I had painted.
The lighting for the set up was slightly different than used earlier in the day. The main light was a 1.5 meter octabox with a grid positioned 90° to Rachel. On the opposite side a reflector was brought in close to provide some fill.
To add some atmosphere to the images I had borrowed a smoke machine from another photographer. The speedlight shown in the diagram was used only in the images with the smoke. To really see the effect of smoke in an image it needs to be backlit.
It was a fun part of the shoot and I was really pleased with the images. All of the images were shot using a 50mm prime 1/200s f7.1 ISO200.
When Rachel and I started planning for the bird lady shoot, she mentioned that she had a white dress. She thought that it be suitable as a choice to the costume I was designing.
I believe that model shoots are collaborations. I had no problem with her bringing the outfit. So, we took some shots with her in it.
We also included the nest that would form part of the birdlady shoot.
For the lighting I used two lights. My main light was a Godox AD600 in a 1.5m Octobox positioned at 90° to Rachel. The light was covered with a grid so that I control the direction of it. This lighting positioned closely resembled the angle that the sun had been when the birds were photographed.
The imaged were shot using my Nikon D600 f7.1 1/200s ISO200 on a 50mm prime lens.
Although the image below shows it as a square was actually octagonal. On the opposite side to the main light, I positioned a white polystyrene reflector. It provided a bit of fill. At the rear of the studio, I had an Elinchrom D400 firing into the 7 foot umbrella covered with diffusion. This was solely to fill-in the shadows. While Elinchrom and Godox lights operate on different triggers, I could use the optical slave on the Elinchrom. This approach worked really well.
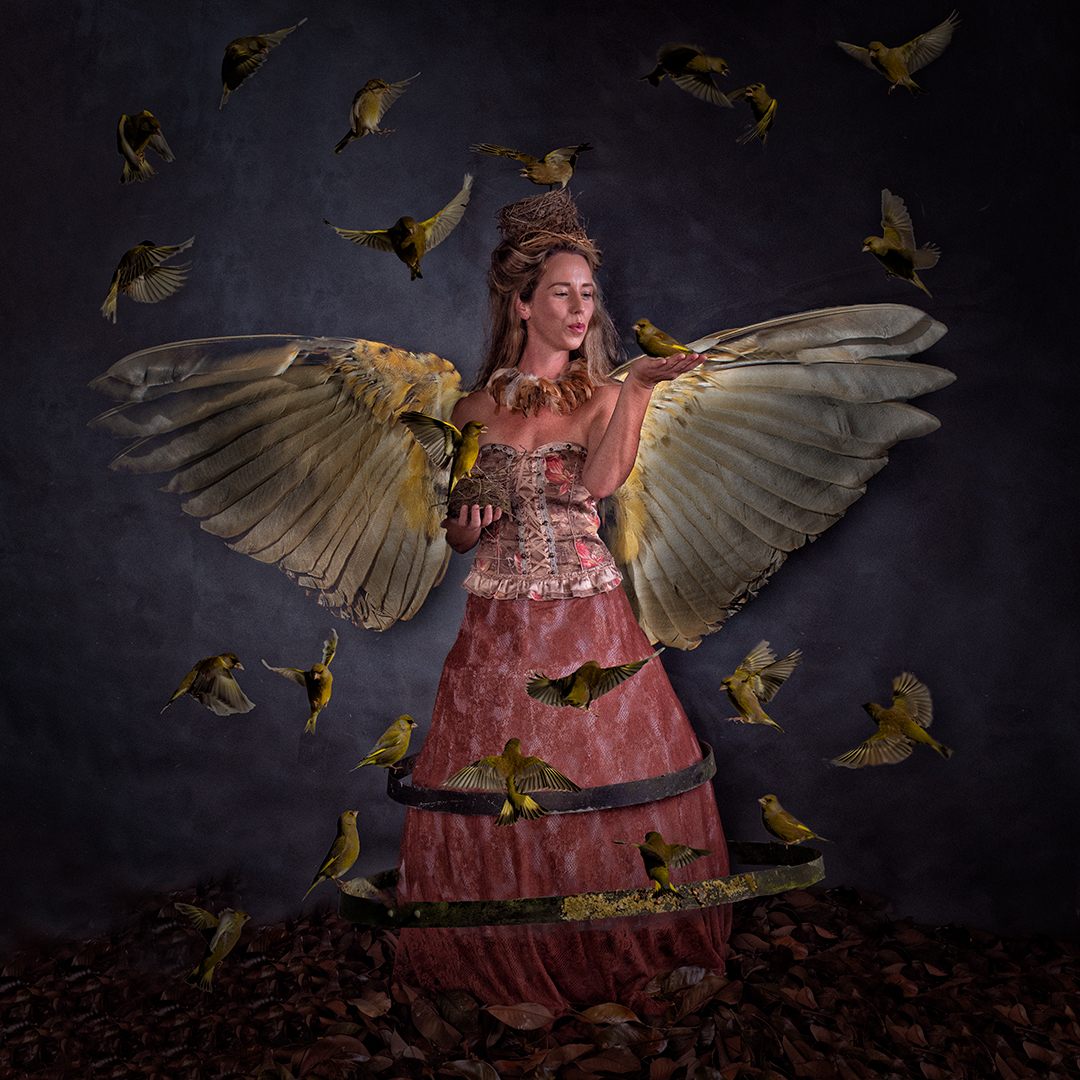
In post I added the wings and the bird sitting on the nest. The image was now looking very angelic so I photographed a glass bowl to create the halo.
The feel of this image is quite different to the birdlady but in someways very complimentary.
Once I had all of the images it was now time to put them together.
I created a Photoshop document and built it up layer by elements as I went.
I had already gone through the Lightroom catalogue containing the bird photos and classified them into potential positions in the final image. From these I selected around 36 images taking each one into Photoshop, making a rough selection, copying it into my main document and then masking out the bird.
I realised that this would be a large file, hence I did not copy across anything that I did not need. Even with an effort I had to use the Photoshop large file format as the resulting file is 2.7 GB.
The image was tweaked over several sessions. The video below takes you through the photoshop document showing what each layer does. I alway work non-destructively so adjustment are always applied on their own layer.
I have shot Rachel several times and so I approached her with a mockup of the image to see if she would be interested. She thought it would be quite fun so we scheduled a shoot.
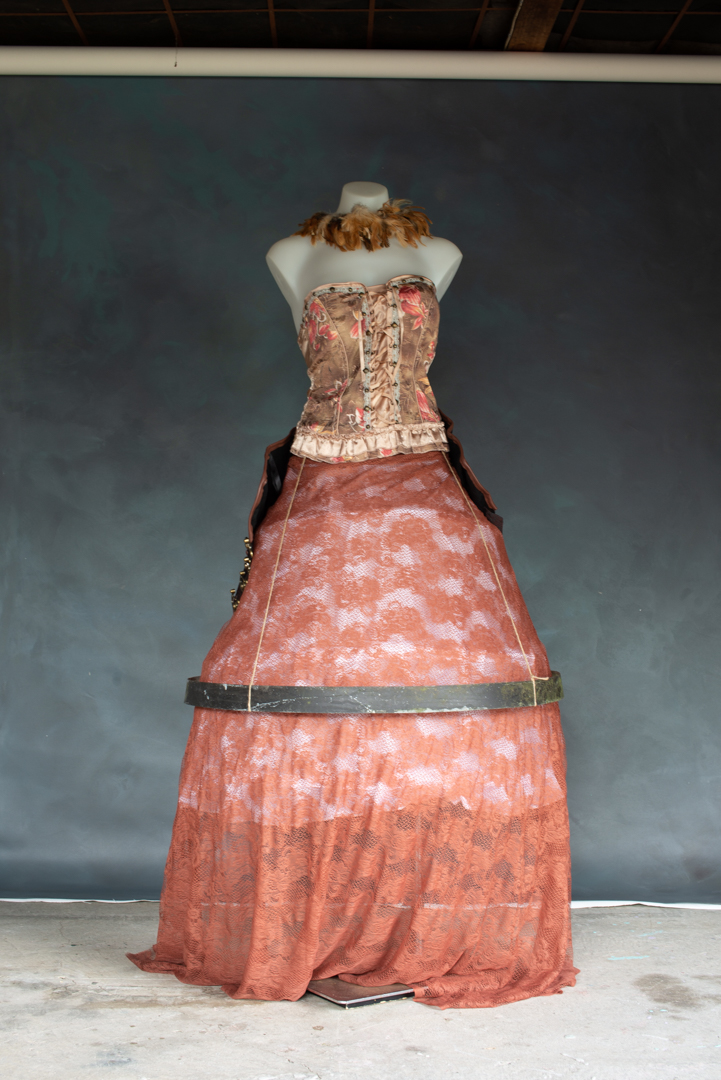
I had always envisaged a Victorian style outfit and so I made one using a corset and then placing lave over a hoop skirt frame. I attached the ring to a belt for strings and positioned it at roughly same height as it appeared on the feeder.
I borrowed a handpainted canvas backdrop and set up a studio in the garage. I knew that the final image would be a composite but at that stage I was not sure whether I would leave the background as it was or replace it. One of the hardest things of bringing a person into a new scene is getting their feet to look right on the new surface. To make this process a lot easier I had collected leaves and I sprayed those around Rachel’s feet.
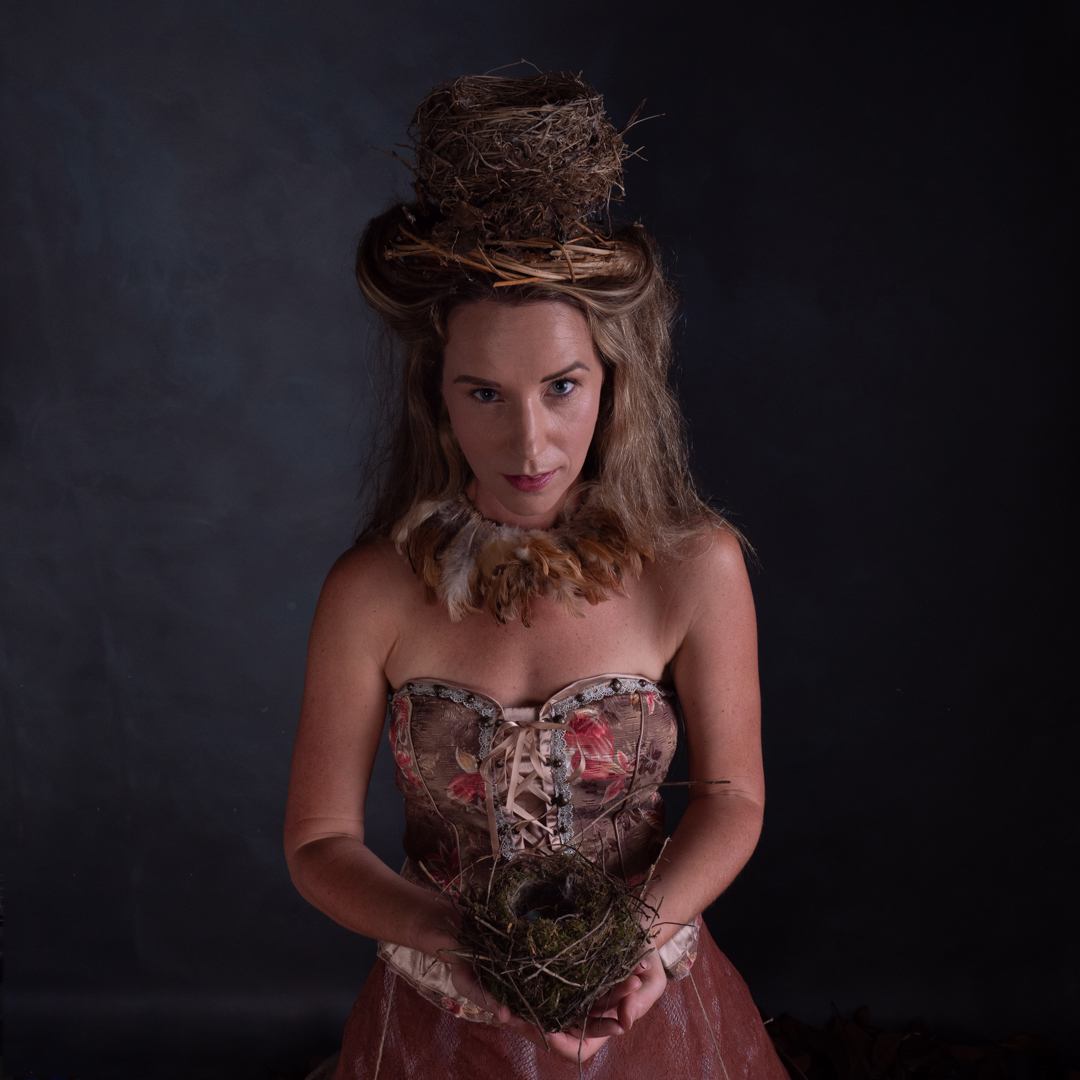
I also collected a number of nests during the previous year and we fixed one to Rachel’s head and she held the other one. It was the a simple matter of shooting her where she was interacting with birds that would be added later. I only provided minimal direction as Rachel is an experienced model. Plus I find that letting a model find their own rhythm makes for better images.
For the lighting I used two lights. My main light was a Godox AD600 in a 1.5m Octobox positioned at 90° to Rachel. The light was covered with a grid so that I could control the direction of it. This lighting positioned closely resembled the angle that the sun had been when the birds were photographed.
Although the image below shows it as a square was actually octagonal. On the opposite side to the main light I positioned a white polystyrene reflector to provide a bit of fill and at the rear of the studio I had an Elinchrom D400 firing into the 7 foot umbrella covered with diffusion. This was solely to fill-in the shadows. While Elinchrom and Godox lights operate on different triggers, I could use the optical slave on the Elinchrom and this worked really well.
All of the images on this page were shot with my Nikon D600 f7.1 1/200s ISO200 using a prime 50mm lens. The camera was mounted on a tripod that was set at the same height as when the birds were shot.
We also shot some images from a different angle but these were never taken any further in post.
You can see a behind the scenes video of the shoot below
In part three we will cover putting it all together.
With my conceptual photography I will often spend several days building a set and sorting out lighting before the model arrives. However the majority of this time is not spent actually shooting.
The creation of my Birdlady image was completely different in that it involved seven days of actual shooting and many hundreds of images.
I am not sure where the concept came from but I definitely wanted to create an image of someone representing Mother Nature surrounded by birds. I also wanted to incorporate some metal rings that had originally come from a wine barrel.
The first task was to photograph the birds which to me was somewhat of an unusual challenge. I have shot them on many previous occasions but I cannot say that I’m overly good at it.
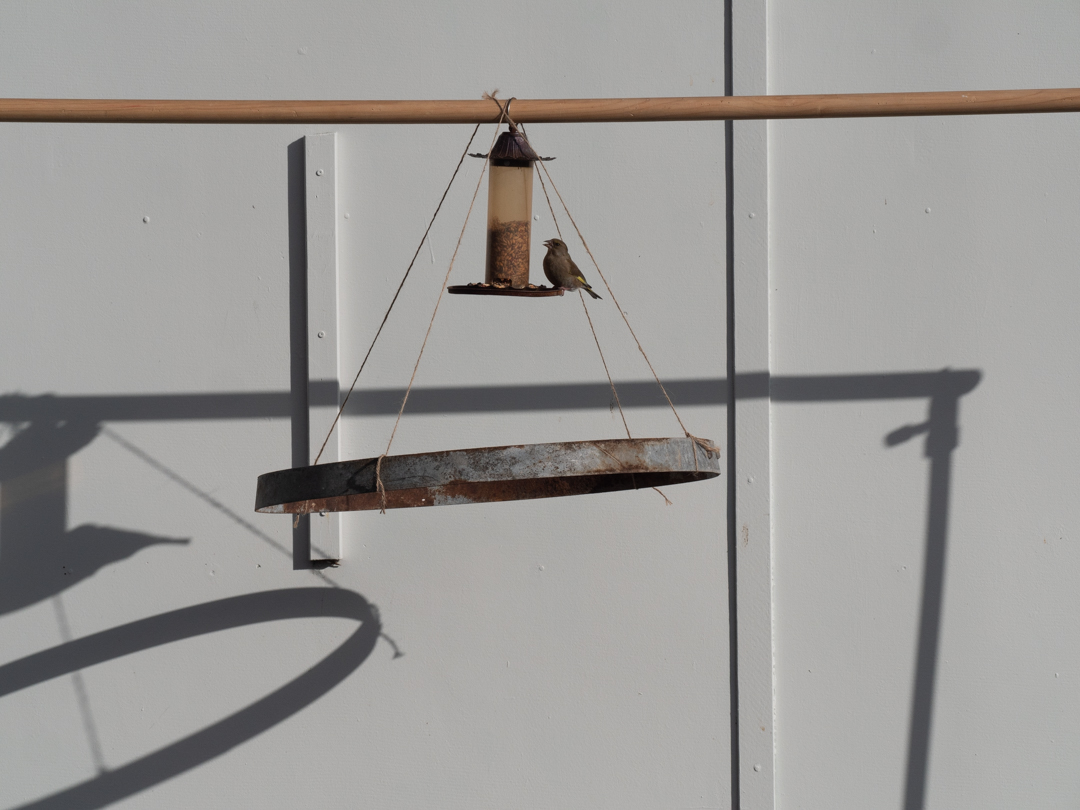
I knew that would have to clearcut the birds out of their background so I tried to make it as simple as possible. In our backyard I set up a frame in front of our old garage that has plain walls. From the crossbar I placed a feeder and then suspended the ring below it. I figured that birds would land on the ring before going up to the feeder.
My Lumix G9 can shoot timelapse so I thought I would use this feature to get my shots. I positioned the camera on a tripod located inside of our double garage. The G9 is a micro 4/3 camera which meant that they reach of the lens was double its setting. was working on the theory that with the camera in the garage the birds would not be disturbed.
That theory proved to be true but the overall experiment was a disaster. During the time that the timelapse was running, the camera shot around 1,200 photos but when I reviewed them I discovered that only three had birds actually in them.
On day two I tried again but this time I set behind the camera and photographed. This guy gave me a much better hit rate but I was still not seeing large numbers of birds I came to the conclusion that the strings were perhaps putting them off.
On day three I tried something different and I moved the birdfeeder to the end of the garage and I also changed cameras to my full frame Nikon D600. This time I had much greater numbers of birds coming but now I realised that these images were going to be much harder to work with. I figured that shooting in front of the plain wall was ideal but that I needed to improve where the feeder was located. I also realised that having the ring positioned higher up was going to cause a problem in matching the perspectives when it came to create the composite.
Day 3 Nikon D600 f5.6 1/800s ISO100 200mm
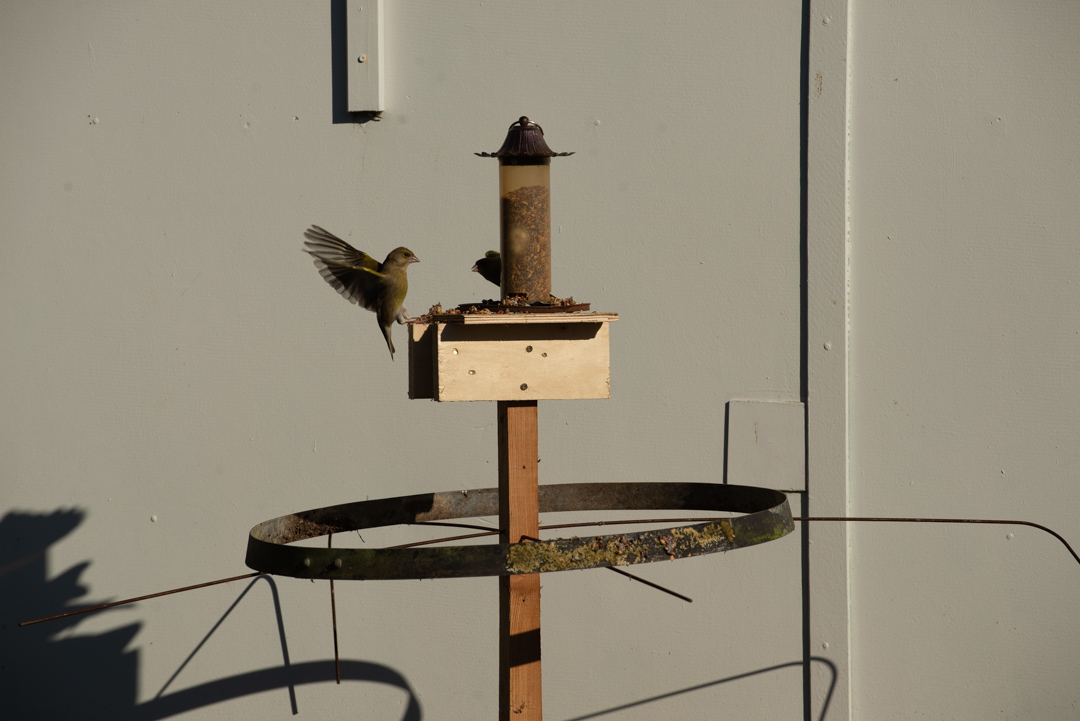
So on the afternoon of day three I built a stand for the feeder that also enabled the ring to be positioned without the need for strings. The rig also meant that I could set the height of the tripod and the ring so that I did not have issues with perspective.
Day 4 Nikon D600 f5.6 1/320s ISO100 200mm
On Day four, the new set up was put into action. I also realised that I did not need to hide myself. Rather if I stayed still the birds would ignore me. So I positioned myself halfway across the driveway with the camera set on a tripod that was triggered remotely. While the shutter did make a noise the birds got used to it.
In order to try to encourage birds onto the ring I used peanut butter and glued seed to it. This was not overly successful.
After about 30 minutes or taking photos I thought that I had some definite ones that I could use. once they were loaded in light room a classified them based on where I thought they would fit in the image. That lead me to the conclusion that I still needed some images specifically birds in flight.
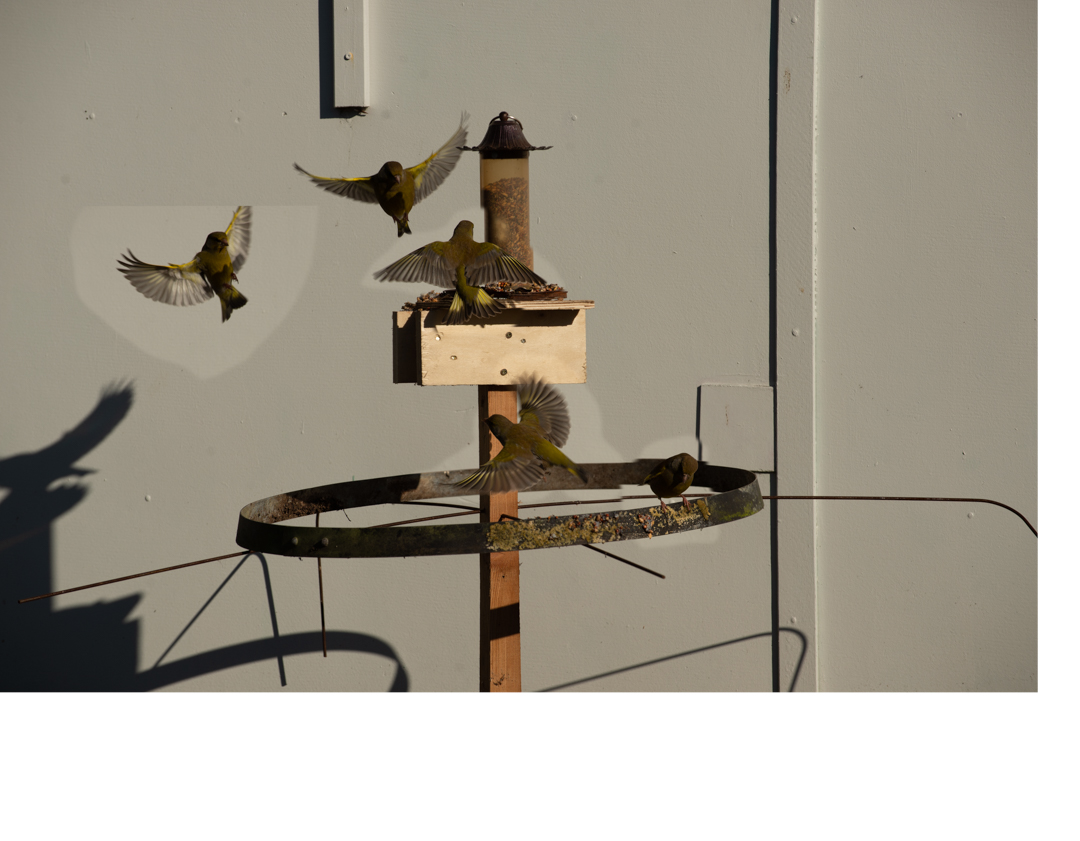
Day 5 Nikon D600 f8 1/800s ISO100 190mm
So on the morning of day five I was back in the seat with the same camera set up but now focused on only shooting flying birds. I had pushed the shutter speeder to 1/800 of a second. I also positioned LED light just out of shot to brighten up the wall slightly. Again this was to make cutting out the birds as easy as possible.
That night I did a very quick composite in Photoshop to see what multiple birds looked like. I was pleased with the result and figure that we were now in a position to move onto the model shoot.
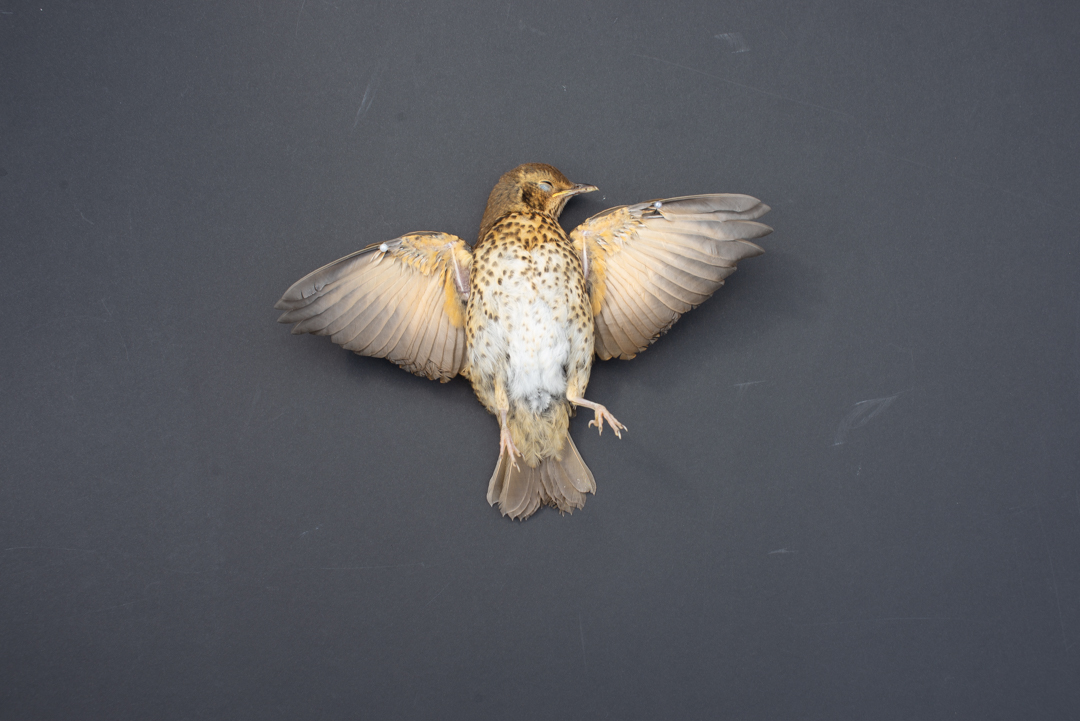
The one thing that I was not sure of was how I was going to incorporate the wings that I wanted my main character have. I knew that I could not use any of the images I had shot as those birds were simply too small for it to be realistic. I had contemplated going in Te Papa Museum and photographing one of the stuffed birds.
That proved to be not necessary. When we returned from a Saturday morning walk I discovered that a young thrush had flown into our bedroom windows and broken its neck in the process. Before I disposed of the body I positioned it on a black piece of card and insured that the light direction matched how I had photographed the birds.
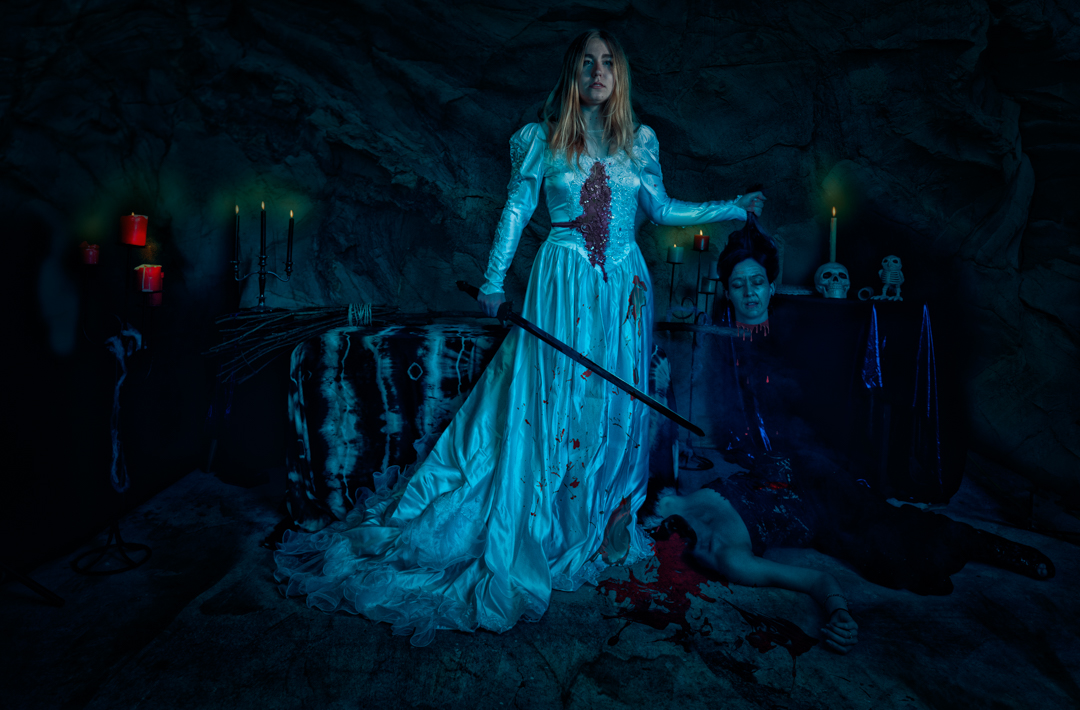
This is the fifth and final instalment in my 2021 Halloween Themed editorial. The story continues:
But just before the blade can hit Red comes out of the trance. The Witch had forgotten that the spell only lasted so long. She fights with the witch and stops the knife.
Red stands and picks up a sword lying nearby.
Before the witch can react she swings it removing the witches head from her shoulders. Triumphantly Red picks up the witches head. As with most fairytales good has triumphed over evil.But in our modern fairytale the damsel in distress does not need a prince to save her.
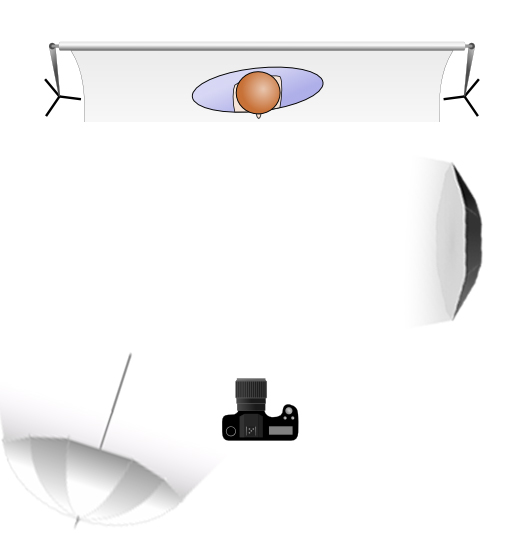
The lighting for this part of the shoot was a two light set up. The main light was positioned camera right at a 90° angle to the subject and provided the main illumination. At the rear of the room I had a 7 foot umbrella with diffusion set at a low power to simply fill in the shadows
These image were shot at f8 1/125s ISO200 to ensure that I had sufficient depth of field. The main difference from the previous setup was that the camera was now placed on a tripod to make the composite easier.
We shot two images were Lexy held the same pose but where Sian changed positions. For the body part I covered Sian head to make it easier in post.
In Photoshop it was a matter of putting both images in a document and masking the Sian’s body from the top image, and then creating the blood and open wound.
Then the image received the same treatment as the rest in the series. Overall it was darken and the rock texture was added to the rear. The image was then run into Nik Color Efex Pro to create the high texture image. Finally the moonlit LUT was added.
I was really pleased how the overall series went and everyone seemed to enjoy the series when I released them each day leading up to Halloween.
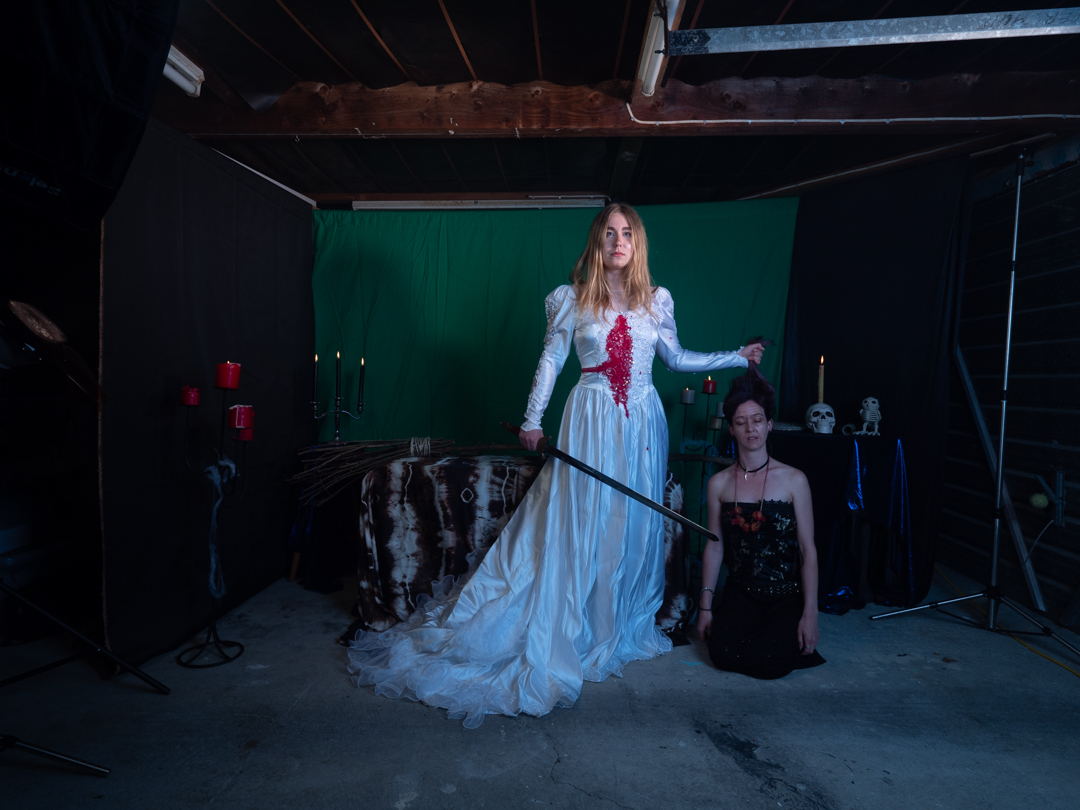
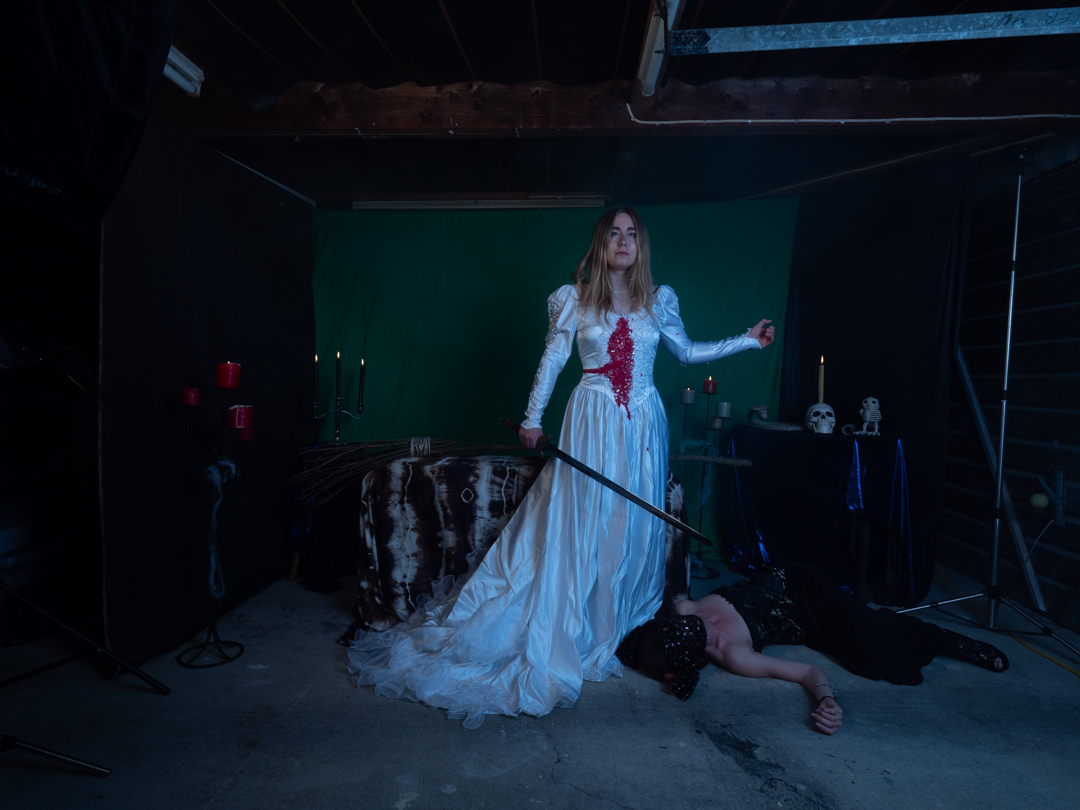
This is the fourth instalment in my 2021 Halloween Themed editorial.. The story continues:
The Witch takes Red back to her lair and puts her in a wedding dress so that she can be a bride sacrifice to Satan the Witches Master.
The witch pour blood over Red and it about to make deep cut.
For this part of the shoot I built a small seat inside the garage in positioned various prompts around the scene. I chose a green background because I knew that I was going to replace it and I hoped that using green would make it easier.
The lighting for this part of the shoot was a two light set up. The main light was positioned camera right at a 90° angle to the subject and provided the main illumination. At the rear of the room I had a 7 foot umbrella with diffusion set at a low power to simply fill in the shadows The image above shows what the shots look like straight out of camera.
These image were shot at f8 1/125s ISO200 to ensure that I had sufficient depth of field.
In Photoshop the image overall was darken and I added a rock texture to the rear. The image was then run into Nik Color Efex Pro to create the high texture image. Finally the moonlit LUT was added.
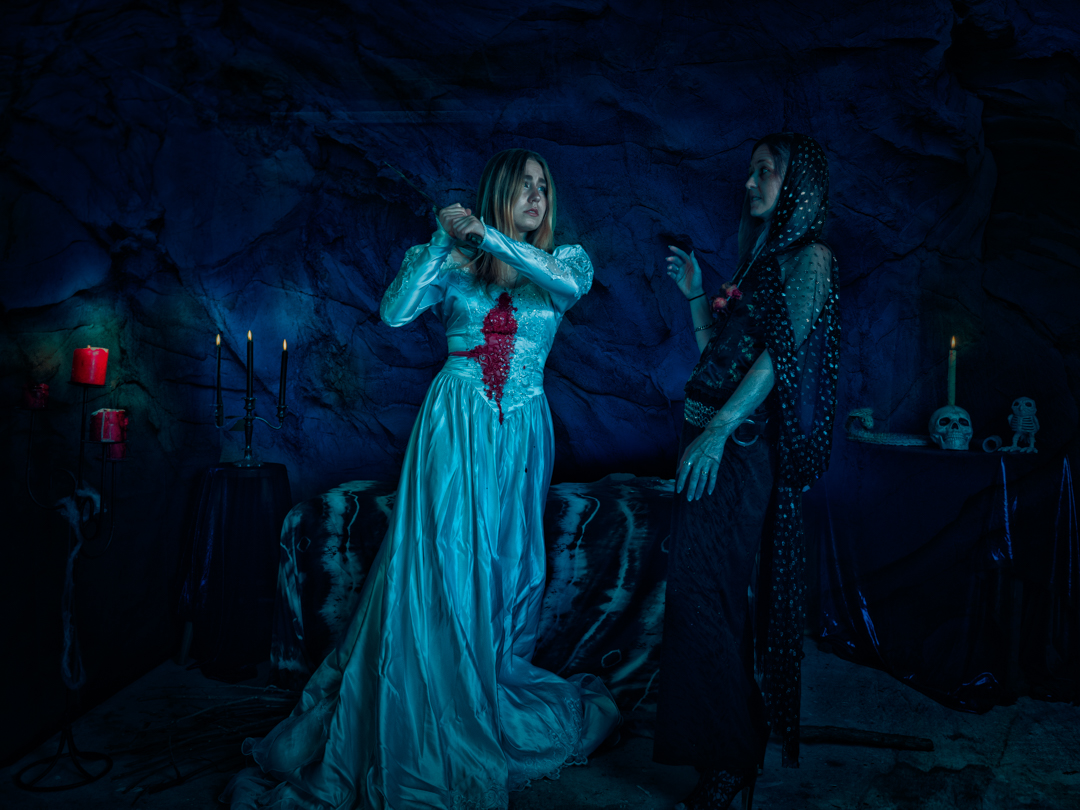
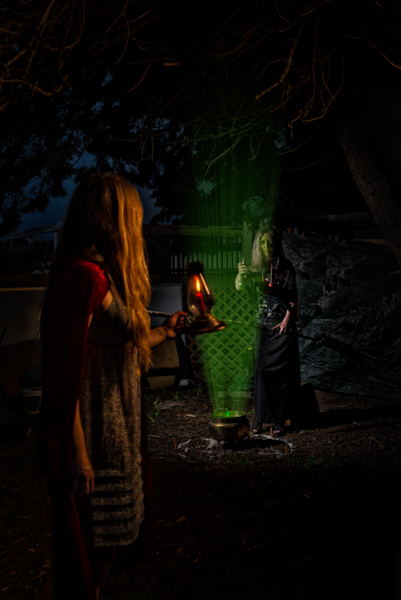
This is the third instalment in my 2021 Halloween Themed editorial.. The story continues:
“Red wanders into the forest. Hearing a strange sound she ventures towards it and sees a green glowing light and a strange lady hovering over a glowing cauldron.”
“The witch looks up and sees the candle awakening red to come closer. But when she is in range the witch casts the spell over read and she loses full control of yourself.”
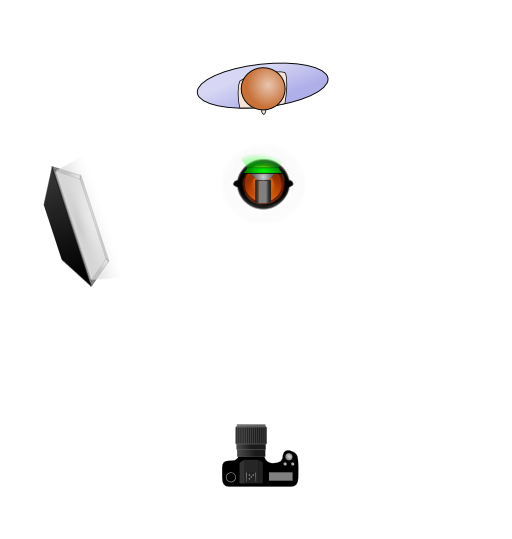
The challenge with lighting this image was that I only wanted to bring the two characters out from the background but I did not want a lot of spill as that would ruin the impact. Therefore using a single large light source would have not achieved my look.
The lighting on the witch was the same as in the previous post and used a speed light in a small square soft box. I added a second Godox speed light in a 65 cm round softbox positioned camera right and just in front of Red.
The settings were slightly changed to f4.5 1/60s ISO100.
For the shot where the Witch puts the spell on Red, I changed positions and moved the Godox speed light in a 65 cm round softbox to be positioned camera left and just in front so that it would light up both of the subjects.
While the softbox was coming into the shot, I knew it would be an easy fix to remove it in post. Plus with it being so close to the subjects I knew that the fall off of light would be quite dramatic.
In post I cropped it down , darken down the background and then added a glow emanating from the cauldron using a mist brush that I had downloaded. I also applied a Moonlight Colour Look Up (LUT) which is one of the LUT’s that comes standard in Photoshop.
In the next post we move back inside for the sacrifice.
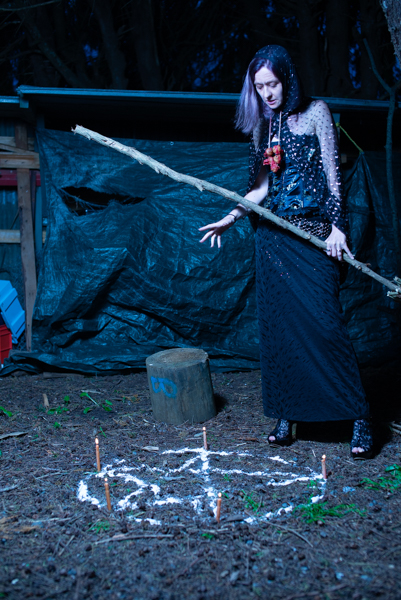
This is the second instalment in my 2021 Halloween Themed editorial.
The story continues:
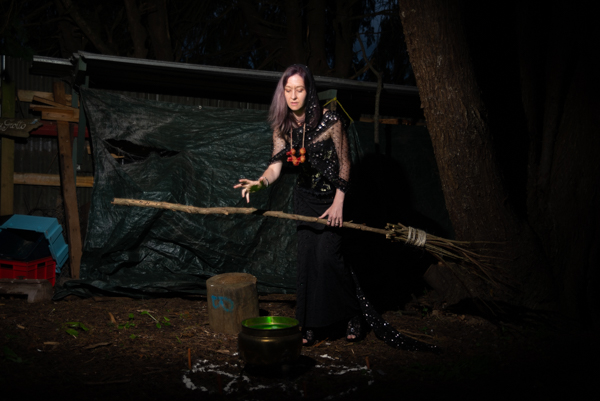
“Deep in the forest the witch begins rituals for All Hallows Eve brewing up a strong potion and hoping that a suitable victim for her planned sacrifice will come along.”
In my original planning for the shoot I wanted to have three witches reminiscent of the scene in Shakespeare’s Macbeth. Unfortunately I was not able to achieve that and Sian was the only one who was available. We had shot together before so I knew that she could bring the character to life. I constructed a mini see it in the back of our section and made her witches broom.
Please note that most of images shown on this page are outtakes that were not used so they have not been processed. with shoots like this you do end up with a lot of images that you will not use especially those when you were trying to achieve particular lighting look.
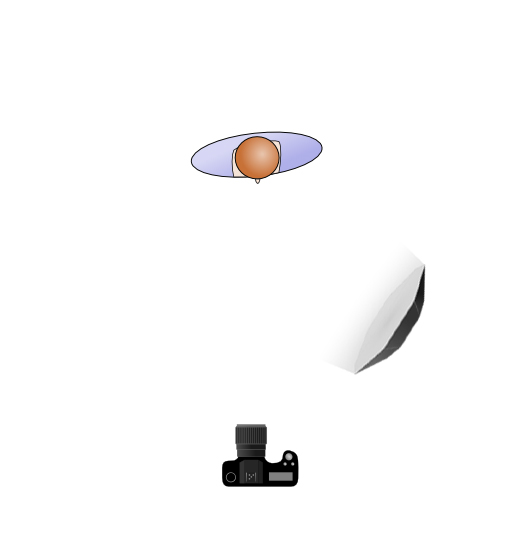
I used a single Godox speedlight is a small square soft box positioned camera right to illuminate Sian. A lume cube was placed inside the cauldron with a green gel to cast light from below. Halloween is one of the few occasions where you can get away with lighting a subject from below.
The settings on the camera did not change from the first shoot namely 1/100s f2.8 ISO100.
As the series was in intended for Instagram in post I cropped it down to a portrait orientation, darken down the background and then added a glow emanating from the cauldron using a mist brush that I had downloaded. I also applied a Moonlight Colour Look Up (LUT) which is one of the LUT’s that comes standard in Photoshop.
Each year in October I challenge myself to shoot something with a Halloween theme. Back in 2021 I took this one stage further and decided to shoot another story similar to what I had done earlier with the Dressmaker series. This is the story of Red and the Witch a modern interpretation of fairytales. It will be split over five posts as each used differing lighting techniques.
The story begins:
“Red was not the brightest girl in town and she had to habit of ignoring any type of warning that she was given. The main one was to not venture into the dark forest after dark and especially not around all hallows eve. Of course that is exactly what she did.“
I placed the casting cool on Facebook and Lexy was one of the ones who responded to it. In looking through the pictures it was obvious that she would play read.
We set up in the garage and she was lit using a 65cm round soft box with placed camera right. This insured that the light fell only on the model and did not spill into the background. The shorts were taken at f2.8 ISO 100 1/ 100s. The candlelight is real and was not advanced. They glass container that it was in dead cause a problem with reflection of the lights. Unfortunately there was nothing I could do about this other than toning it down.
The image was proceed through Nik software to increase the texture and boost saturation. You can see the original version below.