Behind the Scenes: Shaman Photo Shoot

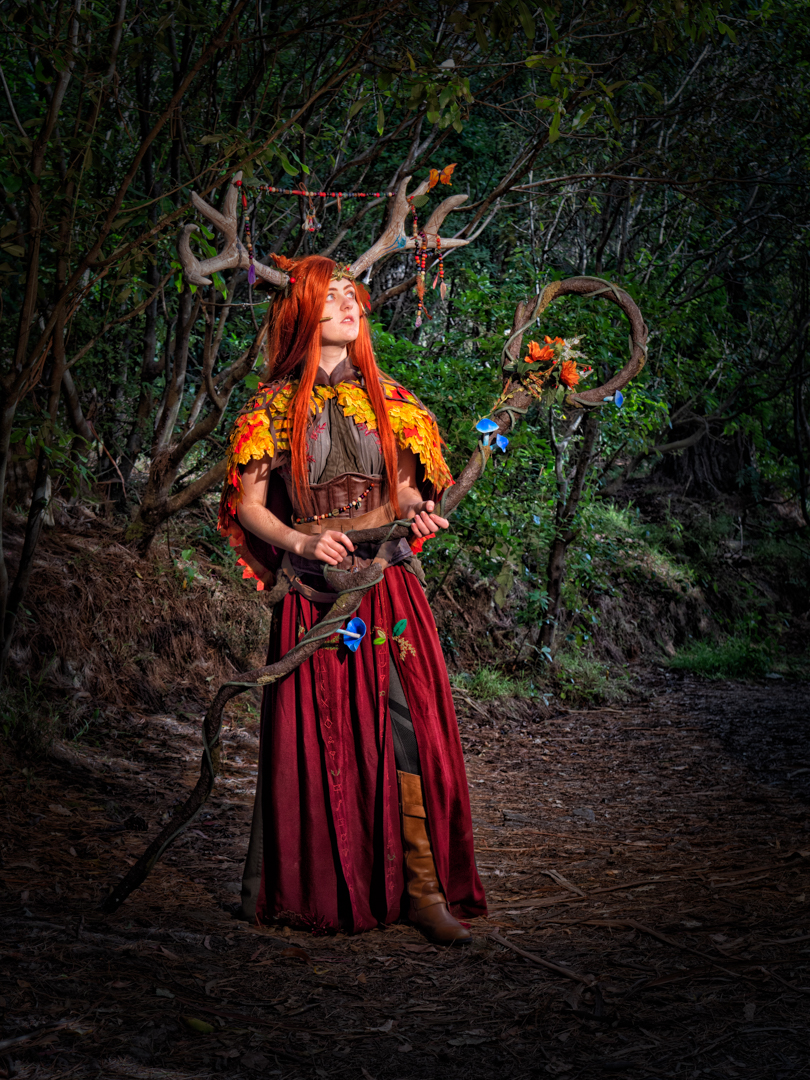
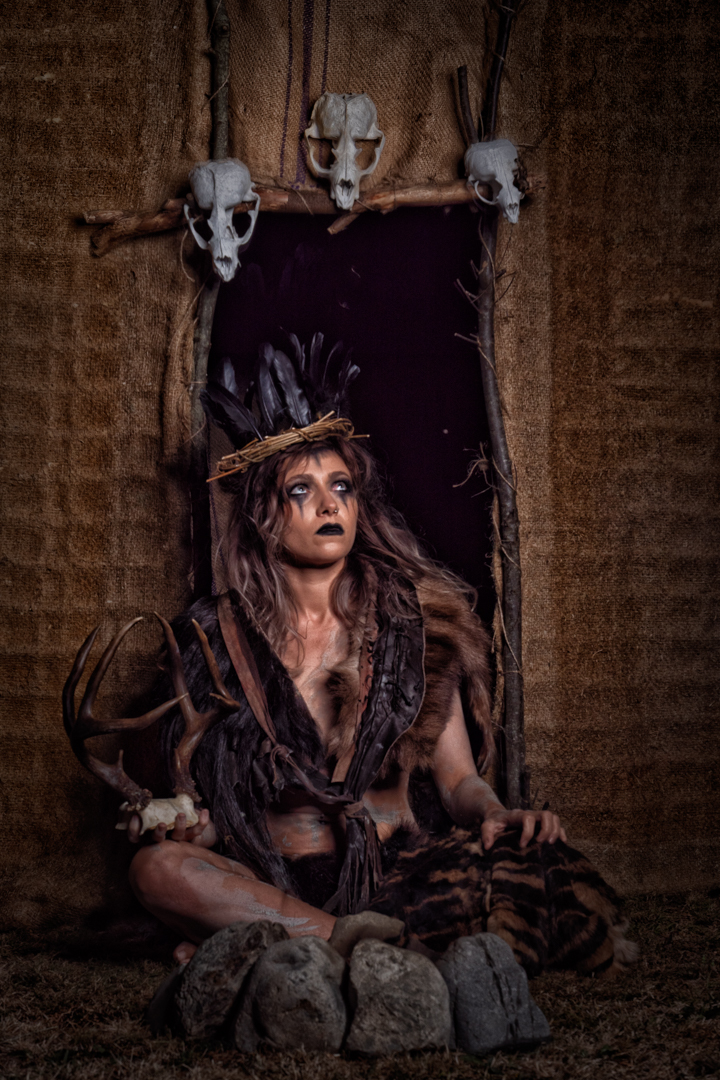
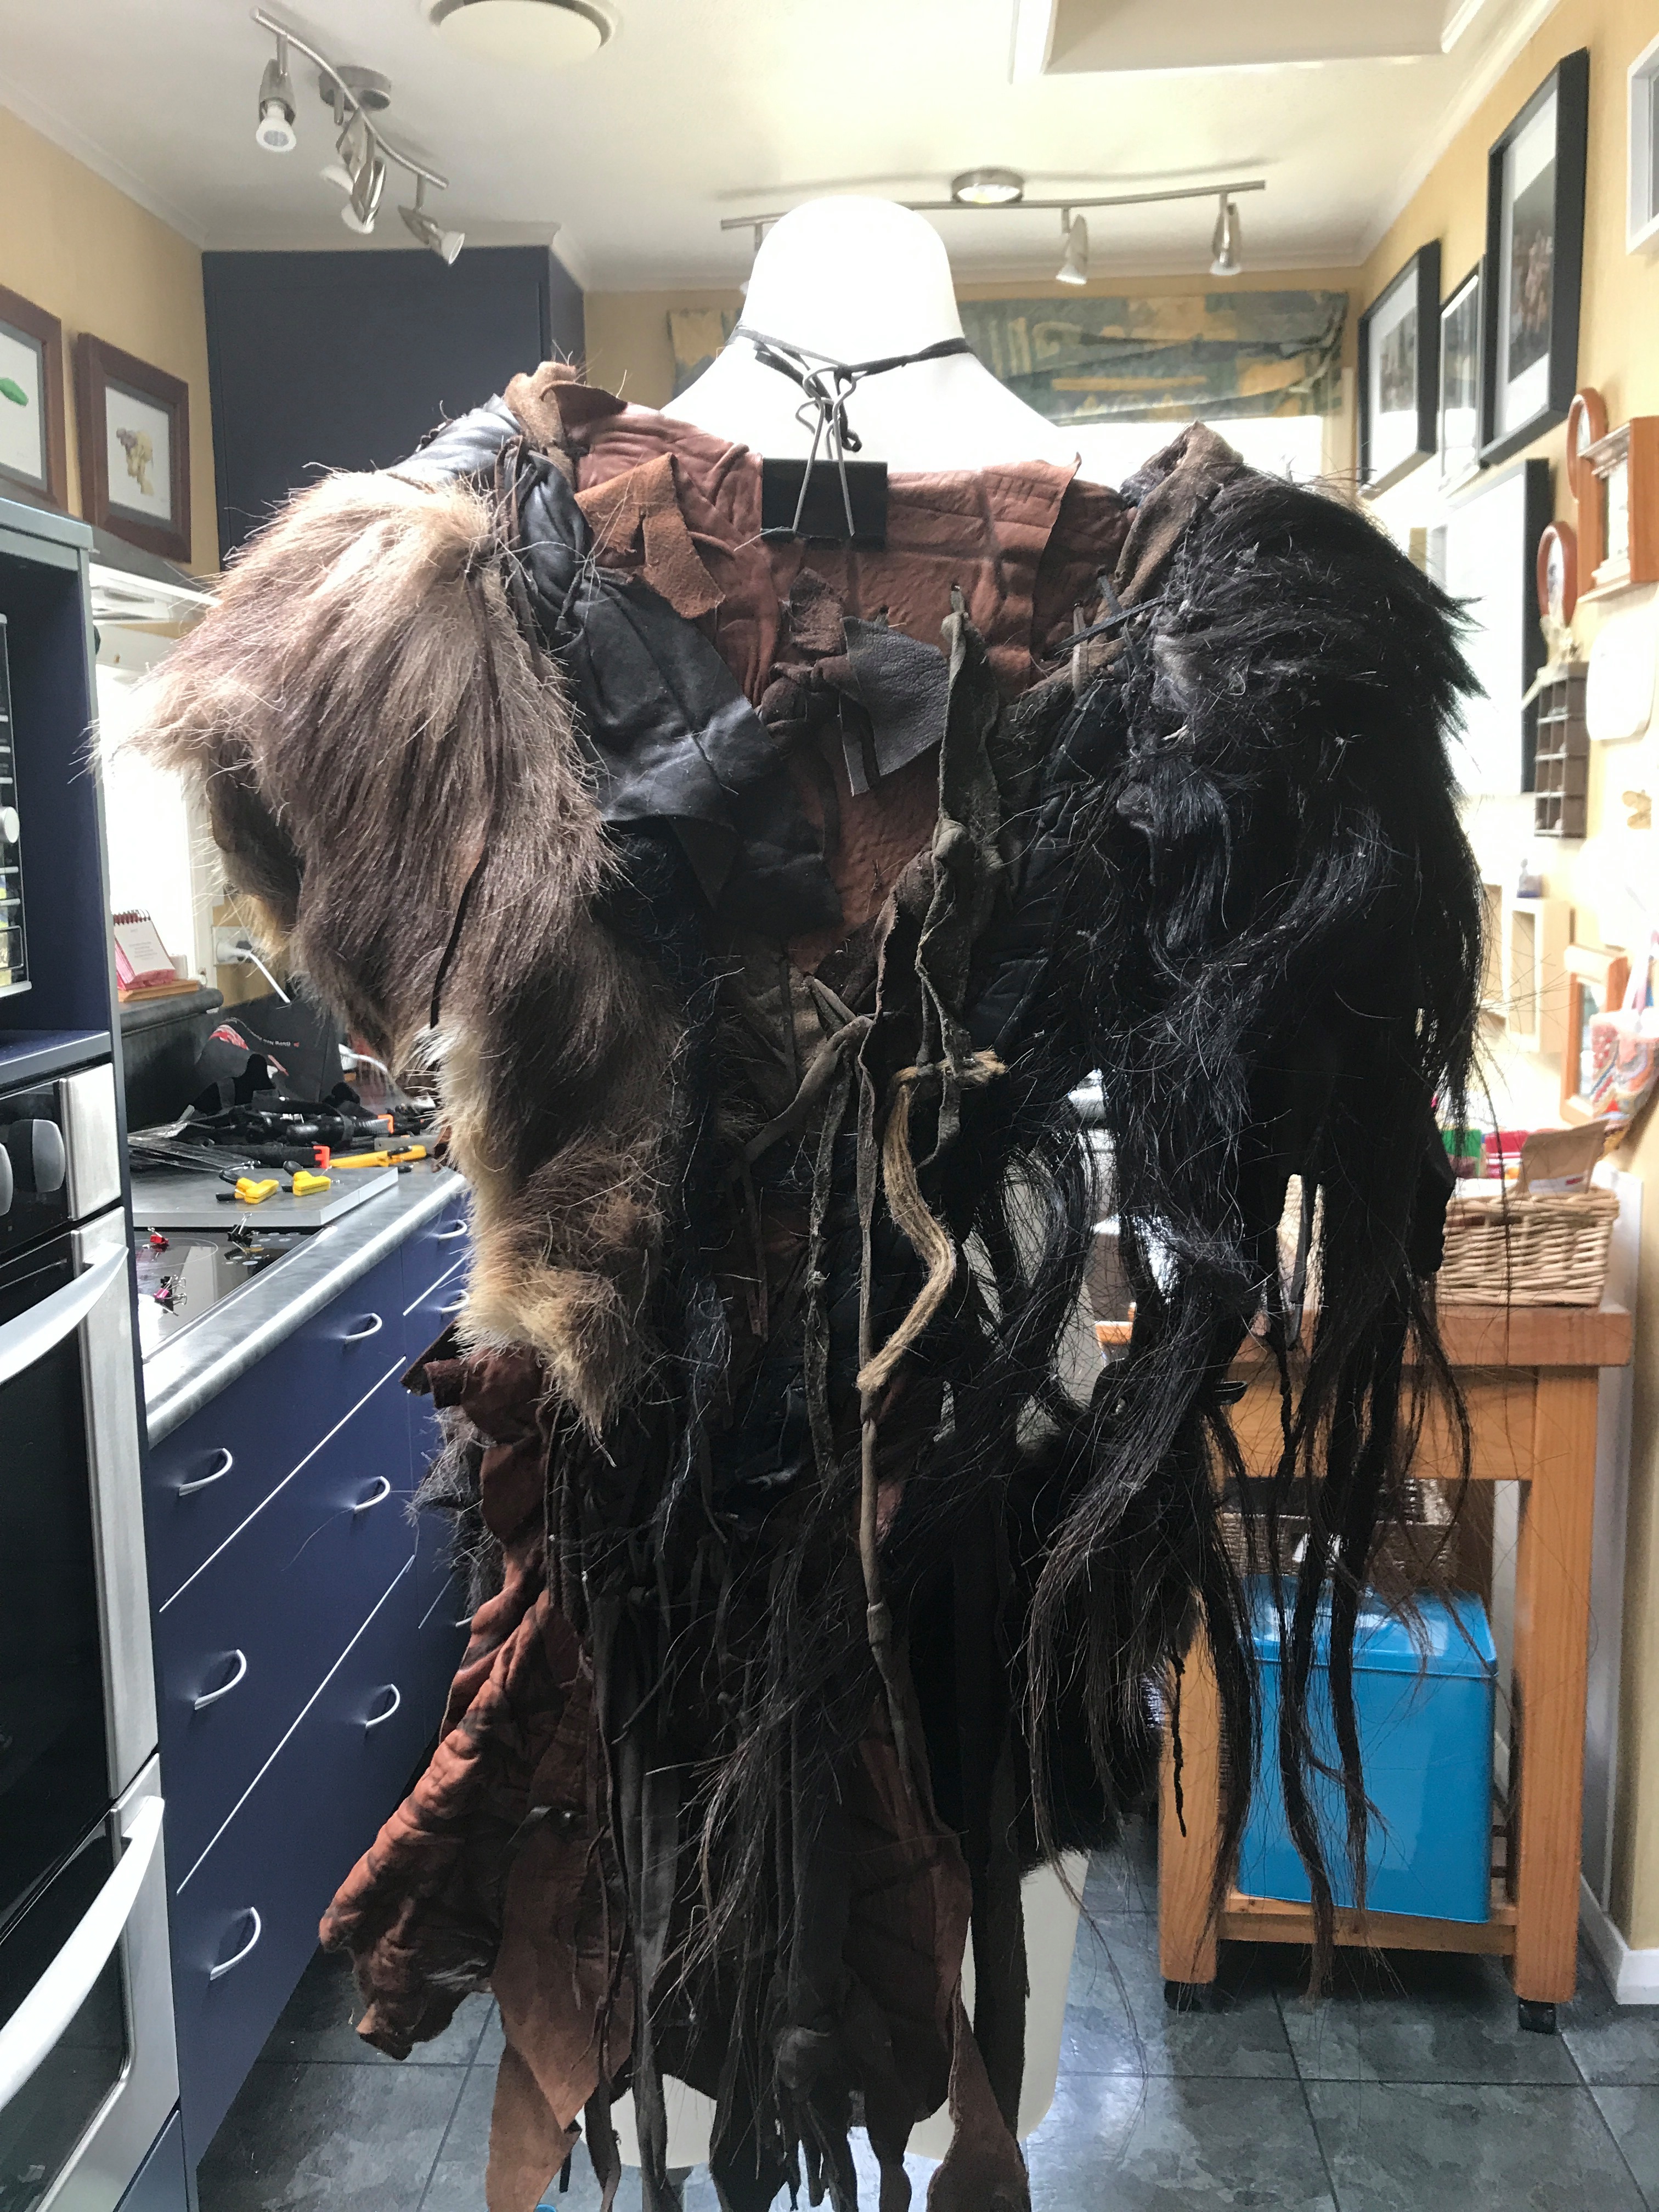
Ideas for shoots quite often start with prop and develop from that. That was certainly the case with my Sharman shoot which started when I was given some pieces of old fur costume that had been used by extras in the television series Xena Warrior Princess.

I knew that I wanted to do something tribal and primitive with them. And that developed into the concept of a witch doctor. The top of the costume was a single piece but for the bottom I glued pieces of the fur onto a nude coloured pantie. I made a headpiece out of dried vines embellished with feathers. In my original design I had antlers as part of it but for these proved to be too difficult to stay on the head so they were used as a prop instead.

I had shot with Casey before on two occasions and I know that she would be willing to play the part. I also recruited a make up artist Erin Gibbons to create the look for me. I used a previous image of Casey that I altered in Photoshop so that she could see what I was going for.

I wanted to create an authentic looking environment for the Sharma so I made the facade of a hut at the bottom of our garden. I used two lightstands with a crossbar to which I attached pieces of hessian that had come from a double mattress. This was sewed to the uprights.

I then used three sticks and sewed them around the doorway closing off the gap with coco sacks that I had. I finally adored the door with three seal skulls that we have found the year before.

I was concerned about wind and so I had the structure both tied to the fence and anchored down. Fortunately wind did not become an issue.

In front of the heart I built a small fire pit using rocks gathered from the river.

As I wanted to control the light, and the set was outside, it was necessary to shoot in the evening. My main light was Godox AD600 in a 1.5m octagonal softbox. In addition I had a small LED constant line that was simply used to assist the camera to focus.

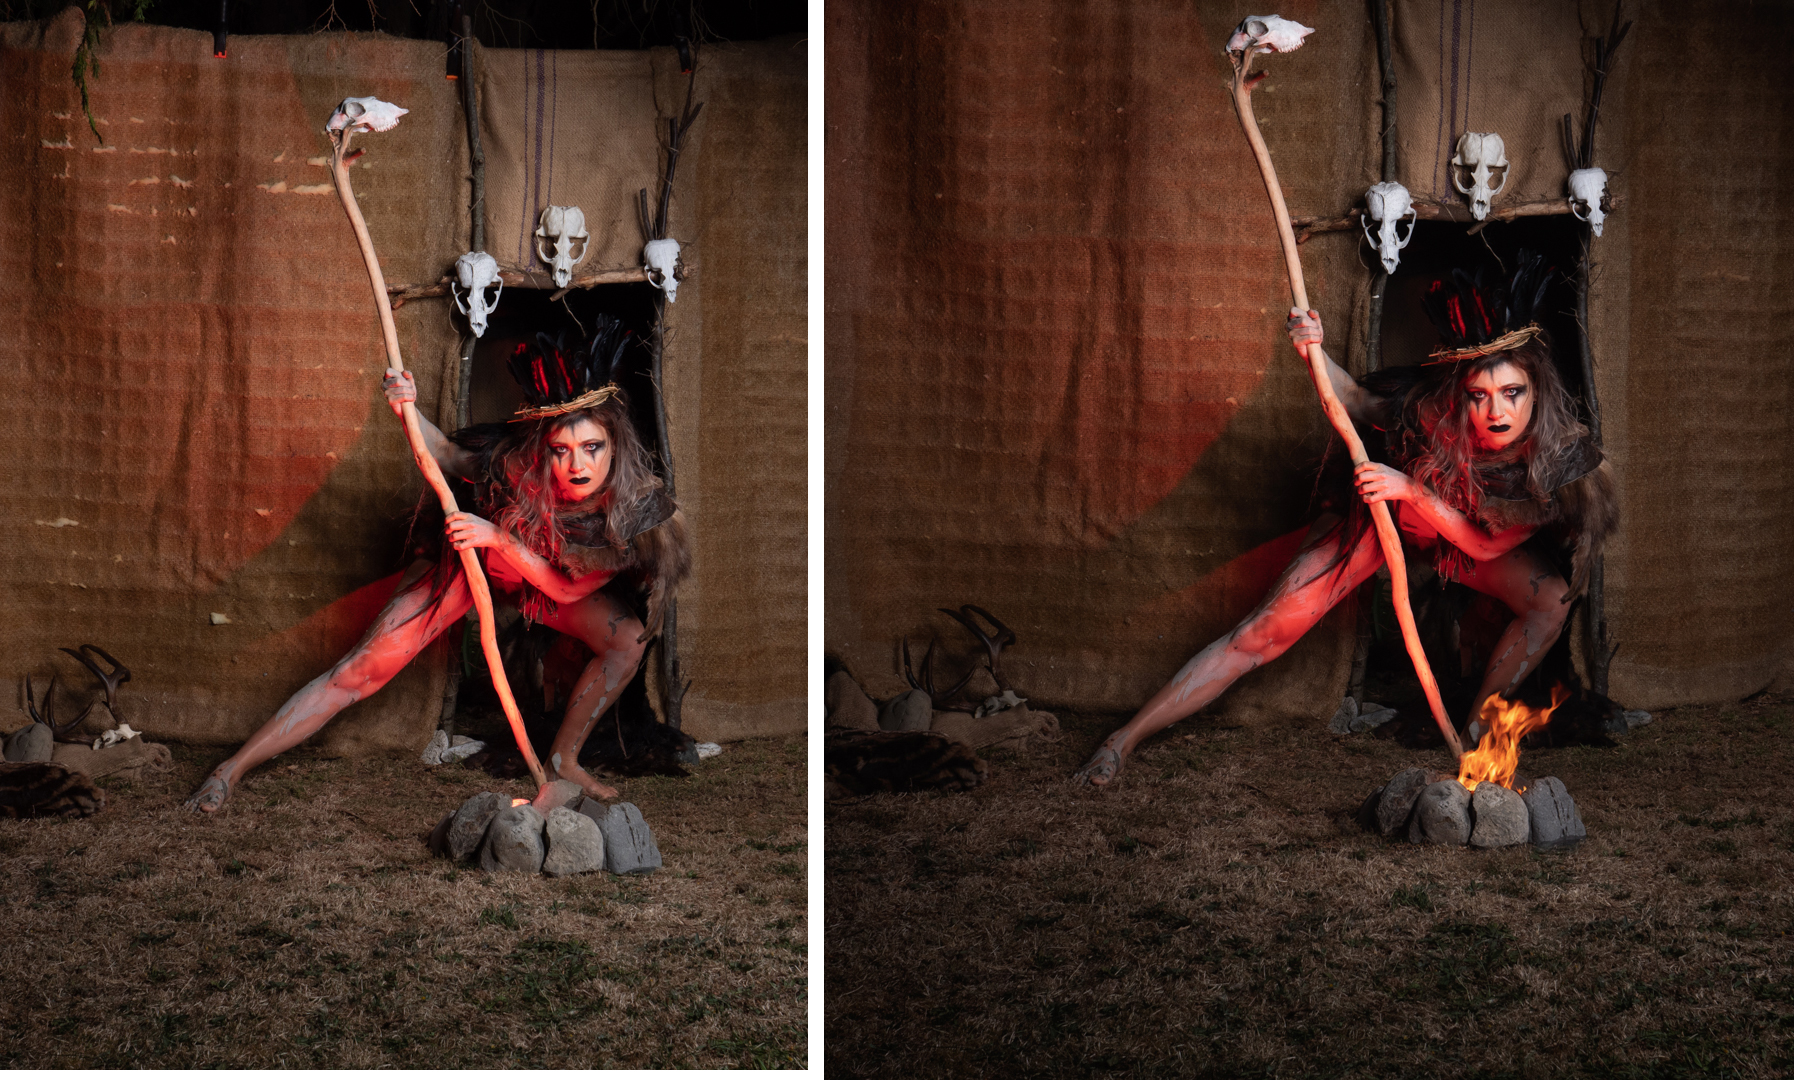
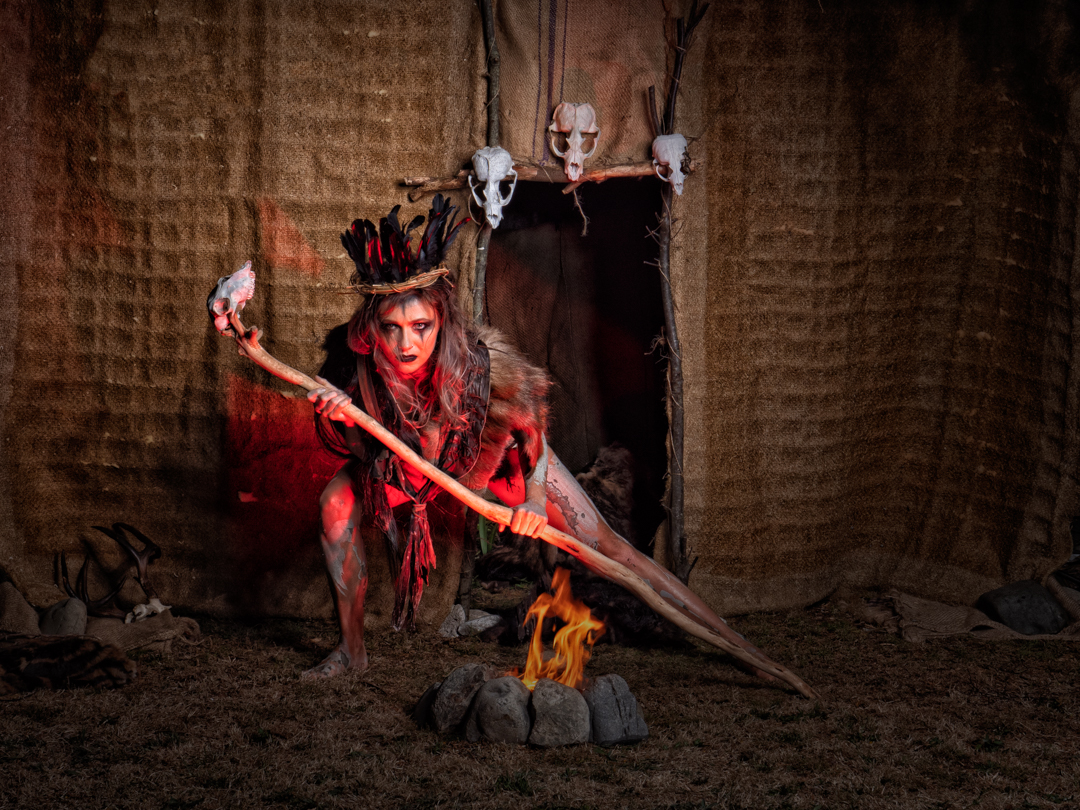
I wanted to have a real fire in the images but I also wanted to ensure the safety of my model. So in the initial shots a small lume cube with an orange gel was placed inside of thefire pit. This created a glow on Casey which I was unable to use in a composite if the actual fire. For this reason the camera was mounted on a tripod so that it would make compositing the images much easier.

As often happens it took nearly an hour to apply the make up and then we move Casey into the garage to apply slip clay to her body relying on a hairdryer to speed up the process.

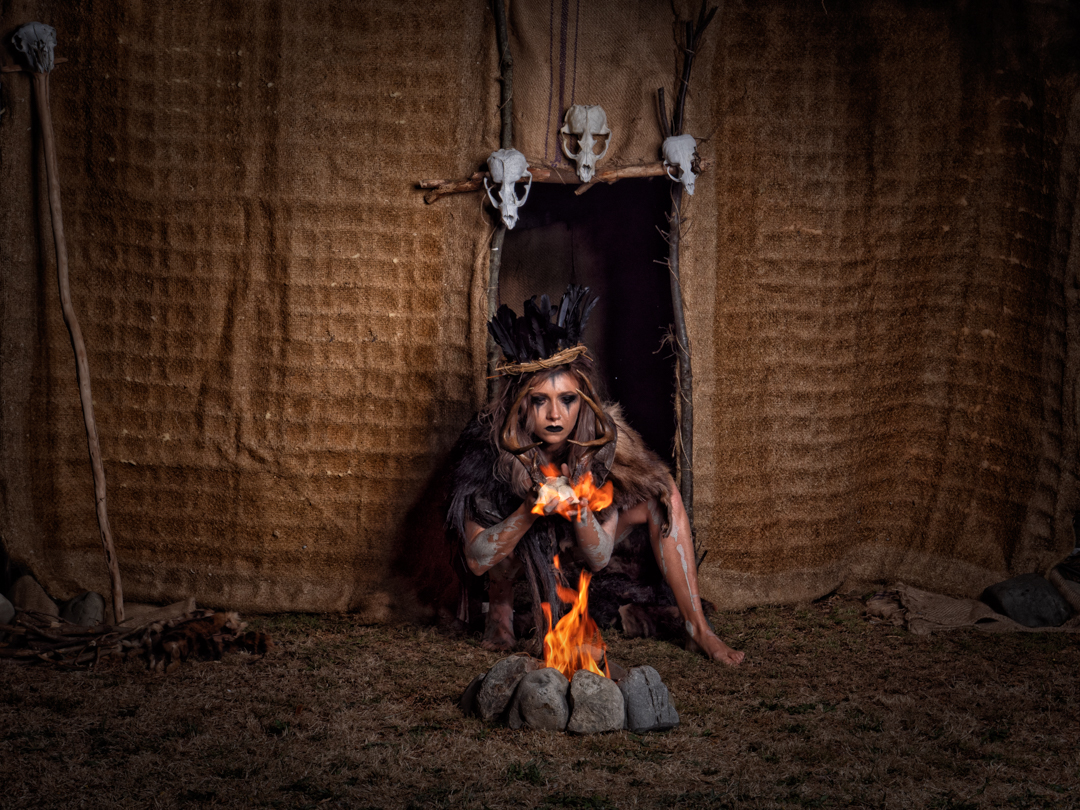
Casey really got into the character and this really brought my idea to life.

As it turned out Casey did interact with the fire and this added further to the series. Although in some images I also added more of it for effect.

From a technical viewpoint the initial images without the fire we shot at 1/160s f8 ISO 200. When the fire was added the shutter was slowed to 1/100 as the fire was not as bright as the LED.

I was really pleased how the images came out and they were well received when they were posted one was submitted for New Zealand Camera and it appeared in the 2022 edition. This is an annual print publication of the Photographic Society of New Zealand and it is quite difficult to have images selected.

Capturing old slides

Fiji 1976

Amongst the mini positions that my wife inherited from her parents with several boxes of slides. She asked me if it was possible to digitise them so that we could save them on the computer and also show other family members without the need of getting out a projector which we did not have.

Egmont

They are commercial outfits that will do this process but it is quite expensive and equally there is gear that you can buy that will enable you to use a camera. I decided to see if I could achieve the same result.

Masterton

Using the table that I had built for the dressmaker series I mounted a LED light below it and created a paper frame on which to place the slides. The camera was mounted above using the arm of my tripod. It was fitted with a 105mm macro lens.

Focusing on a flat surface is very tricky and with the incredibly shallow depth of field on the 105mm macro any movement in the camera created issues. I was using live view on the back of the camera zoomed in to enable me to focus but even there is was not easy. In order to minimise movement further I was using a cable release to fire the camera.

Vicky New,

The images that we got were acceptable especially as they were either not necessarily the most interesting, or they had emotional value.

If I was to do it again I would make a couple of changes. Firstly I would be using a mirrorless camera, rather than the DSLR, to eliminate any shake with the mirror. Secondly, I would shoot tethered to the computer so that I could see the images in greater detail.

WOW Shoot

The World of Wearable Arts (WOW) is an annual event in Wellington that attracts thousands of people. Designers from all around the world submit outfits made from the most unusual materials.

Designers who have never entered before have to go through a pre-elimination round but those that have been successful in the past managed to skip the step. They are still required to submit images of the design plus a video showing how it is fitted to the model.

Through the connection with previous collaborations for a number I’ve been providing photographic services to a number of the designers. We would set up a simple studio that enable them to show off their designs in the best possible way.

In 2021 I worked with outfits creates by Jenny (above), Fiona and Vicki (below) all previous wow finalised. In fact the back Fiona was a previous category winner.

The requirement was a simple look-book shooting the garment from all four sides against a plain background. To achieve this are used two lights on the background and a main light and reflector on the subject. The background lights used my Elinchroms 400 while my Godox 600 provided the key light.

The Elinchroms and Godox lights use different triggers however this is not a problem as the Elinchrom also have optical slaves enabling them to fire when the main light goes.

Once the look-book images had been completed we were able to shoot more creative images which again was to demonstrate how the cost the outfit blocked.

The amount of detail that goes into these outfits is truly amazing as shown with this closeup of the dress.

Wellington Cosplay Photofest – Bianca

My final shoot at 2021 Wellington Cosplay Photofest was with Bianca who goes by @Happy_Cookie-Snapper. She had a number of possible costumes and we agreed that she would play Toshiro Hitsugaya from the Japanese anime series bleach. Given that anime cosplay allows people to be completely different characters it is not unusual to find them portraying characters of the opposite sex.

During our discussions we settled all the shit in Wellington Civic Square and the entrance to the Michael Fowler Centre as we could make these resemble the environment of Bleach. She she mentioned that to her her friends were also taking part in the car fest and they were playing characters from the same series and as such could we shoot it as a group. I was more than happy to do so.

After the incident of the armed police call out at a previous Photofest I was taking no chances that somebody would report us as the characters were carrying samurai swords. I called the police ahead of time and told them that we were doing a photoshoot. As the event ran over a long weekend I knew that the square would not be as busy as it would normally be on day.

When they arrived it turned out that the other two where Jasmine and Ruan had shot a couple years before at the very first Photofest. We shot around the top of the square and then moved down to the entrance of the centre.

Most of the shoot was done in natural light, however for the ones outside the centre I did position a speedlight behind to columns to ensure that the back two characters stood out.

Once I had selected the final images I used Nik Software to create a heavier contrast before delivering them.

I was very pleased when Bianca told me that they had ended up looking exactly how she had imagined and that they fitted the bleach world well.

Wellington Cosplay Photofest – Natasha

My second shoot at the 2020 Wellington Cosplay Photofest was with Natasha .

What was unusual about this shoot in terms of cosplay is that most cosplayers recreate characters from either movies, games or cartoons particularly Japanese anime. Natasha had created her own character that she called Rainella the clown.

This means that there was no reference in which to place the character giving us total freedom. We decided that the Lady Norwood Rose Garden and Begonia House in the botanical Gardens would be an ideal location. All of the images were shot under natural light at f7.1.

As the Begonia House is a large greenhouse there was no need to add in additional lighting.

As you can imagine Natasha’s outfit attracted a lot of attention particularly from children.

Wellington Cosplay Photofest – Nikki

Each year in February there is a cosplay event organised in Wellington that brings together both cosplayers and photographers who collaborate on a completely TFP basis.

It started in 2019 and I was fortunate to be selected in that year and the two following ones. The images in this and the next two posts were taken at the 2020 event.

The way that the event works is that you are matched with a number of cosplayers and you then sort out a shoot time and location over the course of the weekend. Some of the more experienced cosplayers have multiple costumes so there is often variety available.

My first shoot in the 2021 event was with Nikki who goes by the Instagram name @chameleon.costume and we decided to shoot her dressed as Leyleth from Vox machina which she explained to me was a dungeons and dragons fantasy series.

The costume screamed nature so we set up to shoot in the redwood trees that form part of the Wellington city belt on Mount Victoria.

It would have been nice to shoot in golden hour but the timing did not allow for that plus the cloned on the day made it impossible anyway. So I used my usual cheat of a speed light with an orange gell.

I had also packed my lensbaby so I brought that out to play as well.

Melissa – River

While I mainly enjoy shooting in the studio (due to the control it gives me) I also enjoy shoots the involve holder water. So when Melissa and I finish the studio series we made plans for another shoot when the weather warmed up.

The Hutt River is only a kilometre from my home but during the summer months it does run into the issue of an algal bloom, which means swimming in it is not recommended. As I don’t want my models ending up sick this meant it was out of the question. Fortunately on a walk over the summer I discovered a path out of the housing development up on Riverstone Terraces that lead to a reasonable size stream that was feeding the river.

I figured that the water would be safer here so Melissa and I planned to shoot and I pulled one of the ballgowns that is in my position.

While we were shooting in the middle of summer the reality was that the water temperature did not change very much therefore we knew that the whole shoot would need to be done within a short period of time. This is also the case with pool shoots anyway.

Most of the shots which taken using natural light however for a few I did bring a speed light which was positioned in the river on a tripod. The light was gelled orange so that we could attempt to recreate gold light.

Given that part of the river was deep enough for Melissa to be almost fully emerged we attempted a hair flip. This was not as difficult as it could have been and we managed a reasonable shot after only a couple of the teams.

It was a fun afternoon and I’m pleased with the results.

Melissa – White Shirt

While I have suitcases full of prop clothing, one piece that all models seem to have fun with is a simple white shirt. It is quite a versatile item depending on how it is worn.

The image above was shot when we doing the headshot series and involved a Octobox positioned above the camera and two strip-boxes positioned behind Melissa to light the background.

In hhe rest of the images the two strip boxes were brought forward and angled so that they lit Melissa. Both were metered at the same output so the light would be even.

As I have found on many occasions simply letting the model play with the shirt produces the best results.

It is rarely buttoned up which means they can also determine how much skin they wish to show.

Props are also very useful in terms of providing something for the model to interact with. In this case it was pair of my old glasses.

Melissa – Casting images

The second series of images that we shot with Melissa in the studio were aimed to be used for casting rolls therefore they were more full body than the head shots.

For these images the two strip boxes that had been lighting in the background in the headshot images were brought forward and angled so that they lit Melissa. Both were metered at the same output so the light would be even.

One of the reason that I like shooting in studio is that I can have full control over the light. I typically shoot at f8 or f9 and 1/200 s. This provides me with plenty of depth of field but more importantly is normally sufficient to eliminate all of the ambient light in the room.

As with the headshots Melissa had brought a variety of outfits that enabled us to have diversity in the images.

We even utilised the stool to provide something different. This shot ended up not being used hence it has not been cropped down.

Melissa Headshots

A couple of weeks after our previous shoot I arranged with Melissa to shoot some head shots and images that she could use to promote herself as she is a professional actress.

She came out to my studio and we set up a relatively simple lighting arrangement consisting of an octobox positioned above the camera into strip boxes aimed to light the background. The position of the main light is referred to a butterfly lighting due to the shadow cast under the nose.

Melissa was position on a stool which made everything simple in terms of maintain consistent lighting. In order to give her different options she had come with a variety of outfits.

As with most studio shoots I shot tethered into the computer which meant that at the end of the shoot Melissa was able to select the images that she liked. Tethering is a great tool as it lets you see the images much larger than on the back of the camera, the model can see them as they are being shot to make changes to poses. Plus it really speeds up the process of editing. At the end of the session I get the model to pick their favourites so that I don’t waste time editing images that they will not like.

A photographic journey