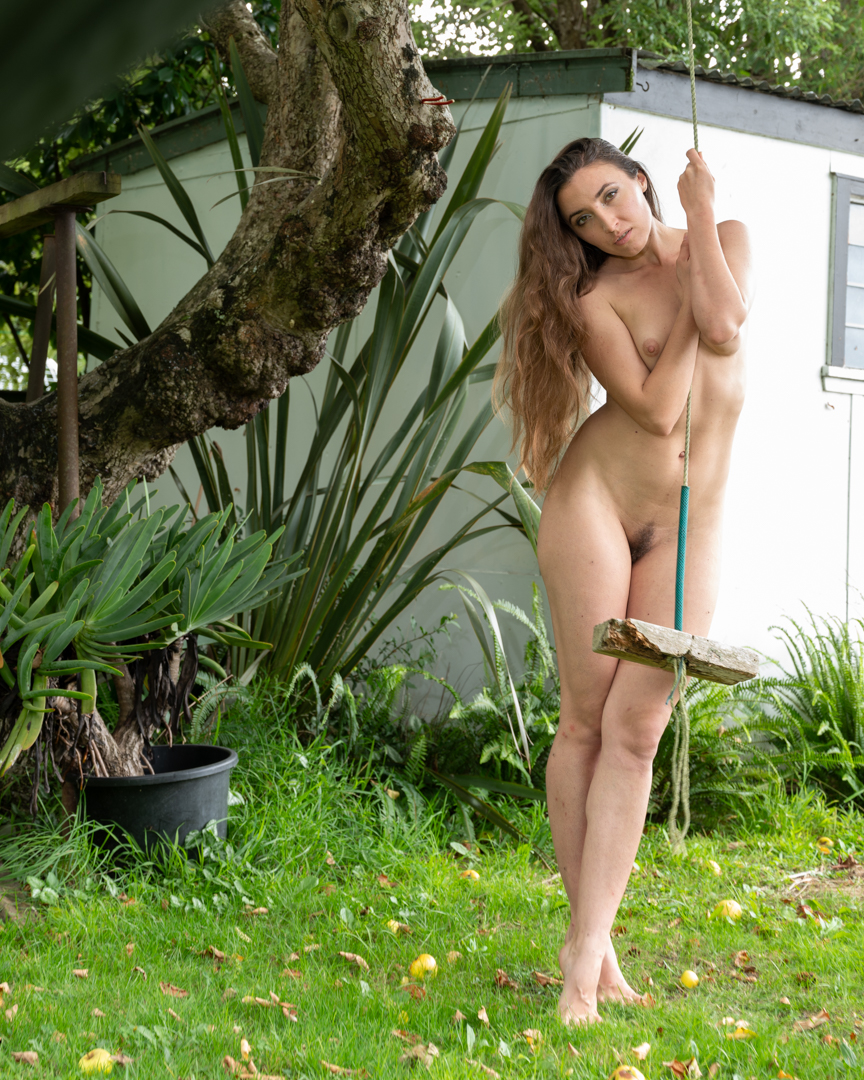
At the end of the studio session Johemiane expressed a desire to get some shots outside. So we all moved out the an old swing that we have hanging in an apple tree.
I grabbed by Nikon Z6ii as the other camera was still tethered. Wow you’re shooting and a natural light as it was 6 pm I was not getting the results I wanted. Shooting in aperture priority mode the Shutter speed was falling to 1/15 of a second. While in-body stabilisation makes it possible to handhold at such slow shutter speeds, it does mean that you will never get a sharp image when your subject is moving.
I went back inside. I grabbed the Godox V1 speedlight in the 65 cm octabox. Then, I positioned it camera left. I was still shooting using Aperture Priority with the flash set on manual at a very low power. This meant that it complemented the natural light rather than overpowered it.
The images were an extra bonus to a great day of shooting. Johemiane was a great model. You can find her on Instagram @Johemiane.
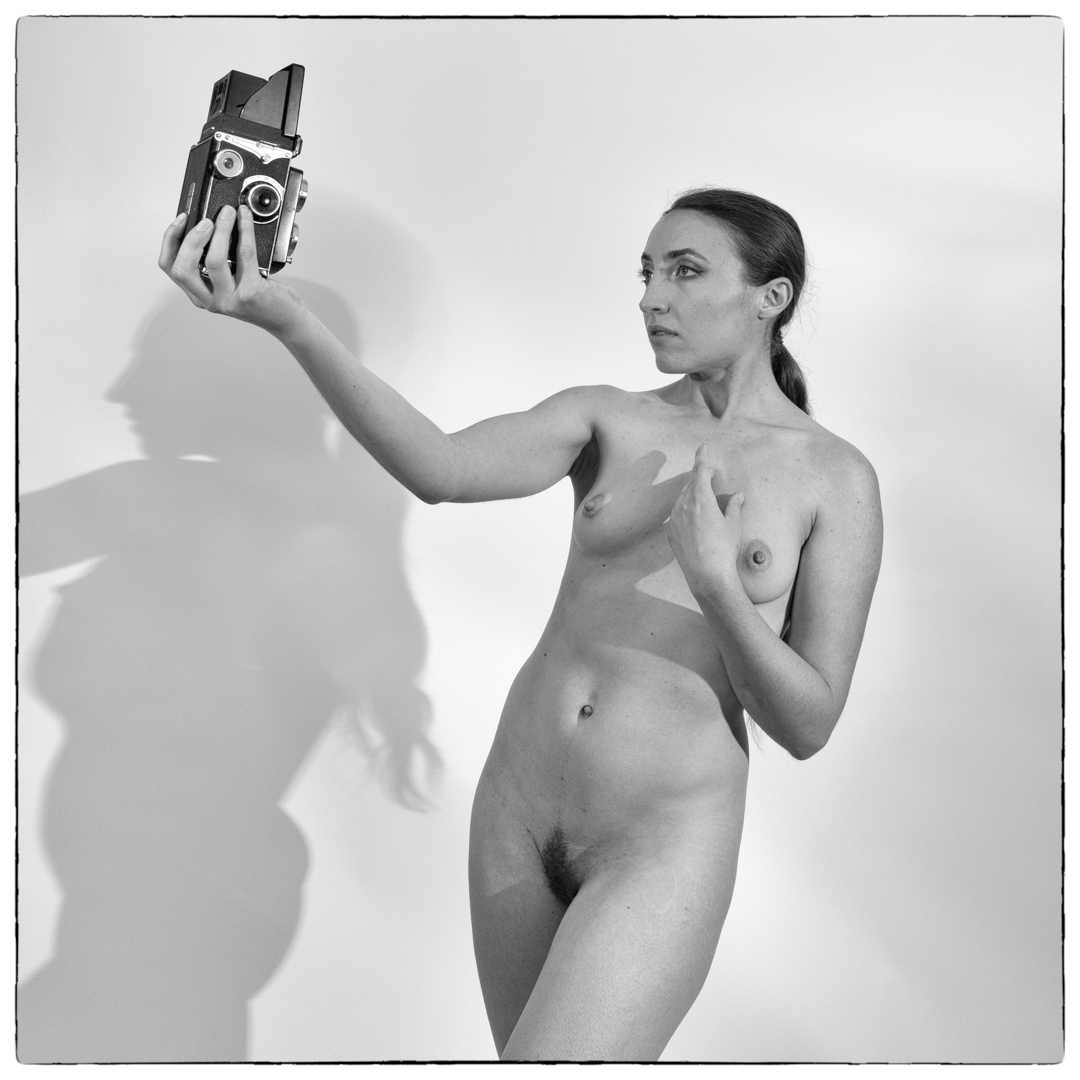
At the end of the studio session with Johemiane, I handed her the old camera. This was so she would be included in the selfie series. As I have mentioned before this camera is used to link all my model shoots together.
I initially shot from the same position and with the same lights as we had done for the photographers wife. This is explained in much more detail in the previous post or shown in the diagram below.
While that was giving me an interesting take, it was not what I wanted. So I moved both her and myself back into a more traditional pose and location.
The final image was shot using my Lumix G9 camera 1/200s f8 ISO200. I imported it into Silver Efex Pro. I used the Black & White recipe I had created for all of the images taken that day.
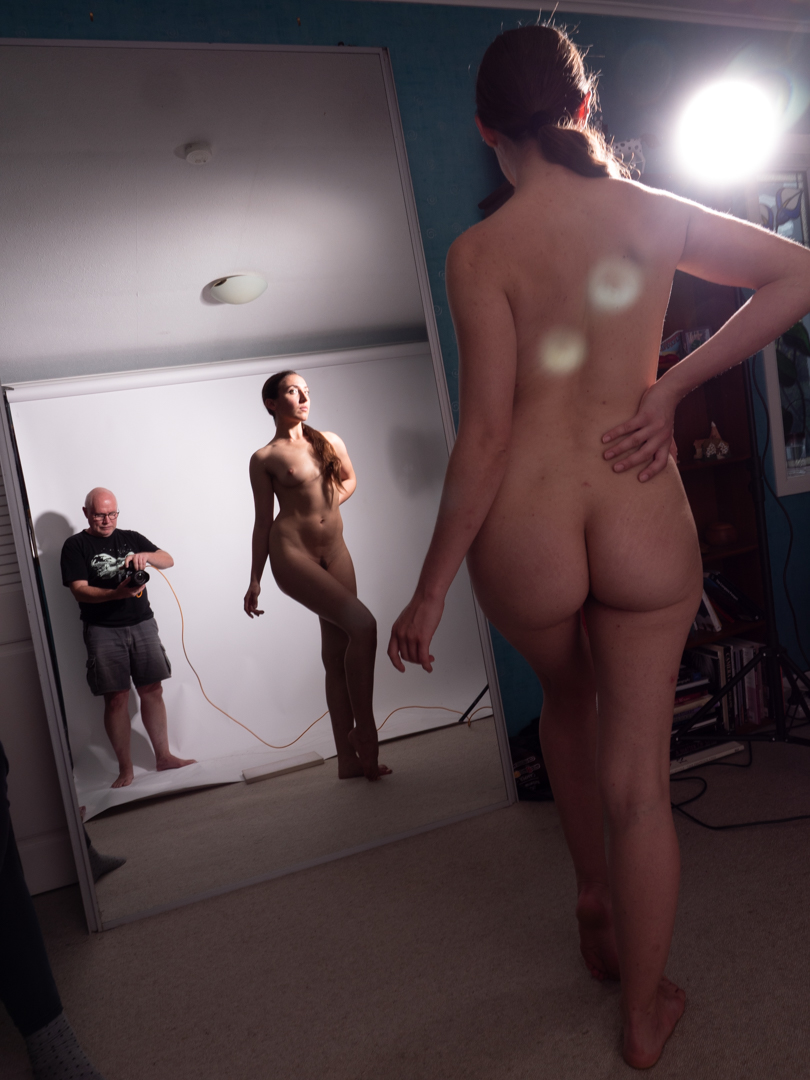
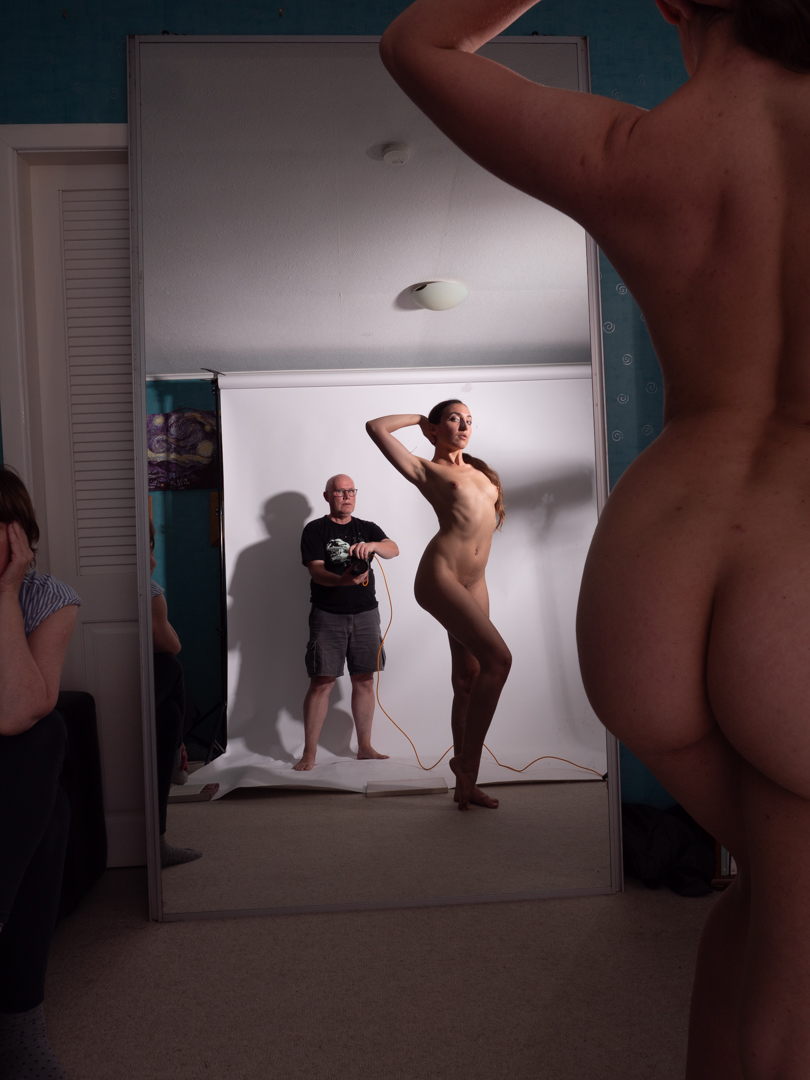
As I was researching helmet Newton to determine his style I came across an image that really took my fancy. It is called “Self Portrait with Model and Wife” and was shot in Paris in 1981.
Sometime ago I acquired a very large mirror that came out of the shop that was being refurbished. I knew that it would be perfect to try to recreate the image. While one of the other photographers (Helen) was shooting Johana I was working out the angles that were needed.
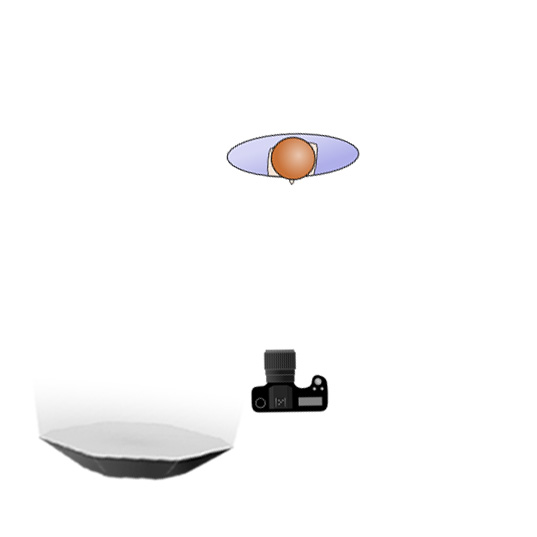
Lighting was going to be the challenge. I needed to ensure that both myself and Johemiane were lit especially as we were in quite different locations.
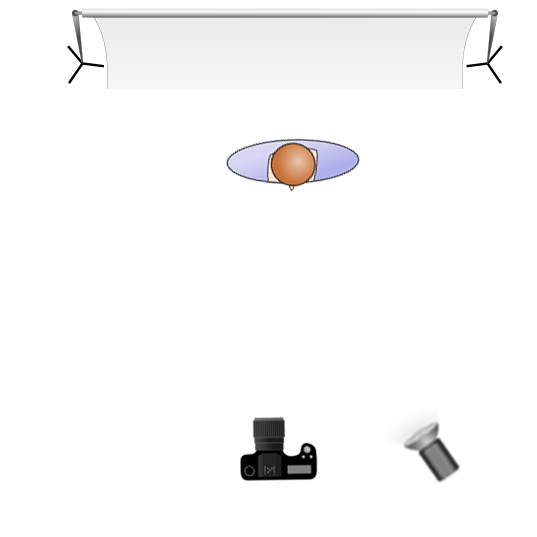
I initially tried to use the single lit positioned camera on the right. However, the image below shows that this created a number of issues. The lighting was very uneven and I was getting unwanted flares.
In order to eliminate the flare I moved the constant light so that it was in line with Johemiane. Then I placed a 65cm octabox just out of view so that it provided better light on her.
While it fixed one issue it presented a further two. Firstly there was no light on Johemiane’s back or on Helen who was acting the part of the “wife”. Secondly I will getting an ugly shadow on the backdrop from the constant light.
The answer was to move the large light. This was positioned next to me aiming it to just touch Johemiane. This provided lighting for her back. It also had the advantage that the light reflecting off the mirror illuminated her front. The same light also lit Helen.
It took about 15 shots to get everything right in camera.
I selected the final image. Then, I took it into Photoshop. I used Silver Efex Pro to apply the same black and white treatment. This was the treatment I had used on all images from the shoot. Finally to replicate the image I flipped my one.
In the final image you can see the code connecting my camera to the computer. A similar cable can be seen in the original photo however its purpose would’ve been completely different. In Helmet’s case the cord would have been to fire the flashes.
As I mentioned in the first post of the series, this whole shoot was intended to produce images. These images could be considered for the Wellington income print competition.
This image ended up being the one selected by the club to represent them. It came third in the round.
This is the third post covering the shoot where we were trying to produce images in the style of Helmet Newton. You can look at the previous post for the background to the shoot.
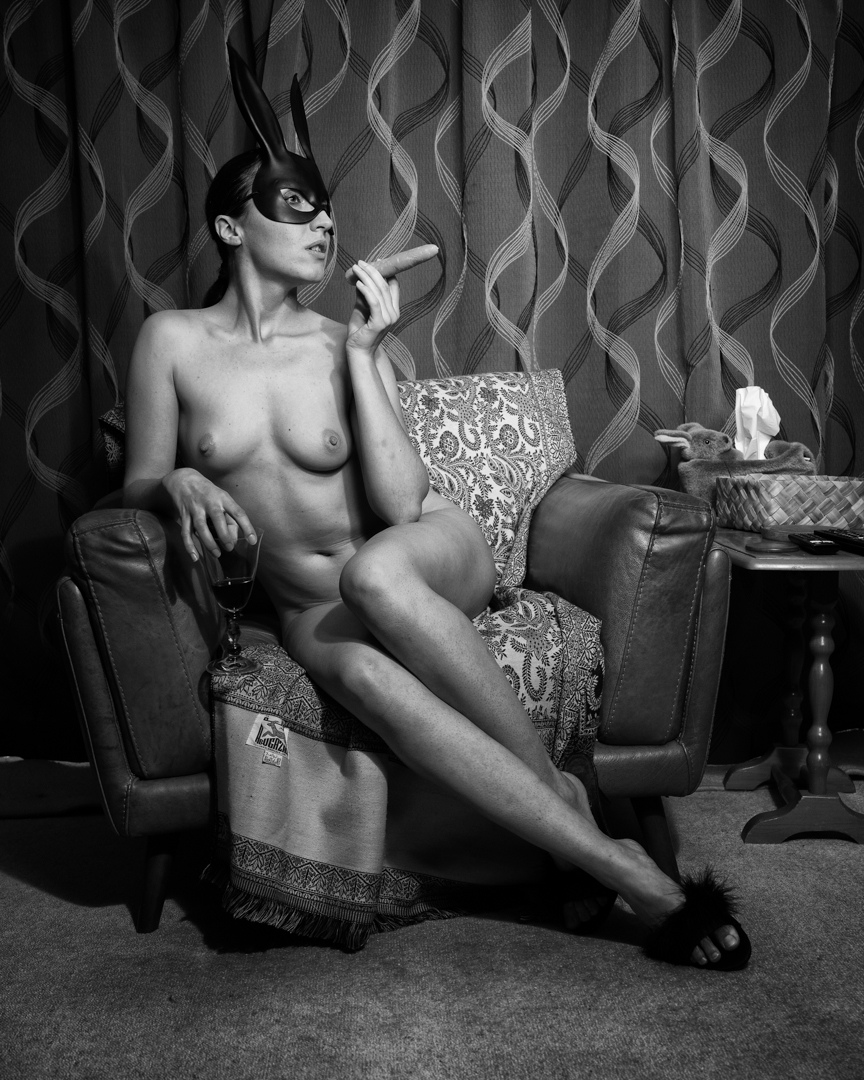
After we completed the domestic nudes images I moved into our lounge where I had another set up already in place. This consisted of my Godox AD300 strobe in a 80cm softbox.
As in the previous location there was no diffusion material on the softbox. This meant that the light was harder than you typically get. The settings on the camera did not change f5 1/100s ISO100.
This image was not directly inspired by one of Helmet’s actual photos however they use of the bunny mask is not exactly original.
I positioned Johemiane on the chair and gave her a couple of props to interact with. She was absolutely brilliant at getting into character and this showed in the resulting images. The video below gives you a behind-the-scenes view of this part of the shoot.
The image came out exactly as I visualised it. As with the others it was coverted to a high contrast black-and-white image using a specific recipe I had created in Silver EffexPro.
In the next post we move to the most complicated shoot of the session.
This is the second post covering the shoot where we were trying to produce images in the style of Helmet Newton. You can look at the previous post for the background to the shoot.
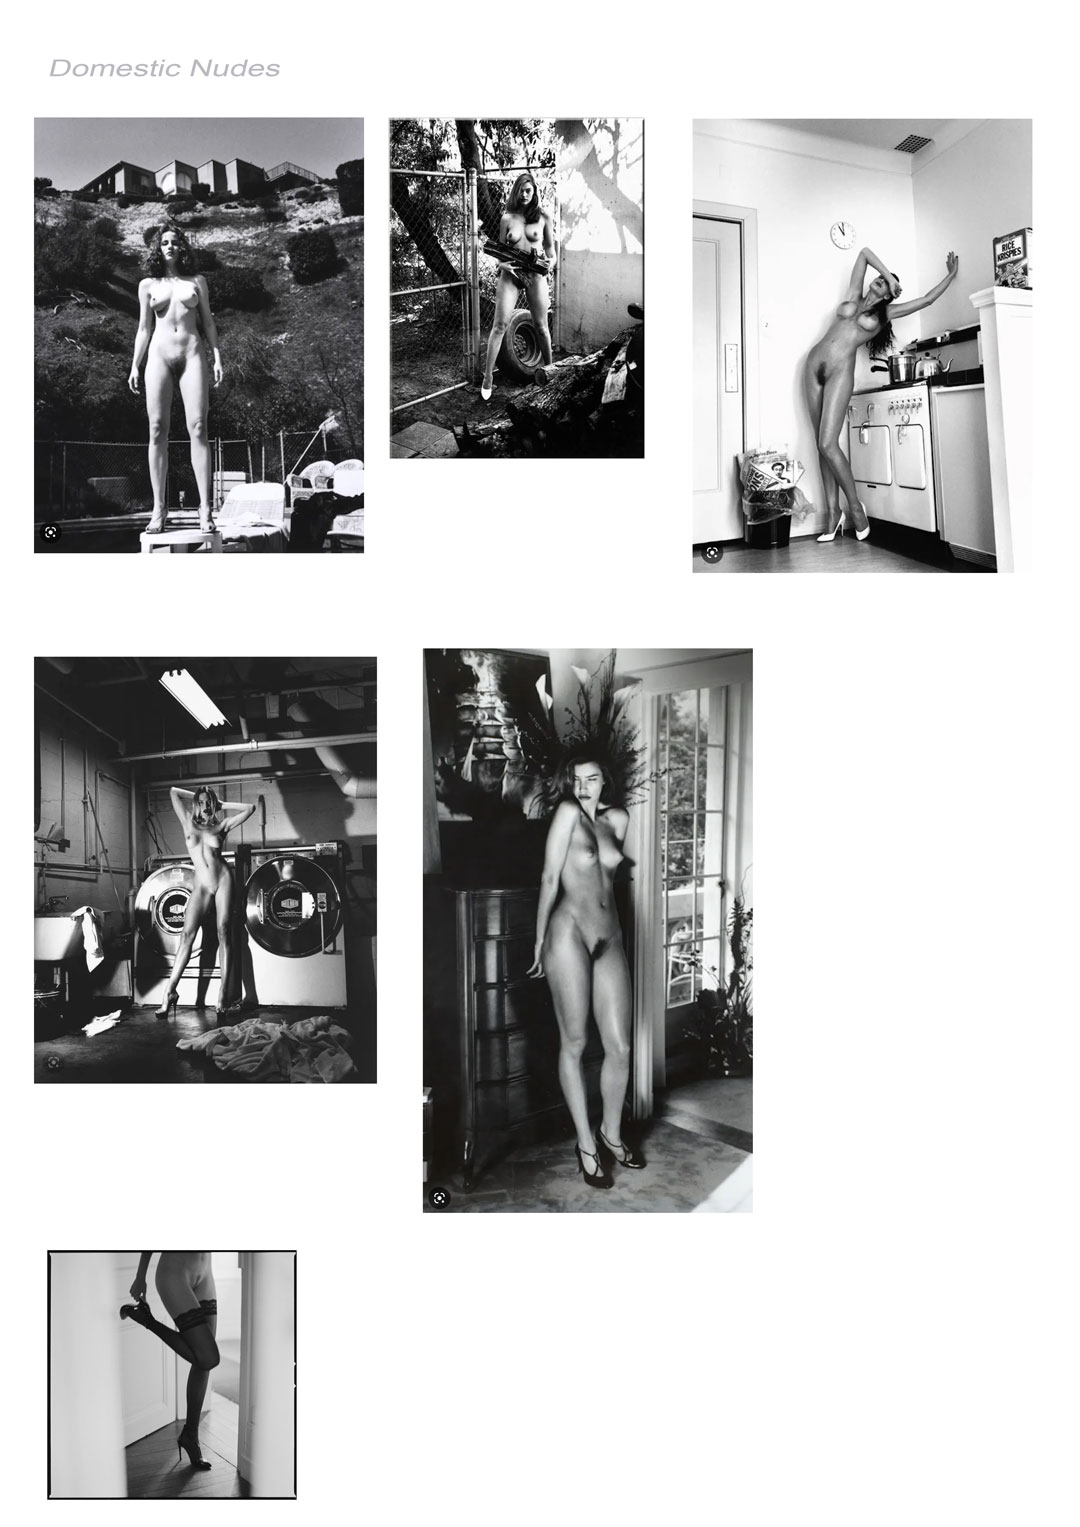
The first series of images were shot on a white seamless in what was obviously a studio. He had done another body of work entitled “Domestic Nudes” with subjects naked and more normal circumstances. In the second part of the show I wanted to recreate some of these.
I had only booked an hour with Johemiane to complete different looks. I knew that I could not afford to waste time mucking around with lights. Fortunately, I have a lot of gear. I was able to set up lights ahead of time in the areas I had identified as places I wanted to shoot. As they all walked off the same trigger I only had to move Johemiane, myself and the camera. I also swapped cameras to my Nikon Z6ii.
We started in the kitchen which turned out to be a great location. I had set up my Godox V1 speedlight in a 65cm softbox. I found that the speedlight is more than adequate in such a situation. To keep the light punchy there was no diffusion material over the front of the softbox.
The only issue I was dealing with was the reflection of the softbox in our garden window. To get around this problem I moved the light to minimise the effect.
We then moved into our entranceway and I had a Johemiane play the piano.
The setting for these images was f5 1/100s ISO100. This allowed some of the ambient light to enter the image. It prevented the photo from looking completely flashed up.
Each year the Camera club in the Wellington region have a print competition. The club that hosts sends out a list of 10 topics. Each club submits one print for each topic. Generally, the topics are fairly lame. However, in 2023, the Kapiti club decided to stir things up a little with the topic “In the style of Helmet Newton”.
For anyone unfamiliar Helmut Newton (born Helmut Neustädter; 31 October 1920 – 23 January 2004) was a German-Australian photographer. The New York Times described him as a “prolific, widely imitated fashion photographer whose provocative, erotically charged black-and-white photos were a mainstay of Vogue and other publications.
I heard about the topic before its release. A member of the Kapiti Club asked whether I could help them source models. I know that recreating some of his work would be very fun and challenging. It was it was a challenge I was very happy to undertake.
As chance would have it, as I was thinking about setting a shoot up, I was approached by Johemiane (@Johemiane). She was a professional nude model from the Czech Republic who was travelling through New Zealand. She was approaching local photographers to earn a little bit of money to fund her travel. I spoke with a couple of photographers from my club. I wanted to see if they were interested in sharing the costs. We booked Joanna for a two hour shoot. The first hour would be shared in the second hour was totally devoted to my own concepts. Because the lighting and arrangement in each shoot is different I have split the two hour session into a series of posts.
The first task was the analyse Helmut’s images to try to determine what was his style. Given that he started photography in 1936 and was shooting right through into the 1990s this was not a simple exercise. However when you looked at his most famous word there were two things that sprung out. Firstly they all portrayed women in strong/dramatic poses. Secondly the lighting was very contrasty and it was clear that he had deployed hard light a lot. While he was mainly known for black & white images, you could see the same style in the colour ones.
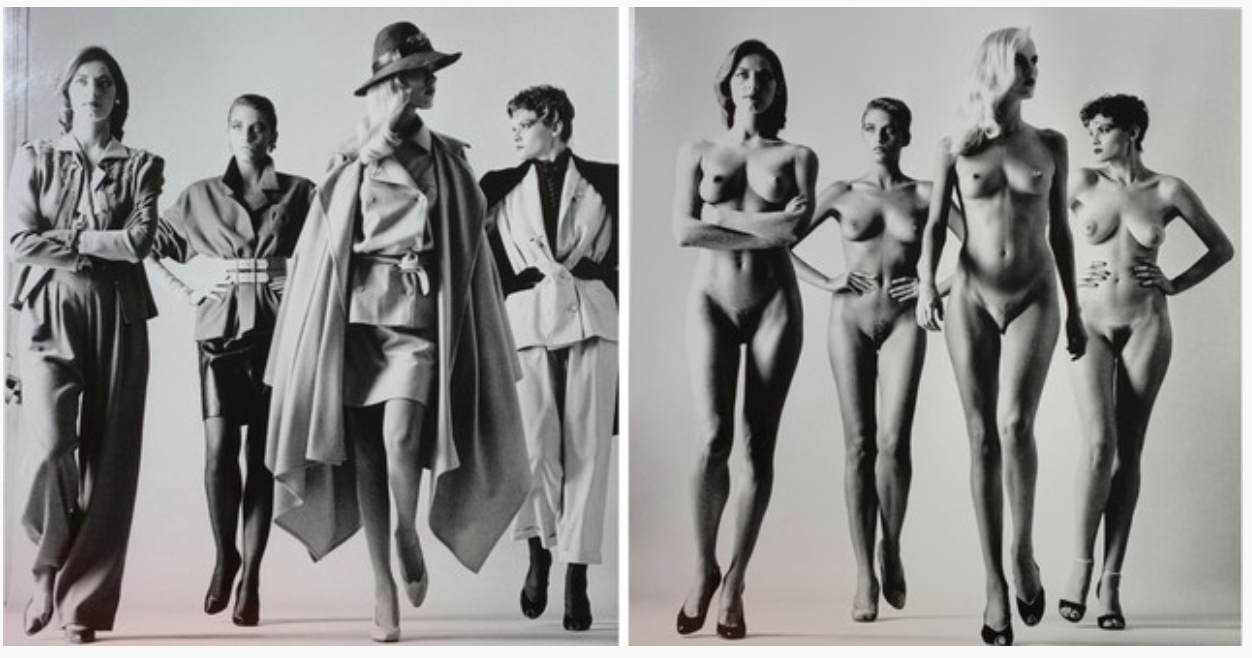
The first look I set out to recreate was an image entitled “They Come” shot in 1981. In his original image helmet had photographed four models in the latest Vogue fashions he then got them to repeat the same pose except they were fully nude.
The lighting in the image indicates that it is a single night coming from Camera left. They are short on a seamless white background. I see that exactly the same arrangement I initially positioned the light camera right. As this was part of the session with the other two photographers, I made things easier. I used a constant LED light that I had recently acquired. The idea was that they would not have to much about swapping out the trigger.
We started with Johemiane fully clothed. By using a constant light my settings where is f5.6 1/125s IS0800. The image below is an example example of what these settings produced. They were not exactly what I was looking for.
So I powered up an Elinchrom D400 and positioned it camera left. It was in a 7″ reflector which gave a very hard light. I left the constant light in place to provide fill.
I also determined that the black dress was not working so I had Johana change into a pink one.
It was there a matter of getting here to do a number of strong poses. As my usual practice I was shooting tether to the computer. Once the clothed shots were taken, we reviewed them in the computer, and chose the ones that we wanted to repeat nude.
The computer was positioned just out of shot but where Johemiane could see it. The other great feature with the Panasonic tether app is that you can select a previous image and use it as an overlay while shooting the next image. This meant that we could get Johana to adjust her poses to exactly align with the clothed shots.
Then in photoshop it was a simple matter of bringing the two images together.
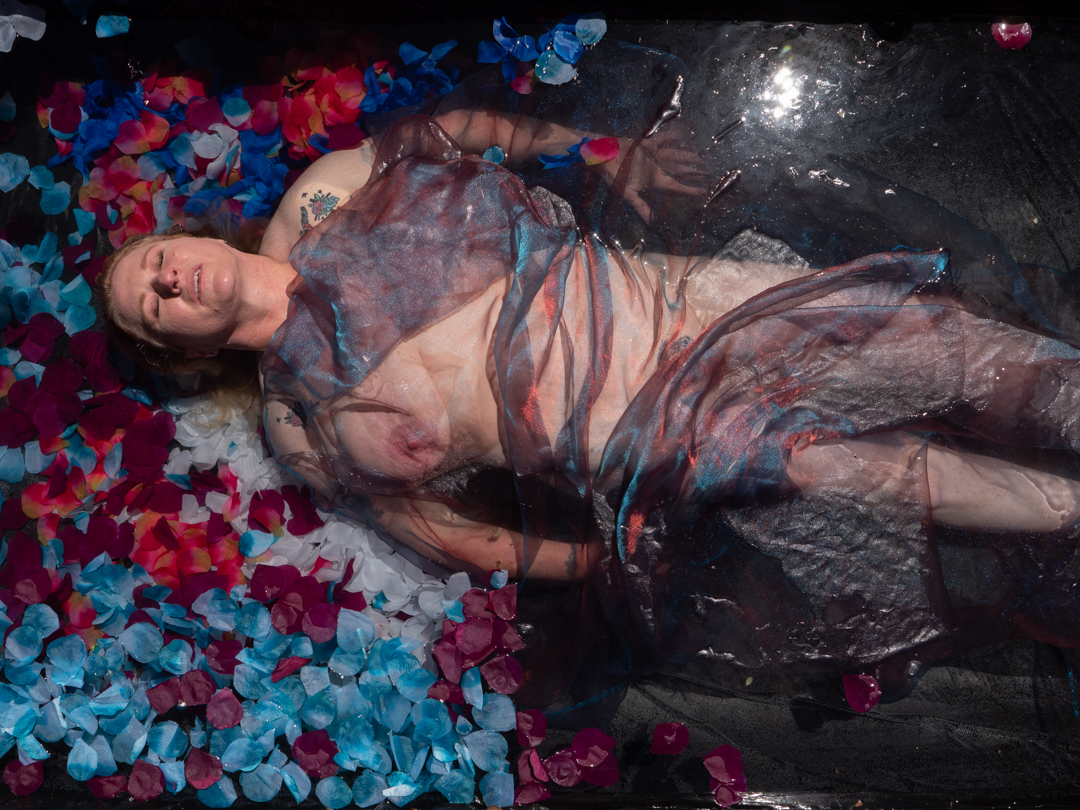
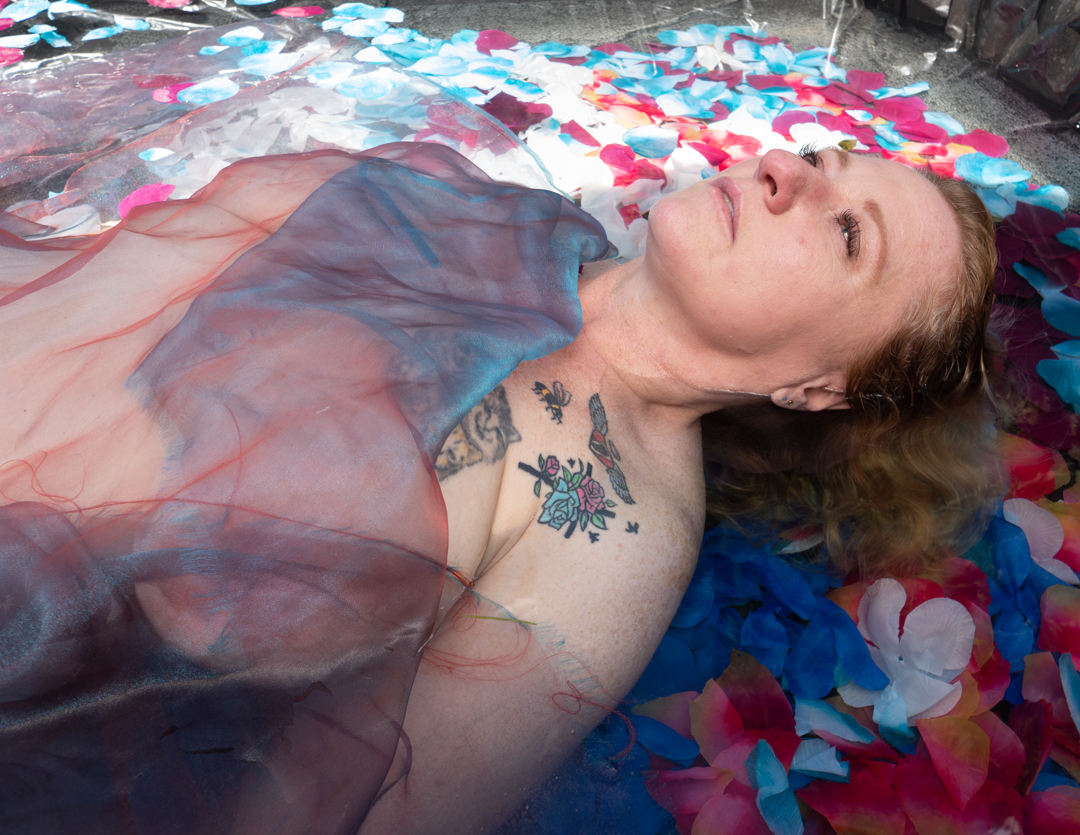
The pool that I constructed for these shoots was built on a wooden frame with an internal measurement of 1.1m (3’ 9”) wide and 2m (6’ 7”) long. It was fitted with a double liming of black polythene. It was then filled with water at approximately depth of 30cm. As the ground sloped it was actually deeper at one end.
The pool was filled the day before the shoot in the hope that the sun would warm the water.
At either end of the pool I positioned backdrop supports with a bar running between them. I then draped a double layer of frost cloth over the whole pool. The intention of this was to diffuse the light. The video below shows the pool.
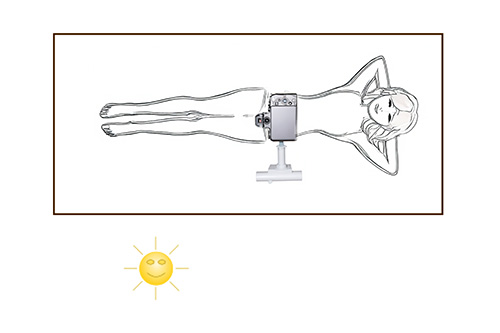
My Lumix G9 camera was positioned at the end of a boom arm over the pool. I controlled it via an app on my iPad. This gave me the advantage that I could get it perfectly square to Shirley without having to stand over her.
We had started the outdoor shoot around 3 o’clock. The idea was to allow time for the pool water to heat up. The day was very bright with next to no clouds. This created an immediate problem and that the frost cloth was not sufficient to diffuse the light. The result was a very bright spot in the pool.
I tried to eliminate this by mounting the inner panel of my largest reflector on a boom. I then positioned this over the pool. While this did reduce most of the light it introduced a new problem. There was now a very strong reflection in the water.
Even with the pool water being heated by the sun, you can only work for a maximum of around 15 minutes. After that, the Model becomes too cold. Therefore I did not have the luxury of time to fully deal with the problem. The solution was to move the reflector so that it was not directly above Shirley and then to shoot from a different angle. I also shot closer so that we could eliminate the reflection.
At the end of the day I managed to get a series of usable images which Shirley was happy with. As this was the first shoot with the pool I always know that it would be challenging and that there were things I could learn from it.
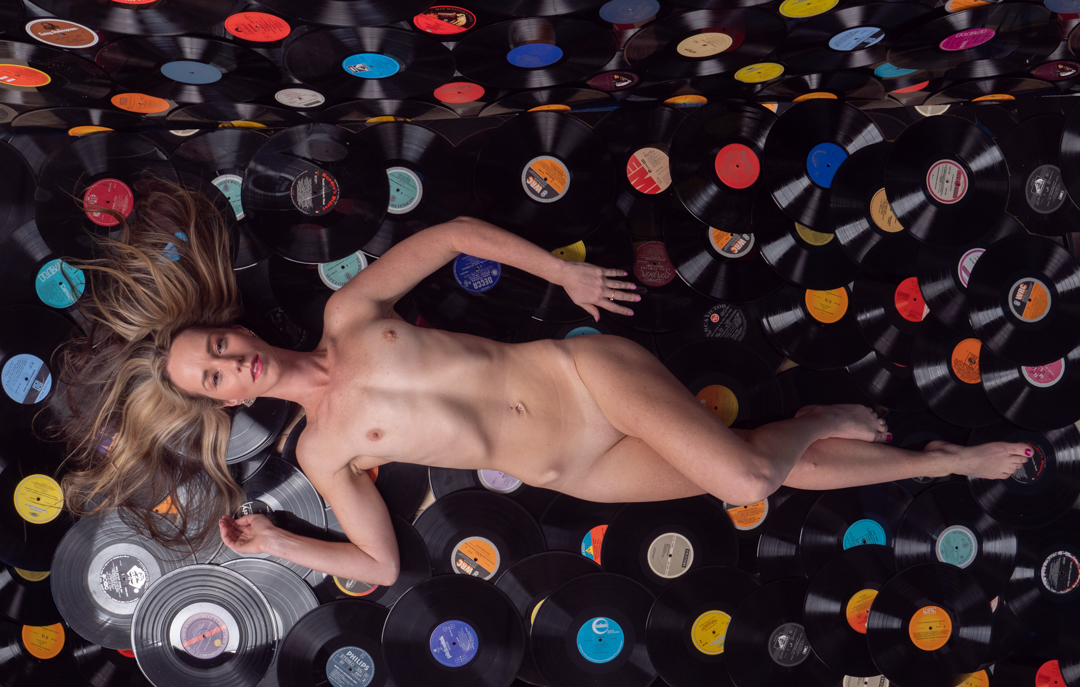
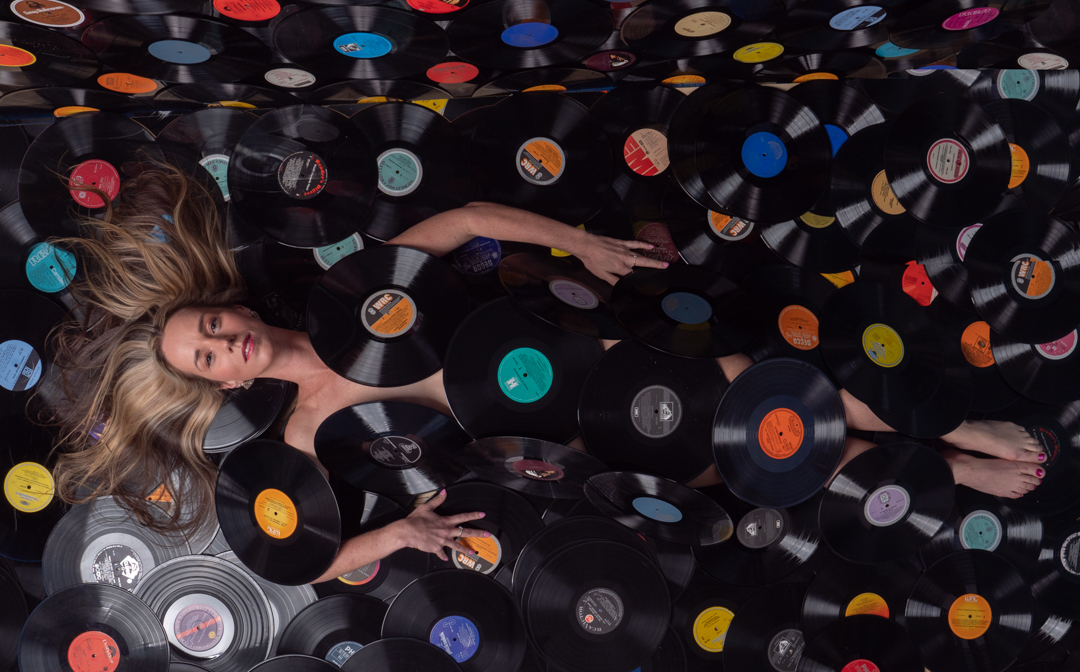
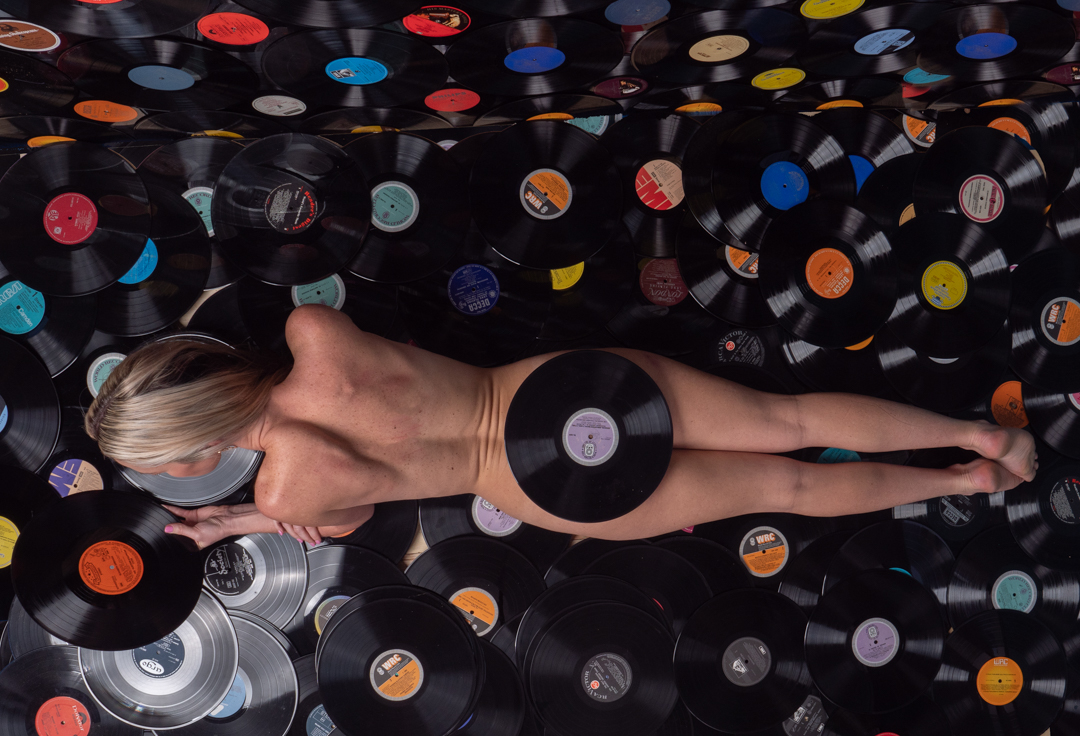
This is the final post covering a concept shoot with Rachel and around 300 vinyl records. As mentioned in the previous post the records were all classical discards from a bookfest that my wife is involved with. In this shoot we recreated the famous flower scene from “American Beauty”.
For this set in addition to the records on the backdrop I covered the flooring with them.
I positioned Rachel on the floor and then used records or pose to shoot. The camera was at the end of a boom arm over her. As it was tethered to the computer I was able to control it. Using the the boom enabled me to get the camera positioned level. This is much more preferable than standing on a stool and trying to take the shot.
The lighting was the same as the previous two posts. It consisted of a Godox AD600 shooting into a 1.5m softbox. This was positioned at Rachel’s head and shot along her body. The light was also elevated and then angled down. At the rear of the room my Elinchrom D400 was shooting into a 7 foot umbrella with diffusion covering it. This light was being fired by an optical slave built in.
In addition to the overhead shots I did shoot some from floor level so that we had a variety.
All of the images in this post were shot on my Lumix G9. The setting was 1/200s f8 ISO200. The focal lengths ranged was 24mm.
The angle of the main light did mean that I was getting some reflection/hotspots in some of the records. This was a relatively simple adjustment to fix in post. In the final images I also cloned in more records to fill blank spots on the floor. Some were also needed when I created the images using the 1.91:1 ratio used for Instagram landscape images.
The whole afternoon was enjoyable and Rachel really loved the Images that we produced during the sessions.
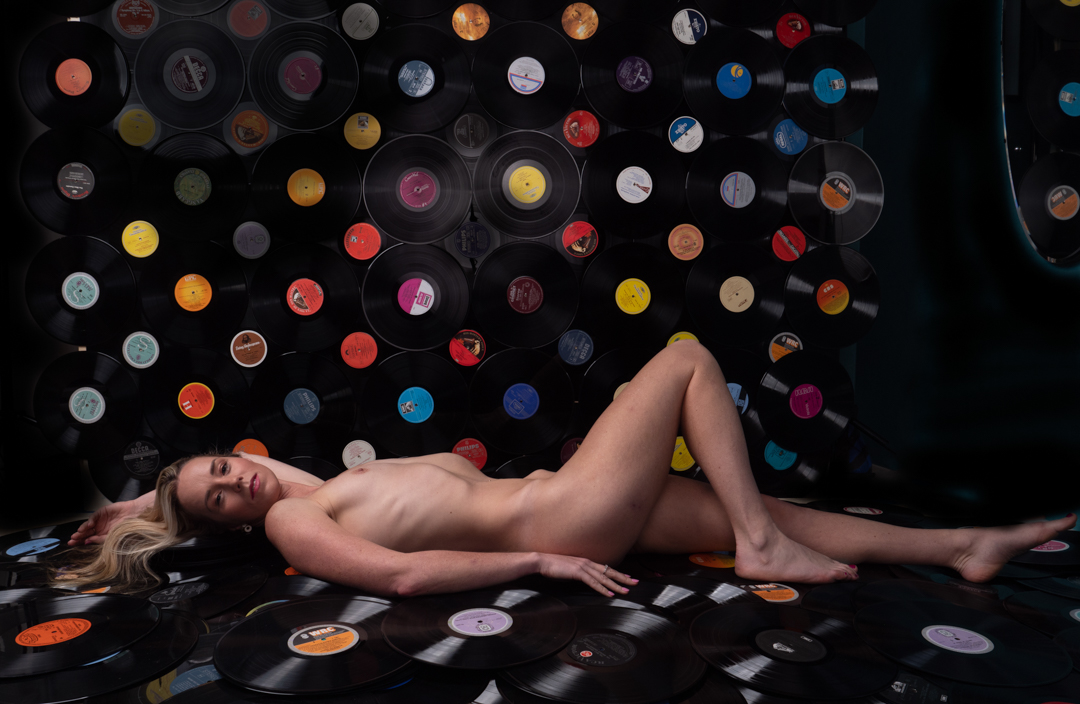
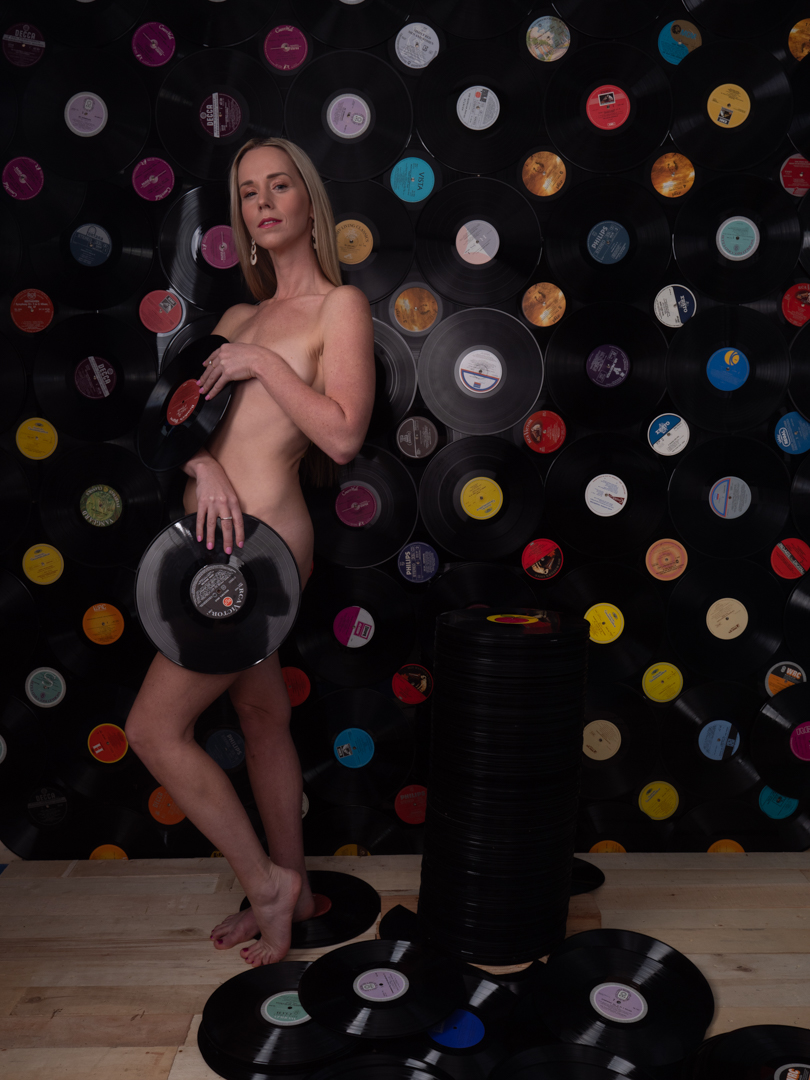
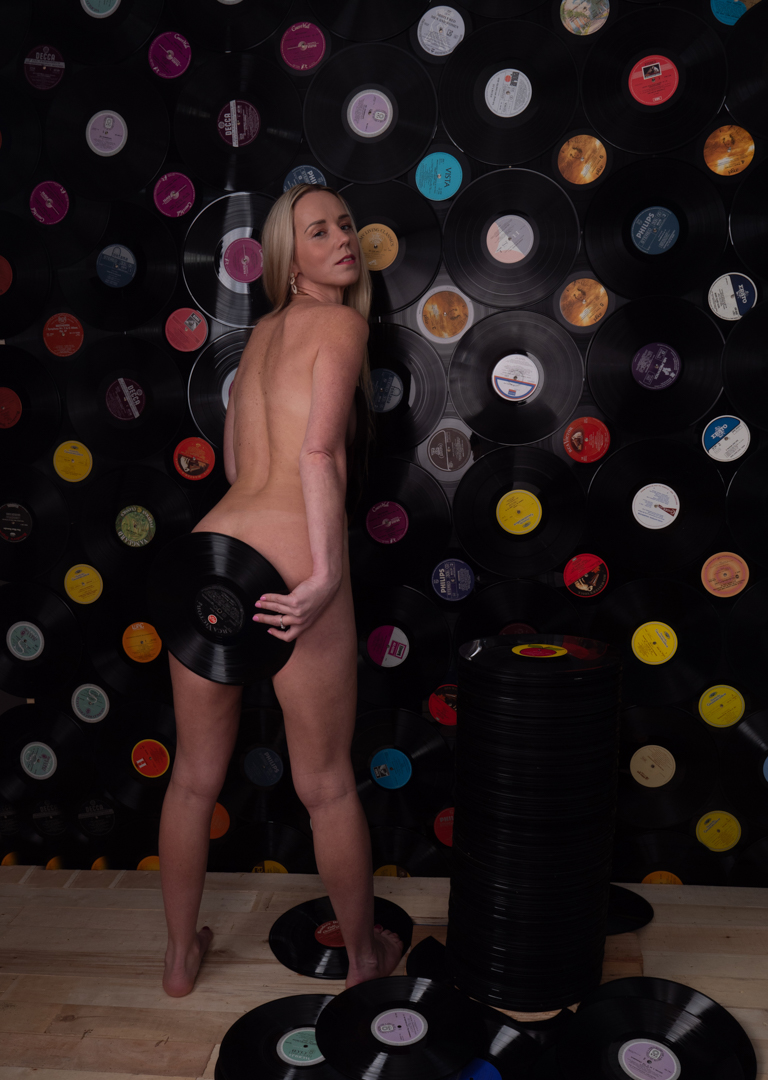
This is the second post covering a concept shoot with Rachel and around 200 vinyl records. As mentioned in the previous post the records were all classical discards from a bookfest that my wife is involved with.
In the studio I had positioned two sheets of plywood as a backdrop. Onto this I attached overlapping records using small nails to hang them up. It took the best part of two hours to nail them all in. I lost count of how many times I hit my thumb during the process.
On the floor I placed plywood planking as I thought this gave a better look than the carpet. The records stack was made up of groups of ten records glued together with a central steel rod giving it stability.
The video below shows what the overall studio set look like as well as the lighting positions.
The actual lighting is shown in the diagram below. It consisted of a Godox AD600 shooting into a 1.5m softbox positioned 90° to Rachel. At the rear of the room my Elinchrom D400 was shooting into a 7 foot umbrella with diffusion covering it. This light was being fired by an optical slave built in. The video shows a hairlight but this was not actually used.
For the second shoot Rachel was naked and used records to create images that wouldn’t get me banned from IG. Rachel is comfortable being nude in front of camera so the shoot flowed easily.
My studio has mirrors on both sides so we also used them in the shots.
All of the images in this post were shot on my Lumix G9 at the following setting 1/200s f8 ISO200 with focal lengths ranging from 24mm to 32mm. The combination of 1/200s and f8 ensures that I have full control of the light while giving me a reasonable depth of field. I am operating in a small studio with only 2.4m (8 feet) available between my model and camera. So if I want full body I am forced to shoot wide. This is not an issue if you place the subject in the middle third of the frame.
This is a somewhat unusual post, in that it is not about a photographic session that was run, but rather the reaction that occurred when the images were posted on Facebook. So in someways it is a little bit of a rant.
In my last post I shared the story of the shoot with Heaven and particularly the background as to how I came about shooting her. The session went really well, and she was very happy with how it had gone. Once she saw the images she absolutely loved them.
As is my normal practice she chose the top ones that were shared online.
It was then that one female member of the Facebook group complained that the images were creepy and went onto suggest that they were typical of situations where a male photographer had enticed a female model to pose in next to nothing.
Other female posters did not see anything creepy in the images so her opinion was not wide spread.
Now with criticism like this sometime it is better to ignore it. However in this case I decided not to do that, as the poster was making some very wide assumptions that were frankly incorrect. Heaven was not enticed into the shoot, in fact she wanted to do it. She had also had full control over the poses (which had been discussed in advance) and she had chosen the selected images.
The only thing that the poster had correct was that I was a male photographer.
It is the sad fact that there are male photographers who do shoot nude/lingerie images simply as a way of seeing naked women. However not all of male photographers are like this, but to judge our work on that standard is just not right.
I believe that I got through to the poster, however rather than apologise for her mistake, she simply deleted the whole post.