Category Archives: Lighting

Tanisha in the pool

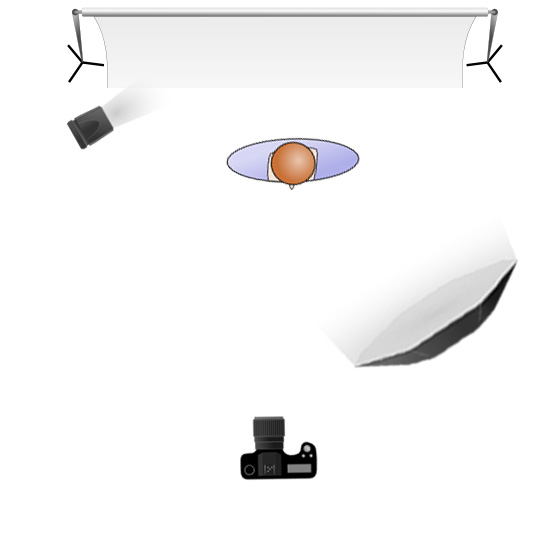
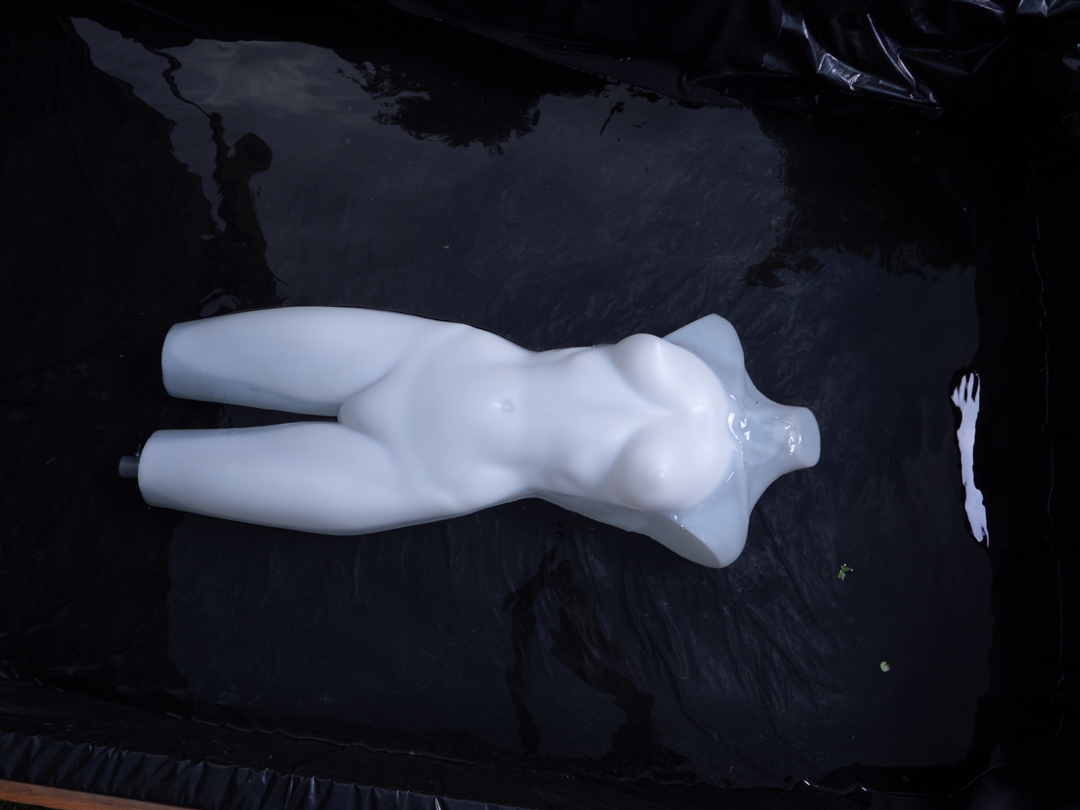
After we finished the studio shoot we headed out to the pool. As this shoot took place almost a month after the previous one the pool had been emptied and refilled. On previous occasions The polythene lining had been doubled up but I determined that that was not necessary. Instead I extended it up at the rear of the pool providing me with a solid wall backdrop.

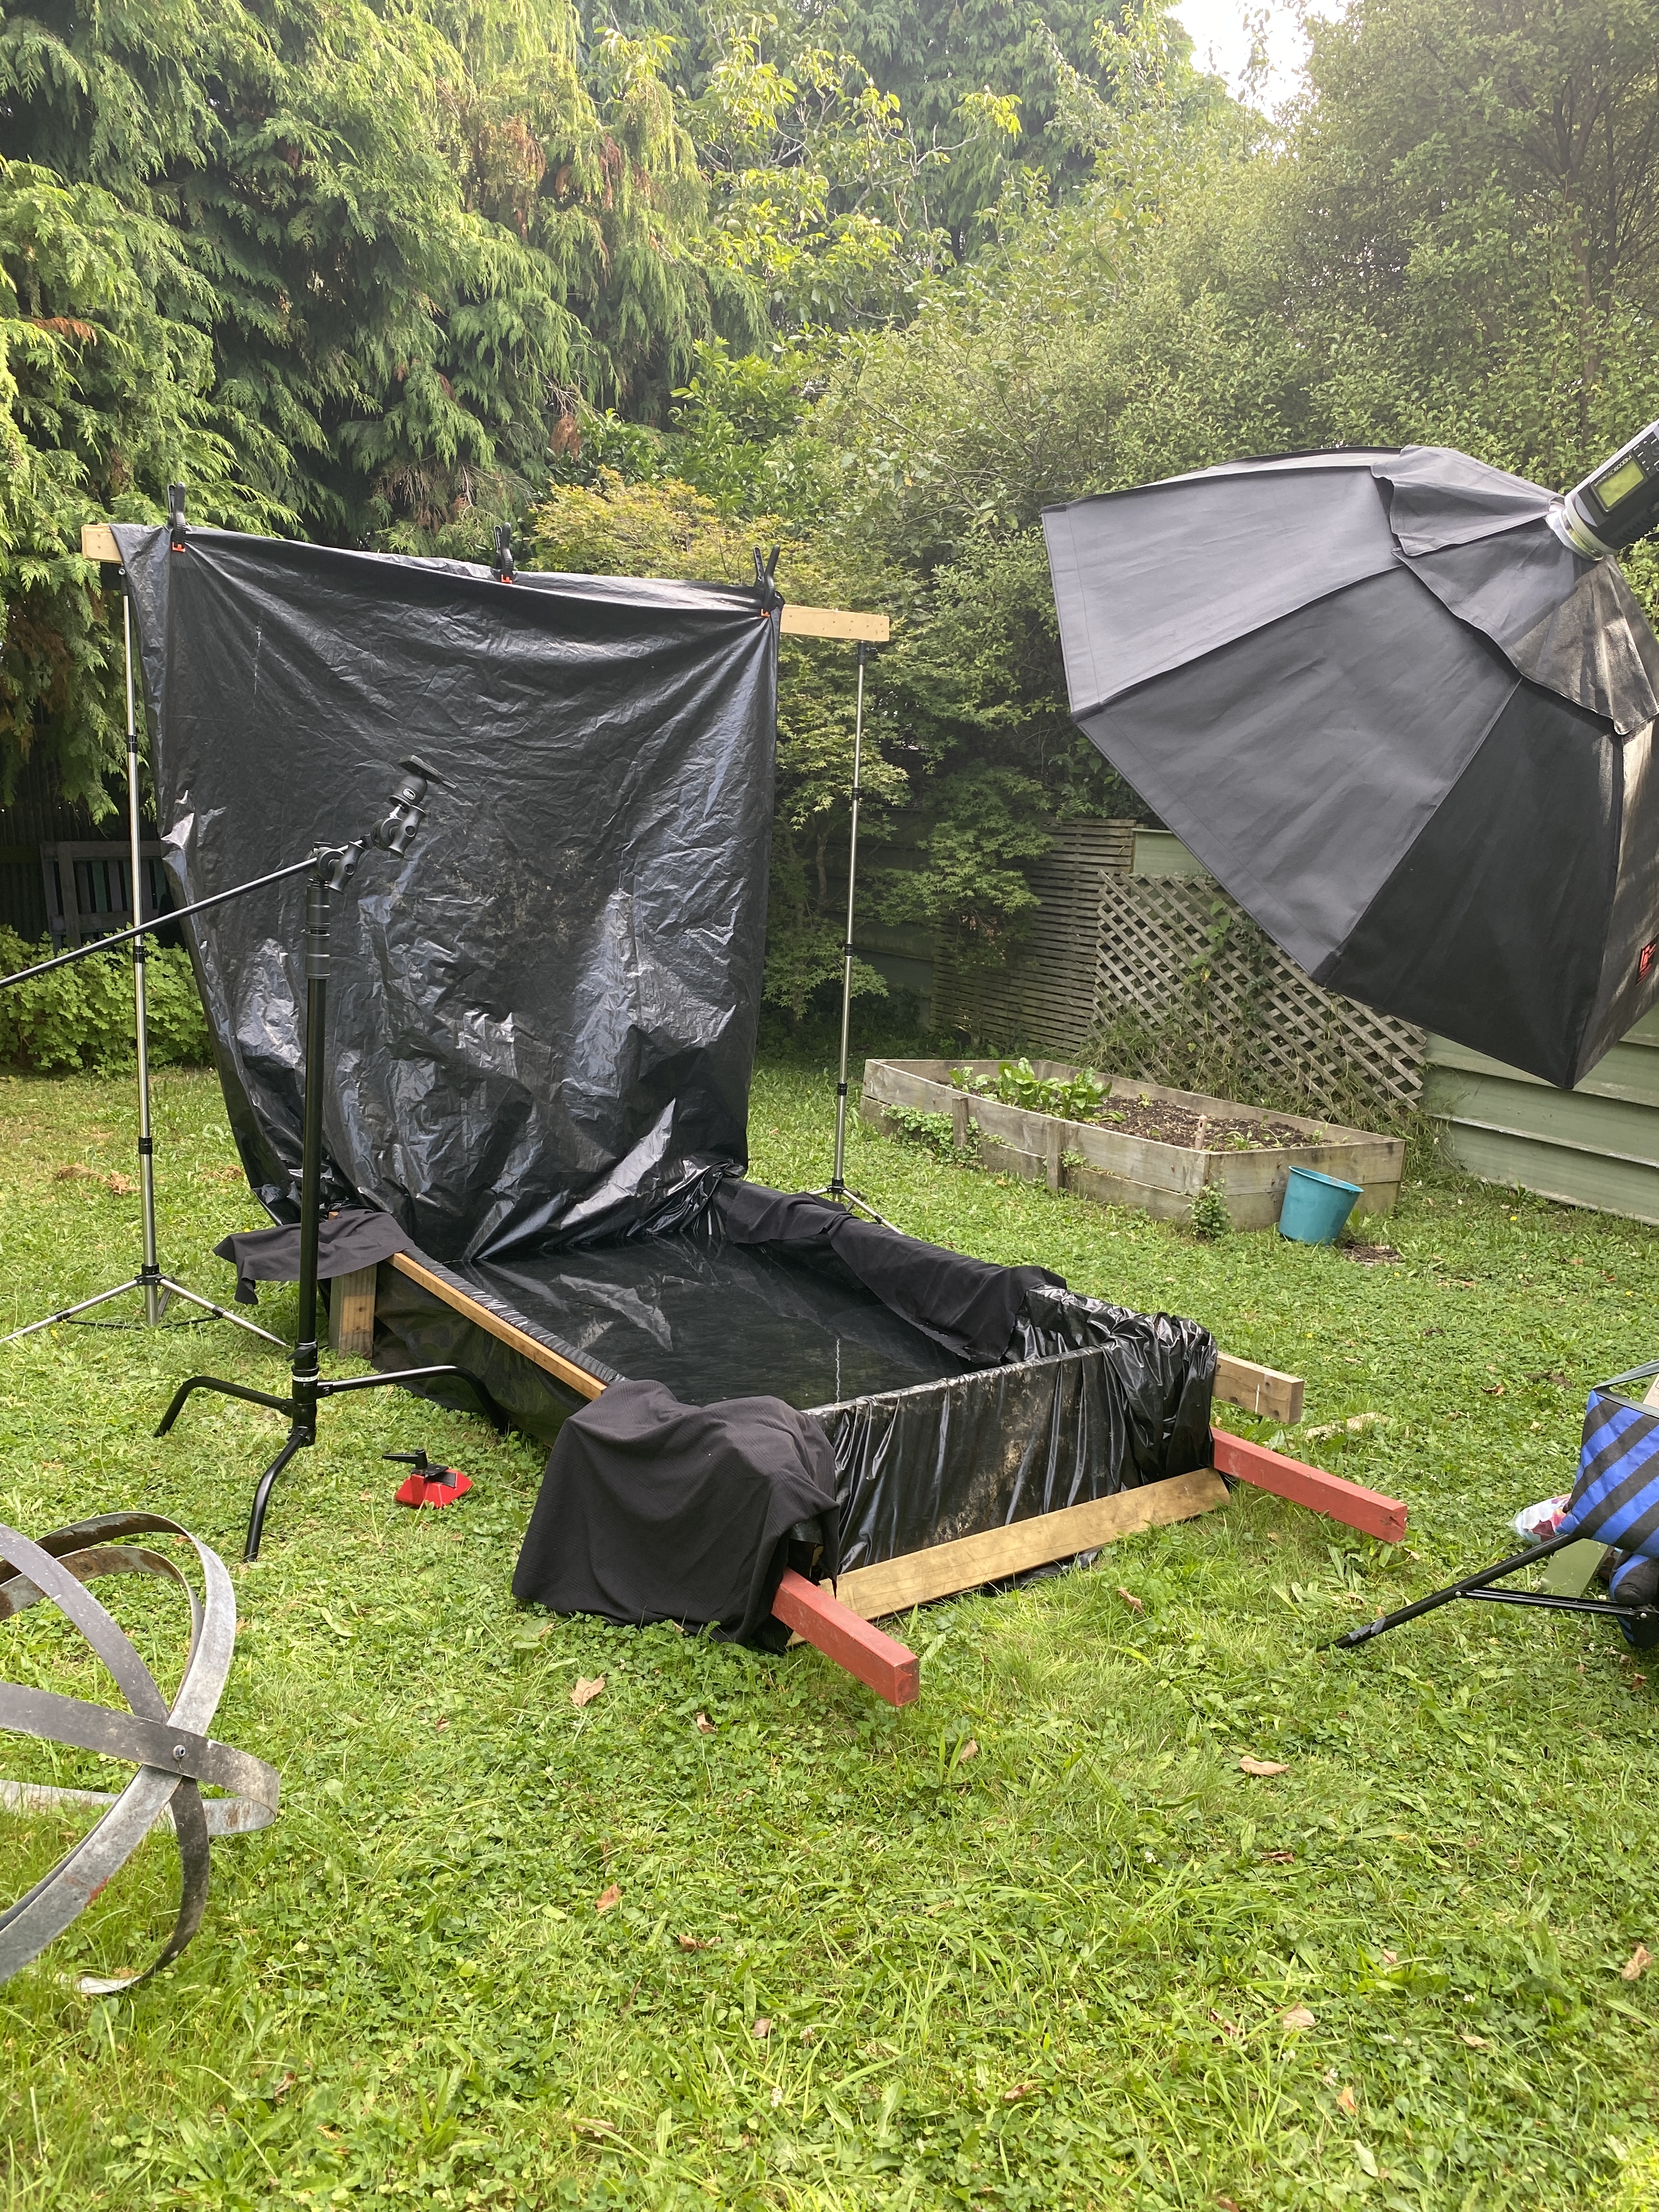
As in previous shoots we moved fairly quickly. While the pullback image shows the stand mount for the camera this ended up not being used. Something glitched in the camera and iPad app refuse to talk to each other. So rather than mucking around I ditched the idea and shot standing on a stepladder.

The video below is a small section of the behind-the-scenes. The video was shot using a small Panasonic DMC-LF1 which is a point and shoot camera. Despite being small it is great for shooting behind the scenes videos.

The time that I had invested setting up the lights ahead of time paid off. I was able to reposition Tanisha without having to worry too much.

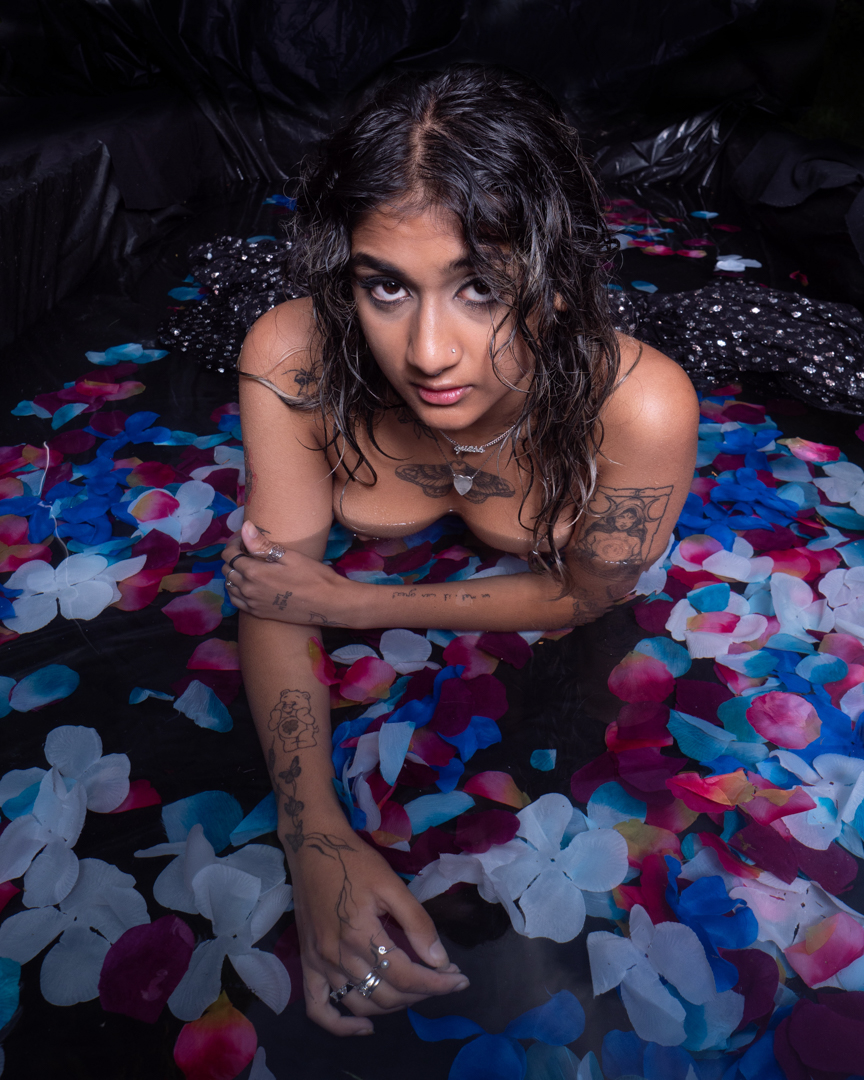
All of the images were taken on my Lumix G9 at f8 1/160s ISO200.

As this was to be the last shoot of the pool series for the summer I wanted to try something different. The next post will cover that .

Tanisha in the Studio

As mentioned in the previous post, my last studio/pool session of the summer was with Tanisha. She was off Indian descent and had a fabulous rich skin colour. I therefore chose a blue satin backdrop as I knew this would look great in the images.

We started in the studio with a range of poses. We also included a couple of outfit changes. This helped her and me get comfortable shooting together. Tanisha was a natural and this process ran extremely smoothly.

For my lighting I used two lights. My Godox AD300 was the main light which was positioned camera left in a 65cm octabox. My Godox V1 speedlight acted as a second light. It was in a 7 inch reflector and was positioned camera left and aimed at the backdrop. This was simply to provide a little separation and to push the lustre of the backdrop.

I had acquired a very funky phone from an op shop. I thought it was a great opportunity to use that. Tanisha had quite a bit of fun with her and it showed in the images.

All of the shots were taken on my Nikon Z6ii at f5 1/100s ISO100. These are not my usual settings for studio work. However, they were sufficient to gain full control over the ambient light.

As with other shoots we included the selfie image with the old camera.

We also brought in a silk veil as I knew that Tanisha would rock the lock with her big brown eyes.

I really liked how these images turned out. In the next post we head out to the pool. 

Getting set up for another pool shoot

There is a lot to be said about the use of repetition to improve your photography. I certainly found that as I was shooting the pool series early 2023. Each shoot presented new challenges that I would then take into the next one. This was a novel experience given that normally my shoots a one off events.

My final shoot of the summer was with Tanisha. She had answered the casting call I placed back in December. We were unable to shoot until mid-February. I booked the shoot for the evening based on previous experience. This timing ensured I would not be fighting bright overhead light.

The previous shoot with Morgane occurred at roughly the same time. It showed me that I could not rely completely on natural light. Therefore I made the decision that I was going to overpower it. 

As I have mentioned before, shoots in pools with sun-heated water have to be done quickly. You cannot spend time playing with the lights while the model is in the water. The answer was to set everything up before the model arrived. That way I could make sure that everything was as I wanted it.

As shown in the image the start of the post I set up my AD600 at the rear of the pool shooting into a 1.5m octabox. The camera was positioned on a boom over the over the pool and triggered from an app on my iPad.

A test shot at f8 1/160s ISO200 proved that I was removing most of the ambient light from the screen. I set the power level of the light in the mid-range and took another shot. This provided enough light on the water but also the softbox reflected in it. I moved the light back and adjusted its power level to compensate.

Once I got the reflection only appearing in a small point of the pool, I was happy. I knew that I could fix this easily in post. There was still a sky reflection in the water. I knew this would go away once the flowers were added.

This test, however, did not show how the light would affect a model. I pulled out my handy mannequin. Then, I placed her in the pool. Being plastic she actually floated which meant it was not an exact replication of a human but it was close.

I was now confident that the set up was in place and ready for Tanisha.

Catwoman in the headlights

My second shoot in the 2023 Wellington Cosplay Photo Fest was with Dawn.  

She was cosplaying Catwoman from the Batman series. Her costume was based on the original 1960’s television series. It was not based on the later movies. 

For the shoot we chose Fort Balance which is an old World War 2 gun emplacement on the Miramar Peninsula. It is a favourite location for shooting. It has many great areas with a never-changing array of street art.

I am splitting the shoot into two post as the lighting for each was quite different.

For the initial shoot I had a concept of Catwoman being caught in the headlights of a police car.  That meant that I wanted to have both blue and red lights illuminating the scene. Within the complex, there are a couple of rooms where there is next to no natural light. I knew they would be perfect for what I was wanting.

My camera was set at f8 1/200s and ISO100. This is my normal setting for studio work as it ensures full control of the light. Really given that I was in darkness anyway, I could have chosen different settings. But there is a little point in playing around when you know what works.

The original plan was to shoot using two speed lights at the same time. One would positioned camera left with a blue gel. The other would be positioned camera right covered with a red gel. This would have resulted in a wash of light.

The complex is on the top of the hill. It is just under a kilometre walk from where you can park the car. I decided not to carry all of the gear uphill. I chose what I thought I needed and left the remainder in the car. Unfortunately, when we went to set up the shoot, I realized the trigger for the second flash was in the car. It was not with us.

I decided not to waste time going back together. Instead, I repositioned the light. Then I took two shots, which I combined in Photoshop.  This is not that difficult to do although I would have preferred to have shot in the field. It did require Dawn to replicate poses. Fortunately she was able to do this.

Apart from the mess up with the missing equipment, this part of the shoot went well. I was really pleased with the finished image.

Kaylene Studio Shoot

My second pool shoot of 2023, and the third in the series, was with Kaylene. As before it started in the studio. It had been booked the previous week but the weather conditions that I had faced on that shoot were either worse where Kaylene lives. She drives a Tesla which auto systems did not like driving in low cloud.

For the shoot I was using my Nikon Z6ii tethered into the computer. The settings where F8 1/100s at ISO 100. The settings gave me full control over the ambient light.

The main light was positioned in a large softbox camera right at a 45° angle to Kaylene. A second light was at the rear of the room firing into a 7 foot umbrella fitted with a diffusion panel. This was set at a low power to simply fill in the shadows.

Kaylene was an experienced model so we were only using the studio shoots first is to get her comfortable with me. As such unlike the previous two shoots it only took around 30 minutes.

Kaylene has bought two outfits that we shot with both full lengths and with her sitting on the posing stool. I then grabbed one of the outfits that I had bought previously from thrift shops and we had a bit of fun with it and some other props. 

Kaylene was easy to work with and it was no trouble nailing great images of her. The only issue that needed fixing in practically every shot was an annoying gap at the bottom of the backdrop and the floor. I had ordered the backdrop at what I thought was an adequate size. As it turned out they had included the area that was rolled over in the size in the printed size so the usable surface was about 10cm short.

We finished the shoot with an image for the selfie series.

Camila Studio Shoot

My first shoot of 2023 was the second in the pool series with Camila as the model. As before it started in the studio.

I have mentioned previously that we do the studio shoots first to get the model comfortable with me. This makes for better images when we get to the pool. It also gives the model more variety of images that they can use.

For the studio shoots I was using my Nikon Z6ii tethered into the computer. The settings where f8 1/125s at ISO 100. The settings gave me full control over the ambient light.

I set up one of my printed backgrounds to provide a more interesting look. The main light was positioned in a large softbox camera right at a 90° angle to Camila. A second light was in a 7 inch reflector providing a hairlight.

Camila was more comfortable shooting so we worked fairly quickly through a series of poses and costume changes.

She had asked if she could bring her boyfriend with her for support. I was more than happy to agree to this. I find that anything that increases the comfort of the model improves the shoot. 

I always say this. If somebody comes to a shoot, they have to be prepared to be in front of the Camera. Therefore we included him in a number of images so that they had something to take away.

I finished the shoot getting them involved in selfie series.

We ended up shooting in the studio for nearly an hour. Then we decided it was time to head out to the pool.

Shirley Studio Shoot

Anyone who has looked back over this blog will know that I like to use to water in shoots. I had shot a number of occasions using a blow up pool. While I got the results I was after they did present a number of issues. After the success of the reflecting pool I realised that I had the materials to build my own pool. And that is what I did. 

I posted on Facebook for any models interested in a water shoot. I got a reasonably good response. As a result, four shots were set up. In the past, I discovered the best pool shots capture the model wearing very little. The model is covered with fabric which they can drape to hide or reveal. This does mean that the model has to be comfortable shooting in such a way.

So with all of the models I had not shot before, I started with a studio session. The purpose of this was to get them comfortable shooting with me. If they were happy to wear very little in the pool then during the session we move from them wearing less and less.

The first model who answered my call was Shirley. She was initially reluctant as she thought that she was too old to be a model. I assured her that it would not be an issue.

For the studio, I didn’t want to make it too complicated. I also wanted to avoid off-putting her. So, I used a single light positioned camera right. I decided not to set up a full rig. Instead, I used my Westcott X-Frame backdrop. This worked really well. I could even use it for full length shots.

After some initial hesitation we got into the rhythm of the shooting went through the series of outfits. By the end of the session, she was comfortable. We finished the indoor shoot with her reclining on the couch. She wore a sheer black outfit.

All of the shots were taken on my Nikon Z6ii at 1/123s f8 ISO100. The focal lengths were between 37mm and 50mm depending on how full length I wanted to go. 

Last Photo Booth

December 2022 marked the end of an era for The Kings Arms church in Trentham . The church had been going for 25 years. However, it was closing down because the lease of their premises was ending. Despite an effort they had not been able to find alternative accommodation.

A final lunch had been organised to mark the occasion. We had photographed various activities over the years. Therefore, we were asked if we could set up a Photo Booth.

The idea was to create images as a record for the church. They were also meant for people to use for their Christmas cards. A large wreath had been created onto which lights had been wrapped. 

We set up a rough canvas backdrop in an alcove and then hung the wreath over the cross bar using nylon ties at the back.  The wreath had coloured Christmas lights on it.

This was a set up where “safe” lighting was needed, not dramatic lighting. I positioned my two Elinchrom D400 strobes at a 45 degree angle both left and right of the camera. This gave a very even light across the area and could accommodate any family sizes. 

We set up a computer and tethered my Lumix G9 camera to it. This meant that we could show each family the images immediately after they were taken. All images were taken at f8 1/125s at ISO200 with a focal length of 32mm.

I generally took two or three images of each family and then we got them to chose the one that they liked the most. This meant that I only had to edit one image for each family which saved a lot of time. 

The shoots went without any really issues, and the families seem to enjoy what we sent them 

Devon Christmas Lights

f8 1/3s ISO3200

You will know that I like to use studio strobes in my sessions if you have been following this blog. However that is not all I will use, especially when I can given a challenge. That happened at the end of 2022 when Devon asked if I wanted to do a shoot using Christmas light. Of course I said yes and we set up a time.

Devon is very creative. When she arrived, she had created a dress that had the lights built into it. I knew we were going to have a great session.

We started very simply with only the lights for her dress and a candle lighting the scene. I love using candles as they produce a very lovely light. However they don’t let off a lot of light and therefore a longer exposure was needed.  We also needed to crank up the ISO

We then decided to get a little more complicated.  

f4.5 1/40s ISO6400

I set up two c-stands arms. One in front and one behind Devon on which I hung lights. This enabled me to create depth in the images. 

f4.5 1/25s ISO6400
f10 1/10s ISO6400

For the final shot I brought in a LED hula hoop that I had Devon hold. As this was going to be a longer exposure I also set up a flash to fire at the end of the exposure. This meant that I would get a sharp image of Devon as well as the effect of the lights. 

f10 1.3s IS0320

It was a fun shoot and we both loved the images that came out of it.

Mikki Summer – With a little Flash

This is second post about the Mikki Summers session (www.mikkisummers.co.nz). In this post I am going to cover the images that made use of flash.

As I mentioned in the previous post the shoot with Katie took place around Wellington. Therefore, I did not want to be lugging too much gear around.

I knew there was a possibility that the natural light would not be sufficient in some circumstances. I took my Godox V1 speed light. I also took a small soft box and a lightweight light stand. The stand was easy to carry.

Most locations did have sufficient light. However, the first photo on this page had too much shadow. So the flash was used as a main light.

Where the flash really helped was when I found a location where the sun was beaming through a gap in the buildings. This enabled me to use it as a backlight.

So that I had full control the camera was placed in manual mode. I was shooting 1/200s at f4.5 ISO 100. At these setting Katie became heavily in shadow. I then brought the flash in camera right to illuminate Katie. This technique is called “fill flash”

Within the collection was a number of outfits that were designed to be worn around the home. In fact they could double as pyjamas. As Marie had booked the hotel room I thought it was a perfect opportunity to use it as well.

While the room was reasonably well it was not providing me with the quality of light that I was after. So I decided to use flash to compliment rather than overpower the ambient light. I did this by positioning the flash on the balcony outside of the windows. In this way it was coming from the same direction as the natural light.

We finished the shoot with Katie relaxing on the balcony. Flash was used again. At this stage, the area where she was sitting was in too much shade.

Having flash available was a good choice. It meant I was not limited by what the natural light would provide. Choosing a small, soft speed light stand was wise. It is lightweight and not too difficult to move around with.