Category Archives: 2022 Shoots

Shirley Pool Shoot (NSFW)

The pool that I constructed for these shoots was built on a wooden frame with an internal measurement of 1.1m (3’ 9”) wide and 2m (6’ 7”) long. It was fitted with a double liming of black polythene. It was then filled with water at approximately depth of 30cm. As the ground sloped it was actually deeper at one end.

The pool was filled the day before the shoot in the hope that the sun would warm the water. 

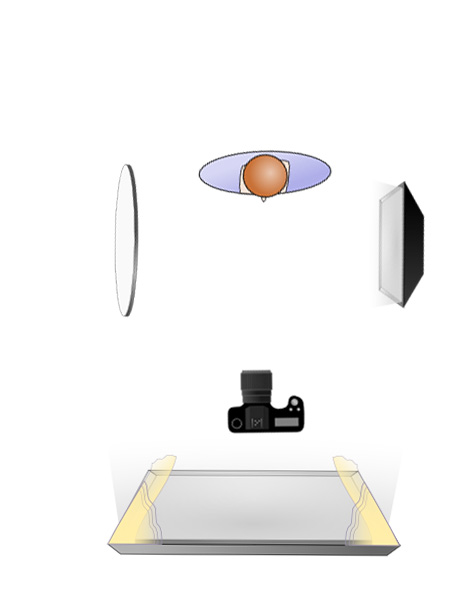
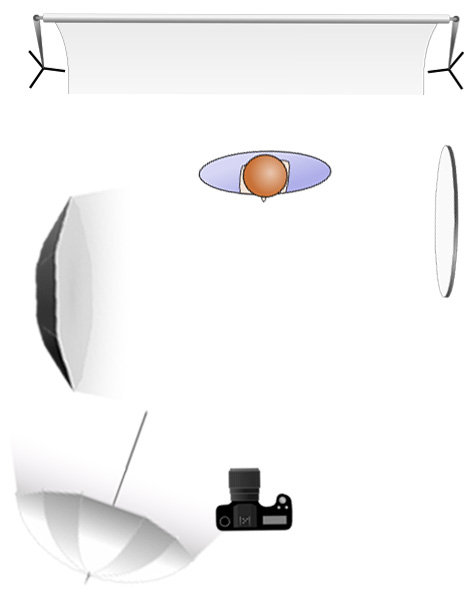
At either end of the pool I positioned backdrop supports with a bar running between them. I then draped a double layer of frost cloth over the whole pool. The intention of this was to diffuse the light. The video below shows the pool.

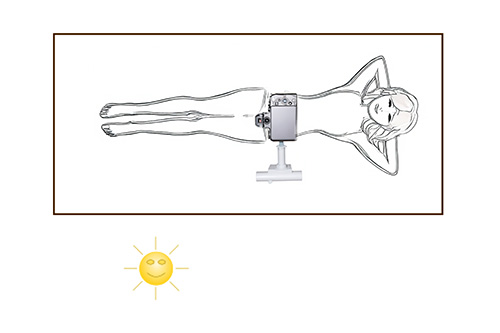
My Lumix G9 camera was positioned at the end of a boom arm over the pool. I controlled it via an app on my iPad. This gave me the advantage that I could get it perfectly square to Shirley without having to stand over her.

We had started the outdoor shoot around 3 o’clock. The idea was to allow time for the pool water to heat up. The day was very bright with next to no clouds. This created an immediate problem and that the frost cloth was not sufficient to diffuse the light. The result was a very bright spot in the pool.

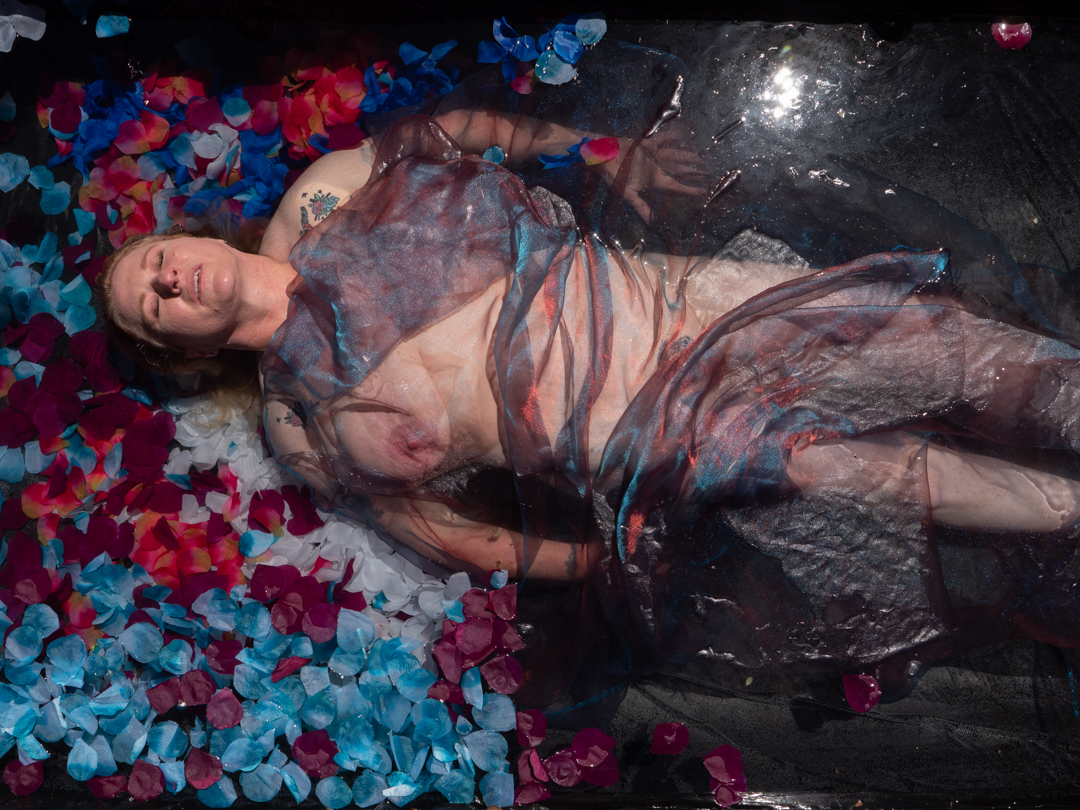
I tried to eliminate this by mounting the inner panel of my largest reflector on a boom. I then positioned this over the pool. While this did reduce most of the light it introduced a new problem. There was now a very strong reflection in the water.

Even with the pool water being heated by the sun, you can only work for a maximum of around 15 minutes. After that, the Model becomes too cold. Therefore I did not have the luxury of time to fully deal with the problem. The solution was to move the reflector so that it was not directly above Shirley and then to shoot from a different angle. I also shot closer so that we could eliminate the reflection.

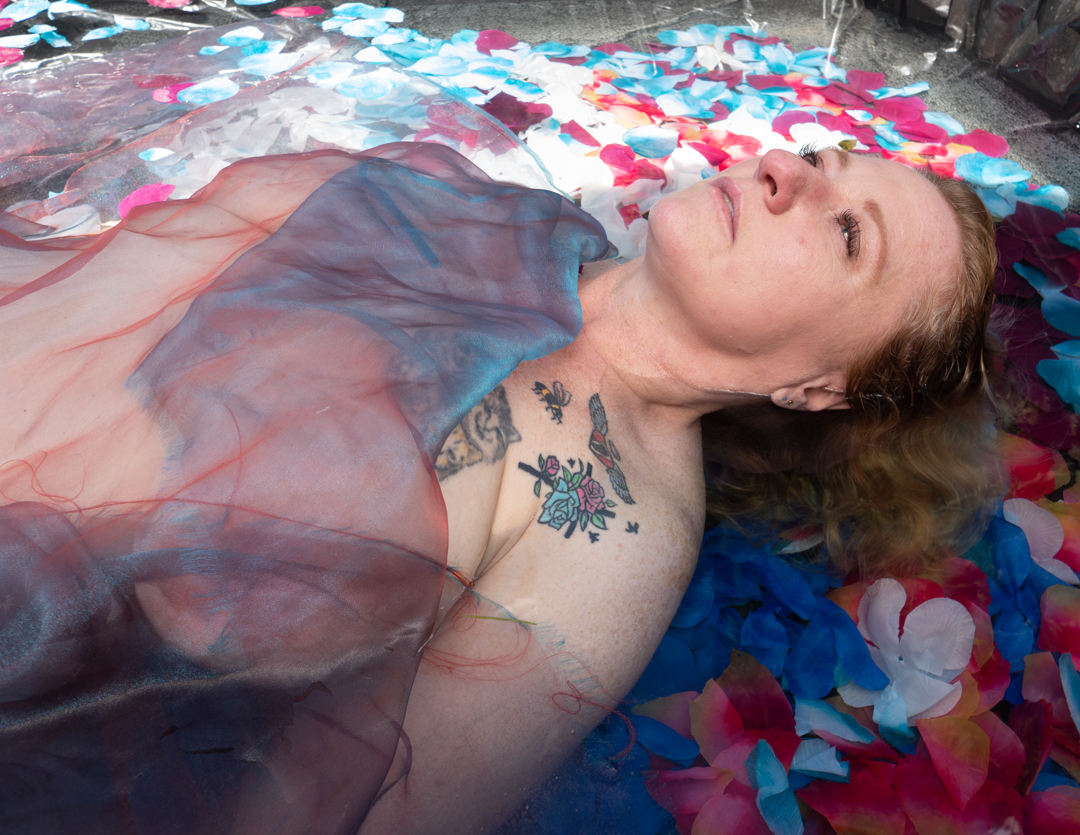
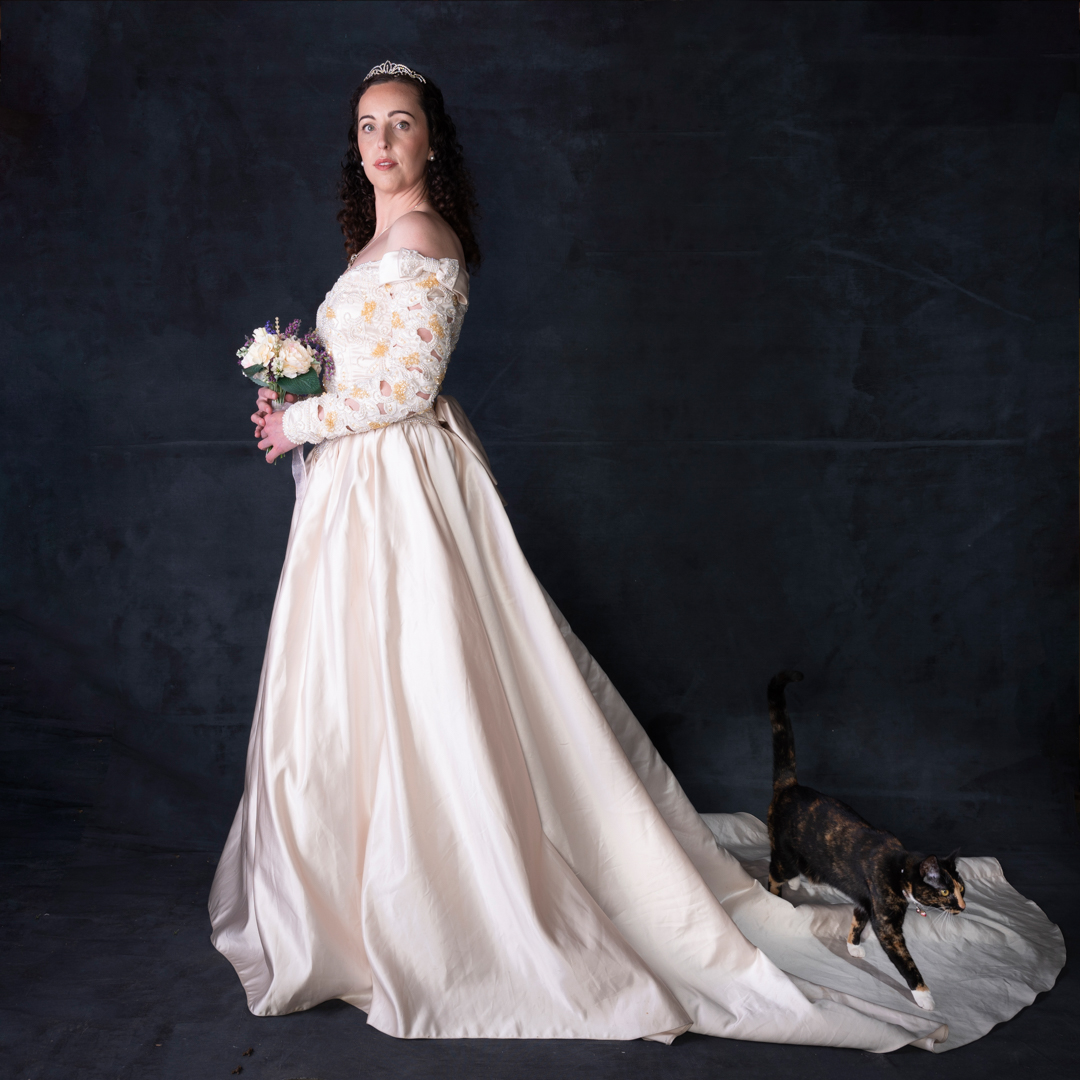
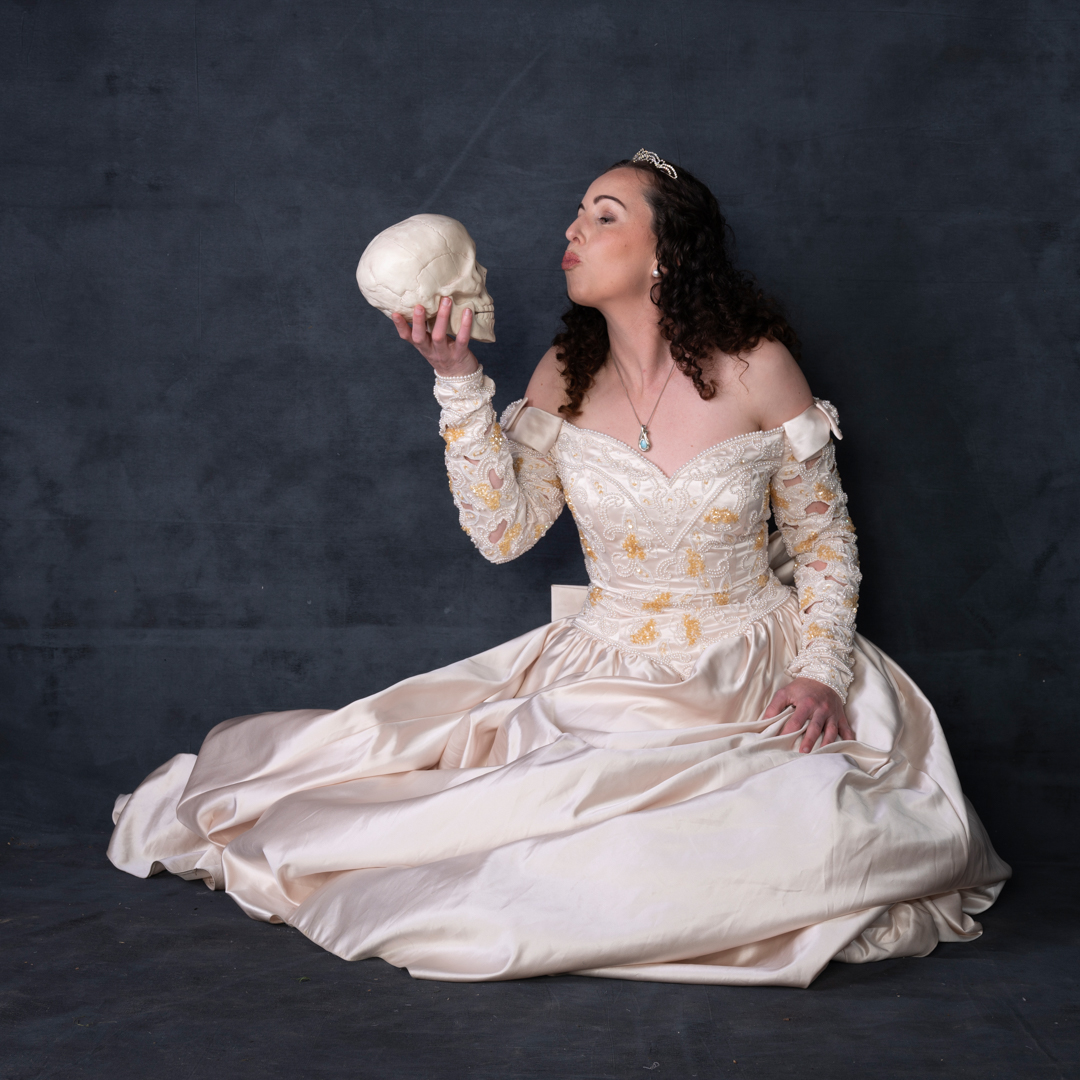
At the end of the day I managed to get a series of usable images which Shirley was happy with. As this was the first shoot with the pool I always know that it would be challenging and that there were things I could learn from it.

Shirley Studio Shoot

Anyone who has looked back over this blog will know that I like to use to water in shoots. I had shot a number of occasions using a blow up pool. While I got the results I was after they did present a number of issues. After the success of the reflecting pool I realised that I had the materials to build my own pool. And that is what I did. 

I posted on Facebook for any models interested in a water shoot. I got a reasonably good response. As a result, four shots were set up. In the past, I discovered the best pool shots capture the model wearing very little. The model is covered with fabric which they can drape to hide or reveal. This does mean that the model has to be comfortable shooting in such a way.

So with all of the models I had not shot before, I started with a studio session. The purpose of this was to get them comfortable shooting with me. If they were happy to wear very little in the pool then during the session we move from them wearing less and less.

The first model who answered my call was Shirley. She was initially reluctant as she thought that she was too old to be a model. I assured her that it would not be an issue.

For the studio, I didn’t want to make it too complicated. I also wanted to avoid off-putting her. So, I used a single light positioned camera right. I decided not to set up a full rig. Instead, I used my Westcott X-Frame backdrop. This worked really well. I could even use it for full length shots.

After some initial hesitation we got into the rhythm of the shooting went through the series of outfits. By the end of the session, she was comfortable. We finished the indoor shoot with her reclining on the couch. She wore a sheer black outfit.

All of the shots were taken on my Nikon Z6ii at 1/123s f8 ISO100. The focal lengths were between 37mm and 50mm depending on how full length I wanted to go. 

Last Photo Booth

December 2022 marked the end of an era for The Kings Arms church in Trentham . The church had been going for 25 years. However, it was closing down because the lease of their premises was ending. Despite an effort they had not been able to find alternative accommodation.

A final lunch had been organised to mark the occasion. We had photographed various activities over the years. Therefore, we were asked if we could set up a Photo Booth.

The idea was to create images as a record for the church. They were also meant for people to use for their Christmas cards. A large wreath had been created onto which lights had been wrapped. 

We set up a rough canvas backdrop in an alcove and then hung the wreath over the cross bar using nylon ties at the back.  The wreath had coloured Christmas lights on it.

This was a set up where “safe” lighting was needed, not dramatic lighting. I positioned my two Elinchrom D400 strobes at a 45 degree angle both left and right of the camera. This gave a very even light across the area and could accommodate any family sizes. 

We set up a computer and tethered my Lumix G9 camera to it. This meant that we could show each family the images immediately after they were taken. All images were taken at f8 1/125s at ISO200 with a focal length of 32mm.

I generally took two or three images of each family and then we got them to chose the one that they liked the most. This meant that I only had to edit one image for each family which saved a lot of time. 

The shoots went without any really issues, and the families seem to enjoy what we sent them 

Devon Christmas Lights

f8 1/3s ISO3200

You will know that I like to use studio strobes in my sessions if you have been following this blog. However that is not all I will use, especially when I can given a challenge. That happened at the end of 2022 when Devon asked if I wanted to do a shoot using Christmas light. Of course I said yes and we set up a time.

Devon is very creative. When she arrived, she had created a dress that had the lights built into it. I knew we were going to have a great session.

We started very simply with only the lights for her dress and a candle lighting the scene. I love using candles as they produce a very lovely light. However they don’t let off a lot of light and therefore a longer exposure was needed.  We also needed to crank up the ISO

We then decided to get a little more complicated.  

f4.5 1/40s ISO6400

I set up two c-stands arms. One in front and one behind Devon on which I hung lights. This enabled me to create depth in the images. 

f4.5 1/25s ISO6400
f10 1/10s ISO6400

For the final shot I brought in a LED hula hoop that I had Devon hold. As this was going to be a longer exposure I also set up a flash to fire at the end of the exposure. This meant that I would get a sharp image of Devon as well as the effect of the lights. 

f10 1.3s IS0320

It was a fun shoot and we both loved the images that came out of it.

Connor – water shoot

Within the Photographic Society of New Zealand there is an honours system. It is based on submitting a portfolio of images that are then assessed by a panel. In August 2022, I successfully achieved the associate level. After this achievement, I started working on the set for the top fellowship level.

The Fellowship requires you to submit 18 images that tell a story. I decided that it would be based on the way in which we use our hands. I drew up a list of the shots that I wanted.

When Connor and Kassie came for their shoot I asked if there would take part. With Connor I wanted to show “washing” set up a basin in the garage.

I used a single light positioned camera right with a reflector on the other side. Fill was provided by the doorway to the garage. The camera was set at 1/200s f8 ISO200. While this is not a particular fast shutter speed I knew that the flash would freeze the action.

In order to maintain consistency in the set I had decided that all images would be black & white. I edited the images in Photoshop first. Then, I ran them through Nik Silver Efex. There, I developed a particular recipe. This recipe gave me the gritty high contrast I was after.

Corpse Bride – Part 4 back in the Studio

This is the fourth and final post from my 2022 Halloween themed shoot.

After we had finished outside the other two photographers decided that they had enough images. So we moved back into the studio and I shot on my own. 

I started taking individual photos and let the models interact as they liked. Devon got right into character again and produced some great images.

With Katie I suggested that she mentioned we were doing her formal wedding photos. As usual my cat Beanie decided to make an appearance and ensure she got into at least one shot. When then added with the slight edition of a skull.

The main light was my Godox AD600 in a 1.5 m octabox positioned at a 90° angle camera left. This provided for in coverage and insured that we got catchlight in the eyes. A reflector camera right provided a bit of fill on that side. At the rear of the room an Elincron D400 fired into a 7″ umbrella with a diffusion panel to further provide fill.  

I have bought a almost full size skeleton and so Devon had fun interacting with it.

Yhe month before the shoot I had travelled to Christchurch and spent some time in the Christchurch Museum. In one of the rooms they had animal skeletons on display. I thought these could be useful. So, I took a couple of photos. I then composed them into an image with Devon and Katie. I was quite pleased with the result

All of the images we shot with my Nikon Z6ii camera using a 24 -70 4.0 lens. camera was in manual mode set a 1/200s f8 at ISO100. 

In my camera collection I have an old double lens camera . The camera doesn’t work but models seem to find it interesting. Therefore I have used it as a link image by getting them to imagine using it to take a selfie.

Corpse Bride – Part 3 Outdoors

This is the third post from my 2022 Halloween themed shoot.

After getting the shot for the ghost image, we then brought Katy into the image and we had Devon interact with her in a most threatening way. 

As mentioned previously the area was in shade and I was finding that there was not enough light. So I brought out my Godox V1 speed light in a small 24 inch soft box and positioned it camera right.  This added sufficient light for what I needed.

All of the images we shot with my Nikon Z6ii camera using a 24 -70 4.0 lens. camera was in manual mode set a 1/200s f8 at ISO100. 

Most of the final images from this sequence received relativey simple adjustments in photoshop but the main one received an extensive edit. The video below shows the layers in the Photoshop file.

The first step involved removing items that had come into frame such as flex leaves. Although Eden had done a great make up on Devon I decided for this image I wanted more. So I added a hue/saturation layer and completely desaturated Devon.

I then dodged down the highlights on Devon’s face. This was done by creating a 50% Gray layer setting the blend mode to soft light and then painting with a black brush. After this I add a Colour Lookup layer the image using the moonlight option. This was then lightly masked around my character and the layers opacity was set to 57%

Finally I created a stamp visible layer and on this used Color Effex Pro to get the final look I was going for. 

Corpse Bride – Part 2 Ghost

This is the second post from my 2022 Halloween themed shoot.

If I’m going to the effort of costuming a model I want to get the maximum amount of shots from the session. Given that the theme was corpse bride I thought that it was quite appropriate to have her as a ghost in a graveyard.

Not far from home is an old church with a section a small section of graves that date from the late 1800s. I am always mindful of the sensitivity about shooting in graveyards. For this reason I decided that I would composite the image rather than take Devon to the site.

The actual show was scheduled for a Sunday so on the Saturday I went to the graveyard at around the same time that I figured we would be shooting the next day. I did this so that light would be as close as possible to that on the day.

The back of our old garage has a plain wall and the ground was covered in onion plant. This had two advantages. Firstly, the wall made it easier to cut Devon out from the background. Secondly the plants covered her feet. Composing a person’s feet into an image is one of the most difficult parts of the process. Therefore, if you can cover them or not show them it makes the process much easier.

The area that Devon was in shade and I was finding that there was not enough light. So I brought out my Godox V1 speed light in a small 24 inch soft box and positioned it camera right.  This added sufficient light for what I needed.

All of the images we shot with my Nikon Z6ii camera using a 24 -70 4.0 lens. The ones in the graveyard were shot at f8 ISO100 using aperture priority which set a shutter speed of 1/80s. For the ones in the garden the camera was in manual mode set a 1/200s f8 at ISO100. 

Once ahead of the images it was a matter of choosing the best background and the best image of Devon and bringing them together in Photoshop as shown in this video.

Once Devon had been positioned and masked I applied both exposure curve adjustment to her. This was to balance her more to the background. Once I was happy with that I created a stamp visible layer (SVL) onto which I applied the moonlight LUT which is one of the standard colour look up tables. After that I tweaked the hue/ saturation particularly around Devon.

Once this was done another SVL was created. I did a slight brightness correction before creating another SVL where I masked out everything but Devon. This layer’s blend mode was set to softlight so that the effect was very subtle. Finally I created another SVL and on this used Color Effex Pro to get the final look I was going for. 

Corpse Bride Shoot – Part 1

Each year in October I plan a Halloween themed shoot. In 2022 I decided to reuse a dress from the previous year and create a corpse bride shoot. I knew that Devon would be perfect for the shoot and was really happy when she agreed to do it. The original concept was only to have her in it. During the fashion shoot with Katie, we were talking about the shoot and Katie sh said she would be keen to take part.

So we modified the concept so that the corpse bride was unhappy that her groom was marrying someone else. I reached out to a friend who has a whole collection of wedding dresses and brought four to choose from. I also enlisted the assistance of Erin Gibbons to do both bridal and horror makeup. 

I took the dress and further distressed it. First, I soaked it in diluted black poster pipe. Then we added rips to it.

Normally I shoot alone but for this session I invited two other photographer friends to take part. Rochelle lives in Palmerston North and has a wicked since of imagination. Toya mainly shoots birds. As she had invited me to shoot on a number of occasions. I felt it was appropriate to return the favour.  

The initial set was set up in my garage as it had sufficient room. I used the canvas backdrop that I had painted previously. From the roof I hung a chandelier to add a little extra element.

The main light was my Godox AD600 in a 1.5 m octabox positioned at a 90° angle camera left. This provided for in coverage and insured that we got catchlight in the eyes. A reflector camera right provided a bit of fill on that side. At the rear of the room an Elincron D400 fired into a 7″ umbrella with a diffusion panel to further provide fill.  

Devon was told to act like she was a ghost and two interact with Katie by trying to annoy her. Katie was told to look like she was completely unaware of Devon. Both pulled off these rolls perfectly.

All of the images we shot with my Nikon Z6ii camera using a 24 -70 4.0 lens. The camera was in manual mode set a 1/200s f9 at ISO100. This is my standard setting for studio work. It provides a reasonable depth of field as well eliminating all ambient light. This means that I am in full control of the light.

My original plan was to set up the lighting. Then, I would allow each of us to take turns with the trigger. While I am totally comfortable with flash, the other two were not. We discovered that if we opened the rear door of the garage it let in enough light for them to capture their images without affecting mine.

Everyone enjoyed this part of the session and some great images came from it.

Cassie & Connor

The most important factor in getting the most out of any model is their comfort in the shooting environment. Uncomfortable models will never give you great results. That is unless you are looking for an uncomfortable model look.

I also want them to feel safe. I know that going into a strange environment and meeting somebody for the very first time can be unsettling. Therefore, I always make it plain that I have no problem with them bringing a support person to the shoot.

In addition to making the model feel safer they can also provide an extra pair of hands. It is also not unusual that they will end up in front of the camera as well.

This was certainly the case when Cassie brought her boyfriend Connor to our shoot. I took one look at his features and said we have to shoot. Fortunately, he was happy to oblige after some initial hesitation.

While Cassie was getting changed I got Connor in front of the lens and we shot some simple images just to warm him up. Then we took a series of images with him and Casey which he was happy to pose. He was also willing to help me with another shit but that is a subject of the next post.

The main light was my Godox AD600 in a 1.5 m octabox positioned at a 45° angle camera left. This provided for in coverage and insured that we got catchlight in the eyes. A reflector camera right provided a bit of fill. 

All of the images we shot with my Nikon Z6ii camera using a 24 -70 4.0 lens. The camera was in manual mode set a 1/200s f8 at ISO100. This is my standard setting for studio work. It provides a reasonable depth of field as well eliminating all ambient light. This means that I am in full control of the light.