This is the third post covering the shoot where we were trying to produce images in the style of Helmet Newton. You can look at the previous post for the background to the shoot.
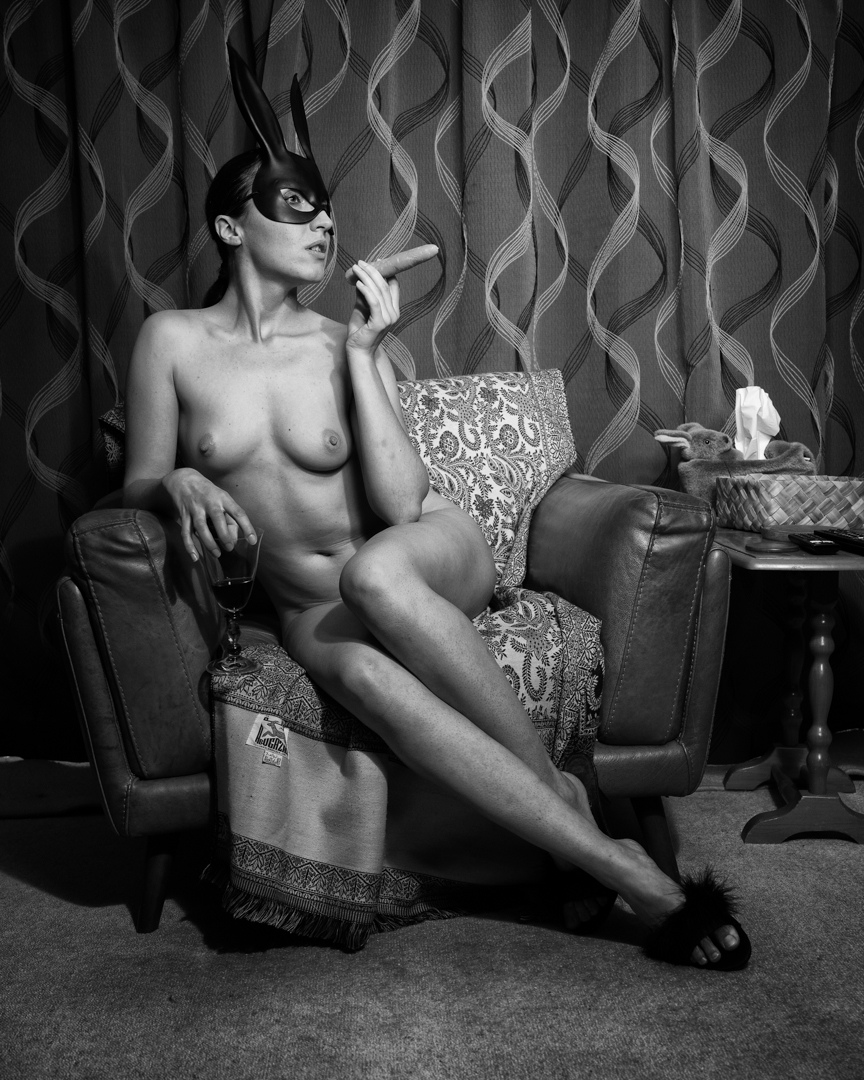
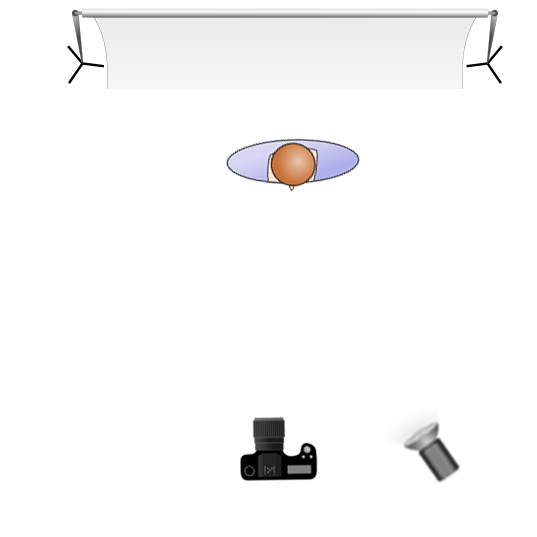
After we completed the domestic nudes images I moved into our lounge where I had another set up already in place. This consisted of my Godox AD300 strobe in a 80cm softbox.
As in the previous location there was no diffusion material on the softbox. This meant that the light was harder than you typically get. The settings on the camera did not change f5 1/100s ISO100.
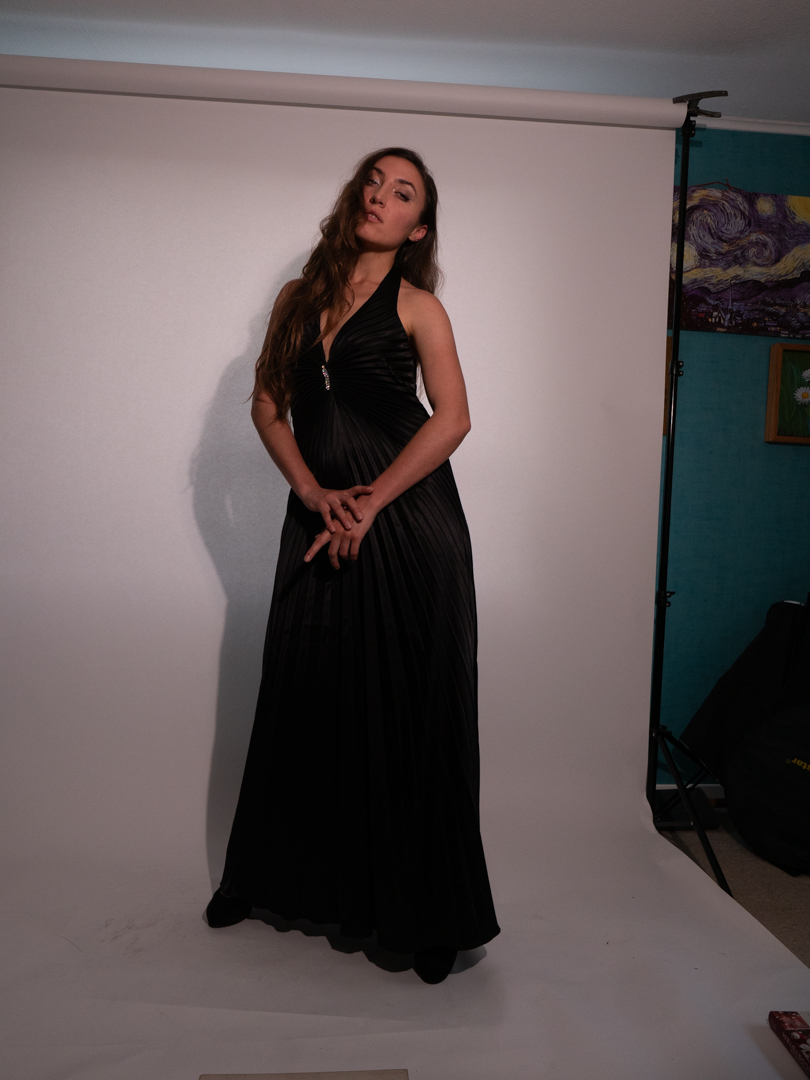
This image was not directly inspired by one of Helmet’s actual photos however they use of the bunny mask is not exactly original.
I positioned Johemiane on the chair and gave her a couple of props to interact with. She was absolutely brilliant at getting into character and this showed in the resulting images. The video below gives you a behind-the-scenes view of this part of the shoot.
The image came out exactly as I visualised it. As with the others it was coverted to a high contrast black-and-white image using a specific recipe I had created in Silver EffexPro.
In the next post we move to the most complicated shoot of the session.
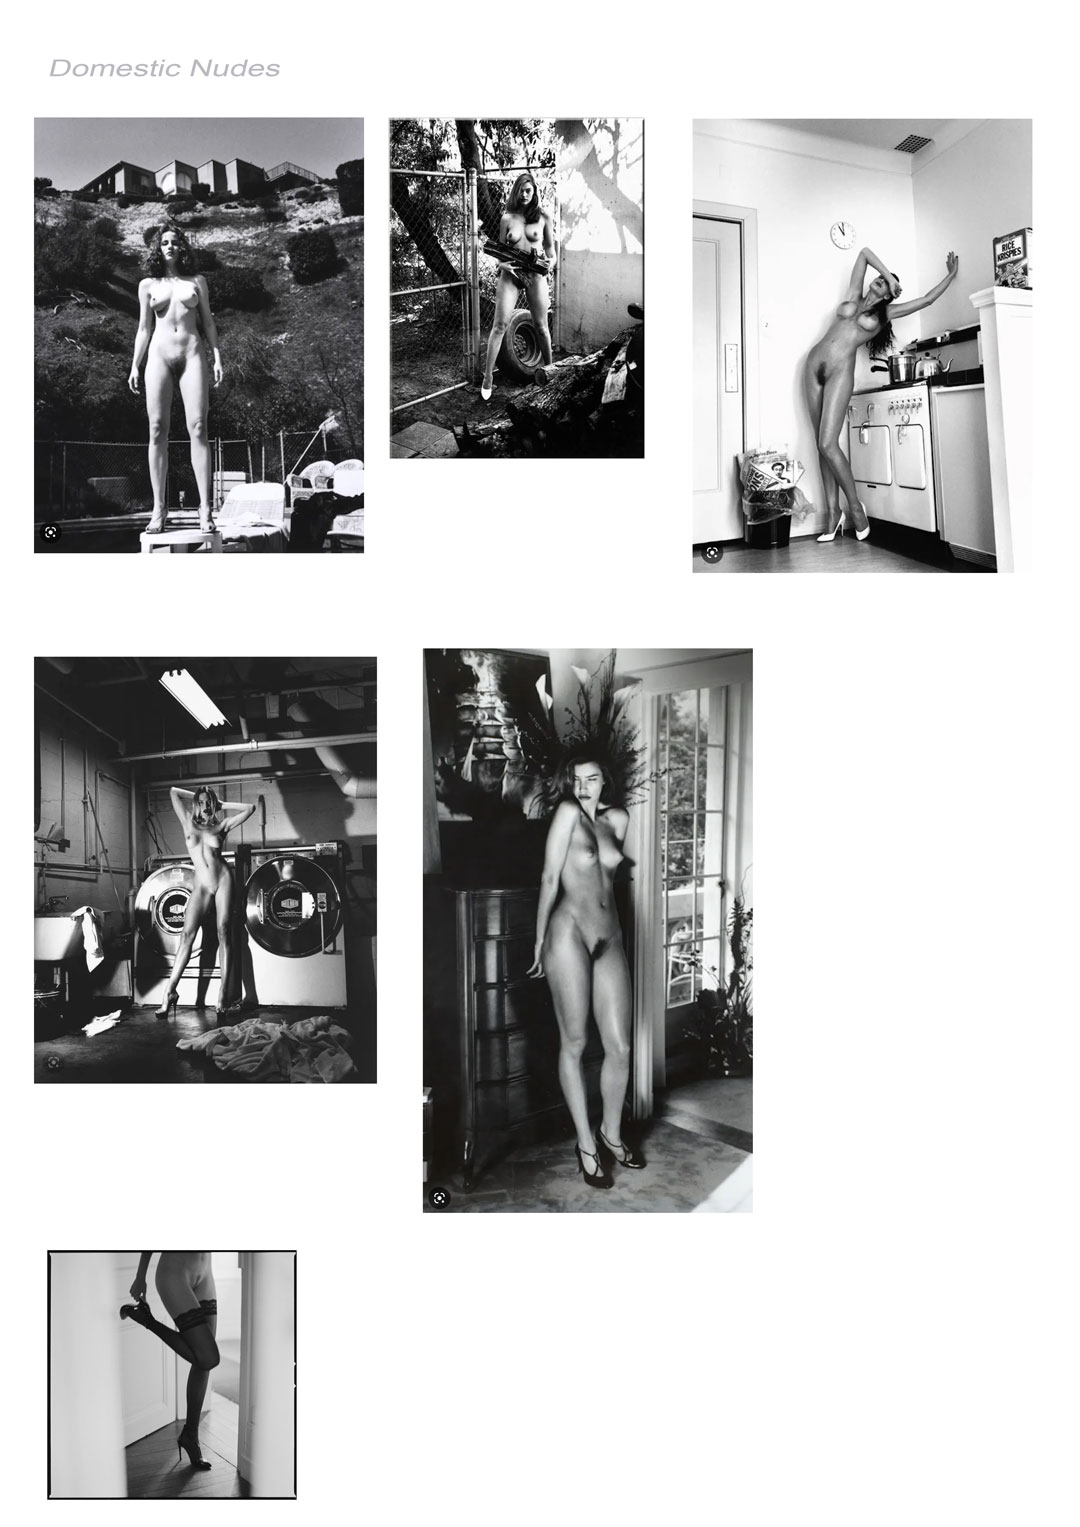
This is the second post covering the shoot where we were trying to produce images in the style of Helmet Newton. You can look at the previous post for the background to the shoot.
The first series of images were shot on a white seamless in what was obviously a studio. He had done another body of work entitled “Domestic Nudes” with subjects naked and more normal circumstances. In the second part of the show I wanted to recreate some of these.
I had only booked an hour with Johemiane to complete different looks. I knew that I could not afford to waste time mucking around with lights. Fortunately, I have a lot of gear. I was able to set up lights ahead of time in the areas I had identified as places I wanted to shoot. As they all walked off the same trigger I only had to move Johemiane, myself and the camera. I also swapped cameras to my Nikon Z6ii.
We started in the kitchen which turned out to be a great location. I had set up my Godox V1 speedlight in a 65cm softbox. I found that the speedlight is more than adequate in such a situation. To keep the light punchy there was no diffusion material over the front of the softbox.
The only issue I was dealing with was the reflection of the softbox in our garden window. To get around this problem I moved the light to minimise the effect.
We then moved into our entranceway and I had a Johemiane play the piano.
The setting for these images was f5 1/100s ISO100. This allowed some of the ambient light to enter the image. It prevented the photo from looking completely flashed up.
Each year the Camera club in the Wellington region have a print competition. The club that hosts sends out a list of 10 topics. Each club submits one print for each topic. Generally, the topics are fairly lame. However, in 2023, the Kapiti club decided to stir things up a little with the topic “In the style of Helmet Newton”.
For anyone unfamiliar Helmut Newton (born Helmut Neustädter; 31 October 1920 – 23 January 2004) was a German-Australian photographer. The New York Times described him as a “prolific, widely imitated fashion photographer whose provocative, erotically charged black-and-white photos were a mainstay of Vogue and other publications.
I heard about the topic before its release. A member of the Kapiti Club asked whether I could help them source models. I know that recreating some of his work would be very fun and challenging. It was it was a challenge I was very happy to undertake.
As chance would have it, as I was thinking about setting a shoot up, I was approached by Johemiane (@Johemiane). She was a professional nude model from the Czech Republic who was travelling through New Zealand. She was approaching local photographers to earn a little bit of money to fund her travel. I spoke with a couple of photographers from my club. I wanted to see if they were interested in sharing the costs. We booked Joanna for a two hour shoot. The first hour would be shared in the second hour was totally devoted to my own concepts. Because the lighting and arrangement in each shoot is different I have split the two hour session into a series of posts.
The first task was the analyse Helmut’s images to try to determine what was his style. Given that he started photography in 1936 and was shooting right through into the 1990s this was not a simple exercise. However when you looked at his most famous word there were two things that sprung out. Firstly they all portrayed women in strong/dramatic poses. Secondly the lighting was very contrasty and it was clear that he had deployed hard light a lot. While he was mainly known for black & white images, you could see the same style in the colour ones.
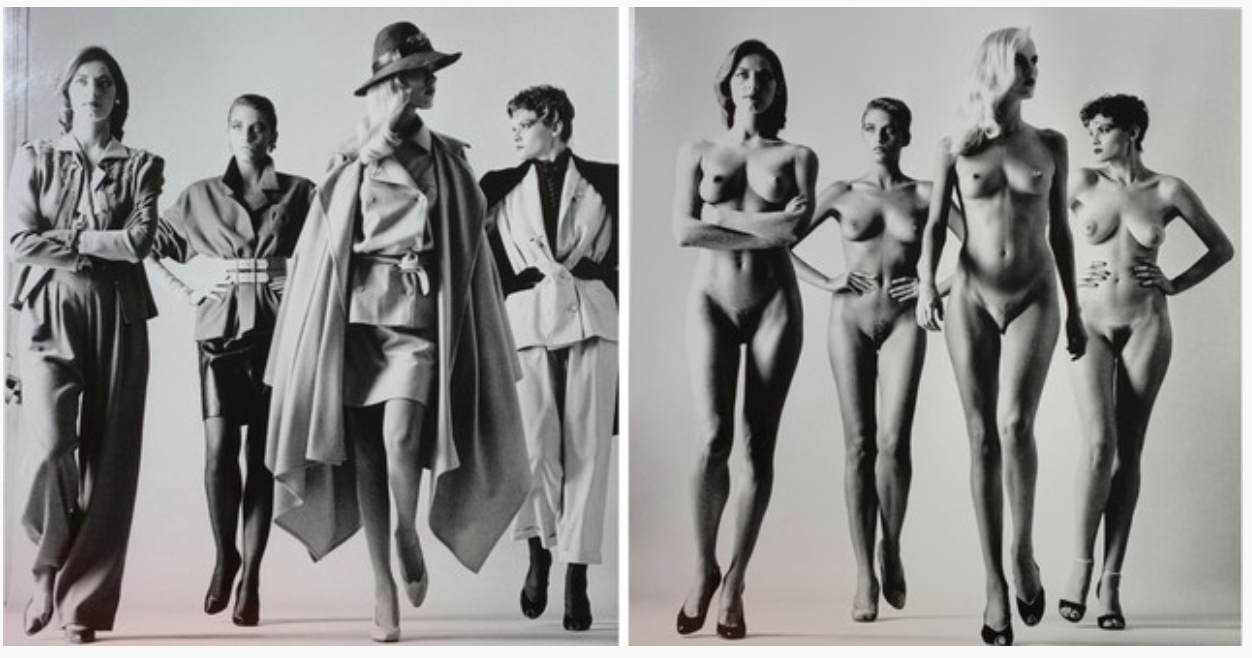
The first look I set out to recreate was an image entitled “They Come” shot in 1981. In his original image helmet had photographed four models in the latest Vogue fashions he then got them to repeat the same pose except they were fully nude.
The lighting in the image indicates that it is a single night coming from Camera left. They are short on a seamless white background. I see that exactly the same arrangement I initially positioned the light camera right. As this was part of the session with the other two photographers, I made things easier. I used a constant LED light that I had recently acquired. The idea was that they would not have to much about swapping out the trigger.
We started with Johemiane fully clothed. By using a constant light my settings where is f5.6 1/125s IS0800. The image below is an example example of what these settings produced. They were not exactly what I was looking for.
So I powered up an Elinchrom D400 and positioned it camera left. It was in a 7″ reflector which gave a very hard light. I left the constant light in place to provide fill.
I also determined that the black dress was not working so I had Johana change into a pink one.
It was there a matter of getting here to do a number of strong poses. As my usual practice I was shooting tether to the computer. Once the clothed shots were taken, we reviewed them in the computer, and chose the ones that we wanted to repeat nude.
The computer was positioned just out of shot but where Johemiane could see it. The other great feature with the Panasonic tether app is that you can select a previous image and use it as an overlay while shooting the next image. This meant that we could get Johana to adjust her poses to exactly align with the clothed shots.
Then in photoshop it was a simple matter of bringing the two images together.
Anyone looking at this Blog would clearly know that I mainly shoot people. However that is not to say that I will turn down the opportunity to shoot other things. Especially if the process is challenging.
That happened when a lady we knew through the church asked if I was willing to photograph her artwork. She wanted to put the digital images up for sale.
I had done something similar in the past with the work of a local upper Hutt artist. I had learned lots through that process that I applied this time. The big difference was that previously I had been photographing canvases. This time it was screen print on paper. This meant that they could not be supported on an easel and therefore had to be laid flat.
The key to photographing art is to ensure both consistency of colour and secondly consistency of light across the piece. You want to avoid hot-spots at all cost. The first requirement is met using a colour checker card and setting up a profile on the computer. The second was achieved by my lighting set up.
I positioned my two Elincrom D 400 lights fitted with one meter square soft boxes. Both were fitted with inner diffusion panels as well. The lights were at 90° to the art meaning that there was no direct light falling anywhere. I was aiming to shoot at f10 so that I would have a good depth of field. I used a light meter to test the light at various points around the piece of art. Then, I adjusted the position of the soft box to ensure it was consistent. You will note in the image below that the left soft box is further back than the right. This is because there is an inconsistency between the two lights at the same setting.
The camera I was using was my Lumix G9 position on a boom head overhead. It was tethered into the computer using the Panasonic Tether software. I have mentioned in previous posts that I like to shoot tethered. It has the advantage that you can see the image much larger then on the back of the camera.
This particular tethering software has another advantage in that you can like grid lines into the live video. You can make fine adjustments to the camera’s position. This ensures that it is perfectly square to what is being captured. This removes the need to correct distortion in post. The software loaded the images into a folder on the computer. I had set up Lightroom to monitor that folder. As soon as the image appeared, it would copy the image into its database.
We set the camera height based on the largest print that we needed to capture. This meant that once it was set we did not have to muck with the Camera. I was using the equivalent of a 50 mil Lance as this again meant we had no distortion to factor..
The table that we were using had a metal surface on it. To hold the prints down we used a combination of magnets hands.
The first image took some time to set up. Once that was achieved, the other images were shot very quickly. My wife would place the paper on the table while I watched the computer monitor. I would then get her to make slight adjustments to align to edges to the grid. We did not bother trying to get all four edges. We discovered that the art paper that had been used was not always completely square. With each pace I generally only took 2 to 3 images.
Once I had all of the images captured, I selected the best one. I then did final edits in Photoshop. As we had taken the time at the start this was not a difficult process. It mainly involved squaring off the images and removing either the magnets or fingers used to hold them flat.
I delivered the images to Lisa in a high resolution version suitable for printing. I also provided a low resolution version suitable for display on her website. She was very happy with the results.
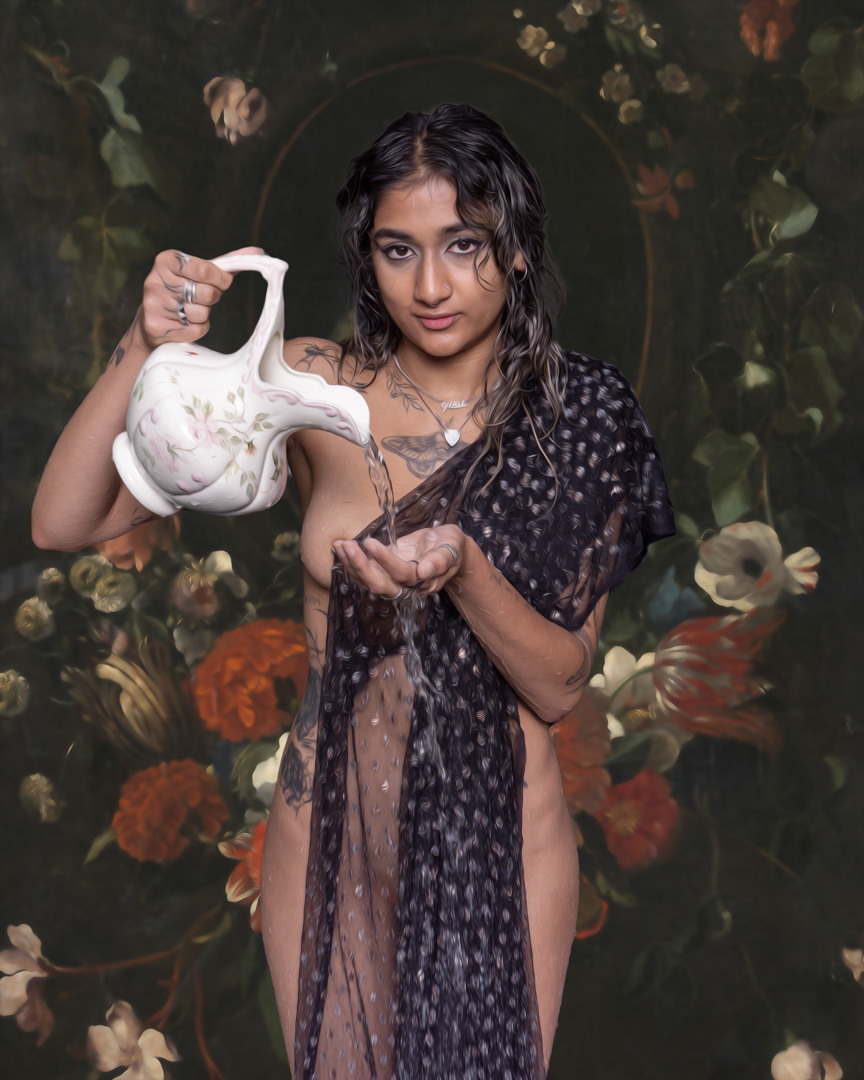
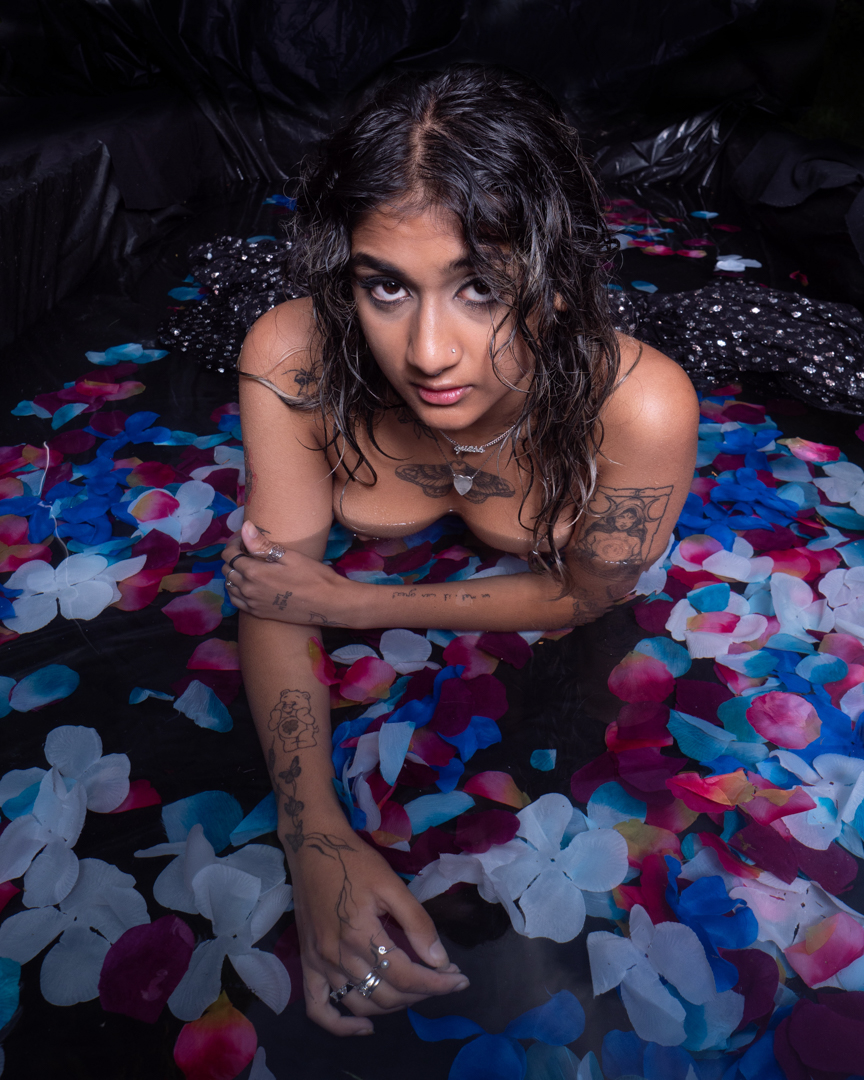
As I mentioned in the previous post I wanted to end the pool shoots with something different. That was to tell a story of a water maiden.
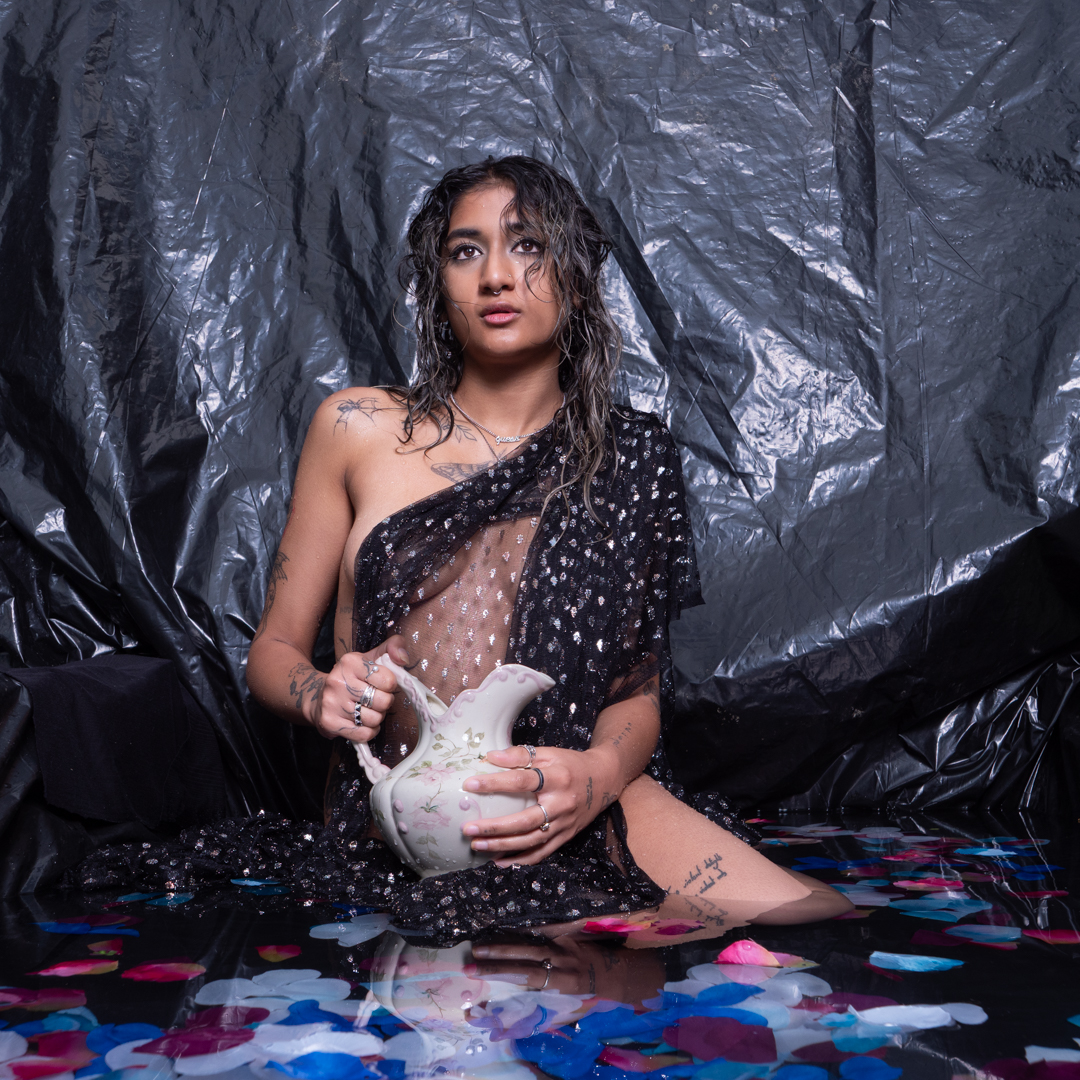
One of the items that I think we got from my in-laws estate was an old Victorian style pitcher. I knew that this would look good in an image. I also knew that my black lace with silver accents would look stunning Tanisha. Veils like this are great because they allow both modesty and sensuality at the same time.
The video below shows Behind behind-the-scenes of this part of the shoot.
While I knew the overall concept I was not sure exactly how it would look. Therefore to give me flexibility I insured that I shot Tanisha from different angles and also indifferent poses.
The images were shot on my Lumix G9 at f5.6 1/100s ISO200.
I had always intended that the black polythene would not be in the final image. It was acting as a backdrop.
I had downloaded a series of digital backdrops, made by Havelock North photographer Richard Woods. I chose the one that both matched the image while at the same time not overpowering it.
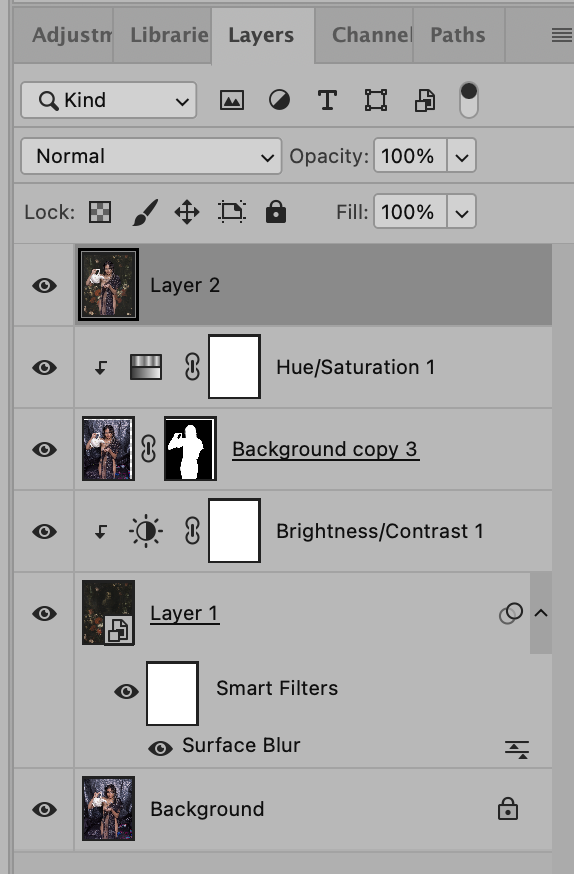
It was now time to put the concept together. In Lightroom I selected the background and the image of Tanisha. I then got the program to open them in Photoshop as separate layers. The layers are shown below.
I felt that the digital background was too sharp so I applied a surface blur to it. This was done using a smart filter so that I could come back and tweak it. I also pushed the brightness of the background.
I did the copy of the layer containing Tanisha and created a mask around her. As often happens when you bring multiple images together in a composite they do not exactly match. So I did a small queue and saturation adjustment.
I wanted this to resemble a painting, so I created a new layer by merging all of the others. Then, I applied the oil paint filter found under Filters: Stylize. I kept the setting really low as I did not want to overpower the underlying photo.
I was really pleased how the image came out and it has been well received when posted online. I cannot use it in competitions however as the use of the downloaded digital background disqualifies Me.
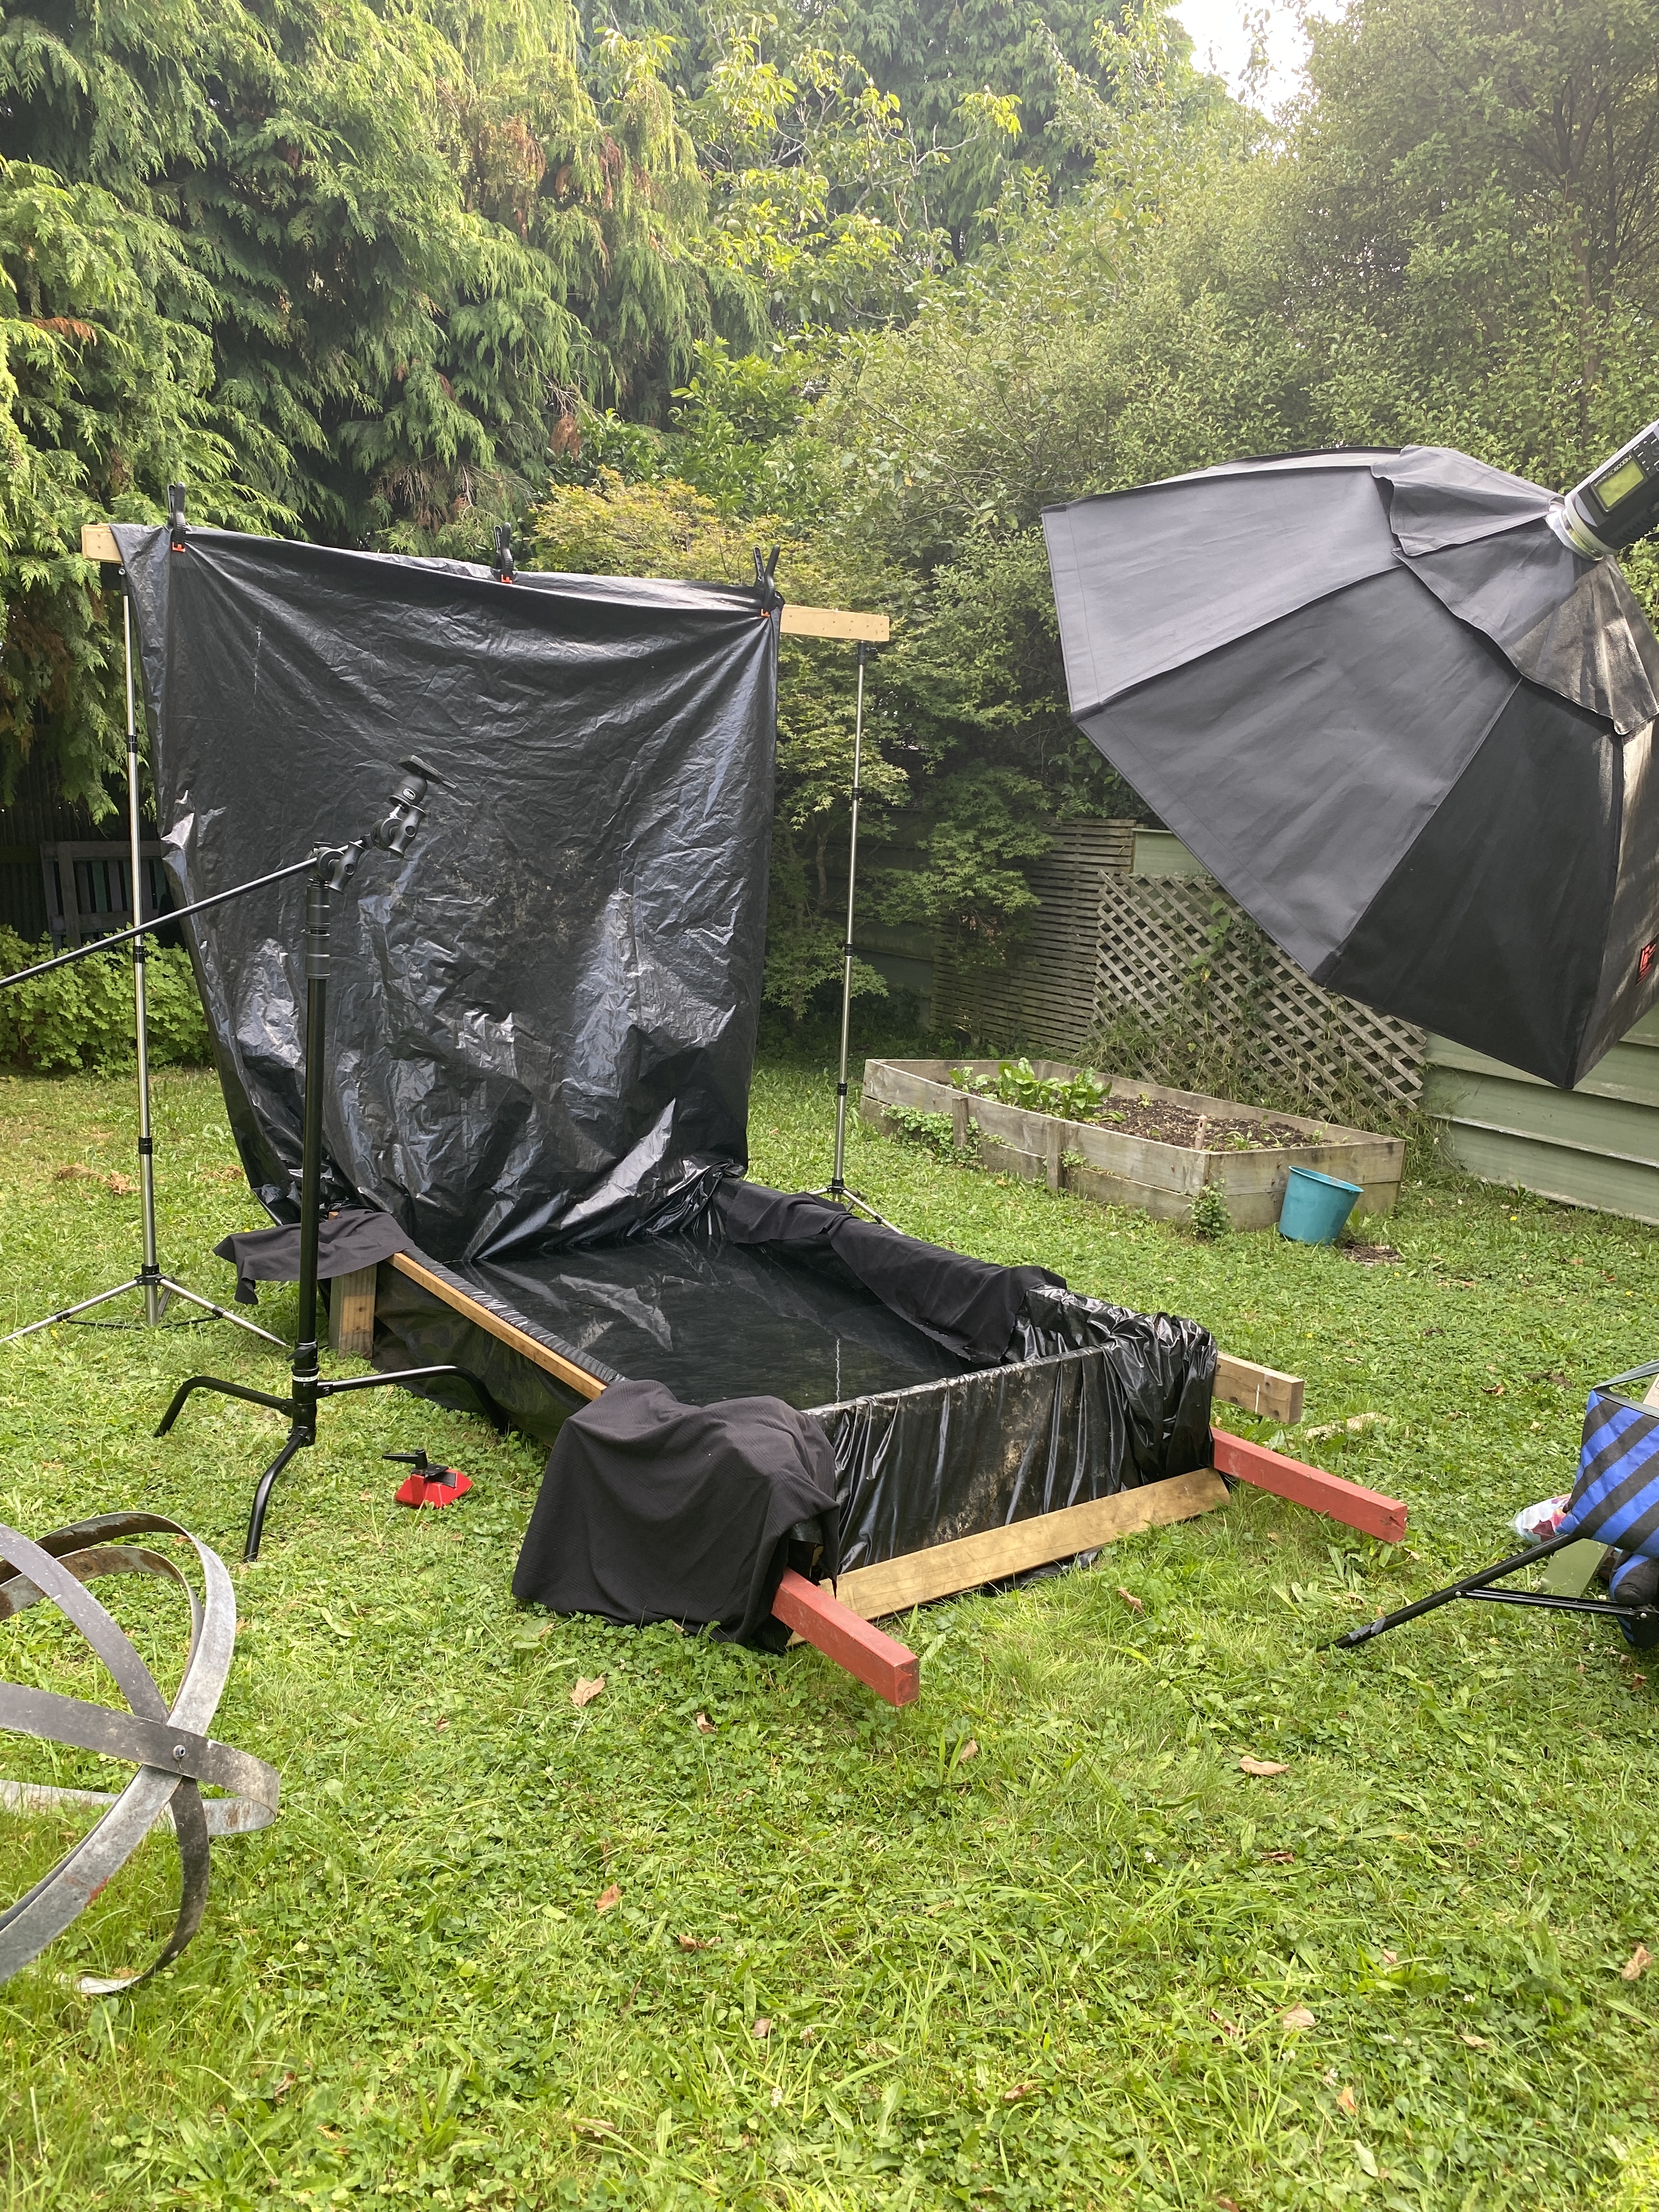
After we finished the studio shoot we headed out to the pool. As this shoot took place almost a month after the previous one the pool had been emptied and refilled. On previous occasions The polythene lining had been doubled up but I determined that that was not necessary. Instead I extended it up at the rear of the pool providing me with a solid wall backdrop.
As in previous shoots we moved fairly quickly. While the pullback image shows the stand mount for the camera this ended up not being used. Something glitched in the camera and iPad app refuse to talk to each other. So rather than mucking around I ditched the idea and shot standing on a stepladder.
The video below is a small section of the behind-the-scenes. The video was shot using a small Panasonic DMC-LF1 which is a point and shoot camera. Despite being small it is great for shooting behind the scenes videos.
The time that I had invested setting up the lights ahead of time paid off. I was able to reposition Tanisha without having to worry too much.
All of the images were taken on my Lumix G9 at f8 1/160s ISO200.
As this was to be the last shoot of the pool series for the summer I wanted to try something different. The next post will cover that .
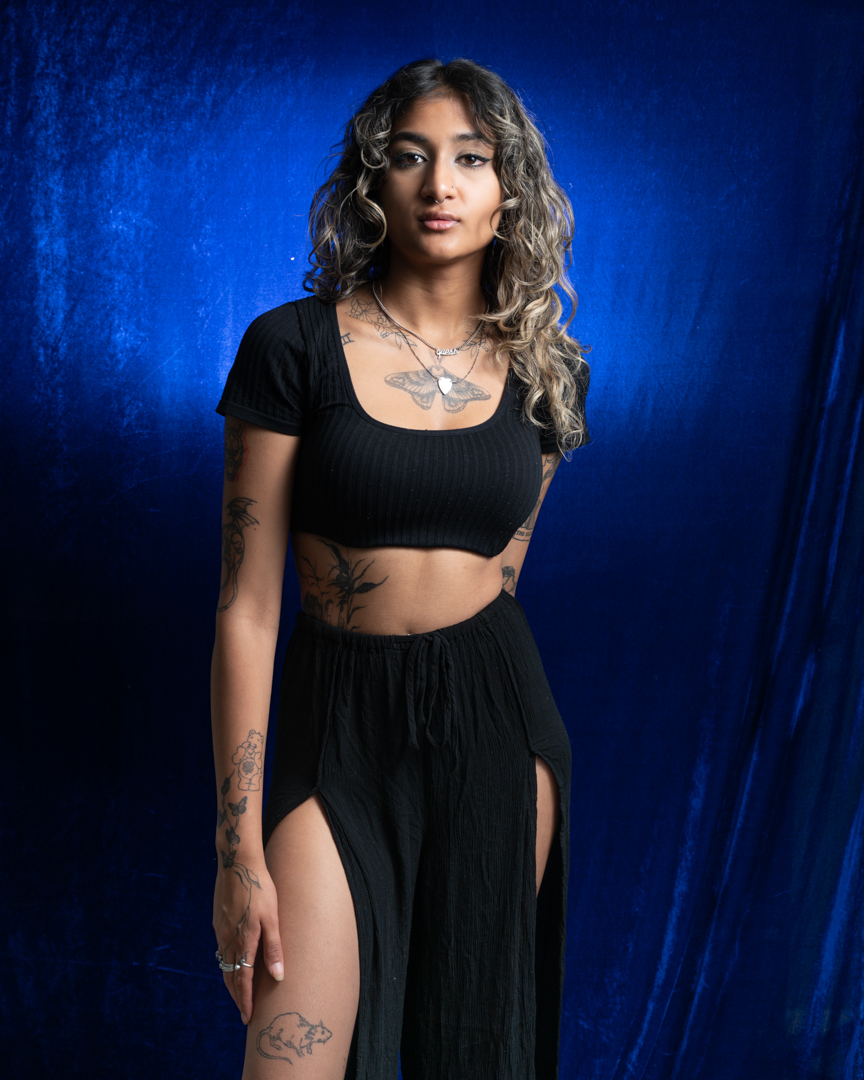
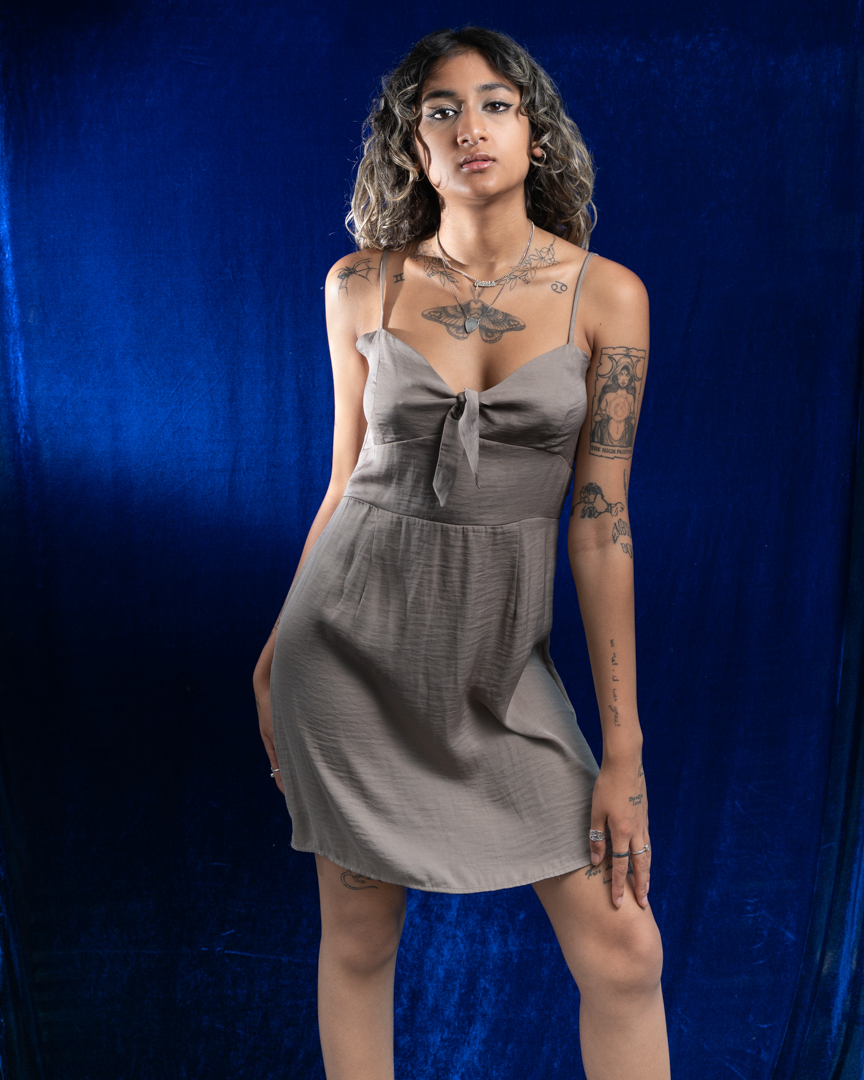
As mentioned in the previous post, my last studio/pool session of the summer was with Tanisha. She was off Indian descent and had a fabulous rich skin colour. I therefore chose a blue satin backdrop as I knew this would look great in the images.
We started in the studio with a range of poses. We also included a couple of outfit changes. This helped her and me get comfortable shooting together. Tanisha was a natural and this process ran extremely smoothly.
For my lighting I used two lights. My Godox AD300 was the main light which was positioned camera left in a 65cm octabox. My Godox V1 speedlight acted as a second light. It was in a 7 inch reflector and was positioned camera left and aimed at the backdrop. This was simply to provide a little separation and to push the lustre of the backdrop.
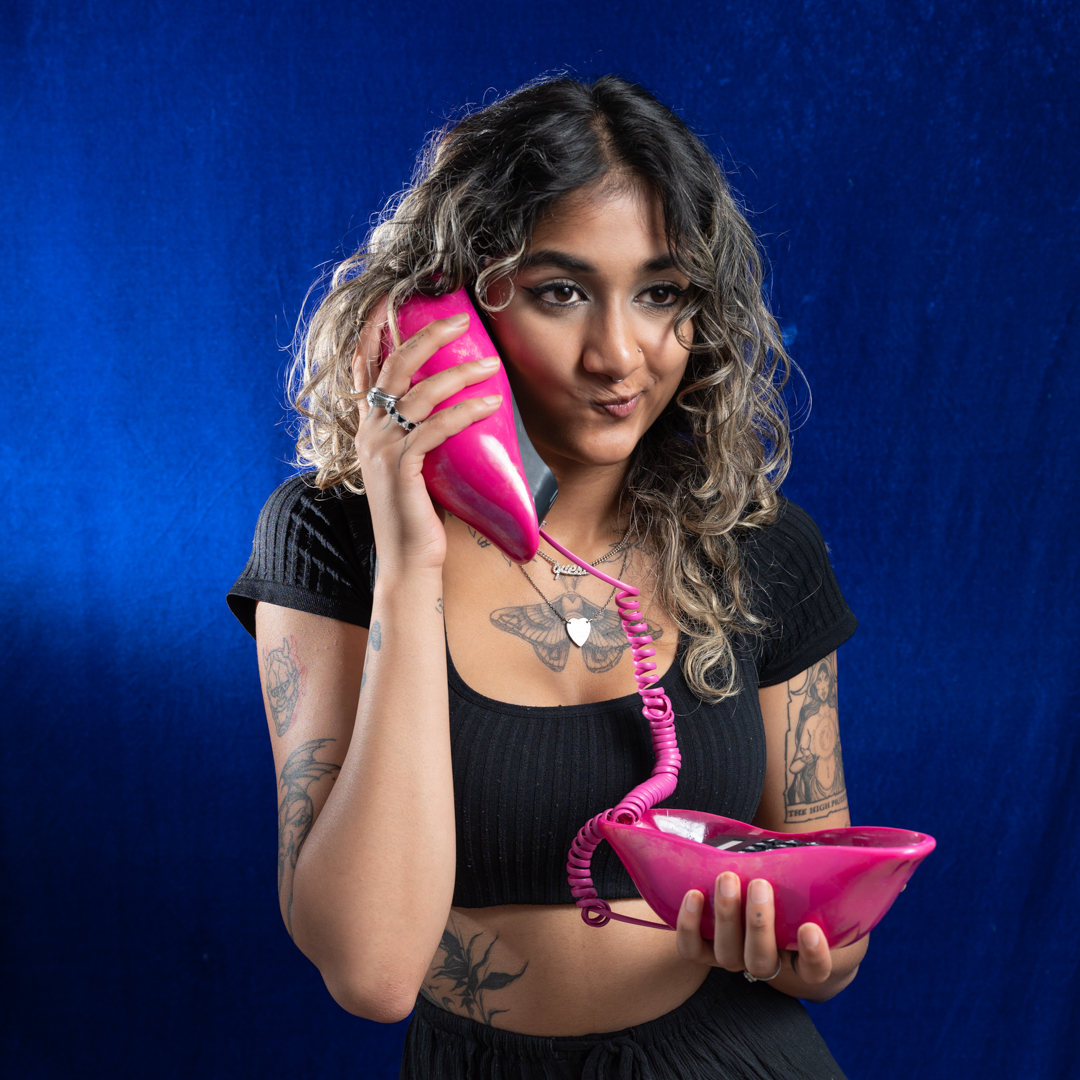
I had acquired a very funky phone from an op shop. I thought it was a great opportunity to use that. Tanisha had quite a bit of fun with her and it showed in the images.
All of the shots were taken on my Nikon Z6ii at f5 1/100s ISO100. These are not my usual settings for studio work. However, they were sufficient to gain full control over the ambient light.
As with other shoots we included the selfie image with the old camera.
We also brought in a silk veil as I knew that Tanisha would rock the lock with her big brown eyes.
I really liked how these images turned out. In the next post we head out to the pool.
There is a lot to be said about the use of repetition to improve your photography. I certainly found that as I was shooting the pool series early 2023. Each shoot presented new challenges that I would then take into the next one. This was a novel experience given that normally my shoots a one off events.
My final shoot of the summer was with Tanisha. She had answered the casting call I placed back in December. We were unable to shoot until mid-February. I booked the shoot for the evening based on previous experience. This timing ensured I would not be fighting bright overhead light.
The previous shoot with Morgane occurred at roughly the same time. It showed me that I could not rely completely on natural light. Therefore I made the decision that I was going to overpower it.
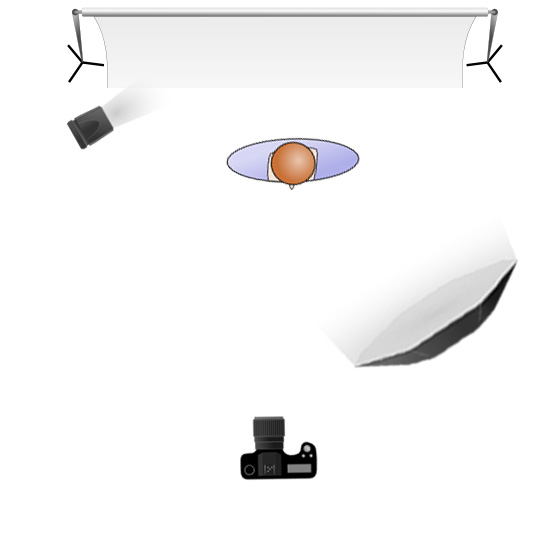
As I have mentioned before, shoots in pools with sun-heated water have to be done quickly. You cannot spend time playing with the lights while the model is in the water. The answer was to set everything up before the model arrived. That way I could make sure that everything was as I wanted it.
As shown in the image the start of the post I set up my AD600 at the rear of the pool shooting into a 1.5m octabox. The camera was positioned on a boom over the over the pool and triggered from an app on my iPad.
A test shot at f8 1/160s ISO200 proved that I was removing most of the ambient light from the screen. I set the power level of the light in the mid-range and took another shot. This provided enough light on the water but also the softbox reflected in it. I moved the light back and adjusted its power level to compensate.
Once I got the reflection only appearing in a small point of the pool, I was happy. I knew that I could fix this easily in post. There was still a sky reflection in the water. I knew this would go away once the flowers were added.
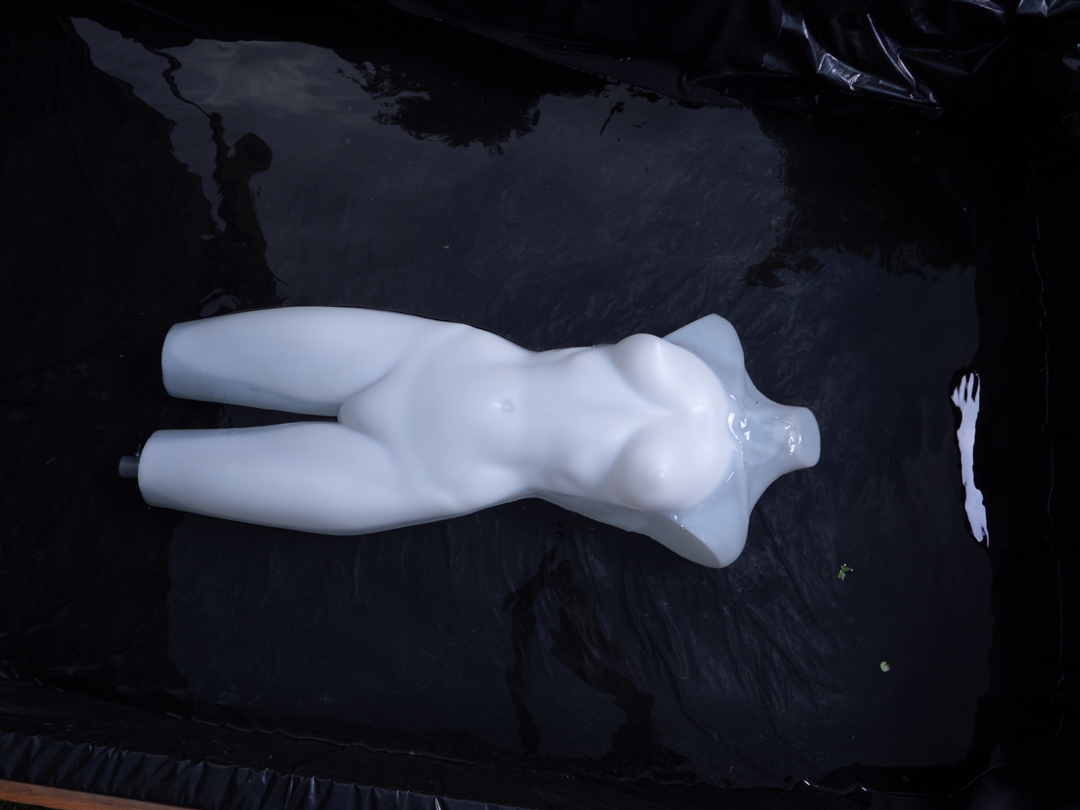
This test, however, did not show how the light would affect a model. I pulled out my handy mannequin. Then, I placed her in the pool. Being plastic she actually floated which meant it was not an exact replication of a human but it was close.
I was now confident that the set up was in place and ready for Tanisha.
I mentioned in my post about her pool shoot that Megan was a photographer as well as a model. In that capacity she would organise meetup for Wellington photographers which she would model.
f4 200mm 1/640s ISO100
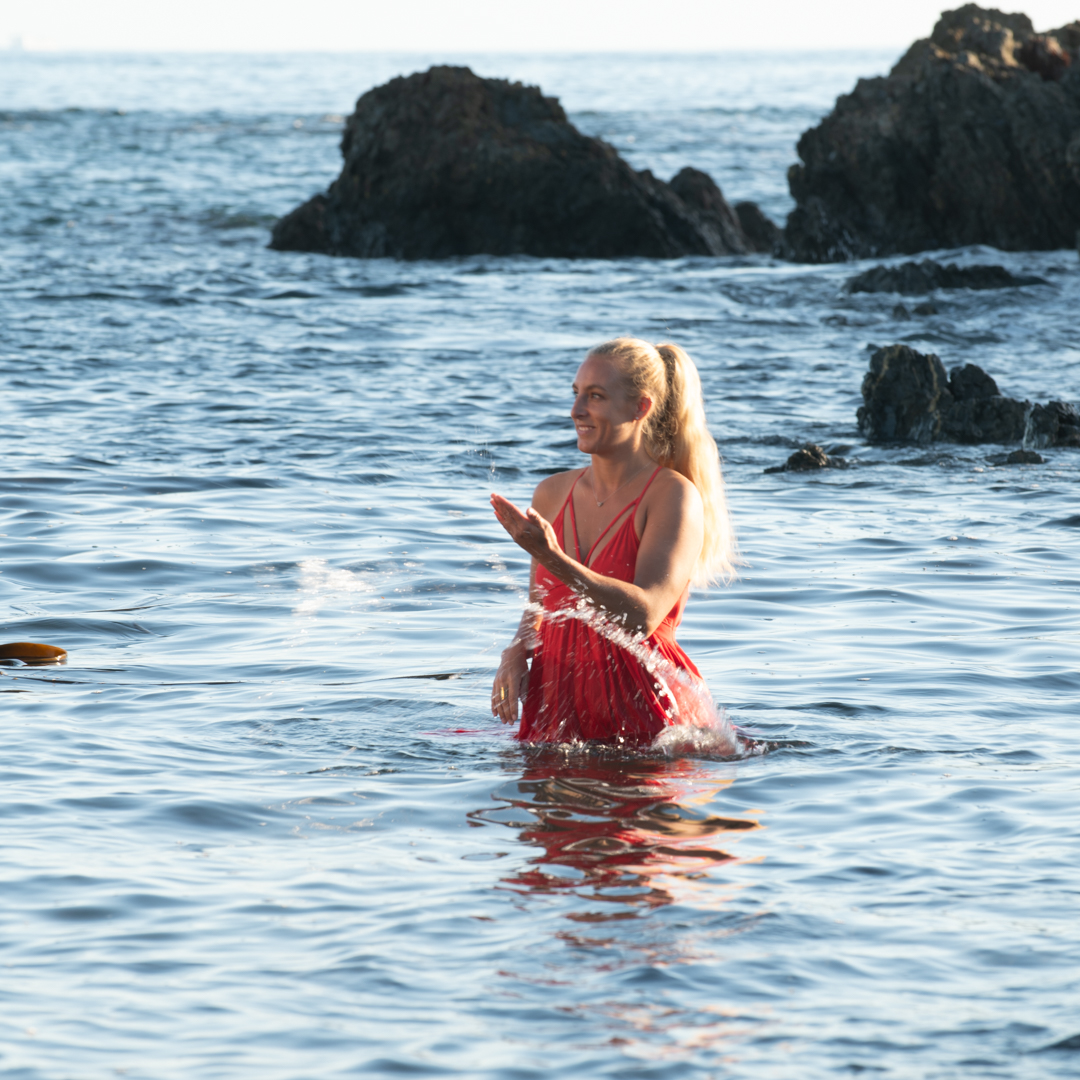
One such shoot took part in princess Bay which is on the south coast of Wellington. Now shooting outside in Wellington can be fraught with difficulty unless you get a really good day. Fortunately this was one of them. The weather was really nice and the beach was packed.
We started the shoot around 6:30pm in the evening and went through to 8 pm. This let us go into golden light as you can see in the first image in this post.
As I did not know in advance what I could be facing I packed a very full camera bag. That included my 50mm f1.4, 24-70 f4 and 70-200mm f2.8. The last lens is one of my favourites especially shooting in group environments. When I am not directing the Model I can stand back and shoot more candid images.
f5 56mm 1/250s ISO100
I have stated before that I love reflections. The rocks gave me the perfect opportunity to try to achieve some.
We each took turns posing Morgane on the rocks and then with props. She then went into the water and I tried to get some some shots with action.
f8 200mm 1/60s ISO200
As this was an outdoor sheet I had the camera in aperture priority mode. As the light was somewhat contrast I had it said to spot meter so that I could ensure that I was getting the perfect exposure on Morgane’s skin.
It was a great evening and I was pleased with the results. As I am off to the one organising such events it was nice to be able to simply turn up and shoot.
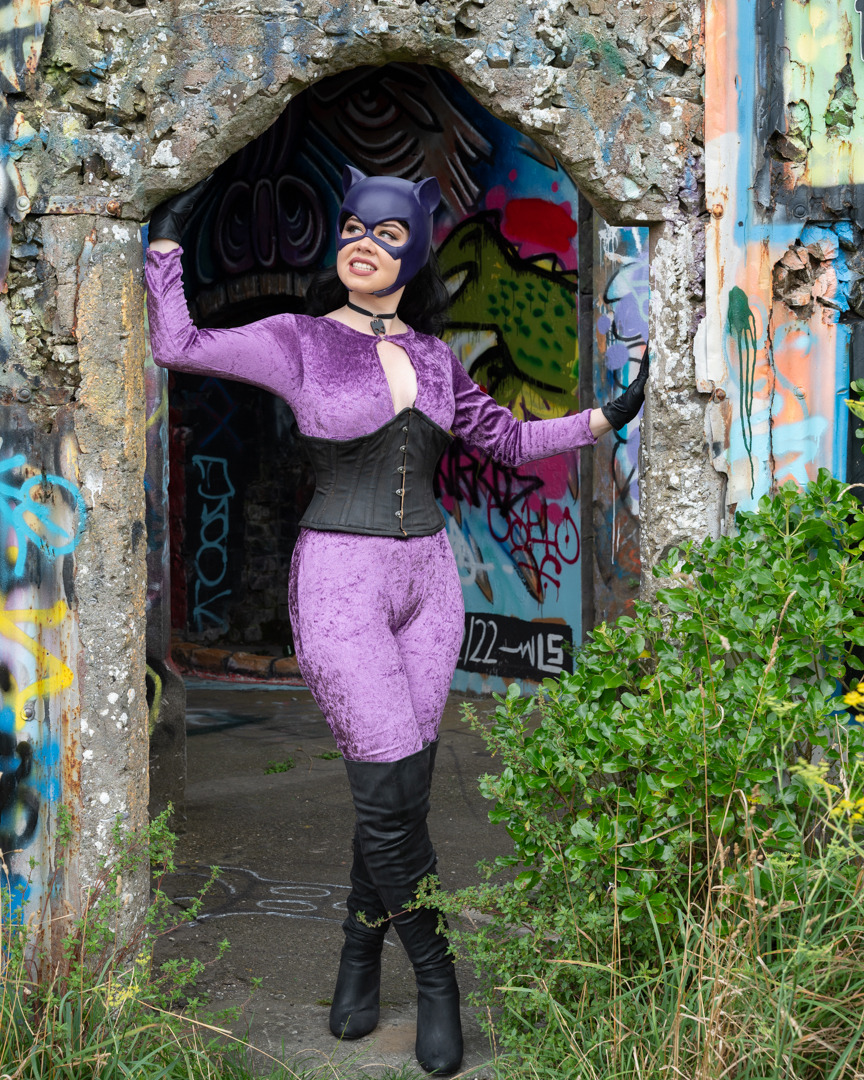
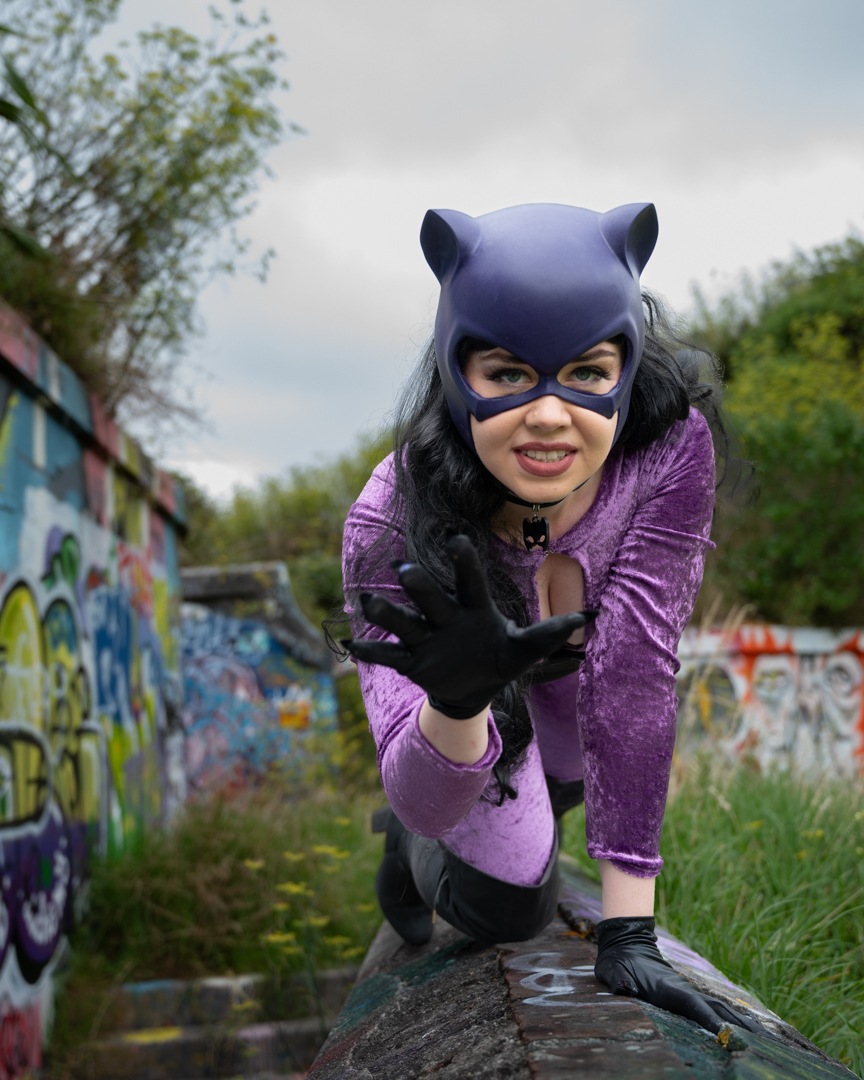
This is the second post on my shoot with Dawn at Fort Balance. It includes all the shots taken outside under natural light. This was after we finished the original Catwoman in the headlights mentioned in the previous place.
We moved around the complex which gave us many options to shoot. It also gave Dawn the opportunity to really play into her character.
For these series of images I was using my Nikon Z6ii camera with the 24-70 f4 lens set at f4. It was in aperture priority mode as I was happy to let the camera control the shutter speed. The majority of them seem to be around 1/200s second. Towards the end of the shoot, I did have to push the ISO up to 400. Even then the final images were at 1/50s.
Despite the fact that the fort is nearly a kilometre up a hill it is amazing what people take up there. We found this couch and I just had to use it.
The fort contains many different opportunities for shooting such as ladders that enable you to shoot down from above.
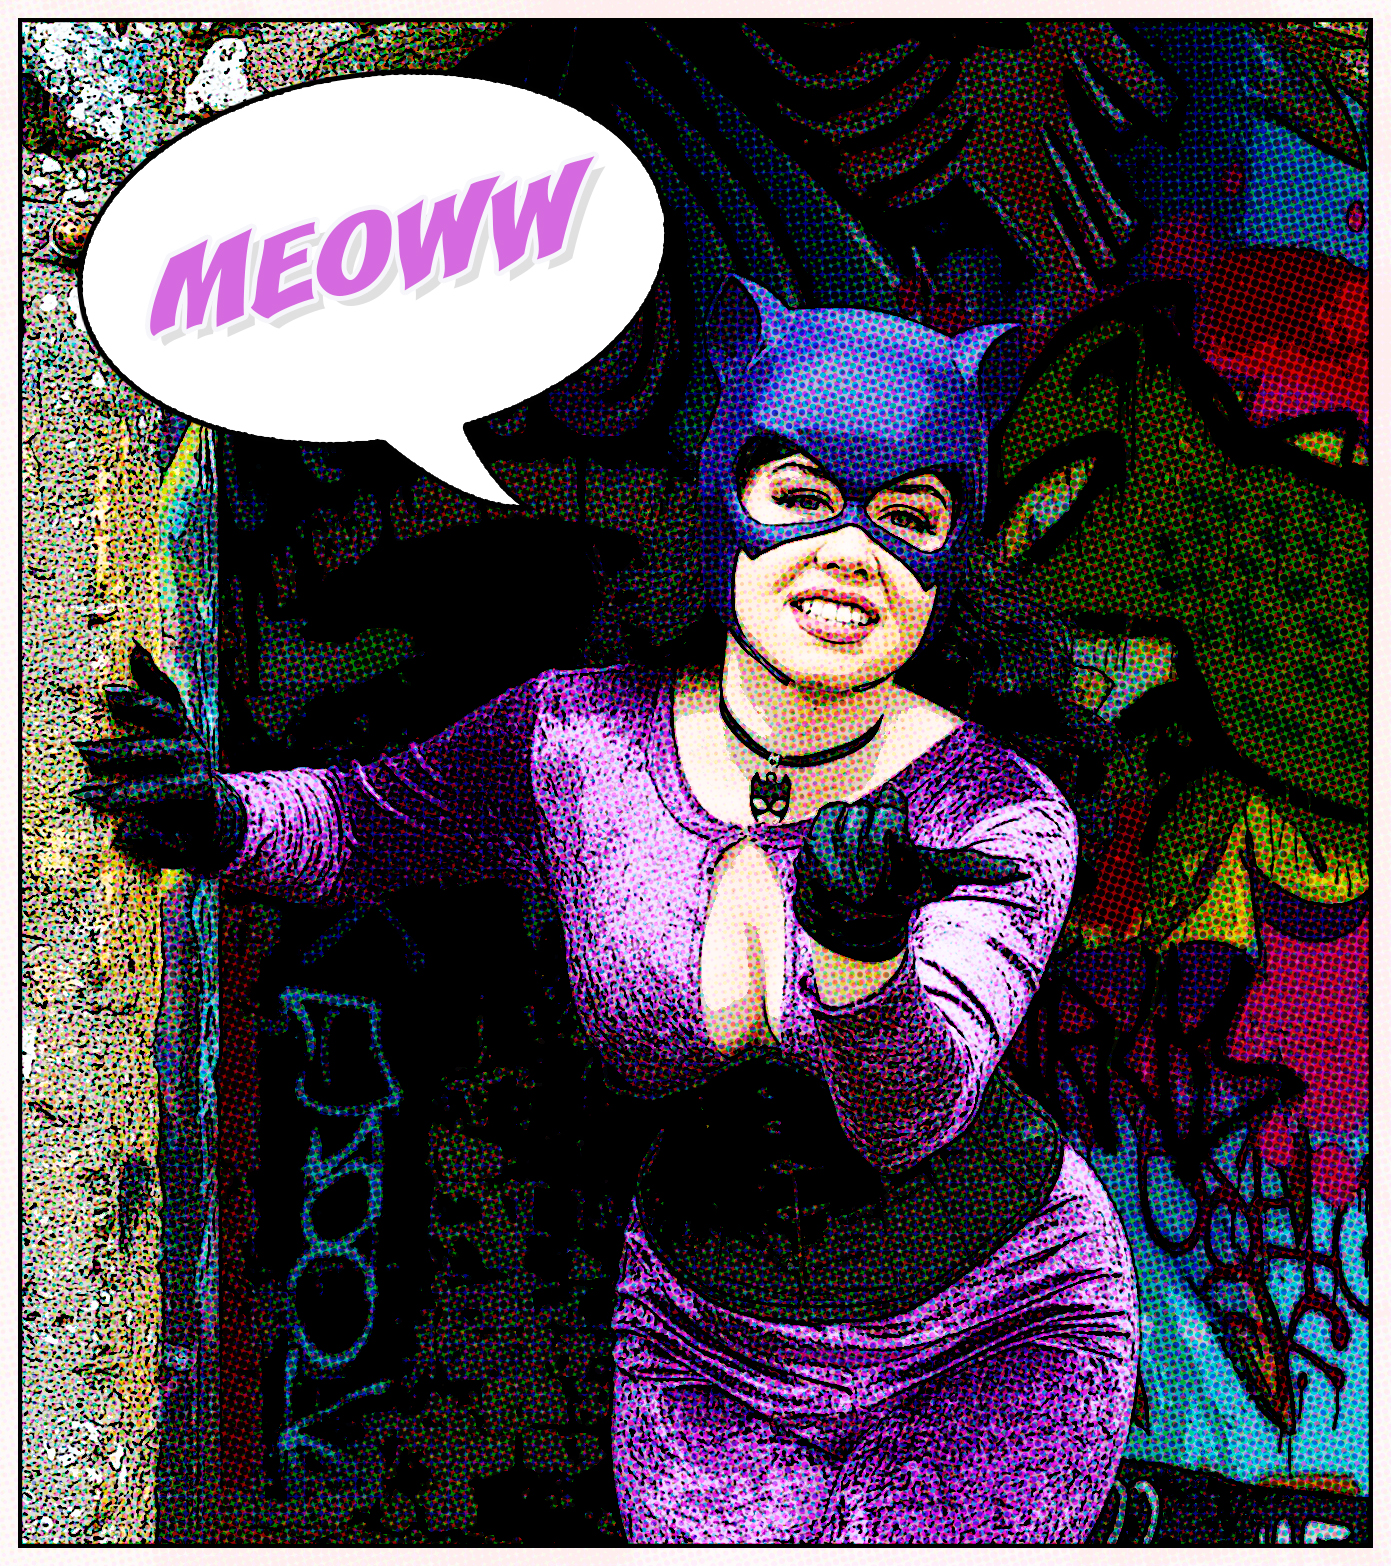
The Walls also gave the opportunity for Dawn to behave like a cat. Anyone who has seen the original Batman series will know that the Catwoman character did do overemphasised cat behaviour.
Anyone who has a cat will know that they like to find comfy nooks in which to sleep. I spotted an alcove complete with a cushion. It was a no-brainer that we were going to use it. The lighting in this particular area was not the best but my camera easily handled it.
Dawn was a great model. She was really comfortable being in front of the Camera which made the whole process so much easier. It also meant that we got really great images from the session.
Finally when we got back to the car it was time for a selfie shot to add to the series
The 1960s when the original show screened was also the time of the rise of pop art. Therefore I thought of appropriate to create a version of my own. This went across really well when I posted it.